HP Notebook Reference Guide
Page 31
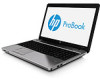
... battery power or on external power, or when the battery reaches a critical battery level. With the computer on the keyboard. ● Tap or swipe the TouchPad. Your work is closed, open the display. ● Press a key on , you have set at the factory: Sleep and Hibernation. Setting power options Using power...
... battery power or on external power, or when the battery reaches a critical battery level. With the computer on the keyboard. ● Tap or swipe the TouchPad. Your work is closed, open the display. ● Press a key on , you have set at the factory: Sleep and Hibernation. Setting power options Using power...
HP Notebook Reference Guide
Page 61
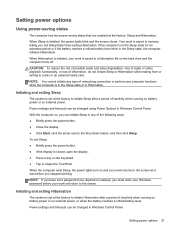
... USB drive. Using passwords 51 Using passwords A password is a group of characters that can also use either a pointing device (TouchPad, pointing stick, or USB mouse) or the keyboard to navigate and make selections in Computer Setup. You can be enabled in Computer...user account Unauthorized access to data Windows user password ● Firewall software ● Windows updates ● Drive Encryption for HP ProtectTools Unauthorized access to Computer Setup settings and other BIOS administrator password in Computer Setup* system identification information Unauthorized removal of ...
... USB drive. Using passwords 51 Using passwords A password is a group of characters that can also use either a pointing device (TouchPad, pointing stick, or USB mouse) or the keyboard to navigate and make selections in Computer Setup. You can be enabled in Computer...user account Unauthorized access to data Windows user password ● Firewall software ● Windows updates ● Drive Encryption for HP ProtectTools Unauthorized access to Computer Setup settings and other BIOS administrator password in Computer Setup* system identification information Unauthorized removal of ...
HP Notebook Reference Guide
Page 71
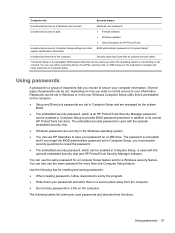
... clean and disinfect the sides and cover, use a soft microfiber cloth or chamois moistened with a straw extension. CAUTION: When cleaning the TouchPad and keyboard, do not use a soft microfiber cloth or chamois moistened with one of compressed air with one of the cleaning solutions listed ... When cleaning the cover of the computer, use a circular motion to aid in removing dirt and debris. ● To clean and disinfect the TouchPad and keyboard, use a vacuum cleaner attachment to internal components, do not let liquids drip between the keys. Cleaning your computer 61 WARNING! A ...
... clean and disinfect the sides and cover, use a soft microfiber cloth or chamois moistened with a straw extension. CAUTION: When cleaning the TouchPad and keyboard, do not use a soft microfiber cloth or chamois moistened with one of compressed air with one of the cleaning solutions listed ... When cleaning the cover of the computer, use a circular motion to aid in removing dirt and debris. ● To clean and disinfect the TouchPad and keyboard, use a vacuum cleaner attachment to internal components, do not let liquids drip between the keys. Cleaning your computer 61 WARNING! A ...
HP Notebook Reference Guide
Page 75
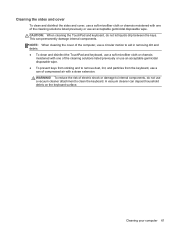
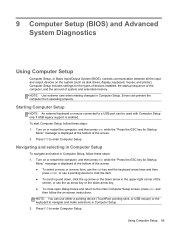
... ESC key for the types of devices installed, the startup sequence of the computer, and the amount of the screen, or use either a pointing device (TouchPad, pointing stick, or USB mouse) or the keyboard to a USB port can prevent the computer from operating properly. Navigating and selecting in Computer Setup To...
... ESC key for the types of devices installed, the startup sequence of the computer, and the amount of the screen, or use either a pointing device (TouchPad, pointing stick, or USB mouse) or the keyboard to a USB port can prevent the computer from operating properly. Navigating and selecting in Computer Setup To...
HP ProtectTools Getting Started
Page 99
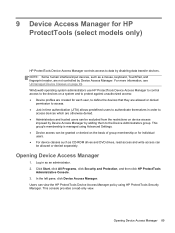
...access to the devices on a system and to protect against unauthorized access: ● Device profiles are created for HP ProtectTools (select models only) HP ProtectTools Device Access Manager controls access to the Device Administrators group. Opening Device Access Manager 1. Click Start, click...denied permission to access. ● Just-in-time authentication (JITA) allows predefined users to authenticate themselves in as a mouse, keyboard, TouchPad, and fingerprint reader, are not controlled by Device Access Manager. NOTE: Some human interface/input devices, such as an administrator. 2....
...access to the devices on a system and to protect against unauthorized access: ● Device profiles are created for HP ProtectTools (select models only) HP ProtectTools Device Access Manager controls access to the Device Administrators group. Opening Device Access Manager 1. Click Start, click...denied permission to access. ● Just-in-time authentication (JITA) allows predefined users to authenticate themselves in as a mouse, keyboard, TouchPad, and fingerprint reader, are not controlled by Device Access Manager. NOTE: Some human interface/input devices, such as an administrator. 2....

Getting Started HP Notebook
Page 5
Table of contents 1 Welcome ...1 Finding information ...2 2 Getting to know your computer ...4 Top ...4 TouchPad ...4 Lights ...5 Buttons, speakers, and fingerprint reader (select models only 7 Keys ...10 Front ...12 Right ...13 Left ...14 Display ...15 Bottom ...17 Identifying the bottom parts ... integrated numeric keypad (select models only 24 Using an optional external numeric keypad 24 Using pointing devices ...24 Setting pointing device preferences 24 Using the TouchPad ...25 v
Table of contents 1 Welcome ...1 Finding information ...2 2 Getting to know your computer ...4 Top ...4 TouchPad ...4 Lights ...5 Buttons, speakers, and fingerprint reader (select models only 7 Keys ...10 Front ...12 Right ...13 Left ...14 Display ...15 Bottom ...17 Identifying the bottom parts ... integrated numeric keypad (select models only 24 Using an optional external numeric keypad 24 Using pointing devices ...24 Setting pointing device preferences 24 Using the TouchPad ...25 v
Getting Started HP Notebook
Page 6
... and on 26 Navigating ...26 Selecting ...27 Using TouchPad gestures 27 Scrolling 28 Pinching/Zooming 28 5 Maintenance ...29 Inserting or removing the battery ...29 Using the optional security screw ...30 Removing or replacing the ... computer ...38 Cleaning products ...38 Cleaning procedures ...38 Cleaning the display 38 Cleaning the sides and cover 38 Cleaning the TouchPad and keyboard 39 6 Backup and recovery ...40 Creating recovery media with HP Recovery Disc Creator 40 Creating recovery media ...41 Backing up your information ...41 Performing a system recovery ...42 Using the...
... and on 26 Navigating ...26 Selecting ...27 Using TouchPad gestures 27 Scrolling 28 Pinching/Zooming 28 5 Maintenance ...29 Inserting or removing the battery ...29 Using the optional security screw ...30 Removing or replacing the ... computer ...38 Cleaning products ...38 Cleaning procedures ...38 Cleaning the display 38 Cleaning the sides and cover 38 Cleaning the TouchPad and keyboard 39 6 Backup and recovery ...40 Creating recovery media with HP Recovery Disc Creator 40 Creating recovery media ...41 Backing up your information ...41 Performing a system recovery ...42 Using the...
Getting Started HP Notebook
Page 12
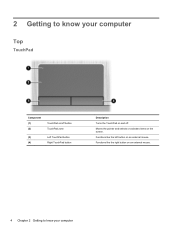
Functions like the right button on an external mouse. 4 Chapter 2 Getting to know your computer Top TouchPad Component (1) (2) TouchPad on/off button TouchPad zone (3) Left TouchPad button (4) Right TouchPad button Description Turns the TouchPad on and off. 2 Getting to know your computer Functions like the left button on the screen. Moves the pointer and selects or activates items on an external mouse.
Functions like the right button on an external mouse. 4 Chapter 2 Getting to know your computer Top TouchPad Component (1) (2) TouchPad on/off button TouchPad zone (3) Left TouchPad button (4) Right TouchPad button Description Turns the TouchPad on and off. 2 Getting to know your computer Functions like the left button on the screen. Moves the pointer and selects or activates items on an external mouse.

Getting Started HP Notebook
Page 13
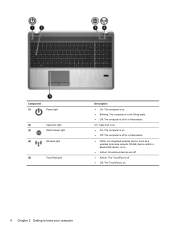
... (WLAN) device and/or a Bluetooth® device, is on. ● Amber: All wireless devices are off. ● Amber: The TouchPad is off. ● Off: The TouchPad is on . ● Blinking: The computer is in Hibernation. Component (1) Power light (2) Caps lock light (3) Web browser light (4) Wireless ...light (5) TouchPad light Description ● On: The computer is off or in the Sleep state. ● Off: The computer is on . Top 5...
... (WLAN) device and/or a Bluetooth® device, is on. ● Amber: All wireless devices are off. ● Amber: The TouchPad is off. ● Off: The TouchPad is on . ● Blinking: The computer is in Hibernation. Component (1) Power light (2) Caps lock light (3) Web browser light (4) Wireless ...light (5) TouchPad light Description ● On: The computer is off or in the Sleep state. ● Off: The computer is on . Top 5...
Getting Started HP Notebook
Page 14
... computer is in the Sleep state. ● Off: The computer is on . ● Amber: All wireless devices are off. ● Amber: The TouchPad is off. ● Off: The TouchPad is off or in Hibernation. ● White: An integrated wireless device, such as a wireless local area network (WLAN) device and/or a Bluetooth®...
... computer is in the Sleep state. ● Off: The computer is on . ● Amber: All wireless devices are off. ● Amber: The TouchPad is off. ● Off: The TouchPad is off or in Hibernation. ● White: An integrated wireless device, such as a wireless local area network (WLAN) device and/or a Bluetooth®...

Getting Started HP Notebook
Page 33
Use the left and right TouchPad buttons as you want the pointer to go. Using the TouchPad To move the pointer, slide one finger across the TouchPad in the direction you would use the buttons on an external mouse. To access Mouse Properties: ● Select Start > Devices and Printers. Using pointing devices 25 Then right-click the device representing your computer, and select Mouse settings.
Use the left and right TouchPad buttons as you want the pointer to go. Using the TouchPad To move the pointer, slide one finger across the TouchPad in the direction you would use the buttons on an external mouse. To access Mouse Properties: ● Select Start > Devices and Printers. Using pointing devices 25 Then right-click the device representing your computer, and select Mouse settings.
Getting Started HP Notebook
Page 34
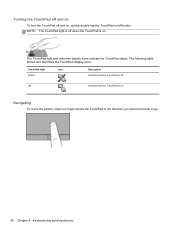
... direction you want the pointer to go. 26 Chapter 4 Keyboard and pointing devices The TouchPad light and onscreen display icons indicate the TouchPad status. Off Indicates that the TouchPad is off when the TouchPad is off . TouchPad light Amber Icon Description Indicates that the TouchPad is on /off button. The following table shows and describes the...
... direction you want the pointer to go. 26 Chapter 4 Keyboard and pointing devices The TouchPad light and onscreen display icons indicate the TouchPad status. Off Indicates that the TouchPad is off when the TouchPad is off . TouchPad light Amber Icon Description Indicates that the TouchPad is on /off button. The following table shows and describes the...

Getting Started HP Notebook
Page 35
...you want to activate the demonstration. Select the check box next to the gesture that is displayed, and then click Settings. 4. NOTE: TouchPad gestures are not supported in the notification area, at the far right of the taskbar, and then click the Device Settings tab. Click ...4. Click the Synaptics Pointing Device icon , and then click Pointing Device Properties. 3. Selecting Use the left and right TouchPad buttons like the corresponding buttons on the TouchPad at the same time. To view and turn the gestures on these features, click the Synaptics Pointing Device icon in ...
...you want to activate the demonstration. Select the check box next to the gesture that is displayed, and then click Settings. 4. NOTE: TouchPad gestures are not supported in the notification area, at the far right of the taskbar, and then click the Device Settings tab. Click ...4. Click the Synaptics Pointing Device icon , and then click Pointing Device Properties. 3. Selecting Use the left and right TouchPad buttons like the corresponding buttons on the TouchPad at the same time. To view and turn the gestures on these features, click the Synaptics Pointing Device icon in ...
Getting Started HP Notebook
Page 36
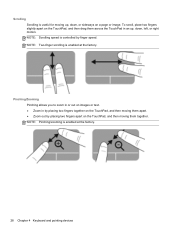
... at the factory. 28 Chapter 4 Keyboard and pointing devices NOTE: Scrolling speed is controlled by placing two fingers apart on the TouchPad, and then moving up , down , or sideways on the TouchPad, and then drag them together. Scrolling Scrolling is useful for moving them across the... TouchPad in by placing two fingers together on the TouchPad, and then moving them apart. ● Zoom out by finger speed. To scroll, place two fingers ...
... at the factory. 28 Chapter 4 Keyboard and pointing devices NOTE: Scrolling speed is controlled by placing two fingers apart on the TouchPad, and then moving up , down , or sideways on the TouchPad, and then drag them together. Scrolling Scrolling is useful for moving them across the... TouchPad in by placing two fingers together on the TouchPad, and then moving them apart. ● Zoom out by finger speed. To scroll, place two fingers ...

Getting Started HP Notebook
Page 47
... components, do not let liquids drip between the keys. A vacuum cleaner can permanently damage internal components. ● To clean and disinfect the TouchPad and keyboard, use a soft microfiber cloth or chamois moistened with one of compressed air with a straw extension. CAUTION: When cleaning the... TouchPad and keyboard, do not use a can of the cleaning solutions listed previously or use an acceptable germicidal disposable wipe. ● To prevent ...
... components, do not let liquids drip between the keys. A vacuum cleaner can permanently damage internal components. ● To clean and disinfect the TouchPad and keyboard, use a soft microfiber cloth or chamois moistened with one of compressed air with a straw extension. CAUTION: When cleaning the... TouchPad and keyboard, do not use a can of the cleaning solutions listed previously or use an acceptable germicidal disposable wipe. ● To prevent ...
Getting Started HP Notebook
Page 55
... B Backup and Restore 41 battery removing 29 replacing 29 battery bay 17, 45 battery release latches 17 Bluetooth label 45 buttons left TouchPad 4 optical drive eject 13 power 7, 9 right TouchPad 4 TouchPad on/off 4 Web browser button 8, 9 wireless 8, 9 C caps lock light, identifying 5, 6 caring for your computer 38 Certificate of...wireless certification 45 WLAN 45 lights AC adapter/battery light 14 caps lock 5, 6 hard drive 12 optical drive 13 power 5, 6 TouchPad 5, 6 Web browser 5, 6 webcam 15, 16 wireless 5, 6 M Media Card Reader 12 media controls, keys 23 memory module inserting 37 Index 47
... B Backup and Restore 41 battery removing 29 replacing 29 battery bay 17, 45 battery release latches 17 Bluetooth label 45 buttons left TouchPad 4 optical drive eject 13 power 7, 9 right TouchPad 4 TouchPad on/off 4 Web browser button 8, 9 wireless 8, 9 C caps lock light, identifying 5, 6 caring for your computer 38 Certificate of...wireless certification 45 WLAN 45 lights AC adapter/battery light 14 caps lock 5, 6 hard drive 12 optical drive 13 power 5, 6 TouchPad 5, 6 Web browser 5, 6 webcam 15, 16 wireless 5, 6 M Media Card Reader 12 media controls, keys 23 memory module inserting 37 Index 47
Getting Started HP Notebook
Page 56
... Certificate of Authenticity label 45 Product Key 45 optical drive 13 optical drive eject button 13 optical drive light 13 P pinching TouchPad gesture 28 pointing devices, setting preferences 24 ports external monitor 14 HDMI 14 USB 13 power button, identifying 7, 9 power connector... WLAN 20 slots security cable 14 system repair disc 40 system restore points 40 T TouchPad buttons 4 using 25 TouchPad gestures pinching 28 scrolling 28 zooming 28 TouchPad light, identifying 5, 6 TouchPad on/off button 4 TouchPad zone identifying 4 traveling with the computer 45 U USB ports, identifying 13, 14 ...
... Certificate of Authenticity label 45 Product Key 45 optical drive 13 optical drive eject button 13 optical drive light 13 P pinching TouchPad gesture 28 pointing devices, setting preferences 24 ports external monitor 14 HDMI 14 USB 13 power button, identifying 7, 9 power connector... WLAN 20 slots security cable 14 system repair disc 40 system restore points 40 T TouchPad buttons 4 using 25 TouchPad gestures pinching 28 scrolling 28 zooming 28 TouchPad light, identifying 5, 6 TouchPad on/off button 4 TouchPad zone identifying 4 traveling with the computer 45 U USB ports, identifying 13, 14 ...

HP Notebook User Guide - Linux
Page 5
Table of contents 1 Welcome ...1 Finding information ...2 2 Getting to know your computer ...3 Top ...3 TouchPad ...3 Lights ...4 Buttons speakers, and fingerprint reader (select models only 6 Keys ...9 Front ...11 Right ...12 Left ...13 Display ...14 Bottom ...16 Identifying the bottom parts of ...
Table of contents 1 Welcome ...1 Finding information ...2 2 Getting to know your computer ...3 Top ...3 TouchPad ...3 Lights ...4 Buttons speakers, and fingerprint reader (select models only 6 Keys ...9 Front ...11 Right ...12 Left ...13 Display ...14 Bottom ...16 Identifying the bottom parts of ...
HP Notebook User Guide - Linux
Page 6
... 26 Using the integrated numeric keypad (select models only 26 Using an optional external numeric keypad 26 Using the TouchPad ...26 Turning the TouchPad off and on 26 Navigating ...27 Selecting ...27 Using TouchPad gestures 27 Scrolling ...29 Pinching/Zooming 29 Setting pointing device preferences 29 5 Multimedia ...30 Using the audio features ...30...
... 26 Using the integrated numeric keypad (select models only 26 Using an optional external numeric keypad 26 Using the TouchPad ...26 Turning the TouchPad off and on 26 Navigating ...27 Selecting ...27 Using TouchPad gestures 27 Scrolling ...29 Pinching/Zooming 29 Setting pointing device preferences 29 5 Multimedia ...30 Using the audio features ...30...
HP Notebook User Guide - Linux
Page 9
... Labels ...82 Appendix B Cleaning your computer ...83 Cleaning products ...83 Cleaning procedures ...83 Cleaning the display ...83 Cleaning the sides and cover 83 Cleaning the TouchPad and keyboard 84 Appendix C Specifications ...85 Input power ...85 Operating environment ...85 Appendix D Electrostatic discharge ...86 Index ...87 ix
... Labels ...82 Appendix B Cleaning your computer ...83 Cleaning products ...83 Cleaning procedures ...83 Cleaning the display ...83 Cleaning the sides and cover 83 Cleaning the TouchPad and keyboard 84 Appendix C Specifications ...85 Input power ...85 Operating environment ...85 Appendix D Electrostatic discharge ...86 Index ...87 ix


