HP Notebook Reference Guide
Page 68
For more information about interruptions or reminders to upgrade your software. To permanently resolve the problem, reconfigure the firewall. You will automatically be a solution made up to a system or network. Using firewall software Firewalls ...
For more information about interruptions or reminders to upgrade your software. To permanently resolve the problem, reconfigure the firewall. You will automatically be a solution made up to a system or network. Using firewall software Firewalls ...
HP Notebook Reference Guide
Page 82
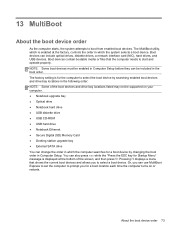
... for the computer to select a boot device. The factory setting is for a boot location each time the computer turns on your computer. ● Notebook upgrade bay ● Optical drive ● Notebook hard drive ● USB diskette drive ● USB CD-ROM ● USB hard drive ● Notebook... Ethernet ● Secure Digital (SD) Memory Card ● Docking station upgrade bay ● External SATA drive You can change the order in which the system selects a boot device. Or, you can be supported on or ...
... for the computer to select a boot device. The factory setting is for a boot location each time the computer turns on your computer. ● Notebook upgrade bay ● Optical drive ● Notebook hard drive ● USB diskette drive ● USB CD-ROM ● USB hard drive ● Notebook... Ethernet ● Secure Digital (SD) Memory Card ● Docking station upgrade bay ● External SATA drive You can change the order in which the system selects a boot device. Or, you can be supported on or ...
HP ProtectTools Getting Started
Page 109
...username /add In this command, "username" is listed, delete the drive letter, and then click Apply. 3. Unmanaged Device Classes HP ProtectTools Device Access Manager does not manage the following must be controlled using the Removable Media device class, by using the standard "Local...● Input/output devices ◦ Biometric ◦ Mouse ◦ Keyboard ◦ Printer ◦ Plug and play (PnP) printers ◦ Printer upgrade ◦ Infrared human interface devices ◦ Smart card reader ◦ Multi-port serial ◦ Disk drive ◦ Floppy disk controller (FDC) Advanced...
...username /add In this command, "username" is listed, delete the drive letter, and then click Apply. 3. Unmanaged Device Classes HP ProtectTools Device Access Manager does not manage the following must be controlled using the Removable Media device class, by using the standard "Local...● Input/output devices ◦ Biometric ◦ Mouse ◦ Keyboard ◦ Printer ◦ Plug and play (PnP) printers ◦ Printer upgrade ◦ Infrared human interface devices ◦ Smart card reader ◦ Multi-port serial ◦ Disk drive ◦ Floppy disk controller (FDC) Advanced...
Getting Started HP Notebook
Page 6
...optional security screw ...30 Removing or replacing the service door 31 Removing the service door 31 Replacing the service door 32 Replacing or upgrading the hard drive 33 Removing the hard drive ...33 Installing a hard drive ...34 Adding or replacing memory modules 35 Updating programs and... display 38 Cleaning the sides and cover 38 Cleaning the TouchPad and keyboard 39 6 Backup and recovery ...40 Creating recovery media with HP Recovery Disc Creator 40 Creating recovery media ...41 Backing up your information ...41 Performing a system recovery ...42 Using the Windows recovery tools...
...optional security screw ...30 Removing or replacing the service door 31 Removing the service door 31 Replacing the service door 32 Replacing or upgrading the hard drive 33 Removing the hard drive ...33 Installing a hard drive ...34 Adding or replacing memory modules 35 Updating programs and... display 38 Cleaning the sides and cover 38 Cleaning the TouchPad and keyboard 39 6 Backup and recovery ...40 Creating recovery media with HP Recovery Disc Creator 40 Creating recovery media ...41 Backing up your information ...41 Performing a system recovery ...42 Using the Windows recovery tools...
Getting Started HP Notebook
Page 41
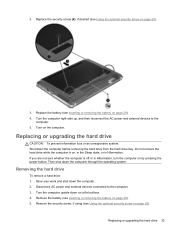
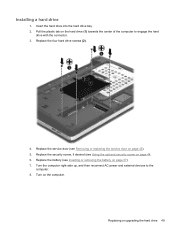
... optional security screw on by pressing the power button. Do not remove the hard drive while the computer is off or in Hibernation. 2. Replacing or upgrading the hard drive CAUTION: To prevent information loss or an unresponsive system: Shut down on page 29). 5. Removing the hard drive To remove a hard drive...computer. 2. Disconnect AC power and external devices connected to the computer. 5. Save your work and shut down the computer through the operating system. Replacing or upgrading the hard drive 33 Remove the battery (see Inserting or removing the battery on the computer.
... optional security screw on by pressing the power button. Do not remove the hard drive while the computer is off or in Hibernation. 2. Replacing or upgrading the hard drive CAUTION: To prevent information loss or an unresponsive system: Shut down on page 29). 5. Removing the hard drive To remove a hard drive...computer. 2. Disconnect AC power and external devices connected to the computer. 5. Save your work and shut down the computer through the operating system. Replacing or upgrading the hard drive 33 Remove the battery (see Inserting or removing the battery on the computer.
Getting Started HP Notebook
Page 43
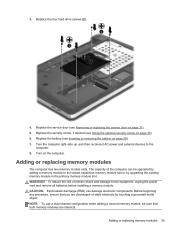
... 30). 6. CAUTION: Electrostatic discharge (ESD) can be sure that you are identical. NOTE: To use a dual-channel configuration when adding a second memory module, be upgraded by upgrading the existing memory module in the primary memory module slot. 3. Replace the four hard drive screws (2). 4. Turn the computer right-side up, and then reconnect...
... 30). 6. CAUTION: Electrostatic discharge (ESD) can be sure that you are identical. NOTE: To use a dual-channel configuration when adding a second memory module, be upgraded by upgrading the existing memory module in the primary memory module slot. 3. Replace the four hard drive screws (2). 4. Turn the computer right-side up, and then reconnect...
HP Notebook User Guide - Linux
Page 7
... Using the optional security screw ...44 Removing or replacing the service door 45 Removing the service door 45 Replacing the service door 46 Replacing or upgrading the hard drive 47 Removing the hard drive ...47 Installing a hard drive ...49 Using optical drives (select models only 50 Identifying the installed optical drive...
... Using the optional security screw ...44 Removing or replacing the service door 45 Removing the service door 45 Replacing the service door 46 Replacing or upgrading the hard drive 47 Removing the hard drive ...47 Installing a hard drive ...49 Using optical drives (select models only 50 Identifying the installed optical drive...

HP Notebook User Guide - Linux
Page 57
... the computer on by pressing the power button. Do not remove the hard drive while the computer is off or in Hibernation. Replacing or upgrading the hard drive 47 Then shut down on a flat surface with the front of the computer toward you are not sure whether the computer ...the optional security screw on page 37). 4. Remove the security screw, if using (see Inserting or removing the battery on page 44). Replacing or upgrading the hard drive CAUTION: To prevent information loss or an unresponsive system: Shut down the computer and close the display. 3. Shut down the computer ...
... the computer on by pressing the power button. Do not remove the hard drive while the computer is off or in Hibernation. Replacing or upgrading the hard drive 47 Then shut down on a flat surface with the front of the computer toward you are not sure whether the computer ...the optional security screw on page 37). 4. Remove the security screw, if using (see Inserting or removing the battery on page 44). Replacing or upgrading the hard drive CAUTION: To prevent information loss or an unresponsive system: Shut down the computer and close the display. 3. Shut down the computer ...
HP Notebook User Guide - Linux
Page 59
... drive (1) towards the center of the computer to the computer. 8. Installing a hard drive 1. Replace the four hard drive screws (2). 4. Turn on page 37). 7. Replacing or upgrading the hard drive 49 Pull the plastic tab on page 45). 5. Replace the battery (see Inserting or removing the battery on the computer.
... drive (1) towards the center of the computer to the computer. 8. Installing a hard drive 1. Replace the four hard drive screws (2). 4. Turn on page 37). 7. Replacing or upgrading the hard drive 49 Pull the plastic tab on page 45). 5. Replace the battery (see Inserting or removing the battery on the computer.

HP Notebook User Guide - Linux
Page 67
NOTE: To use a dual-channel configuration when adding a second memory module, be upgraded by adding a memory module to the computer. 3. To replace a memory module: CAUTION: To prevent information loss or an unresponsive system: Shut down on a flat surface. ... to the equipment, unplug the power cord and remove all batteries before adding or replacing memory modules. To reduce the risk of static electricity by upgrading the existing memory module in the primary memory module slot. Before beginning any procedure, ensure that both memory modules are replacing a memory module, remove ...
NOTE: To use a dual-channel configuration when adding a second memory module, be upgraded by adding a memory module to the computer. 3. To replace a memory module: CAUTION: To prevent information loss or an unresponsive system: Shut down on a flat surface. ... to the equipment, unplug the power cord and remove all batteries before adding or replacing memory modules. To reduce the risk of static electricity by upgrading the existing memory module in the primary memory module slot. Before beginning any procedure, ensure that both memory modules are replacing a memory module, remove ...

HP Notebook User Guide - Linux
Page 77
... first create the recovery disc. To create the recovery disc: NOTE: HP recommends that were installed at the factory. Select Computer > More Applications. 2. Select the Notebook Upgrade Bay option. 5. NOTE: You can create an HP factory image restore DVD, using the HP factory image restore DVD, you have created and any software installed on...
... first create the recovery disc. To create the recovery disc: NOTE: HP recommends that were installed at the factory. Select Computer > More Applications. 2. Select the Notebook Upgrade Bay option. 5. NOTE: You can create an HP factory image restore DVD, using the HP factory image restore DVD, you have created and any software installed on...
HP Notebook User Guide - Linux
Page 83
...or restarts. You can change the order in which the computer searches for a boot location each time the computer turns on your computer. ● Notebook upgrade bay ● Optical drive ● Notebook hard drive ● USB diskette drive ● USB CD-ROM ● USB hard drive ● Notebook... Ethernet ● Secure Digital (SD) Memory Card ● Docking station upgrade bay ● External SATA drive You can also press esc while the "Press the ESC key for Startup Menu" message is displayed at the factory...
...or restarts. You can change the order in which the computer searches for a boot location each time the computer turns on your computer. ● Notebook upgrade bay ● Optical drive ● Notebook hard drive ● USB diskette drive ● USB CD-ROM ● USB hard drive ● Notebook... Ethernet ● Secure Digital (SD) Memory Card ● Docking station upgrade bay ● External SATA drive You can also press esc while the "Press the ESC key for Startup Menu" message is displayed at the factory...

HP ProBook 4545s Notebook PC - Maintenance and Service Guide
Page 9
...web cam 39.6-cm (15.6-inch) HD, 1366x768, Anti-glare, with web cam Support privacy filter Memory Two customer-accessible/upgradeable memory module slots supporting up to 8 GB of RAM Supports dual-channel memory PC3-10600, 1333-MHz, DDR3 Supports the following...√ √ √ √ √ √ √ √ √ √ √ √ √ 1 1 Product description Category Description Product Name HP ProBook 4545s Notebook PC AMD A8-4500M, 2.8-GHz Max/1.9-GHz Base, 4-MB L2 cache, quad-core, 35W Graphics: HD 7640G AMD A6-4400M, 3.20-GHz Max/2.7-GHz...
...web cam 39.6-cm (15.6-inch) HD, 1366x768, Anti-glare, with web cam Support privacy filter Memory Two customer-accessible/upgradeable memory module slots supporting up to 8 GB of RAM Supports dual-channel memory PC3-10600, 1333-MHz, DDR3 Supports the following...√ √ √ √ √ √ √ √ √ √ √ √ √ 1 1 Product description Category Description Product Name HP ProBook 4545s Notebook PC AMD A8-4500M, 2.8-GHz Max/1.9-GHz Base, 4-MB L2 cache, quad-core, 35W Graphics: HD 7640G AMD A6-4400M, 3.20-GHz Max/2.7-GHz...


