HP Notebook Reference Guide
Page 7
...an AC adapter ...28 Switchable graphics/dual graphics (select models only 29 Using switchable graphics (select models only 29 Using dual graphics (select models only 29 5 External cards and devices ...31 Using Media Card Reader cards (select models only 31 Inserting a digital card ...31 Removing a digital card ...32 Using ExpressCards (select ...42 Using hard drives ...43 Improving hard drive performance 43 Using Disk Defragmenter 43 Using Disk Cleanup 43 Using HP 3D DriveGuard (select models only 44 Identifying HP 3D DriveGuard status 44 Managing power with a parked hard drive 44 Using...
...an AC adapter ...28 Switchable graphics/dual graphics (select models only 29 Using switchable graphics (select models only 29 Using dual graphics (select models only 29 5 External cards and devices ...31 Using Media Card Reader cards (select models only 31 Inserting a digital card ...31 Removing a digital card ...32 Using ExpressCards (select ...42 Using hard drives ...43 Improving hard drive performance 43 Using Disk Defragmenter 43 Using Disk Cleanup 43 Using HP 3D DriveGuard (select models only 44 Identifying HP 3D DriveGuard status 44 Managing power with a parked hard drive 44 Using...
HP Notebook Reference Guide
Page 90
... connector, docking 40 conservation, power 26 creating a wireless connection 2 critical battery level 21, 26 critical updates, software 58 D digital card inserting 31 removing 32 supported formats 31 Disk Cleanup software 43 Disk Defragmenter software 43 docking connector 40 drive media 21 DriveLock password description... 55 drives boot order 72 external 39 handling 42 hard 39 optical 40 using 43 dual graphics 29 E electrostatic discharge 79 eSATA cable, connecting 38 eSATA devices connecting 38 defined 37 removing 38 existing wireless network, ...
... connector, docking 40 conservation, power 26 creating a wireless connection 2 critical battery level 21, 26 critical updates, software 58 D digital card inserting 31 removing 32 supported formats 31 Disk Cleanup software 43 Disk Defragmenter software 43 docking connector 40 drive media 21 DriveLock password description... 55 drives boot order 72 external 39 handling 42 hard 39 optical 40 using 43 dual graphics 29 E electrostatic discharge 79 eSATA cable, connecting 38 eSATA devices connecting 38 defined 37 removing 38 existing wireless network, ...
HP Notebook Reference Guide
Page 91
... port 16 F Face Recognition 15 face recognition 50 finding more information 1 fingerprint reader 57 firewall software 6, 58 G GPS 9 graphics modes, switching 29 H hard drive external 39 HP 3D DriveGuard 44 hard drive light 44 HDMI port, connecting 18 HDMI, configuring audio 18 Hibernation exiting 21 initiated during critical battery level...factory settings 66 sharing optical drives 49 shutdown 20 SIM inserting 8 removing 8 Sleep exiting 21 initiating 21 slot-load optical drive 46 smart card defined 34 inserting 35 removing 35 software antivirus 58 critical updates 58 Disk Cleanup 43 Index 81
... port 16 F Face Recognition 15 face recognition 50 finding more information 1 fingerprint reader 57 firewall software 6, 58 G GPS 9 graphics modes, switching 29 H hard drive external 39 HP 3D DriveGuard 44 hard drive light 44 HDMI port, connecting 18 HDMI, configuring audio 18 Hibernation exiting 21 initiated during critical battery level...factory settings 66 sharing optical drives 49 shutdown 20 SIM inserting 8 removing 8 Sleep exiting 21 initiating 21 slot-load optical drive 46 smart card defined 34 inserting 35 removing 35 software antivirus 58 critical updates 58 Disk Cleanup 43 Index 81
HP Notebook User Guide - Linux
Page 42
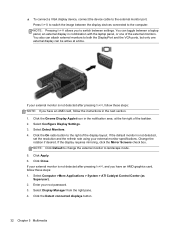
...Enter your external monitor specifications. Click the On radio button to the external monitor port. NOTE: Pressing fn+f4 allows you have an AMD graphics card, follow the instructions in combination with the laptop panel, or one external display can be active at the far right of the external monitors...You can attach external monitors to landscape mode. 5. If the default monitor is not detected after pressing fn+f4, and you have an AMD card, follow these steps: NOTE: If you to the computer. Change the rotation if desired. NOTE: Click Default to change the external monitor to...
...Enter your external monitor specifications. Click the On radio button to the external monitor port. NOTE: Pressing fn+f4 allows you have an AMD graphics card, follow the instructions in combination with the laptop panel, or one external display can be active at the far right of the external monitors...You can attach external monitors to landscape mode. 5. If the default monitor is not detected after pressing fn+f4, and you have an AMD card, follow these steps: NOTE: If you to the computer. Change the rotation if desired. NOTE: Click Default to change the external monitor to...

HP ProBook 4545s Notebook PC - Maintenance and Service Guide
Page 75
... computer. 4. d. Reverse this procedure to the computer. 3. c. Component replacement procedures 67 If you are unsure whether the computer is off or in models with UMA graphics Spare part number 683598-001 683599-001 683600-001 Before removing the system board, follow these steps: 1. b. WLAN/Bluetooth combo...
... computer. 4. d. Reverse this procedure to the computer. 3. c. Component replacement procedures 67 If you are unsure whether the computer is off or in models with UMA graphics Spare part number 683598-001 683599-001 683600-001 Before removing the system board, follow these steps: 1. b. WLAN/Bluetooth combo...
HP ProBook 4545s Notebook PC - Maintenance and Service Guide
Page 76
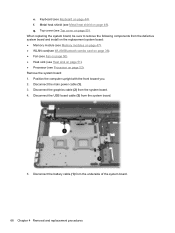
...the system board: 1. Disconnect the battery cable (1) from the system board. 5. Position the computer upright with the front toward you. 2. Disconnect the graphics cable (2) from the defective system board and install on the replacement system board: ● Memory module (see Memory modules on page 47). ● WLAN... card(see WLAN/Bluetooth combo card on page 36). ● Fan (see Fan on page 50). ● Heat sink (see Heat sink on page 51). ●...
...the system board: 1. Disconnect the battery cable (1) from the system board. 5. Position the computer upright with the front toward you. 2. Disconnect the graphics cable (2) from the defective system board and install on the replacement system board: ● Memory module (see Memory modules on page 47). ● WLAN... card(see WLAN/Bluetooth combo card on page 36). ● Fan (see Fan on page 50). ● Heat sink (see Heat sink on page 51). ●...

HP ProBook 4545s Notebook PC - Maintenance and Service Guide
Page 118
function keys identifying 10 G graphics, product description 1 grounding equipment and methods 32 H hard drive precautions 29 product description 2 removal 42 spare part numbers 19, 23, 25, 42 ... power lights 7 power requirements, product description 3 processor removal 53 spare part numbers 19, 53 product description audio 2 chipset 1 display panel 1 Ethernet 2 external media cards 3 graphics 1 hard drives 2 keyboard 3 memory module 1 microphone 2 operating system 3 optical drives 2 pointing devices 3 ports 3 power requirements 3 product name 1 security 3 serviceability 5 110 Index
function keys identifying 10 G graphics, product description 1 grounding equipment and methods 32 H hard drive precautions 29 product description 2 removal 42 spare part numbers 19, 23, 25, 42 ... power lights 7 power requirements, product description 3 processor removal 53 spare part numbers 19, 53 product description audio 2 chipset 1 display panel 1 Ethernet 2 external media cards 3 graphics 1 hard drives 2 keyboard 3 memory module 1 microphone 2 operating system 3 optical drives 2 pointing devices 3 ports 3 power requirements 3 product name 1 security 3 serviceability 5 110 Index


