Limited Warranty Statement
Page 4
...WARRANTIES OR CONDITIONS OF MERCHANTABILITY, SATISFACTORY QUALITY, AND FITNESS FOR A PARTICULAR PURPOSE. HP's limited warranty covers only those that arise as a result of purchase by HP; HP shall have other cameras: One year. The level of warranty service may also have no obligation to ...warranty period begins on -site service, and accident protection, may : 2 For each HP product specified above . HP does not warrant that of the Product being notified of limited warranty Camera hardware and software media R740 series: 90 days in the United States, and some...
...WARRANTIES OR CONDITIONS OF MERCHANTABILITY, SATISFACTORY QUALITY, AND FITNESS FOR A PARTICULAR PURPOSE. HP's limited warranty covers only those that arise as a result of purchase by HP; HP shall have other cameras: One year. The level of warranty service may also have no obligation to ...warranty period begins on -site service, and accident protection, may : 2 For each HP product specified above . HP does not warrant that of the Product being notified of limited warranty Camera hardware and software media R740 series: 90 days in the United States, and some...
Limited Warranty Statement
Page 5
...on the region where you with the Product name or Product number. Materials disposal This HP product contains the following products: • Product name (HP Photosmart R830 series Digital Camera); The Regulatory model number for all service and support needs. For European customers only ...cannot disclaim; Product number (L2466A, L2467A, L2468A, L2469A, L2470A, L2471A); It is FCLSD-0703. • Product name (HP Photosmart R840 series Digital Camera); Customer may contain one -stop source for your product is listed below for a fee You will be confused with peace ...
...on the region where you with the Product name or Product number. Materials disposal This HP product contains the following products: • Product name (HP Photosmart R830 series Digital Camera); The Regulatory model number for all service and support needs. For European customers only ...cannot disclaim; Product number (L2466A, L2467A, L2468A, L2469A, L2470A, L2471A); It is FCLSD-0703. • Product name (HP Photosmart R840 series Digital Camera); Customer may contain one -stop source for your product is listed below for a fee You will be confused with peace ...
Limited Warranty Statement
Page 6
... information is in the charger that are recommended for your product is SNPRB-0706. • Product name (HP Photosmart R930 series Digital Camera); Product number (L2472A, L2473A, L2474A, L2475A, L2476A, L2477A); R930 series: Your camera uses a rechargeable HP Photosmart R07 Lithium Ion battery (L1812A/ L1812B); R740 series: Your camera uses a rechargeable HP Photosmart LI40 battery (Q6277A); It will also void your...
... information is in the charger that are recommended for your product is SNPRB-0706. • Product name (HP Photosmart R930 series Digital Camera); Product number (L2472A, L2473A, L2474A, L2475A, L2476A, L2477A); R930 series: Your camera uses a rechargeable HP Photosmart R07 Lithium Ion battery (L1812A/ L1812B); R740 series: Your camera uses a rechargeable HP Photosmart LI40 battery (Q6277A); It will also void your...

User Guide
Page 3
... the language...6 Set the region...6 Set the date and time...7 Install and format an optional memory card 7 Install the software...8 Using your camera...8 Using the Touch Screen interface 8 Related information...9 2 Taking pictures and recording video clips Taking pictures...12 Recording video clips...12 Instant Review...12 Auto focus ...
... the language...6 Set the region...6 Set the date and time...7 Install and format an optional memory card 7 Install the software...8 Using your camera...8 Using the Touch Screen interface 8 Related information...9 2 Taking pictures and recording video clips Taking pictures...12 Recording video clips...12 Instant Review...12 Auto focus ...
User Guide
Page 4
... reader 36 Printing directly to a printer...36 7 Using HP Photosmart Express Using the Photosmart Express Menu 38 Marking images for printing...39 Buying prints online...39 Sharing images...40 Setting up online destinations in the camera 40 Sending images to online destinations 41 8 Using the Camera Setup Menu Setting Remembered Settings 43 Modifying Date and...
... reader 36 Printing directly to a printer...36 7 Using HP Photosmart Express Using the Photosmart Express Menu 38 Marking images for printing...39 Buying prints online...39 Sharing images...40 Setting up online destinations in the camera 40 Sending images to online destinations 41 8 Using the Camera Setup Menu Setting Remembered Settings 43 Modifying Date and...

User Guide
Page 6
Camera top, side, and back 34 5 6 1 2 11 7 8 10 9 1 Speaker. 2 button 3 Power light. 4 selector-Switches between Picture Capture, Video Record, and Playback (see "Taking pictures" on page ... 8). 11 Touch Screen Image Display- Frames images when in Picture Capture or Video Record, reviews images when in Playback, and provides a Touch Screen interface for camera operations (see "Using the Touch Screen interface" on page 8). 4 Getting started Use this section to get familiar with the...
Camera top, side, and back 34 5 6 1 2 11 7 8 10 9 1 Speaker. 2 button 3 Power light. 4 selector-Switches between Picture Capture, Video Record, and Playback (see "Taking pictures" on page ... 8). 11 Touch Screen Image Display- Frames images when in Picture Capture or Video Record, reviews images when in Playback, and provides a Touch Screen interface for camera operations (see "Using the Touch Screen interface" on page 8). 4 Getting started Use this section to get familiar with the...

User Guide
Page 7
...latch catches. 3. NOTE: Fully charge the battery before removing the battery. Turn off the camera before using it the first time (see "Charge the battery" on page 6). Install the battery 1. Camera front and bottom 5 Before taking pictures Complete the following procedures before taking pictures or recording ...Close the Battery/Memory Card door. Insert the battery in the larger slot, pushing the battery in until the battery springs free. Camera front and bottom 1 23 5 4 1 Flash. 2 Self-Timer/Focus Assist light-See "Using the Self-Timer settings" on the Battery/Memory Card ...
...latch catches. 3. NOTE: Fully charge the battery before removing the battery. Turn off the camera before using it the first time (see "Charge the battery" on page 6). Install the battery 1. Camera front and bottom 5 Before taking pictures Complete the following procedures before taking pictures or recording ...Close the Battery/Memory Card door. Insert the battery in the larger slot, pushing the battery in until the battery springs free. Camera front and bottom 1 23 5 4 1 Flash. 2 Self-Timer/Focus Assist light-See "Using the Self-Timer settings" on the Battery/Memory Card ...

User Guide
Page 8
... region Along with the language setting, the region setting determines the default date format. 1. Plug the small end of the USB cable into the camera and the large end into the power adapter, then plug the power adapter into an electrical outlet, as shown. Choose the language 1. Touch Next...and display the Date screen. 6 Getting started When charging is charging. Turn on the camera To turn on page 42). To change the language later, use the Camera Setup Menu (see "Using the Camera Setup Menu" on the camera, press the button. Chapter 1 Charge the battery To charge the battery in the...
... region Along with the language setting, the region setting determines the default date format. 1. Plug the small end of the USB cable into the camera and the large end into the power adapter, then plug the power adapter into an electrical outlet, as shown. Choose the language 1. Touch Next...and display the Date screen. 6 Getting started When charging is charging. Turn on the camera To turn on page 42). To change the language later, use the Camera Setup Menu (see "Using the Camera Setup Menu" on the camera, press the button. Chapter 1 Charge the battery To charge the battery in the...

User Guide
Page 9
...Time Imprint under "Using the Playback Menu" on page 34). 1. Close the Battery/Memory Card door and turn on your camera with a memory card installed, the camera indicates the number of 1999 images on the memory card at the current Image Quality setting. To use internal memory and view...the date and time imprint feature. Touch Next to display Format Card, then touch Format Card. 4. Install and format an optional memory card This camera supports standard, high speed, and high capacity Secure Digital (SD and SDHC) memory cards, 32MB to adjust the month, date, and year....
...Time Imprint under "Using the Playback Menu" on page 34). 1. Close the Battery/Memory Card door and turn on your camera with a memory card installed, the camera indicates the number of 1999 images on the memory card at the current Image Quality setting. To use internal memory and view...the date and time imprint feature. Touch Next to display Format Card, then touch Format Card. 4. Install and format an optional memory card This camera supports standard, high speed, and high capacity Secure Digital (SD and SDHC) memory cards, 32MB to adjust the month, date, and year....
User Guide
Page 10
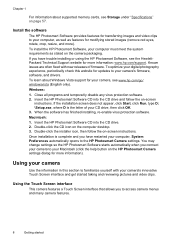
... click OK. 3. Using the Touch Screen interface This camera features a Touch Screen interface that allows you connect your camera to the HP Photosmart Camera settings. Insert the HP Photosmart Software CD into the CD drive and follow the on the camera packaging. Double-click the CD icon on the HP Photosmart Camera settings dialog for more information). Close all programs and...
... click OK. 3. Using the Touch Screen interface This camera features a Touch Screen interface that allows you connect your camera to the HP Photosmart Camera settings. Insert the HP Photosmart Software CD into the CD drive and follow the on the camera packaging. Double-click the CD icon on the HP Photosmart Camera settings dialog for more information). Close all programs and...

User Guide
Page 11
... 36. Tips on using the stylus. For information on setting up and sending images to a computer See "Transferring images with HP Photosmart Software" on page 34. For information on transferring images from your camera to online destinations See "Sharing images" on page 40. Related information 9 For information on taking pictures and video record...
... 36. Tips on using the stylus. For information on setting up and sending images to a computer See "Transferring images with HP Photosmart Software" on page 34. For information on transferring images from your camera to online destinations See "Sharing images" on page 40. Related information 9 For information on taking pictures and video record...

User Guide
Page 13
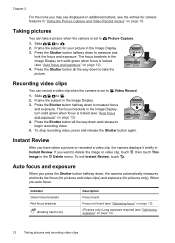
... Picture Capture and you can record video when you selected. Video Record, displays Video Record Menu. ( only) Displays the Shooting Mode menu. Whenever you set a camera feature to record video clips. The icon that displays on page 12). For example, White Balance is Off by default and no button displays. Taking...
... Picture Capture and you can record video when you selected. Video Record, displays Video Record Menu. ( only) Displays the Shooting Mode menu. Whenever you set a camera feature to record video clips. The icon that displays on page 12). For example, White Balance is Off by default and no button displays. Taking...
User Guide
Page 14
... the Shutter button all the way down to begin recording video. 5. Press the Shutter button all the way down to take a picture when the camera is set to Picture Capture. 1. Press the Shutter button halfway down and release to measure and lock the focus and exposure. The focus brackets in... page 14). 12 Taking pictures and recording video clips Auto focus and exposure When you have taken a picture or recorded a video clip, the camera displays it briefly in the Delete menu. Slide to measure focus and exposure. Taking pictures You can record a video clip when the...
... the Shutter button all the way down to begin recording video. 5. Press the Shutter button all the way down to take a picture when the camera is set to Picture Capture. 1. Press the Shutter button halfway down and release to measure and lock the focus and exposure. The focus brackets in... page 14). 12 Taking pictures and recording video clips Auto focus and exposure When you have taken a picture or recorded a video clip, the camera displays it briefly in the Delete menu. Slide to measure focus and exposure. Taking pictures You can record a video clip when the...
User Guide
Page 15
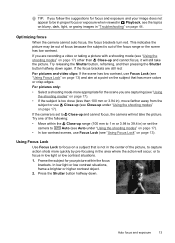
...capture action shots more colors or crisp edges. In low light or low contrast situations, frame a brighter or higher contrast object. 2. Optimizing focus When the camera cannot auto focus, the focus brackets turn red. Using Focus Lock Use Focus Lock to focus on page 44. If the focus brackets are still..." on page 13). TIP: If you follow the suggestions for focus and exposure and your picture within the Close-up and cannot focus, the camera will not take the picture. This indicates the picture may be in proper focus or exposure when viewed in the center of the following: •...
...capture action shots more colors or crisp edges. In low light or low contrast situations, frame a brighter or higher contrast object. 2. Optimizing focus When the camera cannot auto focus, the focus brackets turn red. Using Focus Lock Use Focus Lock to focus on page 44. If the focus brackets are still..." on page 13). TIP: If you follow the suggestions for focus and exposure and your picture within the Close-up and cannot focus, the camera will not take the picture. This indicates the picture may be in proper focus or exposure when viewed in the center of the following: •...

User Guide
Page 16
...To reduce potential blur, see Steady Photo under "Using the Picture Capture and Video Record menus" on page 18). • Turn on page 14. The camera will require a very long exposure, a shaking hand icon ( ) appears. While in "Optimizing exposure" on more you are magnified (this is difficult to... control zoom. NOTE: When you zoom in and to take the picture, but it is called camera shake). Optimizing exposure When you have a tripod, turn on Steady Photo (see the suggestions in Picture Capture or Video Record, use the buttons...
...To reduce potential blur, see Steady Photo under "Using the Picture Capture and Video Record menus" on page 18). • Turn on page 14. The camera will require a very long exposure, a shaking hand icon ( ) appears. While in "Optimizing exposure" on more you are magnified (this is difficult to... control zoom. NOTE: When you zoom in and to take the picture, but it is called camera shake). Optimizing exposure When you have a tripod, turn on Steady Photo (see the suggestions in Picture Capture or Video Record, use the buttons...

User Guide
Page 17
... zoom in Picture Capture, press on page 18. While in , the scene enlarges within the yellow frame to indicate the area of the scene the camera will capture, and the MP value decreases to the maximum level, then release the lever. 2. Release , then press it again. Digital zoom In digital zoom...
... zoom in Picture Capture, press on page 18. While in , the scene enlarges within the yellow frame to indicate the area of the scene the camera will capture, and the MP value decreases to the maximum level, then release the lever. 2. Release , then press it again. Digital zoom In digital zoom...

User Guide
Page 18
...see "Red eye" on page 30) or the HP Photosmart Software that optimize the camera for taking pictures and recording video clips Your camera's default settings work well for most shooting situations. Flash On-The camera always uses flash. Flash Off-The camera does not use this setting to capture poorly lit ...in animal subjects after you have captured the image, using Pet-Eye Fix (see "Red eye" on page 16). Auto Flash (Default)-The camera uses the flash, if necessary. The flash may cause a phenomenon called red-eye (see "Enhancing photos" on the front of pictures rapidly or...
...see "Red eye" on page 30) or the HP Photosmart Software that optimize the camera for taking pictures and recording video clips Your camera's default settings work well for most shooting situations. Flash On-The camera always uses flash. Flash Off-The camera does not use this setting to capture poorly lit ...in animal subjects after you have captured the image, using Pet-Eye Fix (see "Red eye" on page 16). Auto Flash (Default)-The camera uses the flash, if necessary. The flash may cause a phenomenon called red-eye (see "Enhancing photos" on the front of pictures rapidly or...

User Guide
Page 19
... you are recording video clips. Action-For capturing sporting events, moving cars, or any scene where you installed the HP Photosmart Software (see "Stitching panoramas" on the camera (see "Install the Using the shooting modes 17 This mode uses the flash and a long exposure. Sunset-For ... Portrait-For pictures that have time to fit into a single picture. Using Panorama mode The / Panorama mode allows you must set the camera on page 17). Shooting Mode menu without using flash. To select a shooting mode: 1. Using the shooting modes Shooting modes are predefined ...
... you are recording video clips. Action-For capturing sporting events, moving cars, or any scene where you installed the HP Photosmart Software (see "Stitching panoramas" on the camera (see "Install the Using the shooting modes 17 This mode uses the flash and a long exposure. Sunset-For ... Portrait-For pictures that have time to fit into a single picture. Using Panorama mode The / Panorama mode allows you must set the camera on page 17). Shooting Mode menu without using flash. To select a shooting mode: 1. Using the shooting modes Shooting modes are predefined ...

User Guide
Page 20
... allow you to display the feature's menu and change the setting. Unless otherwise noted, the setting remains in the panoramic sequence. 3. Position the camera to take the second picture. 5. Press the Shutter button to take the first picture in effect until you return to or , then touch Menu.... 2. Slide to Picture Capture or Video Record. To exit the menu, touch repeatedly until you turn on the camera, the settings reset to your second picture with the first. 4. TIP: You can specify which remain as you transfer them to their options, touch...
... allow you to display the feature's menu and change the setting. Unless otherwise noted, the setting remains in the panoramic sequence. 3. Position the camera to take the second picture. 5. Press the Shutter button to take the first picture in effect until you return to or , then touch Menu.... 2. Slide to Picture Capture or Video Record. To exit the menu, touch repeatedly until you turn on the camera, the settings reset to your second picture with the first. 4. TIP: You can specify which remain as you transfer them to their options, touch...

User Guide
Page 21
...Lighting ( only)-Balances the relationship between light and dark areas. The setting remains in effect until it is changed , even when you turn off the camera. Date & Time Imprint ( only)-Imprints date in pictures. For information about tags, see "Adaptive Lighting" on page 16. This setting remains in...and compression for video clips. Self-Timer-For capturing images or recording video after the image is changed , even when you turn off the camera. For more shots quickly in effect until it is taken. • Off (Default)-Disables Self-Timer. • On-For taking one ...
...Lighting ( only)-Balances the relationship between light and dark areas. The setting remains in effect until it is changed , even when you turn off the camera. Date & Time Imprint ( only)-Imprints date in pictures. For information about tags, see "Adaptive Lighting" on page 16. This setting remains in...and compression for video clips. Self-Timer-For capturing images or recording video after the image is changed , even when you turn off the camera. For more shots quickly in effect until it is taken. • Off (Default)-Disables Self-Timer. • On-For taking one ...


