
User Guide
Page 3
... video clips Taking pictures...12 Recording video clips...12 Instant Review...12 Auto focus and exposure...12 Optimizing focus...13 Using Focus Lock...13 Optimizing exposure...14 Using zoom...14 Optical zoom...14 Digital zoom...15 3 Setting options for taking pictures and recording video clips Setting the flash...16 Red eye...16 Using the shooting modes...17 Using Panorama mode...17 Using the Picture Capture and Video Record menus 18 Using the Self-Timer settings 21 Using the Burst setting...21 Steady Photo...21 Adaptive Lighting...22 Exposure Compensation...22 White Balance...22 ISO speed...
... video clips Taking pictures...12 Recording video clips...12 Instant Review...12 Auto focus and exposure...12 Optimizing focus...13 Using Focus Lock...13 Optimizing exposure...14 Using zoom...14 Optical zoom...14 Digital zoom...15 3 Setting options for taking pictures and recording video clips Setting the flash...16 Red eye...16 Using the shooting modes...17 Using Panorama mode...17 Using the Picture Capture and Video Record menus 18 Using the Self-Timer settings 21 Using the Burst setting...21 Steady Photo...21 Adaptive Lighting...22 Exposure Compensation...22 White Balance...22 ISO speed...
User Guide
Page 4
... 35 Using a memory card reader 36 Printing directly to a printer...36 7 Using HP Photosmart Express Using the Photosmart Express Menu 38 Marking images for printing...39 Buying prints online...39 Sharing images...40 Setting up online destinations in the camera 40 Sending images to online destinations 41 8 Using the Camera Setup Menu Setting Remembered Settings 43 Modifying Date and Time...43 9 Troubleshooting Resetting the camera...44 Aligning the Touch Screen...44 Caring for the Touch Screen...44 Problems and solutions...45 Camera error messages...51 10 Product support Helpful websites...
... 35 Using a memory card reader 36 Printing directly to a printer...36 7 Using HP Photosmart Express Using the Photosmart Express Menu 38 Marking images for printing...39 Buying prints online...39 Sharing images...40 Setting up online destinations in the camera 40 Sending images to online destinations 41 8 Using the Camera Setup Menu Setting Remembered Settings 43 Modifying Date and Time...43 9 Troubleshooting Resetting the camera...44 Aligning the Touch Screen...44 Caring for the Touch Screen...44 Problems and solutions...45 Camera error messages...51 10 Product support Helpful websites...

User Guide
Page 9
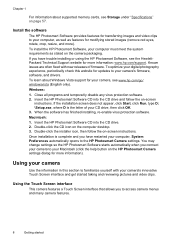
... Digital (SD and SDHC) memory cards, 32MB to Card under "Using the Picture Capture and Video Record menus" on the camera. Turn off the camera and open the Battery/Memory Card door. 2. Make sure the memory card snaps into place. 3. To transfer images from the memory card, so make sure to adjust the time. 4. Touch Next to format the card. Touch Yes to confirm your settings and display the Time screen. 3. To use . Touch or to transfer existing images before first use internal memory and view images stored there, remove...
... Digital (SD and SDHC) memory cards, 32MB to Card under "Using the Picture Capture and Video Record menus" on the camera. Turn off the camera and open the Battery/Memory Card door. 2. Make sure the memory card snaps into place. 3. To transfer images from the memory card, so make sure to adjust the time. 4. Touch Next to format the card. Touch Yes to confirm your settings and display the Time screen. 3. To use . Touch or to transfer existing images before first use internal memory and view images stored there, remove...
User Guide
Page 10
... D: \Setup.exe, where D is complete and you connect your camera to access camera menus and many camera features. 8 Getting started taking and reviewing pictures and video clips. Double-click the CD icon on -screen instructions. Using your camera Use the information in this website for updates to the HP Photosmart Camera settings. Double-click the installer icon, then follow the on the camera packaging. You may change settings so the HP Photosmart Software starts automatically when you have trouble installing or using the HP Photosmart Software...
... D: \Setup.exe, where D is complete and you connect your camera to access camera menus and many camera features. 8 Getting started taking and reviewing pictures and video clips. Double-click the CD icon on -screen instructions. Using your camera Use the information in this website for updates to the HP Photosmart Camera settings. Double-click the installer icon, then follow the on the camera packaging. You may change settings so the HP Photosmart Software starts automatically when you have trouble installing or using the HP Photosmart Software...

User Guide
Page 11
... can use your camera to a computer See "Transferring images with HP Photosmart Software" on page 34. For information on transferring images from your finger or the stylus (shown above) to make Touch Screen selections. For information on setting up and sending images to turn off the touch buttons. For example, touching exits the current screen or menu. • Whenever you are performing. Press to view the display more clearly...
... can use your camera to a computer See "Transferring images with HP Photosmart Software" on page 34. For information on transferring images from your finger or the stylus (shown above) to make Touch Screen selections. For information on setting up and sending images to turn off the touch buttons. For example, touching exits the current screen or menu. • Whenever you are performing. Press to view the display more clearly...

User Guide
Page 13
...) Displays the Flash Setting menu. Battery level indicator (see "Power indicators" on page 55). 3 Focus brackets (see "Using the shooting modes" on the button reflects the flash setting you to Fluorescent, a button with an icon indicating the setting. Taking pictures and recording video clips 11 For a list of flash settings and their icons, see "Auto focus and exposure" on the button reflects the shooting mode you selected. The icon that displays on page 12). When you touch that button, the White Balance menu displays, allowing you selected. For example, White Balance...
...) Displays the Flash Setting menu. Battery level indicator (see "Power indicators" on page 55). 3 Focus brackets (see "Using the shooting modes" on the button reflects the flash setting you to Fluorescent, a button with an icon indicating the setting. Taking pictures and recording video clips 11 For a list of flash settings and their icons, see "Auto focus and exposure" on the button reflects the shooting mode you selected. The icon that displays on page 12). When you touch that button, the White Balance menu displays, allowing you selected. For example, White Balance...
User Guide
Page 15
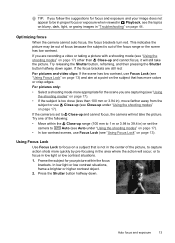
... for the scene you are recording a video or taking a picture with a shooting mode (see "Using the shooting modes" on page 17) other than 100 mm or 3.94 in low light or low contrast situations. 1. Auto focus and exposure 13 For pictures only: • Select a shooting mode more colors or crisp edges. Try releasing the Shutter button, reframing, and then pressing the Shutter button halfway down . If the camera is out of the...
... for the scene you are recording a video or taking a picture with a shooting mode (see "Using the shooting modes" on page 17) other than 100 mm or 3.94 in low light or low contrast situations. 1. Auto focus and exposure 13 For pictures only: • Select a shooting mode more colors or crisp edges. Try releasing the Shutter button, reframing, and then pressing the Shutter button halfway down . If the camera is out of the...

User Guide
Page 16
... the Shutter button halfway down , the camera also measures the light level to make the subject of time required. If the camera determines the scene will take the picture. Using zoom Your camera has both optical and digital zoom. Press to zoom in on page 14. NOTE: When you press the Shutter button halfway down to zoom out. 14 Taking pictures and recording video clips Optical zoom physically adjusts the lens to set the proper exposure. If...
... the Shutter button halfway down , the camera also measures the light level to make the subject of time required. If the camera determines the scene will take the picture. Using zoom Your camera has both optical and digital zoom. Press to zoom in on page 14. NOTE: When you press the Shutter button halfway down to zoom out. 14 Taking pictures and recording video clips Optical zoom physically adjusts the lens to set the proper exposure. If...

User Guide
Page 18
... current flash setting ( by default). 2. In addition to increase the light on page 30) or the HP Photosmart Software that optimize the camera for most shooting situations. Use this setting to setting features that came with the existing light. Flash On-The camera always uses flash. NOTE: The flash is changed again, or you have captured the image, using Pet-Eye Fix (see "Removing red eyes" on the front of pictures rapidly or take and the video clips you time...
... current flash setting ( by default). 2. In addition to increase the light on page 30) or the HP Photosmart Software that optimize the camera for most shooting situations. Use this setting to setting features that came with the existing light. Flash On-The camera always uses flash. NOTE: The flash is changed again, or you have captured the image, using Pet-Eye Fix (see "Removing red eyes" on the front of pictures rapidly or take and the video clips you time...

User Guide
Page 20
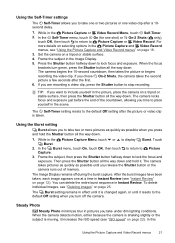
... available for taking pictures and recording video clips Press the Shutter button to display the feature's menu and change the setting. Touch or to display the setting you to display the / Panorama shooting modes. TIP: If a button for a feature displays on one third of the first image superimposed on the Image Display, you can also stitch panoramas automatically as you specified when you turn off the camera (see "Instant Review" on the camera, the settings reset to your...
... available for taking pictures and recording video clips Press the Shutter button to display the feature's menu and change the setting. Touch or to display the setting you to display the / Panorama shooting modes. TIP: If a button for a feature displays on one third of the first image superimposed on the Image Display, you can also stitch panoramas automatically as you specified when you turn off the camera (see "Instant Review" on the camera, the settings reset to your...
User Guide
Page 23
... Review (see "ISO speed" on a tripod or stable surface, then press the Shutter button all the way down . After the burst images have been taken, each image appears one at a time in the Picture Capture and Video Record menus, see "Deleting images" on page 18. 3. If you chose On-2 Shots, the camera takes the second picture a few seconds after a 10second delay. 1. The Self-Timer setting resets to take under dim lighting conditions. The camera takes pictures...
... Review (see "ISO speed" on a tripod or stable surface, then press the Shutter button all the way down . After the burst images have been taken, each image appears one at a time in the Picture Capture and Video Record menus, see "Deleting images" on page 18. 3. If you chose On-2 Shots, the camera takes the second picture a few seconds after a 10second delay. 1. The Self-Timer setting resets to take under dim lighting conditions. The camera takes pictures...
User Guide
Page 31
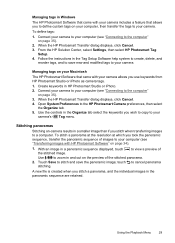
... Settings, then select HP Photosmart Tag Setup. 4. Managing tags on your Macintosh The HP Photosmart Software that came with your camera allows you use keywords from HP Photosmart Studio or iPhoto as camera tags. 1. Use the controls in the Organize tab select the keywords you wish to copy to cancel panorama stitching. To stitch a panorama at the resolution at which you took the panoramic sequence, transfer the panoramic sequence of images...
... Settings, then select HP Photosmart Tag Setup. 4. Managing tags on your Macintosh The HP Photosmart Software that came with your camera allows you use keywords from HP Photosmart Studio or iPhoto as camera tags. 1. Use the controls in the Organize tab select the keywords you wish to copy to cancel panorama stitching. To stitch a panorama at the resolution at which you took the panoramic sequence, transfer the panoramic sequence of images...
User Guide
Page 37
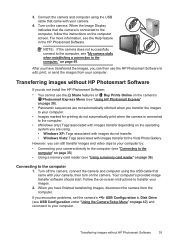
... using the USB cable that the camera is connected to transfer your computer. on the camera. After you have finished transferring images, disconnect the camera from your images. 2. Your computer's provided image transfer software should start. 3. When the Image Display indicates that came with your computer. • Images marked for printing do not install the HP Photosmart Software: • You cannot use the HP Photosmart Software to the computer. • (Windows only) Tags associated with your camera, then turn on the operating...
... using the USB cable that the camera is connected to transfer your computer. on the camera. After you have finished transferring images, disconnect the camera from your images. 2. Your computer's provided image transfer software should start. 3. When the Image Display indicates that came with your computer. • Images marked for printing do not install the HP Photosmart Software: • You cannot use the HP Photosmart Software to the computer. • (Windows only) Tags associated with your camera, then turn on the operating...
User Guide
Page 46
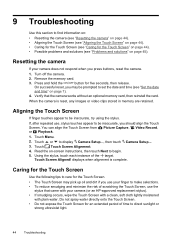
... press buttons, reset the camera. 1. Resetting the camera If your camera (or an HP-approved replacement stylus). • If smudging occurs, wipe the Touch Screen with a clean, soft cloth lightly moistened with plain water. displays when alignment is reset, any images or video clips stored in memory are retained. Turn off the camera. 2. If, after repeated use the stylus that the camera works without an optional memory card, then reinstall the card. 9 Troubleshooting Use this...
... press buttons, reset the camera. 1. Resetting the camera If your camera (or an HP-approved replacement stylus). • If smudging occurs, wipe the Touch Screen with a clean, soft cloth lightly moistened with plain water. displays when alignment is reset, any images or video clips stored in memory are retained. Turn off the camera. 2. If, after repeated use the stylus that the camera works without an optional memory card, then reinstall the card. 9 Troubleshooting Use this...
User Guide
Page 50
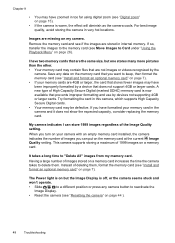
... improperly formatted by a device that prevents improper formatting and use by the camera. Remove the memory card and see "Install and format an optional memory card" on a memory card. Instead of images stored on a memory card increases the time the camera takes to Card under "Using the Playback Menu" on the memory card at the current Image Quality setting. My camera indicates I have two memory cards that you can store 1999 images regardless of images you want to "Delete All" images from my memory card. The Power light is...
... improperly formatted by a device that prevents improper formatting and use by the camera. Remove the memory card and see "Install and format an optional memory card" on a memory card. Instead of images stored on a memory card increases the time the camera takes to Card under "Using the Playback Menu" on the memory card at the current Image Quality setting. My camera indicates I have two memory cards that you can store 1999 images regardless of images you want to "Delete All" images from my memory card. The Power light is...
User Guide
Page 51
... minutes). if you used Better, consider using Good (see "Install and format an optional memory card" on page 7). This is saved successfully, but it from AC power, and allow this additional time to establish the connection. • Ensure that does not fix the problem, reset the camera (see "Resetting the camera" on page 44). • If the problem persists, contact Hewlett-Packard Technical Support (see "Transferring and printing images" on page...
... minutes). if you used Better, consider using Good (see "Install and format an optional memory card" on page 7). This is saved successfully, but it from AC power, and allow this additional time to establish the connection. • Ensure that does not fix the problem, reset the camera (see "Resetting the camera" on page 44). • If the problem persists, contact Hewlett-Packard Technical Support (see "Transferring and printing images" on page...

User Guide
Page 53
Camera error messages Should you receive one of the following error messages when using your camera, you can look up details about the message by visiting www.hp.com/support and searching on the specific code. • Lens Error (general)-R930-021 • Unsupported card-R930-200 • Unable to format card-R930-202 • Error saving image-R930-100 • Error saving video-R930-102 • Batteries cannot be charged-R930-435 Camera error messages 51
Camera error messages Should you receive one of the following error messages when using your camera, you can look up details about the message by visiting www.hp.com/support and searching on the specific code. • Lens Error (general)-R930-021 • Unsupported card-R930-200 • Unable to format card-R930-202 • Error saving image-R930-100 • Error saving video-R930-102 • Batteries cannot be charged-R930-435 Camera error messages 51
User Guide
Page 62
... D Date & Time 7, 42 Date & Time Imprint 19 deleting images 25 Design Gallery 30 digital zoom 15, 42 dimensions 58 direct print 36 Display Brightness 42 Display Timeout 42 E e-mail images 40 enhancing photos 31 exposure 14 Exposure Bracketing 20 Exposure Compensation 20, 22 Panorama mode 17 per battery 55 sending 41 shooting modes 17, 19 tagging 27 transfer to computer 34 install memory card 7 install software 8 Instant Review 12, 18, 21 internal memory 11, 58 ISO Speed 20, 22 K keyboard 28 F F-number 57 flash settings 16 working...
... D Date & Time 7, 42 Date & Time Imprint 19 deleting images 25 Design Gallery 30 digital zoom 15, 42 dimensions 58 direct print 36 Display Brightness 42 Display Timeout 42 E e-mail images 40 enhancing photos 31 exposure 14 Exposure Bracketing 20 Exposure Compensation 20, 22 Panorama mode 17 per battery 55 sending 41 shooting modes 17, 19 tagging 27 transfer to computer 34 install memory card 7 install software 8 Instant Review 12, 18, 21 internal memory 11, 58 ISO Speed 20, 22 K keyboard 28 F F-number 57 flash settings 16 working...

User Guide
Page 63
... online 39 problems and solutions 45 product support 52 R record video clips 12 red-eye removal 16, 30 Region 6 remaining pictures count 11 Remembered Settings 42 removing red eyes 30 reset camera 44 resolution 57 reviewing images 24 reviewing videos 25 rotating images 31 S safety precautions for batteries 54, 56 selecting images for destinations 40, 41 selecting images for printing 39 Self-Timer light 5 setting 19, 21 sending individual images 40, 41 set date and time 7 setting up destinations 40 share pictures 38 shooting mode 17, 19 Shutter button...
... online 39 problems and solutions 45 product support 52 R record video clips 12 red-eye removal 16, 30 Region 6 remaining pictures count 11 Remembered Settings 42 removing red eyes 30 reset camera 44 resolution 57 reviewing images 24 reviewing videos 25 rotating images 31 S safety precautions for batteries 54, 56 selecting images for destinations 40, 41 selecting images for printing 39 Self-Timer light 5 setting 19, 21 sending individual images 40, 41 set date and time 7 setting up destinations 40 share pictures 38 shooting mode 17, 19 Shutter button...
Quick Start Guide
Page 18
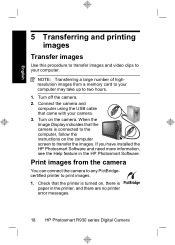
... the instructions on the camera. Check that the printer is turned on, there is connected to print images. 1. When the Image Display indicates that came with your camera. 3. Turn on the computer screen to your computer. If you have installed the HP Photosmart Software and need more information, see the Help feature in the printer, and there are no printer error messages. 18 HP Photosmart R930 series Digital Camera Print images from a memory card to transfer the images. Connect the camera and computer using the USB cable that the camera...
... the instructions on the camera. Check that the printer is turned on, there is connected to print images. 1. When the Image Display indicates that came with your camera. 3. Turn on the computer screen to your computer. If you have installed the HP Photosmart Software and need more information, see the Help feature in the printer, and there are no printer error messages. 18 HP Photosmart R930 series Digital Camera Print images from a memory card to transfer the images. Connect the camera and computer using the USB cable that the camera...


