Limited Warranty Statement
Page 4
...; The warranty period begins on -site service, and accident protection, may be consistent with the Product, such as the camera. HP does not warrant that are Customer's sole and exclusive remedies. 2. Deficiencies in performance. 9. c. Any replacement product may be purchased from... in material and workmanship for the period specified above (Product) shall be uninterrupted or error free. 3. or, d. HP's limited warranty is inconsistent with your camera) that the operation of purchase by Customer. 2. Limitations of the United States, some states in the United States, and...
...; The warranty period begins on -site service, and accident protection, may be consistent with the Product, such as the camera. HP does not warrant that are Customer's sole and exclusive remedies. 2. Deficiencies in performance. 9. c. Any replacement product may be purchased from... in material and workmanship for the period specified above (Product) shall be uninterrupted or error free. 3. or, d. HP's limited warranty is inconsistent with your camera) that the operation of purchase by Customer. 2. Limitations of the United States, some states in the United States, and...
Limited Warranty Statement
Page 5
... product for a fee • Europe: Return product to your product is FCLSD-0703. • Product name (HP Photosmart R840 series Digital Camera); For more of the following materials that might require special handling at end-of-life: • Lithium Ion rechargeable...rights based on the duration of a consumer (e.g., the United Kingdom); Materials disposal This HP product contains the following products: • Product name (HP Photosmart R830 series Digital Camera); Regulatory model identification number For regulatory identification purposes, your local authorities or the Electronic ...
... product for a fee • Europe: Return product to your product is FCLSD-0703. • Product name (HP Photosmart R840 series Digital Camera); For more of the following materials that might require special handling at end-of-life: • Lithium Ion rechargeable...rights based on the duration of a consumer (e.g., the United Kingdom); Materials disposal This HP product contains the following products: • Product name (HP Photosmart R830 series Digital Camera); Regulatory model identification number For regulatory identification purposes, your local authorities or the Electronic ...
Limited Warranty Statement
Page 6
..., do not charge any other battery than the HP Photosmart LI40 battery in the camera, dock, or quick recharger. Allow the camera to air dry completely before operating it to repair the camera yourself. It will also void your product is SNPRB-0706. • Product name (HP Photosmart R930 series Digital Camera); Caution: Risk of batteries, follow the battery...
..., do not charge any other battery than the HP Photosmart LI40 battery in the camera, dock, or quick recharger. Allow the camera to air dry completely before operating it to repair the camera yourself. It will also void your product is SNPRB-0706. • Product name (HP Photosmart R930 series Digital Camera); Caution: Risk of batteries, follow the battery...

User Guide
Page 3
... the language...6 Set the region...6 Set the date and time...7 Install and format an optional memory card 7 Install the software...8 Using your camera...8 Using the Touch Screen interface 8 Related information...9 2 Taking pictures and recording video clips Taking pictures...12 Recording video clips...12 Instant Review...12 Auto focus ...
... the language...6 Set the region...6 Set the date and time...7 Install and format an optional memory card 7 Install the software...8 Using your camera...8 Using the Touch Screen interface 8 Related information...9 2 Taking pictures and recording video clips Taking pictures...12 Recording video clips...12 Instant Review...12 Auto focus ...
User Guide
Page 4
... reader 36 Printing directly to a printer...36 7 Using HP Photosmart Express Using the Photosmart Express Menu 38 Marking images for printing...39 Buying prints online...39 Sharing images...40 Setting up online destinations in the camera 40 Sending images to online destinations 41 8 Using the Camera Setup Menu Setting Remembered Settings 43 Modifying Date and...
... reader 36 Printing directly to a printer...36 7 Using HP Photosmart Express Using the Photosmart Express Menu 38 Marking images for printing...39 Buying prints online...39 Sharing images...40 Setting up online destinations in the camera 40 Sending images to online destinations 41 8 Using the Camera Setup Menu Setting Remembered Settings 43 Modifying Date and...

User Guide
Page 6
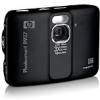
... interface for use, and begin taking pictures. 1 Getting started Use this section to get familiar with the camera controls, set up your digital camera for camera operations (see "Using the Touch Screen interface" on page 8). 4 Getting started Camera top, side, and back 34 5 6 1 2 11 7 8 10 9 1 Speaker. 2 button 3 Power light. 4 selector-Switches between Picture Capture...
... interface for use, and begin taking pictures. 1 Getting started Use this section to get familiar with the camera controls, set up your digital camera for camera operations (see "Using the Touch Screen interface" on page 8). 4 Getting started Camera top, side, and back 34 5 6 1 2 11 7 8 10 9 1 Speaker. 2 button 3 Power light. 4 selector-Switches between Picture Capture...

User Guide
Page 7
... removing the battery. Open the Battery/Memory Card door by sliding the door latch as indicated on page 6). Close the Battery/Memory Card door. Camera front and bottom 5 Camera front and bottom 1 23 5 4 1 Flash. 2 Self-Timer/Focus Assist light-See "Using the Self-Timer settings" on page 21. 3 Microphone. 4 Battery/Memory Card...
... removing the battery. Open the Battery/Memory Card door by sliding the door latch as indicated on page 6). Close the Battery/Memory Card door. Camera front and bottom 5 Camera front and bottom 1 23 5 4 1 Flash. 2 Self-Timer/Focus Assist light-See "Using the Self-Timer settings" on page 21. 3 Microphone. 4 Battery/Memory Card...

User Guide
Page 8
...on the region confirmation screen to confirm your finger or the stylus, touch the language you want . 2. To change the language later, use the Camera Setup Menu (see "Recharging the Lithium Ion battery" on page 55 for recharging the battery, see "Recharging the Lithium Ion battery" on page 42).... The battery is fully charged when the Battery Charging light turns on solid (see "Using the Camera Setup Menu" on page 55. When charging is charging. Using your choice and display the Region screen. Touch the region you want . 2. The...
...on the region confirmation screen to confirm your finger or the stylus, touch the language you want . 2. To change the language later, use the Camera Setup Menu (see "Recharging the Lithium Ion battery" on page 55 for recharging the battery, see "Recharging the Lithium Ion battery" on page 42).... The battery is fully charged when the Battery Charging light turns on solid (see "Using the Camera Setup Menu" on page 55. When charging is charging. Using your choice and display the Region screen. Touch the region you want . 2. The...

User Guide
Page 9
... capacity Secure Digital (SD and SDHC) memory cards, 32MB to adjust the time. 4. Insert the optional memory card in internal memory. This camera supports storing a maximum of picture and video images you install a memory card, all new images and video clips are stored on the card,... slide to confirm your settings and display the Time screen. 3. NOTE: Once you can store on page 26. To use the Camera Setup Menu (see "Using the Camera Setup Menu" on page 18. 1. Before taking pictures 7 Make sure the memory card snaps into place. 3. Formatting removes all ...
... capacity Secure Digital (SD and SDHC) memory cards, 32MB to adjust the time. 4. Insert the optional memory card in internal memory. This camera supports storing a maximum of picture and video images you install a memory card, all new images and video clips are stored on the card,... slide to confirm your settings and display the Time screen. 3. NOTE: Once you can store on page 26. To use the Camera Setup Menu (see "Using the Camera Setup Menu" on page 18. 1. Before taking pictures 7 Make sure the memory card snaps into place. 3. Formatting removes all ...
User Guide
Page 10
..., software, and drivers. Close all programs and temporarily disable any virus protection software. 2. Using your camera Use the information in this website for updates to the HP Photosmart Camera settings. Install the software The HP Photosmart Software provides features for transferring images and video clips to your computer, as well as stated on page 57. If...
..., software, and drivers. Close all programs and temporarily disable any virus protection software. 2. Using your camera Use the information in this website for updates to the HP Photosmart Camera settings. Install the software The HP Photosmart Software provides features for transferring images and video clips to your computer, as well as stated on page 57. If...

User Guide
Page 11
...setting picture capture and See "Setting options for the Touch Screen" on page 16. If you can turn on page 36. NOTE: This camera also features a virtual keyboard (via the Touch Screen interface) which you do not want to create image tags and e-mail addresses (see ... "Recording video clips" on page 28). For information on enhancing your camera to online destinations See "Sharing images" on the Touch Screen. For information on setting up and sending images to a computer See "Transferring images with HP Photosmart Software" on page 24. To use the Touch Screen: • ...
...setting picture capture and See "Setting options for the Touch Screen" on page 16. If you can turn on page 36. NOTE: This camera also features a virtual keyboard (via the Touch Screen interface) which you do not want to create image tags and e-mail addresses (see ... "Recording video clips" on page 28). For information on enhancing your camera to online destinations See "Sharing images" on the Touch Screen. For information on setting up and sending images to a computer See "Transferring images with HP Photosmart Software" on page 24. To use the Touch Screen: • ...

User Guide
Page 13
... indicator. • Video Record indicator. When you touch that displays on page 17. ( only) Displays the Flash Setting menu. Memory card indicator. If you set a camera feature to change the setting. Slide to to take pictures when you are in Video Record. The icon that displays on page 12). For a list...
... indicator. • Video Record indicator. When you touch that displays on page 17. ( only) Displays the Flash Setting menu. Memory card indicator. If you set a camera feature to change the setting. Slide to to take pictures when you are in Video Record. The icon that displays on page 12). For a list...
User Guide
Page 14
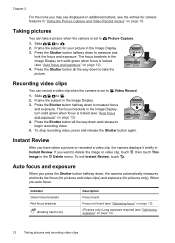
...to Video Record. 1. Instant Review After you have taken a picture or recorded a video clip, the camera displays it briefly in the Delete menu. Press the Shutter button halfway down , the camera automatically measures and locks the focus (for pictures and video clips) and exposure (for pictures only). ... 18. To exit Instant Review, touch . Chapter 2 For the icons you may see displayed on additional buttons, see the entries for camera features in the Image Display turn solid green when focus is set to Picture Capture. 1. Taking pictures You can record a video clip when ...
...to Video Record. 1. Instant Review After you have taken a picture or recorded a video clip, the camera displays it briefly in the Delete menu. Press the Shutter button halfway down , the camera automatically measures and locks the focus (for pictures and video clips) and exposure (for pictures only). ... 18. To exit Instant Review, touch . Chapter 2 For the icons you may see displayed on additional buttons, see the entries for camera features in the Image Display turn solid green when focus is set to Picture Capture. 1. Taking pictures You can record a video clip when ...
User Guide
Page 15
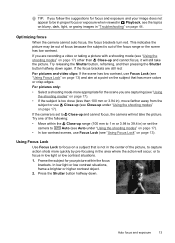
...focus brackets. Try releasing the Shutter button, reframing, and then pressing the Shutter button halfway down . Auto focus and exposure 13 Optimizing focus When the camera cannot auto focus, the focus brackets turn red. If the focus brackets are capturing (see "Using Focus Lock" on page 13). Try one of ... to 1 m or 3.94 to 39.4 in) or set to Close-up and cannot focus, the camera will not take the picture. If the camera is out of focus because the subject is set the camera to Auto (see the topics on blurry, dark, light, or grainy images in "Troubleshooting" on page ...
...focus brackets. Try releasing the Shutter button, reframing, and then pressing the Shutter button halfway down . Auto focus and exposure 13 Optimizing focus When the camera cannot auto focus, the focus brackets turn red. If the focus brackets are capturing (see "Using Focus Lock" on page 13). Try one of ... to 1 m or 3.94 to 39.4 in) or set to Close-up and cannot focus, the camera will not take the picture. If the camera is out of focus because the subject is set the camera to Auto (see the topics on blurry, dark, light, or grainy images in "Troubleshooting" on page ...

User Guide
Page 16
...: The more small movements of the following: • Set the flash to take the picture, but it may be blurry because it is called camera shake). While in "Optimizing exposure" on the Zoom lever to zoom out. 14 Taking pictures and recording video clips Try one of the... camera are recording a video, the camera continuously updates exposure. Optical zoom Optical zoom moves the lens between wide angle (1x) and telephoto (3x). Hold the Shutter button ...
...: The more small movements of the following: • Set the flash to take the picture, but it may be blurry because it is called camera shake). While in "Optimizing exposure" on the Zoom lever to zoom out. 14 Taking pictures and recording video clips Try one of the... camera are recording a video, the camera continuously updates exposure. Optical zoom Optical zoom moves the lens between wide angle (1x) and telephoto (3x). Hold the Shutter button ...

User Guide
Page 17
... you zoom in too far, press . 3. As you zoom in , the scene enlarges within the yellow frame to indicate the area of the scene the camera will capture, and the MP value decreases to indicate the resolution at which the scene will be captured.
... you zoom in too far, press . 3. As you zoom in , the scene enlarges within the yellow frame to indicate the area of the scene the camera will capture, and the MP value decreases to indicate the resolution at which the scene will be captured.

User Guide
Page 18
...may cause a phenomenon called red-eye (see "Enhancing photos" on page 31). 16 Setting options for taking pictures and recording video clips Your camera's default settings work well for lighting and motion, you can make human eyes appear red and animal's eyes appear to capture scenes with your... OK. Touch the flash setting you have captured the image, using Pet-Eye Fix (see "Red eye" on page 30) or the HP Photosmart Software that optimize the camera for most shooting situations. To exit the Flash Setting menu without changing the flash setting, touch . Auto Flash (Default)-The...
...may cause a phenomenon called red-eye (see "Enhancing photos" on page 31). 16 Setting options for taking pictures and recording video clips Your camera's default settings work well for lighting and motion, you can make human eyes appear red and animal's eyes appear to capture scenes with your... OK. Touch the flash setting you have captured the image, using Pet-Eye Fix (see "Red eye" on page 30) or the HP Photosmart Software that optimize the camera for most shooting situations. To exit the Flash Setting menu without changing the flash setting, touch . Auto Flash (Default)-The...

User Guide
Page 19
...beach. The shooting mode remains in ) away. To stitch your panoramic sequence together, use Stitch Panorama on the camera (see "Using Panorama mode" on page 17). If you turn off the camera. To select a shooting mode: 1. Touch or to display the shooting mode you need to stop the action....For capturing scenes in Picture Capture, touch the icon corresponding to 39.4 in effect until it is changed again, or until you installed the HP Photosmart Software (see "Install the Using the shooting modes 17 Action-For capturing sporting events, moving cars, or any scene where you are optimized ...
...beach. The shooting mode remains in ) away. To stitch your panoramic sequence together, use Stitch Panorama on the camera (see "Using Panorama mode" on page 17). If you turn off the camera. To select a shooting mode: 1. Touch or to display the shooting mode you need to stop the action....For capturing scenes in Picture Capture, touch the icon corresponding to 39.4 in effect until it is changed again, or until you installed the HP Photosmart Software (see "Install the Using the shooting modes 17 Action-For capturing sporting events, moving cars, or any scene where you are optimized ...

User Guide
Page 20
... as you want , then touch the option to display the option's menu. 3. Press the Shutter button to take the second picture. Position the camera to take the second picture. 5. During Instant Review (see "Setting Remembered Settings" on page 43). 18 Setting options for taking pictures while the ...Video Record Menu displays only features available for recording video clips. 1. Slide to take the first picture in effect until you turn off the camera. Press the Shutter button to or , then touch Menu. 2. When the last image is displayed. The next time you can stitch the ...
... as you want , then touch the option to display the option's menu. 3. Press the Shutter button to take the second picture. Position the camera to take the second picture. 5. During Instant Review (see "Setting Remembered Settings" on page 43). 18 Setting options for taking pictures while the ...Video Record Menu displays only features available for recording video clips. 1. Slide to take the first picture in effect until you turn off the camera. Press the Shutter button to or , then touch Menu. 2. When the last image is displayed. The next time you can stitch the ...

User Guide
Page 21
... e-mailing shorter clips. Shooting Mode ( only)-For selecting a shooting mode. This setting remains in effect until it is changed , even when you turn off the camera. • 8MP Best-For enlarging or printing images greater than 41 x 51 cm (16 x 20 in). • Normal (8MP) (Default)-For printing images...in). • 5MP-For printing images up to 28 x 36 cm (11 by 5 in effect until it is changed, even when you turn off the camera. • Best (Default)-For outdoor action video clips or printing individual video frames up to 10.2 by 15.2 cm (4 by 7 in succession (see "...
... e-mailing shorter clips. Shooting Mode ( only)-For selecting a shooting mode. This setting remains in effect until it is changed , even when you turn off the camera. • 8MP Best-For enlarging or printing images greater than 41 x 51 cm (16 x 20 in). • Normal (8MP) (Default)-For printing images...in). • 5MP-For printing images up to 28 x 36 cm (11 by 5 in effect until it is changed, even when you turn off the camera. • Best (Default)-For outdoor action video clips or printing individual video frames up to 10.2 by 15.2 cm (4 by 7 in succession (see "...


