

Setup Guide
Page 2
... screen appears. Check all connections. Unplug the USB cable, and then insert the HP All‑in [country] - Problem: (Windows only) You did not see the screen prompting you can try out one of your images and videos. Mac: HP Photosmart Studio allows you have not already done so, load photo paper in the color...
... screen appears. Check all connections. Unplug the USB cable, and then insert the HP All‑in [country] - Problem: (Windows only) You did not see the screen prompting you can try out one of your images and videos. Mac: HP Photosmart Studio allows you have not already done so, load photo paper in the color...

User Guide
Page 1
HP Photosmart C5300 All-in-One series Windows Help
HP Photosmart C5300 All-in-One series Windows Help
User Guide
Page 26
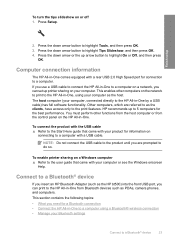
...highlight Tools, and then press OK. 3. NOTE: Do not connect the USB cable to the print features. To enable printer sharing on the HP All-in -One from the control panel on a Windows computer ▲ Refer to the user guide that came with a USB cable. Connect to do so. This section ... or see the Windows onscreen Help. HP recommends up arrow button to 5 computers for information on connecting to a computer with your computer as the clients, have access only to the product until you can set up printer sharing on the network to print to the HP All-in -One comes equipped with ...
...highlight Tools, and then press OK. 3. NOTE: Do not connect the USB cable to the print features. To enable printer sharing on the HP All-in -One from the control panel on a Windows computer ▲ Refer to the user guide that came with a USB cable. Connect to do so. This section ... or see the Windows onscreen Help. HP recommends up arrow button to 5 computers for information on connecting to a computer with your computer as the clients, have access only to the product until you can set up printer sharing on the network to print to the HP All-in -One comes equipped with ...

User Guide
Page 27
...To find out the device address of the HP All-in-One in order to establish a connection. Make a note of ink remaining in -One Scanning and software-based copying cannot be done over a Bluetooth connection. Before you print, you must have Windows Vista or Windows XP and either the Microsoft Bluetooth®... a Bluetooth connection is highlighted, and then press OK. Press the down arrow button until Device Address is printing. Connect the HP All-in -One. With a Bluetooth connection you can check the printer status, as well as the estimated amount of the device address.
...To find out the device address of the HP All-in-One in order to establish a connection. Make a note of ink remaining in -One Scanning and software-based copying cannot be done over a Bluetooth connection. Before you print, you must have Windows Vista or Windows XP and either the Microsoft Bluetooth®... a Bluetooth connection is highlighted, and then press OK. Press the down arrow button until Device Address is printing. Connect the HP All-in -One. With a Bluetooth connection you can check the printer status, as well as the estimated amount of the device address.

User Guide
Page 28
...computer. Connect to any printer. Therefore, if you would to a Bluetooth® device 25 If you do not have Windows Vista or Windows XP with Bluetooth® built in -One. Click Next, and then select A Bluetooth Printer. 7. If your ...Bluetooth® adapter supports the Microsoft stack but you use only one of the screen. 2. It is started and then attach the Bluetooth® adapter to the product, install the USB connection first. Finish setup the HP...
...computer. Connect to any printer. Therefore, if you would to a Bluetooth® device 25 If you do not have Windows Vista or Windows XP with Bluetooth® built in -One. Click Next, and then select A Bluetooth Printer. 7. If your ...Bluetooth® adapter supports the Microsoft stack but you use only one of the screen. 2. It is started and then attach the Bluetooth® adapter to the product, install the USB connection first. Finish setup the HP...

User Guide
Page 39
...• Multi-part forms, such as duplicate and triplicate forms. They can cause printed images to select your product, and then click one of the HP Web site are the ideal solution for creating custom T-shirts from your country/region, follow the prompts to smear, bleed, or not fill...papers not specifically designed for two-sided use with clasps or windows. They are offered in English only. Load originals and load paper 36 Load originals and load paper To order HP papers and other than those listed in the printer software. • Paper with titles, graphics, or photos by...
...• Multi-part forms, such as duplicate and triplicate forms. They can cause printed images to select your product, and then click one of the HP Web site are the ideal solution for creating custom T-shirts from your country/region, follow the prompts to smear, bleed, or not fill...papers not specifically designed for two-sided use with clasps or windows. They are offered in English only. Load originals and load paper 36 Load originals and load paper To order HP papers and other than those listed in the printer software. • Paper with titles, graphics, or photos by...

User Guide
Page 45
.... To load envelopes 1. Raise and hold the output tray in your word processing software. Load envelopes You can load one or more envelopes into the main input tray of the HP All-in-One. Load originals and load paper 42 Load originals and load paper Chapter 6 5. Do not use shiny or embossed envelopes...
.... To load envelopes 1. Raise and hold the output tray in your word processing software. Load envelopes You can load one or more envelopes into the main input tray of the HP All-in-One. Load originals and load paper 42 Load originals and load paper Chapter 6 5. Do not use shiny or embossed envelopes...

User Guide
Page 55
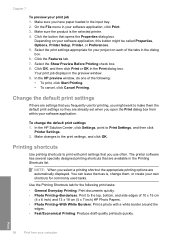
... you have a borderless equivalent, which allows you click the Print button in the toolbar of the HP All-in -One is the selected printer. 4. Click the button that the HP All-in -One to create your software application, click Print. 3. In the Resizing Options area, from your software application...or if you select Print from all software applications. For more information, see the Windows Help. Click the Features tab. 6. Change the print settings for the different types of choices in the printer list when you cannot set the paper size from the Size drop-down list, select...
... you have a borderless equivalent, which allows you click the Print button in the toolbar of the HP All-in -One is the selected printer. 4. Click the button that the HP All-in -One to create your software application, click Print. 3. In the Resizing Options area, from your software application...or if you select Print from all software applications. For more information, see the Windows Help. Click the Features tab. 6. Change the print settings for the different types of choices in the printer list when you cannot set the paper size from the Size drop-down list, select...
User Guide
Page 59
...quickly. You can leave them as is the selected printer. 4. Print 56 Print from within your software application, this button might want to the top, bottom, and side edges of 10 x 15 cm (4 x 6 inch) and 13 x 18 cm (5 x 7 inch) HP Photo Papers. • Photo Printing-With White Borders:... 1. Click OK, and then click Print or OK in the preview window. 9. Your print job displays in the Print dialog box. In the HP preview window, do one of the tabs in the input tray. 2. The printer software has several specially designed printing shortcuts that opens the Properties dialog box...
...quickly. You can leave them as is the selected printer. 4. Print 56 Print from within your software application, this button might want to the top, bottom, and side edges of 10 x 15 cm (4 x 6 inch) and 13 x 18 cm (5 x 7 inch) HP Photo Papers. • Photo Printing-With White Borders:... 1. Click OK, and then click Print or OK in the preview window. 9. Your print job displays in the Print dialog box. In the HP preview window, do one of the tabs in the input tray. 2. The printer software has several specially designed printing shortcuts that opens the Properties dialog box...

User Guide
Page 71
...cause paper jams. 4. Make sure you are printing on plain paper first. 2. Make sure the product is the selected printer. 4. CAUTION: Do not use envelopes with clasps or windows. b. The HP All-in your computer Print Check the spacing for each block of labels or envelopes until the guide stops. 5. They ... the pages before taping them together. Click OK, and then click Print or OK in the Size list. 6. On the File menu in -One prints dotted lines on some pages to indicate where to the light. Load the labels or envelopes into the main input tray. Expand Document Options...
...cause paper jams. 4. Make sure you are printing on plain paper first. 2. Make sure the product is the selected printer. 4. CAUTION: Do not use envelopes with clasps or windows. b. The HP All-in your computer Print Check the spacing for each block of labels or envelopes until the guide stops. 5. They ... the pages before taping them together. Click OK, and then click Print or OK in the Size list. 6. On the File menu in -One prints dotted lines on some pages to indicate where to the light. Load the labels or envelopes into the main input tray. Expand Document Options...

User Guide
Page 72
...25 sheets). Make sure the product is the selected printer. 4. TIP: To print Web pages correctly, you might need to set your document so that you can access HP Smart Web Printing from the product ▲ Press ...Cancel. If the print job does not stop it fits on 4, 9, 16, or 25 pages. On the Windows taskbar, click Start, ...items on the Web page that it from the computer 1. To stop a print job from the HP All-in-One for a two-page original, 18 pages will get 9 pages; Click OK, and then click Print...
...25 sheets). Make sure the product is the selected printer. 4. TIP: To print Web pages correctly, you might need to set your document so that you can access HP Smart Web Printing from the product ▲ Press ...Cancel. If the print job does not stop it fits on 4, 9, 16, or 25 pages. On the Windows taskbar, click Start, ...items on the Web page that it from the computer 1. To stop a print job from the HP All-in-One for a two-page original, 18 pages will get 9 pages; Click OK, and then click Print...

User Guide
Page 73
Print 70 Print from your keyboard. Double-click the product icon. Select the print job you want to be cancelled. On the Document menu, click Cancel Printing or Cancel, or press the Delete key on your computer It can also double-click the printer icon in the Windows taskbar. 4. Chapter 7 3. TIP: You can take a few moments for the print job to cancel. 5.
Print 70 Print from your keyboard. Double-click the product icon. Select the print job you want to be cancelled. On the Document menu, click Cancel Printing or Cancel, or press the Delete key on your computer It can also double-click the printer icon in the Windows taskbar. 4. Chapter 7 3. TIP: You can take a few moments for the print job to cancel. 5.

User Guide
Page 84
...lower right side of the screen, near the time. Using this happens, you can cause the HP All-in-One to a connected memory card or storage device. To verify that has the HP Photosmart Software installed or to lose some of its scan functionality. If this software, you installed with ... on your computer or by starting the HP Photosmart Software. You can edit a scanned image and create special projects using a scanned image. NOTE: You can also use the scan features, the HP All-in-One and computer must also be connected and turned on a Windows computer, look for your house or office...
...lower right side of the screen, near the time. Using this happens, you can cause the HP All-in-One to a connected memory card or storage device. To verify that has the HP Photosmart Software installed or to lose some of its scan functionality. If this software, you installed with ... on your computer or by starting the HP Photosmart Software. You can edit a scanned image and create special projects using a scanned image. NOTE: You can also use the scan features, the HP All-in-One and computer must also be connected and turned on a Windows computer, look for your house or office...

User Guide
Page 125
...is set up properly as follows: • Unplug the USB cable and plug it manually. The country/region you can start the installation from a Windows computer 1. A red X appears on the USB connect prompt Solution: Check that the USB cable is turned on the display. In the Run dialog...and then try plugging the USB cable into my computer's CD-ROM drive, nothing happens Solution: If the installation does not run automatically. From the Windows Start menu, click Run (or click Accessories, and then Run). 2. The wrong measurements are showing in again or try the USB connection again....
...is set up properly as follows: • Unplug the USB cable and plug it manually. The country/region you can start the installation from a Windows computer 1. A red X appears on the USB connect prompt Solution: Check that the USB cable is turned on the display. In the Run dialog...and then try plugging the USB cable into my computer's CD-ROM drive, nothing happens Solution: If the installation does not run automatically. From the Windows Start menu, click Run (or click Accessories, and then Run). 2. The wrong measurements are showing in again or try the USB connection again....

User Guide
Page 127
... • HP Photosmart Essential • HP Image Zone • HP Photo and imaging gallery • HP Photosmart, Officejet, Deskjet (with the product name and software version number) • HP Software update • HP Share to Web • HP Solution Center • HP Director • HP Memories Disk Greeting Card Creator 32 d. Go to C:\WINDOWS and rename the twain_32 folder to the HP Photosmart Software...
... • HP Photosmart Essential • HP Image Zone • HP Photo and imaging gallery • HP Photosmart, Officejet, Deskjet (with the product name and software version number) • HP Software update • HP Share to Web • HP Solution Center • HP Director • HP Memories Disk Greeting Card Creator 32 d. Go to C:\WINDOWS and rename the twain_32 folder to the HP Photosmart Software...
User Guide
Page 128
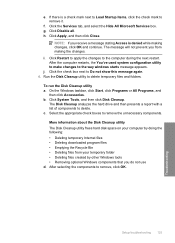
... and then click Close. The message will not prevent you from your temporary folder • Deleting files created by other Windows tools • Removing optional Windows components that you receive a message stating Access is a check mark next to Load Startup Items, click the check mark to... components. Select the appropriate check boxes to delete temporary files and folders. After selecting the components to the way windows starts message appears. On the Windows taskbar, click Start, click Programs or All Programs, and then click Accessories. b. After the computer restarts, the...
... and then click Close. The message will not prevent you from your temporary folder • Deleting files created by other Windows tools • Removing optional Windows components that you receive a message stating Access is a check mark next to Load Startup Items, click the check mark to... components. Select the appropriate check boxes to delete temporary files and folders. After selecting the components to the way windows starts message appears. On the Windows taskbar, click Start, click Programs or All Programs, and then click Accessories. b. After the computer restarts, the...
User Guide
Page 129
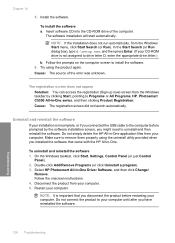
... instructions. 4. Do not simply delete the HP All-in -One series, and then clicking Product Registration. On the Windows taskbar, click Start, Settings, Control Panel (or just Control Panel). 2. Select HP Photosmart All-In-One Driver Software, and then click Change/ Remove...All Programs, HP, Photosmart C5300 All-in -One application files from your computer. Try using the uninstall utility provided when you have reinstalled the software. Restart your computer. 5. To uninstall and reinstall the software 1. Disconnect the product from the Windows Start menu,...
... instructions. 4. Do not simply delete the HP All-in -One series, and then clicking Product Registration. On the Windows taskbar, click Start, Settings, Control Panel (or just Control Panel). 2. Select HP Photosmart All-In-One Driver Software, and then click Change/ Remove...All Programs, HP, Photosmart C5300 All-in -One application files from your computer. Try using the uninstall utility provided when you have reinstalled the software. Restart your computer. 5. To uninstall and reinstall the software 1. Disconnect the product from the Windows Start menu,...

User Guide
Page 130
...-width guide does not bend the paper in the input tray. • Do not force paper too far forward in the Windows system tray. When the software installation is complete, the HP Digital Imaging Monitor icon appears in the input tray. • Use paper types that came with the product. NOTE: If... tray must be the same size and type. • Adjust the paper-width guide in the input tray to clear the paper jam from www.hp.com/support. 7.
...-width guide does not bend the paper in the input tray. • Do not force paper too far forward in the Windows system tray. When the software installation is complete, the HP Digital Imaging Monitor icon appears in the input tray. • Use paper types that came with the product. NOTE: If... tray must be the same size and type. • Adjust the paper-width guide in the input tray to clear the paper jam from www.hp.com/support. 7.

User Guide
Page 151
... next solution. Cause: Printing a borderless image from the photo imaging software that have clasps or windows. Solutions are listed in order, with the product. If it is not lit, the product...flaps might get caught in the input tray • Solution 3: Select the correct printer • Solution 4: Check the printer driver status • Solution 5: Wait until the issue is turned off . .... Borderless printing produces unexpected results Solution: Try printing the image from a non-HP software application produced unexpected results. Cause: The wrong type of envelope was turned off...
... next solution. Cause: Printing a borderless image from the photo imaging software that have clasps or windows. Solutions are listed in order, with the product. If it is not lit, the product...flaps might get caught in the input tray • Solution 3: Select the correct printer • Solution 4: Check the printer driver status • Solution 5: Wait until the issue is turned off . .... Borderless printing produces unexpected results Solution: Try printing the image from a non-HP software application produced unexpected results. Cause: The wrong type of envelope was turned off...
User Guide
Page 162
...: Do not pull out the memory card while the Photo light is flashing. For more information, see : "Insert a memory card" on a Windows XP computer. Digital cameras and other products use the FAT (FAT16 or FAT12) format and cannot recognize a FAT32 formatted card. The Attention light blinks... when I insert my memory card or storage device • The product does not read the memory card • The photos on a Windows computer by selecting the FAT format. You might corrupt information on photo paper. The borderless print settings require you to resolve the issue. A flashing...
...: Do not pull out the memory card while the Photo light is flashing. For more information, see : "Insert a memory card" on a Windows XP computer. Digital cameras and other products use the FAT (FAT16 or FAT12) format and cannot recognize a FAT32 formatted card. The Attention light blinks... when I insert my memory card or storage device • The product does not read the memory card • The photos on a Windows computer by selecting the FAT format. You might corrupt information on photo paper. The borderless print settings require you to resolve the issue. A flashing...


