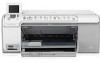
Basics Guide
Page 3
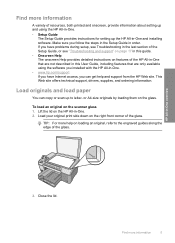
...Find more information...5 Load originals and load paper...5 Avoid paper jams...7 Print directly onto a CD/DVD...8 View, select, and print photos...9 Scan an image...11 Make a copy...11 Replace the print cartridges...12 Clean the HP All-in-One...15 2 Troubleshooting and support Uninstall and reinstall... the software 17 Hardware setup troubleshooting 17 Clear paper jams...20 CD/DVD print troubleshooting 20 Print cartridge troubleshooting 23 Support process...
...Find more information...5 Load originals and load paper...5 Avoid paper jams...7 Print directly onto a CD/DVD...8 View, select, and print photos...9 Scan an image...11 Make a copy...11 Replace the print cartridges...12 Clean the HP All-in-One...15 2 Troubleshooting and support Uninstall and reinstall... the software 17 Hardware setup troubleshooting 17 Clear paper jams...20 CD/DVD print troubleshooting 20 Print cartridge troubleshooting 23 Support process...
Basics Guide
Page 4
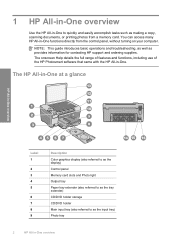
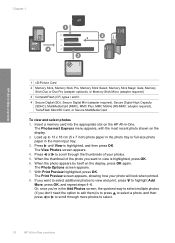
You can access many HP All-in -One overview The HP All-in-One at a glance HP All-in-One overview Label 1 2 3 4 5 6 7 8 9 Description Color graphics display (also referred to as the display) Control panel Memory card slots and Photo light Output tray Paper tray extender (also referred to as the... The onscreen Help details the full range of features and functions, including use of the HP Photosmart software that came with the HP All-in -One to as provides information for contacting HP support and ordering supplies. NOTE: This guide introduces basic operations and troubleshooting, as well ...
You can access many HP All-in -One overview The HP All-in-One at a glance HP All-in-One overview Label 1 2 3 4 5 6 7 8 9 Description Color graphics display (also referred to as the display) Control panel Memory card slots and Photo light Output tray Paper tray extender (also referred to as the... The onscreen Help details the full range of features and functions, including use of the HP Photosmart software that came with the HP All-in -One to as provides information for contacting HP support and ordering supplies. NOTE: This guide introduces basic operations and troubleshooting, as well ...
Basics Guide
Page 6
... on the display. Directional pad: Allows you can select copy options, such as number of copies, paper size, and paper type. By default, this button when a photo is turned on, the HP All-in-One automatically corrects red eye coloring in to print. When the feature is shown on the glass. Start... Copy Black: Starts a black-and-white copy. When the HP All-in -One off , a minimal amount of an ...
... on the display. Directional pad: Allows you can select copy options, such as number of copies, paper size, and paper type. By default, this button when a photo is turned on, the HP All-in-One automatically corrects red eye coloring in to print. When the feature is shown on the glass. Start... Copy Black: Starts a black-and-white copy. When the HP All-in -One off , a minimal amount of an ...
Basics Guide
Page 7
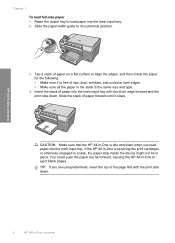
Load originals and load paper You can get help on the HP All-in -One overview 3. Load your original print side down on the glass. HP All-in -One. 2. Close the lid. This Web site offers technical support, drivers, supplies, and ordering information. or A4-size originals by loading them on ... information A variety of resources, both printed and onscreen, provide information about setting up and using the software you installed with the HP All-in-One. • www.hp.com/support If you have Internet access, you follow the steps in the Setup Guide in order. Make sure you can copy ...
Load originals and load paper You can get help on the HP All-in -One overview 3. Load your original print side down on the glass. HP All-in -One. 2. Close the lid. This Web site offers technical support, drivers, supplies, and ordering information. or A4-size originals by loading them on ... information A variety of resources, both printed and onscreen, provide information about setting up and using the software you installed with the HP All-in-One. • www.hp.com/support If you have Internet access, you follow the steps in the Setup Guide in order. Make sure you can copy ...
Basics Guide
Page 8
... edge forward and the print side down . 6 HP All-in place. If the HP All-in-One is servicing the print cartridges or otherwise engaged in a task, the paper stop inside the device might not be in -One overview TIP: If you load paper into the main input tray. 2. HP All-in the stack is the same... the main input tray with the print side down . Insert the stack of paper on a flat surface to load paper into the main input tray. You could push the paper too far forward, causing the HP All-in -One is idle and silent when you are using letterhead, insert the top of rips, dust, wrinkles...
... edge forward and the print side down . 6 HP All-in place. If the HP All-in-One is servicing the print cartridges or otherwise engaged in a task, the paper stop inside the device might not be in -One overview TIP: If you load paper into the main input tray. 2. HP All-in the stack is the same... the main input tray with the print side down . Insert the stack of paper on a flat surface to load paper into the main input tray. You could push the paper too far forward, causing the HP All-in -One is idle and silent when you are using letterhead, insert the top of rips, dust, wrinkles...
Basics Guide
Page 9
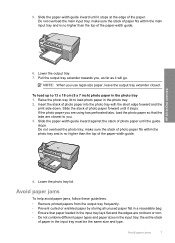
...photo tray and is no higher than the top of paper in the input tray; Avoid paper jams 7 HP All-in the photo tray. 2. Lower the output tray. 7. Raise the photo tray lid to load photo paper in -One overview 6. If the photo paper you , as far as it stops at the edge... of photo paper until the guide stops. Avoid paper jams To help avoid paper jams, ...
...photo tray and is no higher than the top of paper in the input tray; Avoid paper jams 7 HP All-in the photo tray. 2. Lower the output tray. 7. Raise the photo tray lid to load photo paper in -One overview 6. If the photo paper you , as far as it stops at the edge... of photo paper until the guide stops. Avoid paper jams To help avoid paper jams, ...
Basics Guide
Page 10
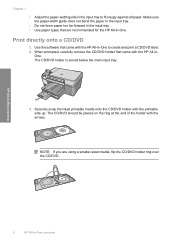
... far forward in the input tray. • Use paper types that came with the HP All-in-One to fit snugly against all paper. When prompted, carefully remove the CD/DVD holder that came with the HP All-in- HP All-in-One overview 8 HP All-in-One overview Use the software that are using a smaller-sized ... holder is stored below the main input tray. 3. NOTE: If you are recommended for the HP All-in-One. Securely snap the inkjet printable media onto the CD/DVD holder with the arrows. Chapter 1 • Adjust the paper-width guide in the input tray to create and print a CD/DVD label. 2.
... far forward in the input tray. • Use paper types that came with the HP All-in-One to fit snugly against all paper. When prompted, carefully remove the CD/DVD holder that came with the HP All-in- HP All-in-One overview 8 HP All-in-One overview Use the software that are using a smaller-sized ... holder is stored below the main input tray. 3. NOTE: If you are recommended for the HP All-in-One. Securely snap the inkjet printable media onto the CD/DVD holder with the arrows. Chapter 1 • Adjust the paper-width guide in the input tray to create and print a CD/DVD label. 2.
Basics Guide
Page 12
...-in -One. adapter required), TransFlash MicroSD Card, or Secure MultiMedia Card To view and select photos 1. When the photo appears by itself on the display. 2. The Print Preview screen appears, showing how your photos. 5. The Photosmart Express menu appears, with the most recent photo shown on ... full-size photo paper in -One overview Press until View is highlighted, press OK. 6. The Photo Options screen appears. 7. Press or to scroll through more photos to view is highlighted, and then press OK. Insert a memory card into the appropriate slot on the HP All-in -One overview 1 xD...
...-in -One. adapter required), TransFlash MicroSD Card, or Secure MultiMedia Card To view and select photos 1. When the photo appears by itself on the display. 2. The Print Preview screen appears, showing how your photos. 5. The Photosmart Express menu appears, with the most recent photo shown on ... full-size photo paper in -One overview Press until View is highlighted, press OK. 6. The Photo Options screen appears. 7. Press or to scroll through more photos to view is highlighted, and then press OK. Insert a memory card into the appropriate slot on the HP All-in -One overview 1 xD...
Basics Guide
Page 14
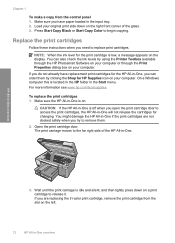
...Chapter 1 To make a copy from the slot on your computer. For more information see www.hp.com/buy/supplies. CAUTION: If the HP All-in-One is off when you do not already have paper loaded in -One will not release the cartridges for the print cartridge is idle and silent, and then lightly... to the far right side of the glass. 3. You can order them . 2. Make sure the HP All-in -One, you are not docked safely when you need to remove them by using the Printer Toolbox available through the HP Photosmart Software on your computer. Make sure you have replacement print cartridges for...
...Chapter 1 To make a copy from the slot on your computer. For more information see www.hp.com/buy/supplies. CAUTION: If the HP All-in-One is off when you do not already have paper loaded in -One will not release the cartridges for the print cartridge is idle and silent, and then lightly... to the far right side of the glass. 3. You can order them . 2. Make sure the HP All-in -One, you are not docked safely when you need to remove them by using the Printer Toolbox available through the HP Photosmart Software on your computer. Make sure you have replacement print cartridges for...
Basics Guide
Page 16
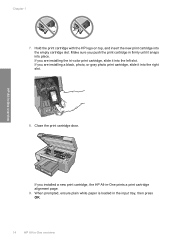
When prompted, ensure plain white paper is loaded in the input tray, then press OK. 14 HP All-in -One prints a print cartridge alignment page. 9. Chapter 1 7. Hold the print cartridge with the HP logo on top, and insert the new print cartridge into place. Close the print cartridge door. Make sure ...color print cartridge, slide it into the right slot. 8. If you push the print cartridge in firmly until it into the left slot. HP All-in-One overview If you are installing a black, photo, or gray photo print cartridge, slide it snaps into the empty cartridge slot. If you ...
When prompted, ensure plain white paper is loaded in the input tray, then press OK. 14 HP All-in -One prints a print cartridge alignment page. 9. Chapter 1 7. Hold the print cartridge with the HP logo on top, and insert the new print cartridge into place. Close the print cartridge door. Make sure ...color print cartridge, slide it into the right slot. 8. If you push the print cartridge in firmly until it into the left slot. HP All-in-One overview If you are installing a black, photo, or gray photo print cartridge, slide it snaps into the empty cartridge slot. If you ...
Basics Guide
Page 17
...paper loaded in -One. If the alignment fails again, you have a defective sensor or print cartridge. TIP: You can purchase an HP Cleaning Kit for technical support. 11. Dry the glass with a dry, soft, lint-free cloth to loosen debris. Plug in the power cord, and then turn on calling for Inkjet Printers... and All-in-Ones (Q6260A) that provides everything needed to dust the exterior of the HP All-in -One To ensure that your copies and scans remain clear, you align the print cartridges, the ...
...paper loaded in -One. If the alignment fails again, you have a defective sensor or print cartridge. TIP: You can purchase an HP Cleaning Kit for technical support. 11. Dry the glass with a dry, soft, lint-free cloth to loosen debris. Plug in the power cord, and then turn on calling for Inkjet Printers... and All-in-Ones (Q6260A) that provides everything needed to dust the exterior of the HP All-in -One To ensure that your copies and scans remain clear, you align the print cartridges, the ...
Basics Guide
Page 18
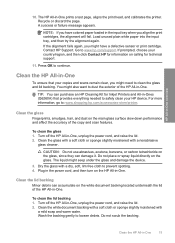
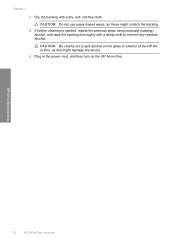
HP All-in-One overview 16 HP All-in -One. CAUTION: Be careful not to remove any residual alcohol. Chapter 1 3. CAUTION: Do not use paper-based wipes, as this might scratch the backing. 4. If further cleaning is needed, repeat the previous steps using isopropyl (rubbing) alcohol, and wipe the backing thoroughly with a dry, soft, lint-free cloth. Dry the backing with a damp cloth to spill alcohol on the HP All-in -One overview Plug in the power cord, and then turn on the glass or exterior of the HP Allin-One, as these might damage the device. 5.
HP All-in-One overview 16 HP All-in -One. CAUTION: Be careful not to remove any residual alcohol. Chapter 1 3. CAUTION: Do not use paper-based wipes, as this might scratch the backing. 4. If further cleaning is needed, repeat the previous steps using isopropyl (rubbing) alcohol, and wipe the backing thoroughly with a dry, soft, lint-free cloth. Dry the backing with a damp cloth to spill alcohol on the HP All-in -One overview Plug in the power cord, and then turn on the glass or exterior of the HP Allin-One, as these might damage the device. 5.
Basics Guide
Page 21
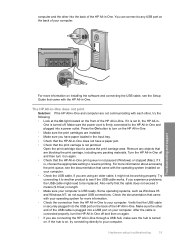
... connections. Remove any objects that the cable does not exceed 3 meters (9.8 feet) in -One. If you have paper loaded in the input tray. • Check that the HP All-in-One does not have a paper jam. • Check that the HP All-in -One. You can connect to see the Setup Guide that came with the... HP All-in -One off and then turn the HP All-in -One. Make sure the power cord is firmly connected ...
... connections. Remove any objects that the cable does not exceed 3 meters (9.8 feet) in -One. If you have paper loaded in the input tray. • Check that the HP All-in-One does not have a paper jam. • Check that the HP All-in -One. You can connect to see the Setup Guide that came with the... HP All-in -One off and then turn the HP All-in -One. Make sure the power cord is firmly connected ...
Basics Guide
Page 22
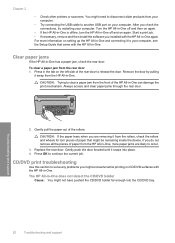
...to another USB port on again. Gently push the door forward until it away from the front of the rear door to clear a paper jam from the HP All-in -One. Troubleshooting and support 20 Troubleshooting and support Start a print job. • If necessary, remove and then install the software you do.... CD/DVD print troubleshooting Use this section to your computer, see the Setup Guide that might encounter while printing on setting up the HP All-in -One again. You might not have pushed the CD/DVD holder far enough into place. 4. Chapter 2 • Check other printers or scanners.
...to another USB port on again. Gently push the door forward until it away from the front of the rear door to clear a paper jam from the HP All-in -One. Troubleshooting and support 20 Troubleshooting and support Start a print job. • If necessary, remove and then install the software you do.... CD/DVD print troubleshooting Use this section to your computer, see the Setup Guide that might encounter while printing on setting up the HP All-in -One again. You might not have pushed the CD/DVD holder far enough into place. 4. Chapter 2 • Check other printers or scanners.
Basics Guide
Page 27
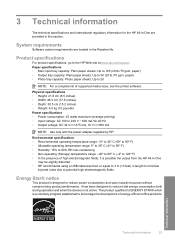
...of supported media sizes, see the printer software. paper) • Photo tray capacity: Photo paper sheets: Up to 20 NOTE: For a complete list of high electromagnetic fields, it is possible the output from the HP All-in-One may be slightly distorted • HP recommends using a USB cable less ... For product specifications, go to 50 (20 lb./75 gsm. paper) • Output tray capacity: Plain paper sheets: Up to the HP Web site at www.hp.com/support. This product qualifies for the HP All-in-One are located in this section. Technical information Technical information 25 Physical ...
...of supported media sizes, see the printer software. paper) • Photo tray capacity: Photo paper sheets: Up to 20 NOTE: For a complete list of high electromagnetic fields, it is possible the output from the HP All-in-One may be slightly distorted • HP recommends using a USB cable less ... For product specifications, go to 50 (20 lb./75 gsm. paper) • Output tray capacity: Plain paper sheets: Up to the HP Web site at www.hp.com/support. This product qualifies for the HP All-in-One are located in this section. Technical information Technical information 25 Physical ...


