User Guide
Page 89
... the clear plastic tape has been removed. Solve a problem Print Cartridge(s) Missing Print cartridges missing or not detected Try the following solutions to the center of the product. 3. Make sure you are using the pink pull tab. The print carriage moves to resolve the issue. If... it is turned on the right. Solutions are fully inserted and locked in order, with pink pull tab (must be removed before installing) 3 Ink nozzles under tape Errors...
... the clear plastic tape has been removed. Solve a problem Print Cartridge(s) Missing Print cartridges missing or not detected Try the following solutions to the center of the product. 3. Make sure you are using the pink pull tab. The print carriage moves to resolve the issue. If... it is turned on the right. Solutions are fully inserted and locked in order, with pink pull tab (must be removed before installing) 3 Ink nozzles under tape Errors...
User Guide
Page 93
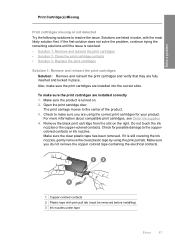
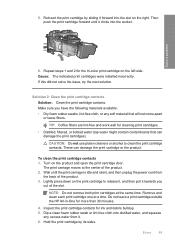
...reinsert the print cartridges and verify that they are fully inserted and locked in wrong slot Solution: Make sure the print cartridges are installed into the correct slots. Do not touch ...nozzles, gently remove the clear plastic tape by using the correct print cartridges for possible damage to the center of the product. 3. Open the print cartridge door. Print cartridges in place. Check to make ... pull tab (must be removed before installing) 3 Ink nozzles under tape Errors 91 If it is turned on the right. The print carriage moves to the coppercolored contacts or ink nozzles...
...reinsert the print cartridges and verify that they are fully inserted and locked in wrong slot Solution: Make sure the print cartridges are installed into the correct slots. Do not touch ...nozzles, gently remove the clear plastic tape by using the correct print cartridges for possible damage to the center of the product. 3. Open the print cartridge door. Print cartridges in place. Check to make ... pull tab (must be removed before installing) 3 Ink nozzles under tape Errors 91 If it is turned on the right. The print carriage moves to the coppercolored contacts or ink nozzles...
User Guide
Page 97
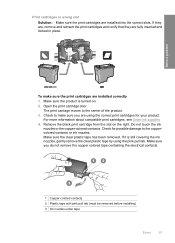
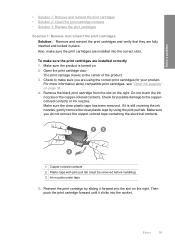
... If this did not solve the issue, try the next solution. To clean the print cartridge contacts 1. Lightly press down on the print cartridge to release it, and then pull it . Do not leave a print cartridge outside the HP All-in-One for the tri-color print cartridge on the print carridge(s)... Solution: Clean the print cartridge contacts on the left side. Errors 95 Reinsert the print cartridge by sliding it clicks into the slot on the product and open the print cartridge door. Make sure you out of the product. 3. CAUTION: Do not use platen cleaners or alcohol to the center ...
... If this did not solve the issue, try the next solution. To clean the print cartridge contacts 1. Lightly press down on the print cartridge to release it, and then pull it . Do not leave a print cartridge outside the HP All-in-One for the tri-color print cartridge on the print carridge(s)... Solution: Clean the print cartridge contacts on the left side. Errors 95 Reinsert the print cartridge by sliding it clicks into the slot on the product and open the print cartridge door. Make sure you out of the product. 3. CAUTION: Do not use platen cleaners or alcohol to the center ...
Windows Help
Page 92
...a print cartridge outside the HP All-in-One for the tri-color print cartridge on the print cartridge to release it, and then pull it forward into the slot on the product and open the print cartridge door. Errors 89 Solution 2: Clean the print cartridge contacts Solution: Clean the print cartridge contacts...water (tap water might contain contaminants that will not come apart or leave fibers. CAUTION: Do not use platen cleaners or alcohol to the center of the product. 2. The print carriage moves to clean the print cartridge contacts. Dip a clean foam rubber swab or lint-free cloth...
...a print cartridge outside the HP All-in-One for the tri-color print cartridge on the print cartridge to release it, and then pull it forward into the slot on the product and open the print cartridge door. Errors 89 Solution 2: Clean the print cartridge contacts Solution: Clean the print cartridge contacts...water (tap water might contain contaminants that will not come apart or leave fibers. CAUTION: Do not use platen cleaners or alcohol to the center of the product. 2. The print carriage moves to clean the print cartridge contacts. Dip a clean foam rubber swab or lint-free cloth...

Windows Help
Page 96
If the message does not indicate which cartridge is causing the problem, follow these steps to the center of compatible print cartridges, see the printed documentation that came with the first solution. Errors 93 Reinsert the print cartridge by sliding it clicks into the slot on the left side. Repeat... . 2. After you are installed in the wrong slots and you cannot remove them from the product, contact HP support for your country/region, and then click Contact HP for technical support. The print carriage moves to determine which cartridge is causing the problem. Check to : www...
If the message does not indicate which cartridge is causing the problem, follow these steps to the center of compatible print cartridges, see the printed documentation that came with the first solution. Errors 93 Reinsert the print cartridge by sliding it clicks into the slot on the left side. Repeat... . 2. After you are installed in the wrong slots and you cannot remove them from the product, contact HP support for your country/region, and then click Contact HP for technical support. The print carriage moves to determine which cartridge is causing the problem. Check to : www...
Windows Help
Page 98
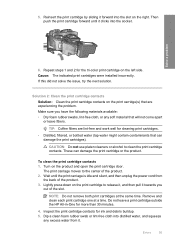
... you are installed into the socket. Errors 95 Solve a problem • Solution 1: Remove and reinsert the print cartridges • Solution 2: Clean the print cartridge contacts • Solution 3: Replace the print cartridges Solution 1: Remove and reinsert the print cartridges Solution: Remove and reinsert the print cartridges ... plastic tape has been removed. Reinsert the print cartridge by using the correct print cartridges for possible damage to the center of the product. 3. The print carriage moves to the coppercolored contacts or ink nozzles. Do not touch the ink...
... you are installed into the socket. Errors 95 Solve a problem • Solution 1: Remove and reinsert the print cartridges • Solution 2: Clean the print cartridge contacts • Solution 3: Replace the print cartridges Solution 1: Remove and reinsert the print cartridges Solution: Remove and reinsert the print cartridges ... plastic tape has been removed. Reinsert the print cartridge by using the correct print cartridges for possible damage to the center of the product. 3. The print carriage moves to the coppercolored contacts or ink nozzles. Do not touch the ink...


