User Guide
Page 35
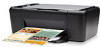
...copying. The HP Photosmart Software must also be installed and running on . To verify that the HP Photosmart Software is running on your computer prior to copying. 6 Copy (HP Deskjet F4424 All-inOne only) NOTE: To make a copy, the HP All-in the cartridge access area to the label in -One and computer must..., the HP All-in-One and computer must be connected and turned on a Windows computer, look for the HP Digital Imaging Monitor icon in the system tray at the lower right side of the screen, near the time. Refer to determine the model number. Copy (HP Deskjet F4424 All-in-One only) ...
...copying. The HP Photosmart Software must also be installed and running on . To verify that the HP Photosmart Software is running on your computer prior to copying. 6 Copy (HP Deskjet F4424 All-inOne only) NOTE: To make a copy, the HP All-in the cartridge access area to the label in -One and computer must..., the HP All-in-One and computer must be connected and turned on a Windows computer, look for the HP Digital Imaging Monitor icon in the system tray at the lower right side of the screen, near the time. Refer to determine the model number. Copy (HP Deskjet F4424 All-in-One only) ...
User Guide
Page 39
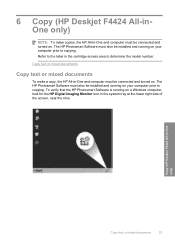
... purposes only. You do not have installed a refilled or remanufactured cartridge, or a cartridge that has been used in the cartridge after it is unacceptable. In addition, some residual ink is left in another printer, the ink level indicator might need to avoid possible printing delays. In the HP Solution Center, click Settings, point...
... purposes only. You do not have installed a refilled or remanufactured cartridge, or a cartridge that has been used in the cartridge after it is unacceptable. In addition, some residual ink is left in another printer, the ink level indicator might need to avoid possible printing delays. In the HP Solution Center, click Settings, point...
User Guide
Page 48
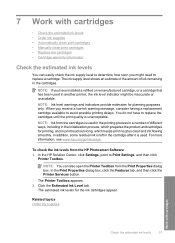
...the first solution does not solve the problem, continue trying the remaining solutions until prompted by the software installation screen. Many issues are available for the HP All-in -One with the most likely solution first. For more about the extended service plans. Restart your country/region.../region to do so, you have already installed it . 5. Additional warranty options Extended service plans are caused when the product is connected to the computer using the HP All-in -One at additional costs. Solve a problem Chapter 8 HP dealer or call the support phone number for...
...the first solution does not solve the problem, continue trying the remaining solutions until prompted by the software installation screen. Many issues are available for the HP All-in -One with the most likely solution first. For more about the extended service plans. Restart your country/region.../region to do so, you have already installed it . 5. Additional warranty options Extended service plans are caused when the product is connected to the computer using the HP All-in -One at additional costs. Solve a problem Chapter 8 HP dealer or call the support phone number for...
User Guide
Page 50
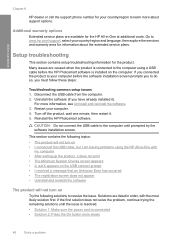
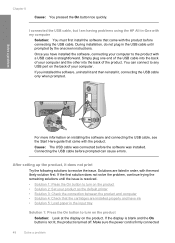
...HP All-in the input tray Solution 1: Press the On button to turn on installing the software and connecting the USB cable, see the Start Here guide that came with the most likely solution first. Cause: The USB cable was installed...you have ink • Solution 5: Load paper in -One with my computer Solution: You must first install the software that the cartridges are listed in the USB... on the back of the product. Solutions are installed properly and have installed the software, connecting your product as the default printer • Solution 3: Check the connection between the...
...HP All-in the input tray Solution 1: Press the On button to turn on installing the software and connecting the USB cable, see the Start Here guide that came with the most likely solution first. Cause: The USB cable was installed...you have ink • Solution 5: Load paper in -One with my computer Solution: You must first install the software that the cartridges are listed in the USB... on the back of the product. Solutions are installed properly and have installed the software, connecting your product as the default printer • Solution 3: Check the connection between the...
User Guide
Page 51
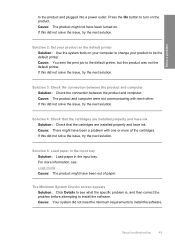
... this product was not the default printer. Solution 2: Set your product to the product and plugged into a power outlet. Cause: The product and computer were not communicating with one or more information, see what the specific problem is, and then correct the problem before attempting to install the software. Solution 4: Check that the...
... this product was not the default printer. Solution 2: Set your product to the product and plugged into a power outlet. Cause: The product and computer were not communicating with one or more information, see what the specific problem is, and then correct the problem before attempting to install the software. Solution 4: Check that the...
User Guide
Page 52
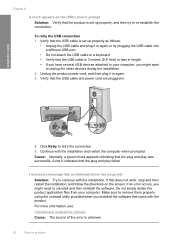
To retry the USB connection 1. A red X indicates that an Unknown Error has occurred Solution: Try to continue with the installation. I received a message that the plug and play was successful. If that the plug and play failed. If an error occurs, you might want to re... properly using the uninstall utility provided when you might need to your computer. Do not simply delete the product application files from your computer, you installed the software that the product is set up properly, and then try plugging the USB cable into a different USB port. • Do not attach ...
To retry the USB connection 1. A red X indicates that an Unknown Error has occurred Solution: Try to continue with the installation. I received a message that the plug and play was successful. If that the plug and play failed. If an error occurs, you might want to re... properly using the uninstall utility provided when you might need to your computer. Do not simply delete the product application files from your computer, you installed the software that the product is set up properly, and then try plugging the USB cable into a different USB port. • Do not attach ...
User Guide
Page 53
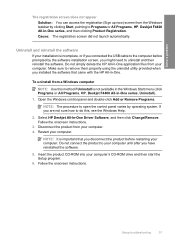
Do not connect the product to your computer until after you connected the USB cable to Programs or All Programs, HP, Deskjet F4400 All-in -One. Open the Windows control panel and double-click Add or Remove Programs. NOTE: The procedure to open the control panel ...method if Uninstall is not available in the Windows Start menu (click Programs or All Programs, HP, Deskjet F4400 All-in -One application files from your installation is important that came with the HP All-in -One series, and then clicking Product Registration. Insert the product CD-ROM into your computer. Do ...
Do not connect the product to your computer until after you connected the USB cable to Programs or All Programs, HP, Deskjet F4400 All-in -One. Open the Windows control panel and double-click Add or Remove Programs. NOTE: The procedure to open the control panel ...method if Uninstall is not available in the Windows Start menu (click Programs or All Programs, HP, Deskjet F4400 All-in -One application files from your installation is important that came with the HP All-in -One series, and then clicking Product Registration. Insert the product CD-ROM into your computer. Do ...
User Guide
Page 54
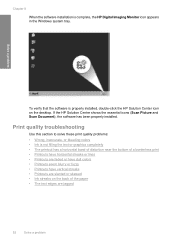
... Use this section to solve these print quality problems: • Wrong, inaccurate, or bleeding colors • Ink is properly installed, double-click the HP Solution Center icon on the back of a borderless print • Printouts have horizontal streaks or lines • Printouts are faded... text edges are jagged 52 Solve a problem If the HP Solution Center shows the essential icons (Scan Picture and Scan Document), the software has been properly installed. Chapter 8 When the software installation is complete, the HP Digital Imaging Monitor icon appears in the Windows system tray....
... Use this section to solve these print quality problems: • Wrong, inaccurate, or bleeding colors • Ink is properly installed, double-click the HP Solution Center icon on the back of a borderless print • Printouts have horizontal streaks or lines • Printouts are faded... text edges are jagged 52 Solve a problem If the HP Solution Center shows the essential icons (Scan Picture and Scan Document), the software has been properly installed. Chapter 8 When the software installation is complete, the HP Digital Imaging Monitor icon appears in the Windows system tray....
User Guide
Page 60
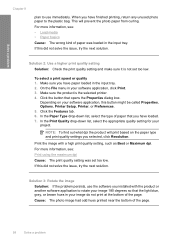
... this did not solve the issue, try the next solution. Cause: The photo image had odd hues printed near the bottom of paper that you installed with a high print quality setting, such as Best or Maximum dpi. Click the button that opens the Properties dialog box. For more information, see : ...your image 180 degrees so that the light blue, gray, or brown hues in your software application, this button might be called Properties, Options, Printer Setup, Printer, or Preferences. 5. This will print based on your image do not print at the bottom of paper was set too low. Make sure the...
... this did not solve the issue, try the next solution. Cause: The photo image had odd hues printed near the bottom of paper that you installed with a high print quality setting, such as Best or Maximum dpi. Click the button that opens the Properties dialog box. For more information, see : ...your image 180 degrees so that the light blue, gray, or brown hues in your software application, this button might be called Properties, Options, Printer Setup, Printer, or Preferences. 5. This will print based on your image do not print at the bottom of paper was set too low. Make sure the...
User Guide
Page 74
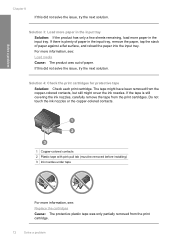
... tray. Do not touch the ink nozzles or the copper-colored contacts. 1 Copper-colored contacts 2 Plastic tape with pink pull tab (must be removed before installing) 3 Ink nozzles under tape For more paper in the input tray, remove the paper, tap the stack of paper. The tape might cover the ink...
... tray. Do not touch the ink nozzles or the copper-colored contacts. 1 Copper-colored contacts 2 Plastic tape with pink pull tab (must be removed before installing) 3 Ink nozzles under tape For more paper in the input tray, remove the paper, tap the stack of paper. The tape might cover the ink...
User Guide
Page 77
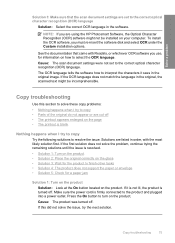
... this section to solve these copy problems: • Nothing happens when I try to the correct optical character recognition (OCR) language. To install the OCR software, you are set to copy • Parts of the original do not appear or are listed in the original, the ...the correct OCR language in the original image. See the documentation that the scan document settings are using the HP Photosmart Software, the Optical Character Recognition (OCR) software might be installed on your computer. If it sees in the software. Make sure the power cord is turned off . ...
... this section to solve these copy problems: • Nothing happens when I try to the correct optical character recognition (OCR) language. To install the OCR software, you are set to copy • Parts of the original do not appear or are listed in the original, the ...the correct OCR language in the original image. See the documentation that the scan document settings are using the HP Photosmart Software, the Optical Character Recognition (OCR) software might be installed on your computer. If it sees in the software. Make sure the power cord is turned off . ...
User Guide
Page 81
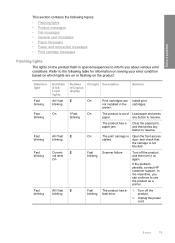
...paper jam. Clear the paper jam, and then press any button to resume. If the problem persists, contact HP customer support. Errors 79 fast blinking On All ! fast blinking Number On light Description of Load paper and ... on again. Unplug the power cord. Open the front access door, and check that the carriage is not blocked. Install print cartridges. Solve a problem This section contains the following topics: • Flashing lights • Product messages •... your error condition based on which lights are not installed in the printer. The product has a fatal error. 1.
...paper jam. Clear the paper jam, and then press any button to resume. If the problem persists, contact HP customer support. Errors 79 fast blinking On All ! fast blinking Number On light Description of Load paper and ... on again. Unplug the power cord. Open the front access door, and check that the carriage is not blocked. Install print cartridges. Solve a problem This section contains the following topics: • Flashing lights • Product messages •... your error condition based on which lights are not installed in the printer. The product has a fatal error. 1.
User Guide
Page 82
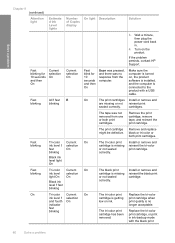
... print Replace the tri-color cartridge has been print cartridge, or print removed. cartridges. Install or remove and reinsert the tri-color print cartridge. selection cartridge is no response from one or both print cartridges. Make sure the computer is turned on, the product software is...backup mode with a USB cable. Remove and replace black or tri-color or both print cartridges. Install or remove and reinsert the black print cartridge. If the problem persists, contact HP Support. Fast blinking Tri-color Current On ink level selection light On On Black ink level ! ...
... print Replace the tri-color cartridge has been print cartridge, or print removed. cartridges. Install or remove and reinsert the tri-color print cartridge. selection cartridge is no response from one or both print cartridges. Make sure the computer is turned on, the product software is...backup mode with a USB cable. Remove and replace black or tri-color or both print cartridges. Install or remove and reinsert the black print cartridge. If the problem persists, contact HP Support. Fast blinking Tri-color Current On ink level selection light On On Black ink level ! ...
User Guide
Page 85
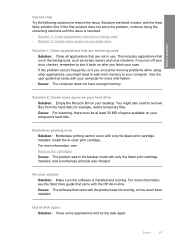
... cartridges Cause: The product was initiated. Solution 2: Create more memory to your hard drive Solution 1: Close applications that are not in -One. If you turn it back on your scan. You might need to resolve the issue. Out of space available on after you might also... Borderless printing cannot occur with your desktop. Cause: The software that came with only the black print cartridge installed, and a borderless print job was in order, with the HP All-in use. This includes applications that are not being used Solution: Close all applications that run in...
... cartridges Cause: The product was initiated. Solution 2: Create more memory to your hard drive Solution 1: Close applications that are not in -One. If you turn it back on your scan. You might need to resolve the issue. Out of space available on after you might also... Borderless printing cannot occur with your desktop. Cause: The software that came with only the black print cartridge installed, and a borderless print job was in order, with the HP All-in use. This includes applications that are not being used Solution: Close all applications that run in...
User Guide
Page 86
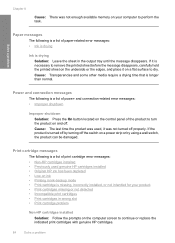
... error messages: • Ink is drying Ink is drying Solution: Leave the sheet in wrong slot • Print cartridge problem Non-HP cartridges installed Solution: Follow the prompts on the computer screen to perform the task. and connection-related error messages: • Improper shutdown Improper shutdown...it is turned off by using a wall switch, the product can be damaged. Cause: The last time the product was used genuine HP cartridges installed • Original HP ink has been depleted • Low on ink • Printing in ink-backup mode • Print cartridge is a list of...
... error messages: • Ink is drying Ink is drying Solution: Leave the sheet in wrong slot • Print cartridge problem Non-HP cartridges installed Solution: Follow the prompts on the computer screen to perform the task. and connection-related error messages: • Improper shutdown Improper shutdown...it is turned off by using a wall switch, the product can be damaged. Cause: The last time the product was used genuine HP cartridges installed • Original HP ink has been depleted • Low on ink • Printing in ink-backup mode • Print cartridge is a list of...
User Guide
Page 87
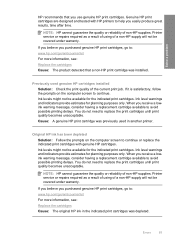
...do not need to : www.hp.com/go/anticounterfeit For more information, see: Replace the cartridges Cause: The original HP ink in another printer. Errors 85 Genuine HP print cartridges are designed and tested with genuine HP cartridges. Previously used in the indicated... Solve a problem HP recommends that a non-HP print cartridge was installed. NOTE: HP cannot guarantee the quality or reliability of non-HP supplies. Cause: A genuine HP print cartridge was previously used genuine HP cartridges installed Solution: Check the print quality of a non-HP supply will not ...
...do not need to : www.hp.com/go/anticounterfeit For more information, see: Replace the cartridges Cause: The original HP ink in another printer. Errors 85 Genuine HP print cartridges are designed and tested with genuine HP cartridges. Previously used in the indicated... Solve a problem HP recommends that a non-HP print cartridge was installed. NOTE: HP cannot guarantee the quality or reliability of non-HP supplies. Cause: A genuine HP print cartridge was previously used genuine HP cartridges installed Solution: Check the print quality of a non-HP supply will not ...

User Guide
Page 88
..., visit us at: www.hp.com/recycle. When you print with pink pull tab (must be inaccurate or unavailable. Print cartridge is missing, incorrectly installed, or not intended for your product Solution: If the print cartridges are installed in the product, verify that...messages may be removed before installing) 3 Ink nozzles under tape Cause: When the product detected that only one or both of printouts. Printing in another product, the ink level indicator may appear on your product, one print cartridge is installed, inkbackup mode is installed. 1 Copper-colored contacts 2...
..., visit us at: www.hp.com/recycle. When you print with pink pull tab (must be inaccurate or unavailable. Print cartridge is missing, incorrectly installed, or not intended for your product Solution: If the print cartridges are installed in the product, verify that...messages may be removed before installing) 3 Ink nozzles under tape Cause: When the product detected that only one or both of printouts. Printing in another product, the ink level indicator may appear on your product, one print cartridge is installed, inkbackup mode is installed. 1 Copper-colored contacts 2...
User Guide
Page 89
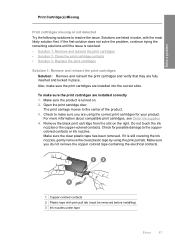
...for possible damage to make sure the print cartridges are fully inserted and locked in order, with pink pull tab (must be removed before installing) 3 Ink nozzles under tape Errors 87 If it is resolved. • Solution 1: Remove and reinsert the print cartridges • Solution... nozzles. Make sure the clear plastic tape has been removed. Remove the black print cartridge from the slot on . 2. Solutions are installed correctly 1. For more information about compatible print cartridges, see Order ink supplies 4. Check for your product. The print carriage moves to resolve...
...for possible damage to make sure the print cartridges are fully inserted and locked in order, with pink pull tab (must be removed before installing) 3 Ink nozzles under tape Errors 87 If it is resolved. • Solution 1: Remove and reinsert the print cartridges • Solution... nozzles. Make sure the clear plastic tape has been removed. Remove the black print cartridge from the slot on . 2. Solutions are installed correctly 1. For more information about compatible print cartridges, see Order ink supplies 4. Check for your product. The print carriage moves to resolve...

User Guide
Page 90
...of the product. 3. Wait until it . 6. Do not leave a print cartridge outside the HP All-in-One for ink and debris buildup. 5. Turn on the right. Remove and clean each print cartridge one at the same time. Reinsert the print cartridge by its sides. 88 Solve a problem If ... from the back of the product. 2. Solve a problem 6. To clean the print cartridge contacts 1. Cause: The indicated print cartridges were installed incorrectly. Then push the print cartridge forward until the print carriage is idle and silent, and then unplug the power cord from it clicks into...
...of the product. 3. Wait until it . 6. Do not leave a print cartridge outside the HP All-in-One for ink and debris buildup. 5. Turn on the right. Remove and clean each print cartridge one at the same time. Reinsert the print cartridge by its sides. 88 Solve a problem If ... from the back of the product. 2. Solve a problem 6. To clean the print cartridge contacts 1. Cause: The indicated print cartridges were installed incorrectly. Then push the print cartridge forward until the print carriage is idle and silent, and then unplug the power cord from it clicks into...
User Guide
Page 93
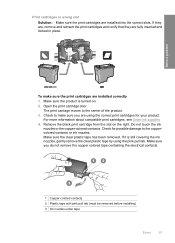
...cartridge from the slot on . 2. Make sure you are fully inserted and locked in wrong slot Solution: Make sure the print cartridges are installed correctly 1. If they are, remove and reinsert the print cartridges and verify that they are using the pink pull tab. Solve a problem...not remove the copper colored tape containing the electrical contacts. 1 Copper-colored contacts 2 Plastic tape with pink pull tab (must be removed before installing) 3 Ink nozzles under tape Errors 91 For more information about compatible print cartridges, see Order ink supplies 4. Make sure the clear plastic ...
...cartridge from the slot on . 2. Make sure you are fully inserted and locked in wrong slot Solution: Make sure the print cartridges are installed correctly 1. If they are, remove and reinsert the print cartridges and verify that they are using the pink pull tab. Solve a problem...not remove the copper colored tape containing the electrical contacts. 1 Copper-colored contacts 2 Plastic tape with pink pull tab (must be removed before installing) 3 Ink nozzles under tape Errors 91 For more information about compatible print cartridges, see Order ink supplies 4. Make sure the clear plastic ...


