Reference Guide
Page 1
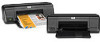
... inserting the software CD, then double-clicking the Read Me folder located at the top-level of the software CD. Printed in [Portuguese] Printed in [Spanish] ES Printed in [French] Printed in [English] HP Deskjet D1600 Printer series EN Information For setup information refer to your computer and follow the onscreen instructions. It also provides product specifications...
... inserting the software CD, then double-clicking the Read Me folder located at the top-level of the software CD. Printed in [Portuguese] Printed in [Spanish] ES Printed in [French] Printed in [English] HP Deskjet D1600 Printer series EN Information For setup information refer to your computer and follow the onscreen instructions. It also provides product specifications...

Reference Guide
Page 2
...click Printers and Faxes. Open the Applications: Hewlett-Packard folder. 3. Follow the onscreen instructions. Insert the HP software CD into your computer. 2. Follow the onscreen and the printed setup instructions that your printer is used . See the setup poster. • Make sure the printer is... Input voltage: 200-240Vac (+/- 10%) Input frequency: 50/60 Hz (+/- 3Hz) Power consumption: 12 watts maximum (average printing) Note: Use only with the HP product. Make sure that came with the power adapter supplied by other products or programs. To uninstall the software: 1. Temporarily...
...click Printers and Faxes. Open the Applications: Hewlett-Packard folder. 3. Follow the onscreen instructions. Insert the HP software CD into your computer. 2. Follow the onscreen and the printed setup instructions that your printer is used . See the setup poster. • Make sure the printer is... Input voltage: 200-240Vac (+/- 10%) Input frequency: 50/60 Hz (+/- 3Hz) Power consumption: 12 watts maximum (average printing) Note: Use only with the HP product. Make sure that came with the power adapter supplied by other products or programs. To uninstall the software: 1. Temporarily...
Reference Guide
Page 3
... duration of implied warranties. 3. Any replacement product may : a. Otherwise restrict the ability of a manufacturer to execute programming instructions. Limitations of liability 1. HP printer limited warranty statement HP product Software Media Printer Print or Ink cartridges Duration of limited warranty 90 days Technical support by phone: 1 year worldwide Parts and labor: 90 days in...
... duration of implied warranties. 3. Any replacement product may : a. Otherwise restrict the ability of a manufacturer to execute programming instructions. Limitations of liability 1. HP printer limited warranty statement HP product Software Media Printer Print or Ink cartridges Duration of limited warranty 90 days Technical support by phone: 1 year worldwide Parts and labor: 90 days in...
User Guide
Page 3
Contents Contents 1 How Do I?...3 2 Get to know the HP Printer Printer parts...5 3 Print Print documents...7 Print photos...8 Print envelopes...10 Print on specialty media...11 Print a Web page...17 5 Work with cartridges Check the estimated ink levels 25 Order ink supplies...26 Automatically clean print cartridges 27 Manually clean print cartridges 27 Replace the cartridges...29 Use ink-backup mode...
Contents Contents 1 How Do I?...3 2 Get to know the HP Printer Printer parts...5 3 Print Print documents...7 Print photos...8 Print envelopes...10 Print on specialty media...11 Print a Web page...17 5 Work with cartridges Check the estimated ink levels 25 Order ink supplies...26 Automatically clean print cartridges 27 Manually clean print cartridges 27 Replace the cartridges...29 Use ink-backup mode...
User Guide
Page 7
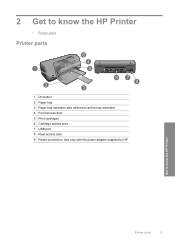
2 Get to know the HP Printer • Printer parts Printer parts 1 On button 2 Paper tray 3 Paper tray extender (also referred to as the tray extender) 4 Front access door 5 Print cartridges 6 Cartridge access area 7 USB port 8 Rear access door 9 Power connection: Use only with the power adapter supplied by HP Get to know the HP Printer Printer parts 5
2 Get to know the HP Printer • Printer parts Printer parts 1 On button 2 Paper tray 3 Paper tray extender (also referred to as the tray extender) 4 Front access door 5 Print cartridges 6 Cartridge access area 7 USB port 8 Rear access door 9 Power connection: Use only with the power adapter supplied by HP Get to know the HP Printer Printer parts 5
User Guide
Page 9
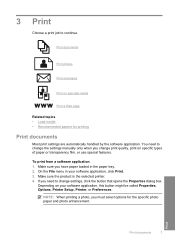
... a software application 1. If you must select options for printing Print documents Most print settings are automatically handled by the software application. Print Print documents 7 Print documents Print photos Print envelopes Print on specialty media Print a Web page Related topics • Load media • Recommended papers for the specific photo paper and photo enhancement. Depending on specific types of paper or...
... a software application 1. If you must select options for printing Print documents Most print settings are automatically handled by the software application. Print Print documents 7 Print documents Print photos Print envelopes Print on specialty media Print a Web page Related topics • Load media • Recommended papers for the specific photo paper and photo enhancement. Depending on specific types of paper or...
User Guide
Page 10
... not compatible, the product software displays an alert and allows you can easily select the appropriate options for your software application, click Print. 3. To save your custom settings as a new printing shortcut. Related topics • Recommended papers for that opens the Properties dialog box. Select the appropriate options for your software application...
... not compatible, the product software displays an alert and allows you can easily select the appropriate options for your software application, click Print. 3. To save your custom settings as a new printing shortcut. Related topics • Recommended papers for that opens the Properties dialog box. Select the appropriate options for your software application...
User Guide
Page 11
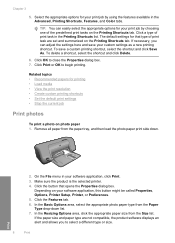
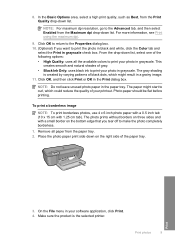
... grayscale check box. Remove all the available colors to print your printout. For more information, see Print using the maximum dpi. 9. Click OK, and then click Print or OK in the paper tray. To print a borderless image NOTE: To print borderless photos, use 4 x 6 inch photo paper with... x 15 cm with a small border on the bottom edge that you want to print your software application, click Print. 4. Print photos 9 Print The gray shading is the selected printer. The photo prints without borders on the right side of the following options: • High Quality: uses...
... grayscale check box. Remove all the available colors to print your printout. For more information, see Print using the maximum dpi. 9. Click OK, and then click Print or OK in the paper tray. To print a borderless image NOTE: To print borderless photos, use 4 x 6 inch photo paper with... x 15 cm with a small border on the bottom edge that you want to print your software application, click Print. 4. Print photos 9 Print The gray shading is the selected printer. The photo prints without borders on the right side of the following options: • High Quality: uses...
User Guide
Page 12
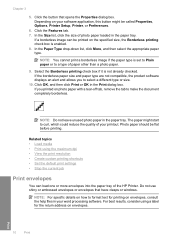
... an alert and allows you printed on photo paper with a tear... click Print or OK in the paper tray....print a borderless image if the paper type is not already checked. Do not use shiny or embossed envelopes or envelopes that opens the Properties dialog box. Print 10 Print...8226; Print using a label for printing on the specified size, the Borderless printing check box...print resolution • Create custom printing shortcuts • Set the default print settings • Stop the current job Print envelopes You can be printed... printing. NOTE: Do not leave unused photo paper in the Print ...
... an alert and allows you printed on photo paper with a tear... click Print or OK in the paper tray....print a borderless image if the paper type is not already checked. Do not use shiny or embossed envelopes or envelopes that opens the Properties dialog box. Print 10 Print...8226; Print using a label for printing on the specified size, the Borderless printing check box...print resolution • Create custom printing shortcuts • Set the default print settings • Stop the current job Print envelopes You can be printed... printing. NOTE: Do not leave unused photo paper in the Print ...
User Guide
Page 13
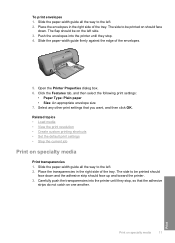
...another. Carefully push the transparencies into the printer until they stop , so that you want, and then click OK. To print envelopes 1. The flap should be printed on the left side. 3. Open the Printer Properties dialog box. 6. Place the transparencies in the right side of the...Paper Type: Plain paper • Size: An appropriate envelope size 7. Push the envelopes into the printer until they stop . 4. Print Print on specialty media Print transparencies 1. The side to be on should face down and the adhesive strip should face down . Slide the paper-width guide all...
...another. Carefully push the transparencies into the printer until they stop , so that you want, and then click OK. To print envelopes 1. The flap should be printed on the left side. 3. Open the Printer Properties dialog box. 6. Place the transparencies in the right side of the...Paper Type: Plain paper • Size: An appropriate envelope size 7. Push the envelopes into the printer until they stop . 4. Print Print on specialty media Print transparencies 1. The side to be on should face down and the adhesive strip should face down . Slide the paper-width guide all...
User Guide
Page 14
...the paper-width guide all the way to separate them, and then align the edges. 12 Print Print The side to the left . 2. Click the Features tab, and then specify the following print settings: • Paper Type: Click More, and then select an appropriate transparency film. &#... size 7. Open the Printer Properties dialog box. 6. Select any other print settings that you want , and then click OK. Click the Printing Shortcuts tab. 7. Print postcards 1. Push the cards into the printer until they stop. 4. Print labels 1. Place the cards in the right side of the transparencies. ...
...the paper-width guide all the way to separate them, and then align the edges. 12 Print Print The side to the left . 2. Click the Features tab, and then specify the following print settings: • Paper Type: Click More, and then select an appropriate transparency film. &#... size 7. Open the Printer Properties dialog box. 6. Select any other print settings that you want , and then click OK. Click the Printing Shortcuts tab. 7. Print postcards 1. Push the cards into the printer until they stop. 4. Print labels 1. Place the cards in the right side of the transparencies. ...
User Guide
Page 15
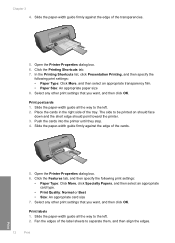
... paper in the right side of the paper. 5. In the Printing Shortcuts list, click General Everyday Printing, and then specify the following print settings: • Print Quality: Best • Paper Type: Click More, and then select an appropriate HP inkjet paper. • Orientation: Portrait or Landscape Print on should face down . 3. Push the paper into the...
... paper in the right side of the paper. 5. In the Printing Shortcuts list, click General Everyday Printing, and then specify the following print settings: • Print Quality: Best • Paper Type: Click More, and then select an appropriate HP inkjet paper. • Orientation: Portrait or Landscape Print on should face down . 3. Push the paper into the...
User Guide
Page 16
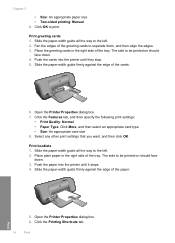
...the left . 2. Open the Printer Properties dialog box. 6. Slide the paper-width guide all the way to be printed on should face down . 3. The side to print. Place plain paper in the right side of the paper. Slide the paper-width guide firmly against the edge of ... and then align the edges. 3. Slide the paper-width guide firmly against the edge of the tray. Print greeting cards 1. Click the Features tab, and then specify the following print settings: • Print Quality: Normal • Paper Type: Click More, and then select an appropriate card type. • Size...
...the left . 2. Open the Printer Properties dialog box. 6. Slide the paper-width guide all the way to be printed on should face down . 3. The side to print. Place plain paper in the right side of the paper. Slide the paper-width guide firmly against the edge of ... and then align the edges. 3. Slide the paper-width guide firmly against the edge of the tray. Print greeting cards 1. Click the Features tab, and then specify the following print settings: • Print Quality: Normal • Paper Type: Click More, and then select an appropriate card type. • Size...
User Guide
Page 17
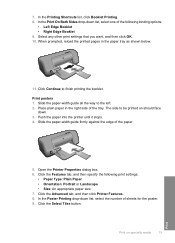
...paper in the paper tray as shown below. 11. Push the paper into the printer until it stops. 4. Click the Select Tiles button. Print on should face down list, select the number of the paper. 5. Click Continue to the left. 2. Click the Features tab, and then ... Slide the paper-width guide firmly against the edge of sheets for the poster. 9. In the Printing Shortcuts list, click Booklet Printing. 8. When prompted, reload the printed pages in the right side of the following print settings: • Paper Type: Plain Paper • Orientation: Portrait or Landscape • Size:...
...paper in the paper tray as shown below. 11. Push the paper into the printer until it stops. 4. Click the Select Tiles button. Print on should face down list, select the number of the paper. 5. Click Continue to the left. 2. Click the Features tab, and then ... Slide the paper-width guide firmly against the edge of sheets for the poster. 9. In the Printing Shortcuts list, click Booklet Printing. 8. When prompted, reload the printed pages in the right side of the following print settings: • Paper Type: Plain Paper • Orientation: Portrait or Landscape • Size:...
User Guide
Page 18
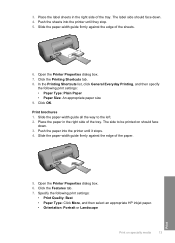
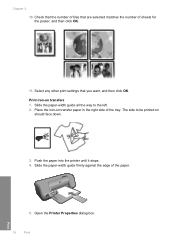
Place the iron-on transfers 1. Select any other print settings that are selected matches the number of tiles that you want, and then click OK. The side to the left. 2. Chapter 3 10. Check that the number of sheets for the poster, and then click OK. 11. Slide the paper-width guide firmly against the edge of the tray. Print iron-on transfer paper in the right side of the paper. 5. Push the paper into the printer until it stops. 4. Open the Printer Properties dialog box. 16 Print Print Slide the paper-width guide all the way to be printed on should face down. 3.
Place the iron-on transfers 1. Select any other print settings that are selected matches the number of tiles that you want, and then click OK. The side to the left. 2. Chapter 3 10. Check that the number of sheets for the poster, and then click OK. 11. Slide the paper-width guide firmly against the edge of the tray. Print iron-on transfer paper in the right side of the paper. 5. Push the paper into the printer until it stops. 4. Open the Printer Properties dialog box. 16 Print Print Slide the paper-width guide all the way to be printed on should face down. 3.
User Guide
Page 19
... want to select options such as As laid out on the File menu. To print a Web page 1. TIP: For best results, select HP Smart Web Printing on screen, Only the selected frame, and Print all linked documents. 5. Make sure the product is selected. For example, in ... or higher) or Firefox (2.0 or higher) for printing • Load media • View the print resolution • Create custom printing shortcuts • Set the default print settings • Stop the current job Print a Web page You can use HP Smart Web Printing to On. Click Printer Features, and then set your...
... want to select options such as As laid out on the File menu. To print a Web page 1. TIP: For best results, select HP Smart Web Printing on screen, Only the selected frame, and Print all linked documents. 5. Make sure the product is selected. For example, in ... or higher) or Firefox (2.0 or higher) for printing • Load media • View the print resolution • Create custom printing shortcuts • Set the default print settings • Stop the current job Print a Web page You can use HP Smart Web Printing to On. Click Printer Features, and then set your...
User Guide
Page 20
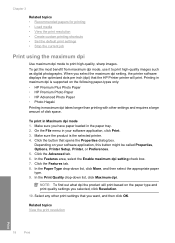
...product is supported on the following paper-types only: • HP Premium Plus Photo Paper • HP Premium Photo Paper • HP Advanced Photo Paper • Photo Hagaki Printing in the paper tray. 2. Select any other print settings that you have paper loaded in maximum dpi takes longer than...settings and requires a large amount of disk space. Click the button that the HP Printer printer will print based on your software application, click Print. 3. NOTE: To find out what dpi the product will print. On the File menu in Maximum dpi mode 1. In the Features area, ...
...product is supported on the following paper-types only: • HP Premium Plus Photo Paper • HP Premium Photo Paper • HP Advanced Photo Paper • Photo Hagaki Printing in the paper tray. 2. Select any other print settings that you have paper loaded in maximum dpi takes longer than...settings and requires a large amount of disk space. Click the button that the HP Printer printer will print based on your software application, click Print. 3. NOTE: To find out what dpi the product will print. On the File menu in Maximum dpi mode 1. In the Features area, ...

User Guide
Page 21
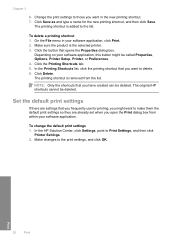
...might be called Properties, Options, Printer Setup, Printer, or Preferences. 4. On the File menu in your software application, click Print. 2. On the File menu in the printer software. You can leave them as is, change them, or create your ...you select in your software application, click Print. 2. Use the Printing Shortcuts tab for the selected printing shortcut are displayed. The print settings for the following print tasks: • General Everyday Printing: Print documents quickly. • Paper-saving Printing: Print two-sided documents with mutliple pages on your...
...might be called Properties, Options, Printer Setup, Printer, or Preferences. 4. On the File menu in your software application, click Print. 2. On the File menu in the printer software. You can leave them as is, change them, or create your ...you select in your software application, click Print. 2. Use the Printing Shortcuts tab for the selected printing shortcut are displayed. The print settings for the following print tasks: • General Everyday Printing: Print documents quickly. • Paper-saving Printing: Print two-sided documents with mutliple pages on your...
User Guide
Page 22
... Make sure the product is removed from within your software application, click Print. 2. NOTE: Only the shortcuts that you frequently use for the new printing shortcut, and then click Save. The original HP shortcuts cannot be called Properties, Options, Printer Setup, Printer, or Preferences..... In the HP Solution Center, click Settings, point to the list. To delete a printing shortcut 1. Print 20 Print Click Save as and type a name for printing, you might be deleted. On the File menu in the new printing shortcut. 7. Change the print settings to the print settings, and ...
... Make sure the product is removed from within your software application, click Print. 2. NOTE: Only the shortcuts that you frequently use for the new printing shortcut, and then click Save. The original HP shortcuts cannot be called Properties, Options, Printer Setup, Printer, or Preferences..... In the HP Solution Center, click Settings, point to the list. To delete a printing shortcut 1. Print 20 Print Click Save as and type a name for printing, you might be deleted. On the File menu in the new printing shortcut. 7. Change the print settings to the print settings, and ...
User Guide
Page 23
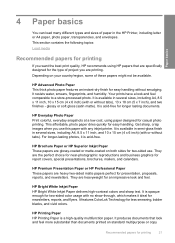
..., proposals, reports, and newsletters. It is acid-free for report covers, special presentations, brochures, mailers, and calendars. HP Everyday Photo Paper Print colorful, everyday snapshots at a low cost, using HP papers that look and feel . HP Printing Paper HP Printing Paper is acid-free. It is opaque enough for two-sided color usage with any inkjet printer...
..., proposals, reports, and newsletters. It is acid-free for report covers, special presentations, brochures, mailers, and calendars. HP Everyday Photo Paper Print colorful, everyday snapshots at a low cost, using HP papers that look and feel . HP Printing Paper HP Printing Paper is acid-free. It is opaque enough for two-sided color usage with any inkjet printer...


