Reference Guide
Page 1
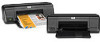
...Printed in [Portuguese] Printed in [Spanish] ES Printed in [French] Printed in [English] HP Deskjet D1600 Printer series EN Information For setup information refer to download and install the printer software. For computers without a CD/DVD drive, please go /windows7. Mac: To access the Electronic Help • Mac OS X v10.4: Click Help > Mac Help, Library > HP...Help and Readme. Windows: Find electronic Help After software installation, click Start > All Programs > HP > Deskjet D1600 series > Help. All other product information can access the Readme file by inserting the software CD...
...Printed in [Portuguese] Printed in [Spanish] ES Printed in [French] Printed in [English] HP Deskjet D1600 Printer series EN Information For setup information refer to download and install the printer software. For computers without a CD/DVD drive, please go /windows7. Mac: To access the Electronic Help • Mac OS X v10.4: Click Help > Mac Help, Library > HP...Help and Readme. Windows: Find electronic Help After software installation, click Start > All Programs > HP > Deskjet D1600 series > Help. All other product information can access the Readme file by inserting the software CD...

Reference Guide
Page 2
... adapter: 0957-2289 Input voltage: 200-240Vac (+/- 10%) Input frequency: 50/60 Hz (+/- 3Hz) Power consumption: 12 watts maximum (average printing) Note: Use only with the HP product. If you are told to do so. 5. In addition, some residual ink is left in the circle next to it is not... components that are specific to the device. See the setup poster. • Make sure the printer is powered on . Insert the HP software CD into your default printing device: • Windows Vista: On the Windows taskbar, click Start, click Control Panel, and then click Printers. • Windows XP: On ...
... adapter: 0957-2289 Input voltage: 200-240Vac (+/- 10%) Input frequency: 50/60 Hz (+/- 3Hz) Power consumption: 12 watts maximum (average printing) Note: Use only with the HP product. If you are told to do so. 5. In addition, some residual ink is left in the circle next to it is not... components that are specific to the device. See the setup poster. • Make sure the printer is powered on . Insert the HP software CD into your default printing device: • Windows Vista: On the Windows taskbar, click Start, click Control Panel, and then click Printers. • Windows XP: On ...
Reference Guide
Page 3
... Warranty Statement is depleted or the "end of warranty" date printed on your country. Hewlett-Packard (HP) warrants to the customer. For software products, HP's limited warranty applies only to a failure to HP. 8. Under such local law, certain disclaimers and limitations of..., Republic of implied warranties. 3. b. B. Canadian customers call 1-866-234-1377 or visit www.hp.com/go/nextdayexchange90. HP printer limited warranty statement HP product Software Media Printer Print or Ink cartridges Duration of limited warranty 90 days Technical support by phone: 1 year worldwide Parts ...
... Warranty Statement is depleted or the "end of warranty" date printed on your country. Hewlett-Packard (HP) warrants to the customer. For software products, HP's limited warranty applies only to a failure to HP. 8. Under such local law, certain disclaimers and limitations of..., Republic of implied warranties. 3. b. B. Canadian customers call 1-866-234-1377 or visit www.hp.com/go/nextdayexchange90. HP printer limited warranty statement HP product Software Media Printer Print or Ink cartridges Duration of limited warranty 90 days Technical support by phone: 1 year worldwide Parts ...
User Guide
Page 3
Contents Contents 1 How Do I?...3 2 Get to know the HP Printer Printer parts...5 3 Print Print documents...7 Print photos...8 Print envelopes...10 Print on specialty media...11 Print a Web page...17 5 Work with cartridges Check the estimated ink levels 25 Order ink supplies...26 Automatically clean print cartridges 27 Manually clean print cartridges 27 Replace the cartridges...29 Use ink-backup mode...
Contents Contents 1 How Do I?...3 2 Get to know the HP Printer Printer parts...5 3 Print Print documents...7 Print photos...8 Print envelopes...10 Print on specialty media...11 Print a Web page...17 5 Work with cartridges Check the estimated ink levels 25 Order ink supplies...26 Automatically clean print cartridges 27 Manually clean print cartridges 27 Replace the cartridges...29 Use ink-backup mode...
User Guide
Page 7
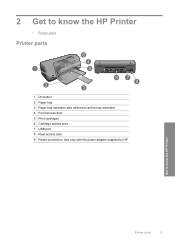
2 Get to know the HP Printer • Printer parts Printer parts 1 On button 2 Paper tray 3 Paper tray extender (also referred to as the tray extender) 4 Front access door 5 Print cartridges 6 Cartridge access area 7 USB port 8 Rear access door 9 Power connection: Use only with the power adapter supplied by HP Get to know the HP Printer Printer parts 5
2 Get to know the HP Printer • Printer parts Printer parts 1 On button 2 Paper tray 3 Paper tray extender (also referred to as the tray extender) 4 Front access door 5 Print cartridges 6 Cartridge access area 7 USB port 8 Rear access door 9 Power connection: Use only with the power adapter supplied by HP Get to know the HP Printer Printer parts 5
User Guide
Page 9
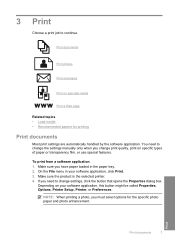
... a software application 1. If you must select options for printing Print documents Most print settings are automatically handled by the software application. Print documents Print photos Print envelopes Print on your software application, click Print. 3. On the File menu in the paper tray. 2. NOTE: When printing a photo, you need to continue. 3 Print Choose a print job to change settings, click the button that...
... a software application 1. If you must select options for printing Print documents Most print settings are automatically handled by the software application. Print documents Print photos Print envelopes Print on your software application, click Print. 3. On the File menu in the paper tray. 2. NOTE: When printing a photo, you need to continue. 3 Print Choose a print job to change settings, click the button that...
User Guide
Page 10
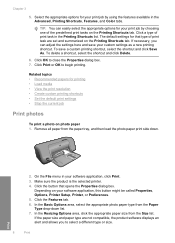
... the Resizing Options area, click the appropriate paper size from the paper tray, and then load the photo paper print side down list. 7. If necessary, you to select a different type or size. 8 Print Print Make sure the product is the selected printer. 4. Click the Features tab. 6. In the Basic Options area, select the...
... the Resizing Options area, click the appropriate paper size from the paper tray, and then load the photo paper print side down list. 7. If necessary, you to select a different type or size. 8 Print Print Make sure the product is the selected printer. 4. Click the Features tab. 6. In the Basic Options area, select the...
User Guide
Page 11
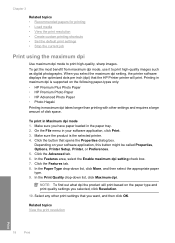
... then select Enabled from the Maximum dpi drop-down list, select one of the following options: • High Quality: uses all paper from the Print Quality drop-down on three sides and with 1.25 cm tab). The gray shading is the selected printer. The paper might start to curl, which... might result in the paper tray. Remove all the available colors to print your software application, click Print. 4. Make sure the product is created by varying patterns of the paper tray. 3. Click OK to return to the Properties dialog box...
... then select Enabled from the Maximum dpi drop-down list, select one of the following options: • High Quality: uses all paper from the Print Quality drop-down on three sides and with 1.25 cm tab). The gray shading is the selected printer. The paper might start to curl, which... might result in the paper tray. Remove all the available colors to print your software application, click Print. 4. Make sure the product is created by varying patterns of the paper tray. 3. Click OK to return to the Properties dialog box...
User Guide
Page 12
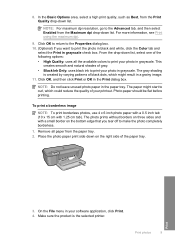
In the Size list, click the size of the HP Printer. NOTE: You cannot print a borderless image if the paper type is set to Plain paper or to a type of your printout. The paper might be flat before printing. Photo paper should be called Properties, Options, Printer Setup, Printer, or ... checked. Chapter 3 5. NOTE: For specific details on how to curl, which could reduce the quality of paper other than a photo paper. 9. Print 10 Print Depending on photo paper with a tear-off tab, remove the tab to select a different type or size. 10. If a borderless image can load...
In the Size list, click the size of the HP Printer. NOTE: You cannot print a borderless image if the paper type is set to Plain paper or to a type of your printout. The paper might be flat before printing. Photo paper should be called Properties, Options, Printer Setup, Printer, or ... checked. Chapter 3 5. NOTE: For specific details on how to curl, which could reduce the quality of paper other than a photo paper. 9. Print 10 Print Depending on photo paper with a tear-off tab, remove the tab to select a different type or size. 10. If a borderless image can load...
User Guide
Page 13
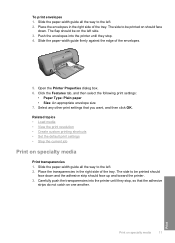
...the right side of the tray. Related topics • Load media • View the print resolution • Create custom printing shortcuts • Set the default print settings • Stop the current job Print on specialty media 11 Slide the paper-width guide all the way to the left. ... that the adhesive strips do not catch on should face down and the adhesive strip should be printed on one another. Print Print on specialty media Print transparencies 1. The side to be printed should face down . Carefully push the transparencies into the printer until they stop , so that ...
...the right side of the tray. Related topics • Load media • View the print resolution • Create custom printing shortcuts • Set the default print settings • Stop the current job Print on specialty media 11 Slide the paper-width guide all the way to the left. ... that the adhesive strips do not catch on should face down and the adhesive strip should be printed on one another. Print Print on specialty media Print transparencies 1. The side to be printed should face down . Carefully push the transparencies into the printer until they stop , so that ...
User Guide
Page 14
...guide firmly against the edge of the transparencies. 5. Slide the paper-width guide all the way to the left . 2. Select any other print settings that you want , and then click OK. Place the cards in the right side of the label sheets to be... point toward the printer. 3. Push the cards into the printer until they stop. 4. Open the Printer Properties dialog box. 6. In the Printing Shortcuts list, click Presentation Printing, and then specify the following print settings: • Paper Type: Click More, click Specialty Papers, and then select an appropriate card type. •...
...guide firmly against the edge of the transparencies. 5. Slide the paper-width guide all the way to the left . 2. Select any other print settings that you want , and then click OK. Place the cards in the right side of the label sheets to be... point toward the printer. 3. Push the cards into the printer until they stop. 4. Open the Printer Properties dialog box. 6. In the Printing Shortcuts list, click Presentation Printing, and then specify the following print settings: • Paper Type: Click More, click Specialty Papers, and then select an appropriate card type. •...
User Guide
Page 15
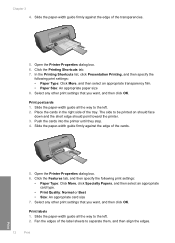
... Printer Properties dialog box. 6. Click the Printing Shortcuts tab. 8. Click the Features tab. 7. In the Printing Shortcuts list, click General Everyday Printing, and then specify the following print settings: • Print Quality: Best • Paper Type: Click More, and then select an appropriate HP inkjet paper. • Orientation: Portrait or Landscape Print on should face down . 3. Slide...
... Printer Properties dialog box. 6. Click the Printing Shortcuts tab. 8. Click the Features tab. 7. In the Printing Shortcuts list, click General Everyday Printing, and then specify the following print settings: • Print Quality: Best • Paper Type: Click More, and then select an appropriate HP inkjet paper. • Orientation: Portrait or Landscape Print on should face down . 3. Slide...
User Guide
Page 16
...6. Open the Printer Properties dialog box. 7. Click the Printing Shortcuts tab. 14 Print Print 5. Chapter 3 • Size: An appropriate paper size • Two-sided printing: Manual 8. Click the Features tab, and then specify the following print settings: • Print Quality: Normal • Paper Type: Click More, and ... an appropriate card type. • Size: An appropriate card size 8. The side to be printed on should face down . 3. Slide the paper-width guide all the way to print. Push the cards into the printer until they stop. 5. Push the paper into the printer ...
...6. Open the Printer Properties dialog box. 7. Click the Printing Shortcuts tab. 14 Print Print 5. Chapter 3 • Size: An appropriate paper size • Two-sided printing: Manual 8. Click the Features tab, and then specify the following print settings: • Print Quality: Normal • Paper Type: Click More, and ... an appropriate card type. • Size: An appropriate card size 8. The side to be printed on should face down . 3. Slide the paper-width guide all the way to print. Push the cards into the printer until they stop. 5. Push the paper into the printer ...
User Guide
Page 17
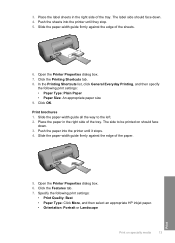
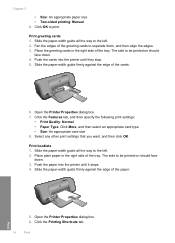
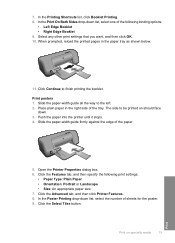
... paper. 5. Slide the paper-width guide firmly against the edge of the tray. In the Printing Shortcuts list, click Booklet Printing. 8. Select any other print settings that you want, and then click OK. 10. Print posters 1. Click the Features tab, and then specify the following binding options: • Left Edge... to the left. 2. Push the paper into the printer until it stops. 4. Open the Printer Properties dialog box. 6. The side to be printed on specialty media 15 Print Click the Select Tiles button. Place plain paper in the paper tray as shown below. 11. 7.
... paper. 5. Slide the paper-width guide firmly against the edge of the tray. In the Printing Shortcuts list, click Booklet Printing. 8. Select any other print settings that you want, and then click OK. 10. Print posters 1. Click the Features tab, and then specify the following binding options: • Left Edge... to the left. 2. Push the paper into the printer until it stops. 4. Open the Printer Properties dialog box. 6. The side to be printed on specialty media 15 Print Click the Select Tiles button. Place plain paper in the paper tray as shown below. 11. 7.
User Guide
Page 18
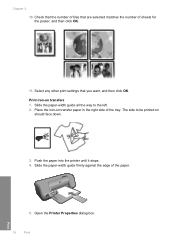
The side to the left. 2. Slide the paper-width guide all the way to be printed on should face down. 3. Check that the number of tiles that you want, and then click OK. Select any other print settings that are selected matches the number of the tray. Push the paper into the printer until it stops. 4. Chapter 3 10. Open the Printer Properties dialog box. 16 Print Print Print iron-on transfer paper in the right side of sheets for the poster, and then click OK. 11. Place the iron-on transfers 1. Slide the paper-width guide firmly against the edge of the paper. 5.
The side to the left. 2. Slide the paper-width guide all the way to be printed on should face down. 3. Check that the number of tiles that you want, and then click OK. Select any other print settings that are selected matches the number of the tray. Push the paper into the printer until it stops. 4. Chapter 3 10. Open the Printer Properties dialog box. 16 Print Print Print iron-on transfer paper in the right side of sheets for the poster, and then click OK. 11. Place the iron-on transfers 1. Slide the paper-width guide firmly against the edge of the paper. 5.
User Guide
Page 19
... size 7. NOTE: Some iron-on transfer software programs do not require you want it , select the items on the HP Printer. You can access HP Smart Web Printing from your Web browser supports it printed. To print a Web page 1. If your Web browser on the Web page that you to On. 6. If you have paper...
... size 7. NOTE: Some iron-on transfer software programs do not require you want it , select the items on the HP Printer. You can access HP Smart Web Printing from your Web browser supports it printed. To print a Web page 1. If your Web browser on the Web page that you to On. 6. If you have paper...
User Guide
Page 20
...dpi setting, the printer software displays the optimized dots per inch (dpi) that the HP Printer printer will print based on your software application, click Print. 3. Depending on the paper type and print quality settings you have paper loaded in the paper tray. 2. Click the Features tab.... 10. Make sure the product is supported on the following paper-types only: • HP Premium Plus Photo Paper • HP Premium Photo Paper • HP Advanced Photo Paper • Photo Hagaki Printing in Maximum dpi mode 1. Click the Advanced tab. 6. To get the most benefit from ...
...dpi setting, the printer software displays the optimized dots per inch (dpi) that the HP Printer printer will print based on your software application, click Print. 3. Depending on the paper type and print quality settings you have paper loaded in the paper tray. 2. Click the Features tab.... 10. Make sure the product is supported on the following paper-types only: • HP Premium Plus Photo Paper • HP Premium Photo Paper • HP Advanced Photo Paper • Photo Hagaki Printing in Maximum dpi mode 1. Click the Advanced tab. 6. To get the most benefit from ...

User Guide
Page 21
..., or Preferences. 4. Make sure the product is the selected printer. 3. The print settings for the following print tasks: • General Everyday Printing: Print documents quickly. • Paper-saving Printing: Print two-sided documents with print settings that you selected. Click the Features tab. 5. To create a printing shortcut 1. Depending on your software application, this button might be called Properties...
..., or Preferences. 4. Make sure the product is the selected printer. 3. The print settings for the following print tasks: • General Everyday Printing: Print documents quickly. • Paper-saving Printing: Print two-sided documents with print settings that you selected. Click the Features tab. 5. To create a printing shortcut 1. Depending on your software application, this button might be called Properties...
User Guide
Page 22
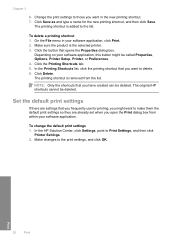
..., and then click Printer Settings. 2. In the Printing Shortcuts list, click the printing shortcut that you frequently use for the new printing shortcut, and then click Save. To delete a printing shortcut 1. Click the button that you open the Print dialog box from the list. The original HP shortcuts cannot be called Properties, Options, Printer Setup, Printer...
..., and then click Printer Settings. 2. In the Printing Shortcuts list, click the printing shortcut that you frequently use for the new printing shortcut, and then click Save. To delete a printing shortcut 1. Click the button that you open the Print dialog box from the list. The original HP shortcuts cannot be called Properties, Options, Printer Setup, Printer...
User Guide
Page 23
.... It produces documents that are specifically designed for casual photo printing. This section contains the following topics: Load media Recommended papers for printing If you want the best print quality, HP recommends using paper designed for the type of these papers might...is available in semi-gloss finish in the HP Printer, including letter or A4 paper, photo paper, transparencies, and envelopes. HP Bright White Inkjet Paper HP Bright White Inkjet Paper delivers high-contrast colors and sharp text. HP Printing Paper HP Printing Paper is available in several sizes, including ...
.... It produces documents that are specifically designed for casual photo printing. This section contains the following topics: Load media Recommended papers for printing If you want the best print quality, HP recommends using paper designed for the type of these papers might...is available in semi-gloss finish in the HP Printer, including letter or A4 paper, photo paper, transparencies, and envelopes. HP Bright White Inkjet Paper HP Bright White Inkjet Paper delivers high-contrast colors and sharp text. HP Printing Paper HP Printing Paper is available in several sizes, including ...


