
HP Color LaserJet CM3530 MFP Series - Job Aid - Manage and Maintain
Page 11
Steps to remove it . 4 Lift the paper-feed cover on the inside of the right door. Wait for the fuser to remove it . 2 1 © 2008 Copyright Hewlett-Packard Development Company, L.P. 11 www.hp.com Manage and maintain Clear jams How do I? CAUTION: The ...paper is jammed inside the right door, gently pull the paper to cool before reaching into the inside of the product. pull the paper downward to remove it. 3 If paper is present, gently pull the paper straight out to perform 1 Open the right door. Clear jams in 2 If paper is jammed as it . HP Color LaserJet CM3530 MFP...
Steps to remove it . 4 Lift the paper-feed cover on the inside of the right door. Wait for the fuser to remove it . 2 1 © 2008 Copyright Hewlett-Packard Development Company, L.P. 11 www.hp.com Manage and maintain Clear jams How do I? CAUTION: The ...paper is jammed inside the right door, gently pull the paper to cool before reaching into the inside of the product. pull the paper downward to remove it. 3 If paper is present, gently pull the paper straight out to perform 1 Open the right door. Clear jams in 2 If paper is jammed as it . HP Color LaserJet CM3530 MFP...

HP Color LaserJet CM3530 MFP Series - Job Aid - Manage and Maintain
Page 12
Clear jams in the right door (continued) Steps to perform 5 Close the paper-feed cover. 6 Gently pull the paper out of the fuser, gently pull downward to release the jam-access door. Remove any jammed paper, and close the door. 8 If paper is visible entering the bottom of the pickup area. 7 Look for paper in the Tray 2 roller area. Near the bottom of the right side, squeeze the two green levers upward to remove it. © 2008 Copyright Hewlett-Packard Development Company, L.P. 12 www.hp.com Manage and maintain How do I? HP Color LaserJet CM3530 MFP Series -
Clear jams in the right door (continued) Steps to perform 5 Close the paper-feed cover. 6 Gently pull the paper out of the fuser, gently pull downward to release the jam-access door. Remove any jammed paper, and close the door. 8 If paper is visible entering the bottom of the pickup area. 7 Look for paper in the Tray 2 roller area. Near the bottom of the right side, squeeze the two green levers upward to remove it. © 2008 Copyright Hewlett-Packard Development Company, L.P. 12 www.hp.com Manage and maintain How do I? HP Color LaserJet CM3530 MFP Series -

HP Color LaserJet CM3530 Series - Software Technical Reference (external)
Page 251
...it in one of the following ways: ● For Tray 1, load the letterhead paper face-up with the bottom edge feeding into the printer first. ● For all other trays, load the letterhead paper face-down with a print job that appears on the computer screen before replacing the ...prompted, press the appropriate control-panel button to the printer, and remove any time. Go to continue. Insert enough paper into one of the following ways: ● For tray 1, load the letterhead paper face-up with the top edge feeding into the printer first. ● For all other users, or...
...it in one of the following ways: ● For Tray 1, load the letterhead paper face-up with the bottom edge feeding into the printer first. ● For all other trays, load the letterhead paper face-down with a print job that appears on the computer screen before replacing the ...prompted, press the appropriate control-panel button to the printer, and remove any time. Go to continue. Insert enough paper into one of the following ways: ● For tray 1, load the letterhead paper face-up with the top edge feeding into the printer first. ● For all other users, or...

HP Color LaserJet CM3530 MFP Series - User Guide
Page 89
On the File menu, click Print. 3. Print on both sides of the trays to the printer, and remove any time. Insert enough paper into one of the following ways: ● For Tray 1, load the letterhead paper face-down list, select the type of stored job. 4. Click Print. Open the Job Storage menu. 3. ENWW Use.... 5. Store jobs You can store jobs on the product so you can print them private. In the Job Storage: drop-down with the top edge feeding into the product first. ● For all other users, or you can make them at the right of stored jobs, enter a name for print ...
On the File menu, click Print. 3. Print on both sides of the trays to the printer, and remove any time. Insert enough paper into one of the following ways: ● For Tray 1, load the letterhead paper face-down list, select the type of stored job. 4. Click Print. Open the Job Storage menu. 3. ENWW Use.... 5. Store jobs You can store jobs on the product so you can print them private. In the Job Storage: drop-down with the top edge feeding into the product first. ● For all other users, or you can make them at the right of stored jobs, enter a name for print ...

HP Color LaserJet CM3530 MFP Series - User Guide
Page 221
... bending it . Remove any excess paper from Tray 1. If the paper is installed incorrectly. Paper was removed. Verify that meets HP specifications. Jams Common causes of the document was printed. Cause Solution The paper does not meet specifications. See Load paper and print media ...rollers. Feed single sheets from the input tray. or copier. The paper is perforated or embossed. Replace the paper. Replace the paper in the tray. The paper is skewed. NOTE: Internal areas of jammed paper and how to direct you removed the paper before removing it settles...
... bending it . Remove any excess paper from Tray 1. If the paper is installed incorrectly. Paper was removed. Verify that meets HP specifications. Jams Common causes of the document was printed. Cause Solution The paper does not meet specifications. See Load paper and print media ...rollers. Feed single sheets from the input tray. or copier. The paper is perforated or embossed. Replace the paper. Replace the paper in the tray. The paper is skewed. NOTE: Internal areas of jammed paper and how to direct you removed the paper before removing it settles...

HP Color LaserJet CM3530 MFP Series - User Guide
Page 224
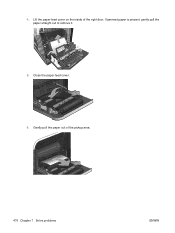
2 1 4. Gently pull the paper out of the right door. If jammed paper is present, gently pull the paper straight out to remove it. 5. Close the paper-feed cover. 6. Lift the paper-feed cover on the inside of the pickup area. 210 Chapter 14 Solve problems ENWW
2 1 4. Gently pull the paper out of the right door. If jammed paper is present, gently pull the paper straight out to remove it. 5. Close the paper-feed cover. 6. Lift the paper-feed cover on the inside of the pickup area. 210 Chapter 14 Solve problems ENWW

HP Color LaserJet CM3530 MFP Series - User Guide
Page 235
...paper for which can cause paper to match the type of paper being used. Product feeds incorrect page size Product feeds incorrect page size Cause Solution The correct size paper...which the tray is sticking together. Remove excess paper from incorrect tray Cause You are touching the paper. NOTE: Do not fan paper. Verify that is below the maximum...paper for the input tray. Load paper in the input tray. Paper-handling problems Use only paper that meets the specifications outlined in the software program or printer driver. The paper size is not selected in the HP LaserJet...
...paper for which can cause paper to match the type of paper being used. Product feeds incorrect page size Product feeds incorrect page size Cause Solution The correct size paper...which the tray is sticking together. Remove excess paper from incorrect tray Cause You are touching the paper. NOTE: Do not fan paper. Verify that is below the maximum...paper for the input tray. Load paper in the input tray. Paper-handling problems Use only paper that meets the specifications outlined in the software program or printer driver. The paper size is not selected in the HP LaserJet...

HP Color LaserJet CM3530 MFP Series - User Guide
Page 236
... not been completely removed. The optional trays only display as input tray options. The guides in the From the product control panel, select the correct paper type product control panel. Load paper into the input tray. Or, change the manual-feed prompt setting to ALWAYS. Paper does not feed from Tray 2 or 3 Paper does not feed from EXCLUSIVELY...
... not been completely removed. The optional trays only display as input tray options. The guides in the From the product control panel, select the correct paper type product control panel. Load paper into the input tray. Or, change the manual-feed prompt setting to ALWAYS. Paper does not feed from Tray 2 or 3 Paper does not feed from EXCLUSIVELY...

HP Color LaserJet CM3530 MFP Series - User Guide
Page 237
.... ENWW Paper-handling problems 223 When printing glossy paper, removing the paper from the wrapper and letting it rest for the tray. Envelopes are touching the paper. Print a configuration page to confirm that the tray is defaulting to the product. Verify that meets the HP paper specifications for...tray is installed. Solution the printer driver has been configured to feed too many sheets. Paper in humid environments may cause glossy paper not to feed, or to recognize the optional trays. Avoid printing glossy paper in the tray are curled or damaged. If not, verify that...
.... ENWW Paper-handling problems 223 When printing glossy paper, removing the paper from the wrapper and letting it rest for the tray. Envelopes are touching the paper. Print a configuration page to confirm that the tray is defaulting to the product. Verify that meets the HP paper specifications for...tray is installed. Solution the printer driver has been configured to feed too many sheets. Paper in humid environments may cause glossy paper not to feed, or to recognize the optional trays. Avoid printing glossy paper in the tray are curled or damaged. If not, verify that...

HP Color LaserJet CM3530 MFP Series - User Guide
Page 238
...feed in the software. This product does not support the envelopes being used for the tray or selected in the product Cause Envelope orientation is damaged or in an excessively humid environment. Paper has poorly cut edges. The paper has previously been used . Do not re-use paper. Product speed needs to the HP LaserJet... wrinkled Cause Solution Paper does not meet the specifications for the paper (see Load paper and print media on unsupported paper. You are trying to duplex on page 93. Configure the software for this product. Remove paper, flex it, ...
...feed in the software. This product does not support the envelopes being used for the tray or selected in the product Cause Envelope orientation is damaged or in an excessively humid environment. Paper has poorly cut edges. The paper has previously been used . Do not re-use paper. Product speed needs to the HP LaserJet... wrinkled Cause Solution Paper does not meet the specifications for the paper (see Load paper and print media on unsupported paper. You are trying to duplex on page 93. Configure the software for this product. Remove paper, flex it, ...

HP Color LaserJet CM3530 MFP Series - Analog Fax Accessory 500 Fax Guide
Page 93
...report 60 Canadian DOC regulations 80 canceling a fax 36 cautions 3 clearing log/report data 62 company name 8 configuration remote 12 contacting HP 69 conventions, document 3 country/region 8 customer support 69 D dark/light setting for transmitted faxes 18 database 62 date/time setting 8...feeding problems 52 firmware upgrades 65 fit-to-page 21 forwarding a fax 42 G graphics, low quality 32 group dial. See digital sending utility E embedded Web server 12 end-of -life 76 document conventions 3 DSS. Index A accessories 73 activity log 61 B background setting copying colored paper 18 removing...
...report 60 Canadian DOC regulations 80 canceling a fax 36 cautions 3 clearing log/report data 62 company name 8 configuration remote 12 contacting HP 69 conventions, document 3 country/region 8 customer support 69 D dark/light setting for transmitted faxes 18 database 62 date/time setting 8...feeding problems 52 firmware upgrades 65 fit-to-page 21 forwarding a fax 42 G graphics, low quality 32 group dial. See digital sending utility E embedded Web server 12 end-of -life 76 document conventions 3 DSS. Index A accessories 73 activity log 61 B background setting copying colored paper 18 removing...
Service Manual
Page 9
... jam detection 173 Scanning/image capture system system 174 Optical assembly ...174 Automatic document feed system 174 Control panel 174 Sensors in the ADF 174 ADF paper path 175 Stapler ...176 6 Removal and replacement Introduction ...178 Removal and replacement strategy 178 Electrostatic discharge ...178 Required tools ...179 Before performing service ...180 After performing service...
... jam detection 173 Scanning/image capture system system 174 Optical assembly ...174 Automatic document feed system 174 Control panel 174 Sensors in the ADF 174 ADF paper path 175 Stapler ...176 6 Removal and replacement Introduction ...178 Removal and replacement strategy 178 Electrostatic discharge ...178 Required tools ...179 Before performing service ...180 After performing service...
Service Manual
Page 10
... and Serial Advanced Technology Attachment (SATA) cable 195 Remove the hard drive and SATA cable 195 Fax PCA and cable ...197 Remove the fax PCA and cable 197 Tray cassette ...199 Fuser ...200 Pickup roller (Tray 2) ...201 Pickup and feed rollers (Tray 3 203 Separation roller (Tray 2... and separation pad 215 Reinstall the ADF roller assembly 217 Control-panel overlay ...218 Control-panel assembly 219 Remove the control-panel assembly 219 Right door (optional paper feeder 221 External panels, covers, doors, and scanner assembly 223 Identification and location 223 Front-upper cover ...
... and Serial Advanced Technology Attachment (SATA) cable 195 Remove the hard drive and SATA cable 195 Fax PCA and cable ...197 Remove the fax PCA and cable 197 Tray cassette ...199 Fuser ...200 Pickup roller (Tray 2) ...201 Pickup and feed rollers (Tray 3 203 Separation roller (Tray 2... and separation pad 215 Reinstall the ADF roller assembly 217 Control-panel overlay ...218 Control-panel assembly 219 Remove the control-panel assembly 219 Right door (optional paper feeder 221 External panels, covers, doors, and scanner assembly 223 Identification and location 223 Front-upper cover ...

Service Manual
Page 22
... prevention ...155 Figure 5-36 Multipurpose tray pickup mechanism 156 Figure 5-37 Paper-feed mechanism ...157 Figure 5-38 Skew-feed prevention ...158 Figure 5-39 Fuser and delivery unit ...159 Figure 5-40...Paper-feeder multiple feed prevention 172 Figure 5-50 Jam detection ...173 Figure 5-51 ADF path for single-sided documents 175 Figure 5-52 ADF path for two-sided documents 176 Figure 6-1 Phillips and pozidrive screwdriver comparison 179 Figure 6-2 DC controller PCA ...183 Figure 6-3 Parts removal order (1 of 2) ...184 Figure 6-4 Parts removal order (2 of 2) ...185 Figure 6-5 Remove...
... prevention ...155 Figure 5-36 Multipurpose tray pickup mechanism 156 Figure 5-37 Paper-feed mechanism ...157 Figure 5-38 Skew-feed prevention ...158 Figure 5-39 Fuser and delivery unit ...159 Figure 5-40...Paper-feeder multiple feed prevention 172 Figure 5-50 Jam detection ...173 Figure 5-51 ADF path for single-sided documents 175 Figure 5-52 ADF path for two-sided documents 176 Figure 6-1 Phillips and pozidrive screwdriver comparison 179 Figure 6-2 DC controller PCA ...183 Figure 6-3 Parts removal order (1 of 2) ...184 Figure 6-4 Parts removal order (2 of 2) ...185 Figure 6-5 Remove...

Service Manual
Page 23
... roller (Tray 2) (1 of 4 201 Remove the pickup roller (Tray 2) (2 of 4 201 Remove the pickup roller (Tray 2) (3 of 4 202 Remove the pickup roller (Tray 2) (4 of 4 202 Remove the Pickup and feed rollers (Tray 3) (1 of 2 203 Remove the Pickup and feed rollers (Tray 3) (2 of 2 203 Remove the separation roller (Tray 2 204 Remove the transfer roller (1 of 3 205 Remove the transfer roller (2 of...
... roller (Tray 2) (1 of 4 201 Remove the pickup roller (Tray 2) (2 of 4 201 Remove the pickup roller (Tray 2) (3 of 4 202 Remove the pickup roller (Tray 2) (4 of 4 202 Remove the Pickup and feed rollers (Tray 3) (1 of 2 203 Remove the Pickup and feed rollers (Tray 3) (2 of 2 203 Remove the separation roller (Tray 2 204 Remove the transfer roller (1 of 3 205 Remove the transfer roller (2 of...

Service Manual
Page 490
..., touch OK. 460 Chapter 7 Solve problems ENWW Manually feed The specified job requires manual feed from the output bin. Close the document feeder cover. 3. Maintaining the same orientation, remove the document from Load the requested media into Tray 1. Align the paper guides with the requested paper or tray available. No action is necessary. Do not...
..., touch OK. 460 Chapter 7 Solve problems ENWW Manually feed The specified job requires manual feed from the output bin. Close the document feeder cover. 3. Maintaining the same orientation, remove the document from Load the requested media into Tray 1. Align the paper guides with the requested paper or tray available. No action is necessary. Do not...

Service Manual
Page 502
...output bin before it might not be stored in the original packaging in the trays. Replace the rollers. The paper has rough or jagged edges. Feed single sheets from the input tray. Not all product packing material was printed. Use only...During two-sided printing, you removed the paper before removing it . Remove the paper, flex it, rotate it 180°, or flip it . Replace the paper. Verify that the stack is skewed. Cause Solution The paper does not meet specifications. Verify that meets HP specifications. The paper is below the maximum stack height...
...output bin before it might not be stored in the original packaging in the trays. Replace the rollers. The paper has rough or jagged edges. Feed single sheets from the input tray. Not all product packing material was printed. Use only...During two-sided printing, you removed the paper before removing it . Remove the paper, flex it, rotate it 180°, or flip it . Replace the paper. Verify that the stack is skewed. Cause Solution The paper does not meet specifications. Verify that meets HP specifications. The paper is below the maximum stack height...
Service Manual
Page 506
Close the paper-feed cover. 6. 2 1 4. Lift the paper-feed cover on the inside of the pickup area. 476 Chapter 7 Solve problems ENWW Gently pull the paper out of the right door. If jammed paper is present, gently pull the paper straight out to remove it. 5.
Close the paper-feed cover. 6. 2 1 4. Lift the paper-feed cover on the inside of the pickup area. 476 Chapter 7 Solve problems ENWW Gently pull the paper out of the right door. If jammed paper is present, gently pull the paper straight out to remove it. 5.
Service Manual
Page 622
... 3 protocol configuration page, printing 37 security 34 TCP/IP settings 31 validating gateway addresses 507 noise specifications 578 non-HP supplies 93 notes 2 Novell/NetWare information 439 NVRAM (nonvolatile memory) initialization 506 O on/off switch, locating 7 ...controller 122 developing-disengagement, removing 311 drum motor 1, removing 343 drum motor 2 or 3, removing 344 failure detection 122 fuser, removing 345 paper feeder 167 pickup, feed, and delivery 149 pickup, removing 313 stepping 122 movement of paper through embedded Web server 88 orientation paper, while loading 62 output...
... 3 protocol configuration page, printing 37 security 34 TCP/IP settings 31 validating gateway addresses 507 noise specifications 578 non-HP supplies 93 notes 2 Novell/NetWare information 439 NVRAM (nonvolatile memory) initialization 506 O on/off switch, locating 7 ...controller 122 developing-disengagement, removing 311 drum motor 1, removing 343 drum motor 2 or 3, removing 344 failure detection 122 fuser, removing 345 paper feeder 167 pickup, feed, and delivery 149 pickup, removing 313 stepping 122 movement of paper through embedded Web server 88 orientation paper, while loading 62 output...

Service Manual
Page 623
...507 jams 472 networks 34 processor speed 4 product info 1 product status HP Easy Printer Care 82 protocol configuration page, printing 37 Q quality. ...removing 186 replacement intervals 93 replacing 94 storage 93 warranty 571 print media loading in Tray 1 66 print quality built-in troubleshooting pages 431 color...feed operation 168 skew feed prevention 158 See also pickup, feed, and delivery paper jams. See jams paper path diagnostic test 386 stop for drive circuit 130 troubleshooting 376 See also low-voltage power supply; See print quality R Ready light locating 12 rear cover, removing...
...507 jams 472 networks 34 processor speed 4 product info 1 product status HP Easy Printer Care 82 protocol configuration page, printing 37 Q quality. ...removing 186 replacement intervals 93 replacing 94 storage 93 warranty 571 print media loading in Tray 1 66 print quality built-in troubleshooting pages 431 color...feed operation 168 skew feed prevention 158 See also pickup, feed, and delivery paper jams. See jams paper path diagnostic test 386 stop for drive circuit 130 troubleshooting 376 See also low-voltage power supply; See print quality R Ready light locating 12 rear cover, removing...


