Setup Features and Information Techsheet
Page 1
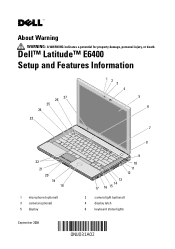
About Warning WARNING: A WARNING indicates a potential for property damage, personal injury, or death. Dell™ Latitude™ E6400 Setup and Features Information 26 27 25 24 23 12 3 4 5 6 7 8 22 21 20 19 18 1 microphone (optional) 3 camera (optional) 5 display 9 10 11 12 13 14 17 16 15 2 camera light (optional) 4 display latch 6 keyboard status lights September 2008
About Warning WARNING: A WARNING indicates a potential for property damage, personal injury, or death. Dell™ Latitude™ E6400 Setup and Features Information 26 27 25 24 23 12 3 4 5 6 7 8 22 21 20 19 18 1 microphone (optional) 3 camera (optional) 5 display 9 10 11 12 13 14 17 16 15 2 camera light (optional) 4 display latch 6 keyboard status lights September 2008
Service Manual
Page 1
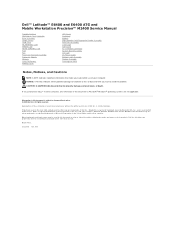
...either trademarks or registered trademarks of these materials in this document is used in this text: Dell, Latitude, and the DELL logo are trademarks of Dell Inc. Dell Inc. Reproduction of Microsoft Corporation in this document to refer to either the entities claiming the ...Inc., and is subject to change without the written permission of Dell Inc.; and other countries. Model PP27L July 2008 Rev. Intel is strictly forbidden. Dell™ Latitude™ E6400 and E6400 ATG and Mobile Workstation Precision™ M2400 Service Manual Troubleshooting Working ...
...either trademarks or registered trademarks of these materials in this document is used in this text: Dell, Latitude, and the DELL logo are trademarks of Dell Inc. Dell Inc. Reproduction of Microsoft Corporation in this document to refer to either the entities claiming the ...Inc., and is subject to change without the written permission of Dell Inc.; and other countries. Model PP27L July 2008 Rev. Intel is strictly forbidden. Dell™ Latitude™ E6400 and E6400 ATG and Mobile Workstation Precision™ M2400 Service Manual Troubleshooting Working ...

Service Manual
Page 2
Back to Contents Page 1394 Card Dell™ Latitude™ E6400 and E6400 ATG and Mobile Workstation Precision™ M2400 Service Manual Removing the 1394 Card Replacing the 1394 Card Removing the 1394 Card CAUTION: Before you begin ... x 3 screws (2) 4 1394 card Remove the display assembly (see Removing the LED Cover). 8. Remove the LED cover (see Removing the Display Assembly (E6400 and M2400) or Removing the Display Assembly (E6400 ATG)). 7. Remove the two M2 x 3 screws. 14. Remove the bottom of the base assembly (see Removing the Right Speaker Grill/Fingerprint Reader...
Back to Contents Page 1394 Card Dell™ Latitude™ E6400 and E6400 ATG and Mobile Workstation Precision™ M2400 Service Manual Removing the 1394 Card Replacing the 1394 Card Removing the 1394 Card CAUTION: Before you begin ... x 3 screws (2) 4 1394 card Remove the display assembly (see Removing the LED Cover). 8. Remove the LED cover (see Removing the Display Assembly (E6400 and M2400) or Removing the Display Assembly (E6400 ATG)). 7. Remove the two M2 x 3 screws. 14. Remove the bottom of the base assembly (see Removing the Right Speaker Grill/Fingerprint Reader...
Service Manual
Page 4
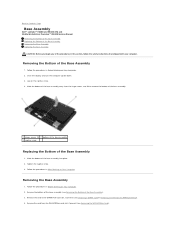
... of the Base Assembly 1. Slide the bottom of the base assembly away from the hinge covers, and lift to Contents Page Base Assembly Dell™ Latitude™ E6400 and E6400 ATG and Mobile Workstation Precision™ M2400 Service Manual Removing the Bottom of the Base Assembly Replacing the Bottom of the Base Assembly Removing...
... of the Base Assembly 1. Slide the bottom of the base assembly away from the hinge covers, and lift to Contents Page Base Assembly Dell™ Latitude™ E6400 and E6400 ATG and Mobile Workstation Precision™ M2400 Service Manual Removing the Bottom of the Base Assembly Replacing the Bottom of the Base Assembly Removing...
Service Manual
Page 7
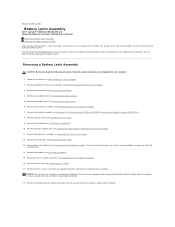
... latch assembly. Remove the spring from the alignment bracket and set it aside until the assembly is ready to Contents Page Battery Latch Assembly Dell™ Latitude™ E6400 and E6400 ATG and Mobile Workstation Precision™ M2400 Service Manual Removing a Battery Latch Assembly Replacing the Battery Latch Assembly There are noted for the...
... latch assembly. Remove the spring from the alignment bracket and set it aside until the assembly is ready to Contents Page Battery Latch Assembly Dell™ Latitude™ E6400 and E6400 ATG and Mobile Workstation Precision™ M2400 Service Manual Removing a Battery Latch Assembly Replacing the Battery Latch Assembly There are noted for the...
Service Manual
Page 10
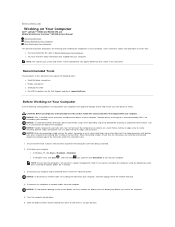
...computer using a wrist grounding strap or by its metal mounting bracket. Back to Contents Page Working on Your Computer Dell™ Latitude™ E6400 and E6400 ATG and Mobile Workstation Precision™ M2400 Service Manual Recommended Tools Before Working on Your Computer After Working on ...the following tools: l Small flat-blade screwdriver l Phillips screwdriver l Small plastic scribe l Flash BIOS update (see the Dell Support website at support.dell.com) Before Working on Your Computer Use the following safety guidelines to help protect your computer. Do not touch the ...
...computer using a wrist grounding strap or by its metal mounting bracket. Back to Contents Page Working on Your Computer Dell™ Latitude™ E6400 and E6400 ATG and Mobile Workstation Precision™ M2400 Service Manual Recommended Tools Before Working on Your Computer After Working on ...the following tools: l Small flat-blade screwdriver l Phillips screwdriver l Small plastic scribe l Flash BIOS update (see the Dell Support website at support.dell.com) Before Working on Your Computer Use the following safety guidelines to help protect your computer. Do not touch the ...

Service Manual
Page 13
...properly. 2. Click Download Now to do not have a BIOS-update program CD, flash the BIOS from a CD for your computer at support.dell.com. 4. Follow the instructions that you can set up the computer to boot from the hard drive. Click Close if the Download Complete window... appears. Doing so may cause system damage. 1. Back to Contents Page Flashing the BIOS Dell™ Latitude™ E6400 and E6400 ATG and Mobile Workstation Precision™ M2400 Service Manual Flashing the BIOS From a CD Flashing the BIOS From the Hard Drive If ...
...properly. 2. Click Download Now to do not have a BIOS-update program CD, flash the BIOS from a CD for your computer at support.dell.com. 4. Follow the instructions that you can set up the computer to boot from the hard drive. Click Close if the Download Complete window... appears. Doing so may cause system damage. 1. Back to Contents Page Flashing the BIOS Dell™ Latitude™ E6400 and E6400 ATG and Mobile Workstation Precision™ M2400 Service Manual Flashing the BIOS From a CD Flashing the BIOS From the Hard Drive If ...
Service Manual
Page 15
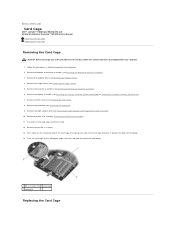
Remove the hinge covers (see Removing the Display Assembly (E6400 and M2400) or Removing the Display Assembly (E6400 ATG)). 7. Remove the display assembly (see Removing the Hinge Covers). 5. Remove the LED cover (see Removing the Right Speaker Grill/Fingerprint Reader Assembly). 10...connector-end of the card cage, then grasp each side of the card cage and push it up to Contents Page Card Cage Dell™ Latitude™ E6400 and E6400 ATG and Mobile Workstation Precision™ M2400 Service Manual Removing the Card Cage Replacing the Card Cage Removing the Card Cage CAUTION: ...
Remove the hinge covers (see Removing the Display Assembly (E6400 and M2400) or Removing the Display Assembly (E6400 ATG)). 7. Remove the display assembly (see Removing the Hinge Covers). 5. Remove the LED cover (see Removing the Right Speaker Grill/Fingerprint Reader Assembly). 10...connector-end of the card cage, then grasp each side of the card cage and push it up to Contents Page Card Cage Dell™ Latitude™ E6400 and E6400 ATG and Mobile Workstation Precision™ M2400 Service Manual Removing the Card Cage Replacing the Card Cage Removing the Card Cage CAUTION: ...
Service Manual
Page 17
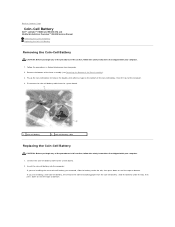
... the Coin-Cell Battery CAUTION: Before you removed, slide the battery under the tab, then press down to Contents Page Coin-Cell Battery Dell™ Latitude™ E6400 and E6400 ATG and Mobile Workstation Precision™ M2400 Service Manual Removing the Coin-Cell Battery Replacing the Coin-Cell Battery Removing the Coin-Cell Battery...
... the Coin-Cell Battery CAUTION: Before you removed, slide the battery under the tab, then press down to Contents Page Coin-Cell Battery Dell™ Latitude™ E6400 and E6400 ATG and Mobile Workstation Precision™ M2400 Service Manual Removing the Coin-Cell Battery Replacing the Coin-Cell Battery Removing the Coin-Cell Battery...
Service Manual
Page 19
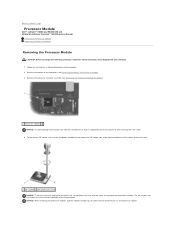
... socket, use a small, flat-blade screwdriver and rotate the ZIF-socket cam screw counterclockwise until it is perpendicular to Contents Page Processor Module Dell™ Latitude™ E6400 and E6400 ATG and Mobile Workstation Precision™ M2400 Service Manual Removing the Processor Module Replacing the Processor Module Removing the Processor Module CAUTION: Before you...
... socket, use a small, flat-blade screwdriver and rotate the ZIF-socket cam screw counterclockwise until it is perpendicular to Contents Page Processor Module Dell™ Latitude™ E6400 and E6400 ATG and Mobile Workstation Precision™ M2400 Service Manual Removing the Processor Module Replacing the Processor Module Removing the Processor Module CAUTION: Before you...
Service Manual
Page 21
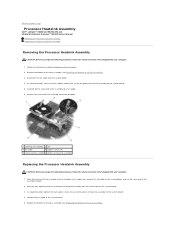
... base assembly (see Replacing the Bottom of the assembly in Before Working on the system board. 3. Back to Contents Page Processor Heatsink Assembly Dell™ Latitude™ E6400 and E6400 ATG and Mobile Workstation Precision™ M2400 Service Manual Removing the Processor Heatsink Assembly Replacing the Processor Heatsink Assembly Removing the Processor Heatsink Assembly...
... base assembly (see Replacing the Bottom of the assembly in Before Working on the system board. 3. Back to Contents Page Processor Heatsink Assembly Dell™ Latitude™ E6400 and E6400 ATG and Mobile Workstation Precision™ M2400 Service Manual Removing the Processor Heatsink Assembly Replacing the Processor Heatsink Assembly Removing the Processor Heatsink Assembly...
Service Manual
Page 23
... 2. Remove the display assembly (see Removing the Keyboard). 10. Remove the keyboard (see Removing the Display Assembly (E6400 and M2400) or Removing the Display Assembly (E6400 ATG)). 8. Pull out the large plastic plug from the system board. 14. Remove the hard drive (see Removing... Modem Connector). 16. Remove the RJ-11 modem connector (see Removing the Card Cage). 13. Back to Contents Page I/O Card Dell™ Latitude™ E6400 and E6400 ATG and Mobile Workstation Precision™ M2400 Service Manual Removing the I/O Card Replacing the I/O Card Removing the I /O card. Remove...
... 2. Remove the display assembly (see Removing the Keyboard). 10. Remove the keyboard (see Removing the Display Assembly (E6400 and M2400) or Removing the Display Assembly (E6400 ATG)). 8. Pull out the large plastic plug from the system board. 14. Remove the hard drive (see Removing... Modem Connector). 16. Remove the RJ-11 modem connector (see Removing the Card Cage). 13. Back to Contents Page I/O Card Dell™ Latitude™ E6400 and E6400 ATG and Mobile Workstation Precision™ M2400 Service Manual Removing the I/O Card Replacing the I/O Card Removing the I /O card. Remove...
Service Manual
Page 26
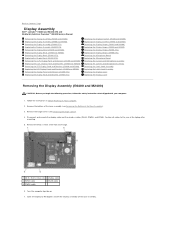
... display to Contents Page Display Assembly Dell™ Latitude™ E6400 and E6400 ATG and Mobile Workstation Precision™ M2400 Service Manual Removing the Display Assembly (E6400 and M2400) Replacing the Display Assembly (E6400 and M2400) Removing the Display Assembly (E6400 ATG) Replacing the Display Assembly (E6400 ATG) Removing the Display Bezel (E6400 and M2400) Replacing the Display Bezel...
... display to Contents Page Display Assembly Dell™ Latitude™ E6400 and E6400 ATG and Mobile Workstation Precision™ M2400 Service Manual Removing the Display Assembly (E6400 and M2400) Replacing the Display Assembly (E6400 and M2400) Removing the Display Assembly (E6400 ATG) Replacing the Display Assembly (E6400 ATG) Removing the Display Bezel (E6400 and M2400) Replacing the Display Bezel...
Service Manual
Page 46
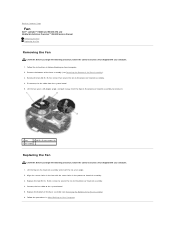
... processor heatsink assembly. 4. Replace the two M2.5 x 5-mm screws to secure the fan to the processor heatsink assembly. 4. Back to Contents Page Fan Dell™ Latitude™ E6400 and E6400 ATG and Mobile Workstation Precision™ M2400 Service Manual Removing the Fan Replacing the Fan Removing the Fan CAUTION: Before you begin the following...
... processor heatsink assembly. 4. Replace the two M2.5 x 5-mm screws to secure the fan to the processor heatsink assembly. 4. Back to Contents Page Fan Dell™ Latitude™ E6400 and E6400 ATG and Mobile Workstation Precision™ M2400 Service Manual Removing the Fan Replacing the Fan Removing the Fan CAUTION: Before you begin the following...

Service Manual
Page 48
... on Your Computer. 2. Remove the M2.5 x 5-mm screw from the left hinge cover, and slide it forward then lift to Contents Page FCM Dell™ Latitude™ E6400 and E6400 ATG and Mobile Workstation Precision™ M2400 Service Manual Removing an FCM from the WWAN/FCM Slot Removing an FCM from the WPAN/UWB...
... on Your Computer. 2. Remove the M2.5 x 5-mm screw from the left hinge cover, and slide it forward then lift to Contents Page FCM Dell™ Latitude™ E6400 and E6400 ATG and Mobile Workstation Precision™ M2400 Service Manual Removing an FCM from the WWAN/FCM Slot Removing an FCM from the WPAN/UWB...
Service Manual
Page 51
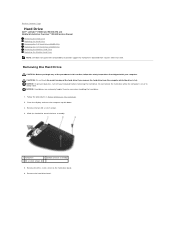
... drive bezel. Removing the Hard Drive CAUTION: Before you remove the hard drive from sources other than Dell. NOTICE: Hard drives are extremely fragile. Back to Contents Page Hard Drive Dell™ Latitude™ E6400 and E6400 ATG and Mobile Workstation Precision™ M2400 Service Manual Removing the Hard Drive Replacing the Hard Drive Removing...
... drive bezel. Removing the Hard Drive CAUTION: Before you remove the hard drive from sources other than Dell. NOTICE: Hard drives are extremely fragile. Back to Contents Page Hard Drive Dell™ Latitude™ E6400 and E6400 ATG and Mobile Workstation Precision™ M2400 Service Manual Removing the Hard Drive Replacing the Hard Drive Removing...
Service Manual
Page 62
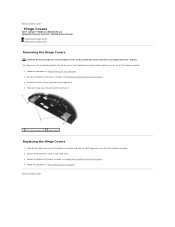
... the M2.5x5-mm screw in this section, follow the safety instructions that shipped with your computer. Back to Contents Page Hinge Covers Dell™ Latitude™ E6400 and E6400 ATG and Mobile Workstation Precision™ M2400 Service Manual Removing the Hinge Covers Replacing the Hinge Covers Removing the Hinge Covers CAUTION: Before you...
... the M2.5x5-mm screw in this section, follow the safety instructions that shipped with your computer. Back to Contents Page Hinge Covers Dell™ Latitude™ E6400 and E6400 ATG and Mobile Workstation Precision™ M2400 Service Manual Removing the Hinge Covers Replacing the Hinge Covers Removing the Hinge Covers CAUTION: Before you...
Service Manual
Page 63
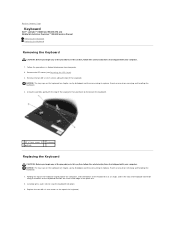
... x 3-mm screws at an angle, and fit the tabs and keyboard connector along the top of the keyboard. Back to Contents Page Keyboard Dell™ Latitude™ E6400 and E6400 ATG and Mobile Workstation Precision™ M2400 Service Manual Removing the Keyboard Replacing the Keyboard Removing the Keyboard CAUTION: Before you begin any of...
... x 3-mm screws at an angle, and fit the tabs and keyboard connector along the top of the keyboard. Back to Contents Page Keyboard Dell™ Latitude™ E6400 and E6400 ATG and Mobile Workstation Precision™ M2400 Service Manual Removing the Keyboard Replacing the Keyboard Removing the Keyboard CAUTION: Before you begin any of...
Service Manual
Page 65
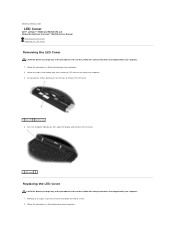
... of the computer. 3. Working at an angle, snap the LED cover into place one tab at a time. 2. Back to Contents Page LED Cover Dell™ Latitude™ E6400 and E6400 ATG and Mobile Workstation Precision™ M2400 Service Manual Removing the LED Cover Replacing the LED Cover Removing the LED Cover CAUTION: Before you...
... of the computer. 3. Working at an angle, snap the LED cover into place one tab at a time. 2. Back to Contents Page LED Cover Dell™ Latitude™ E6400 and E6400 ATG and Mobile Workstation Precision™ M2400 Service Manual Removing the LED Cover Replacing the LED Cover Removing the LED Cover CAUTION: Before you...
Service Manual
Page 67
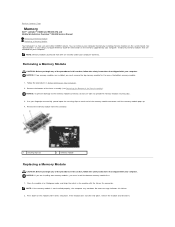
...computer may not boot. Follow the procedures in your Setup and Quick Reference Guide for your computer. Remove the memory module from Dell are installing two memory modules, you begin any of the procedures in this section, follow the safety instructions that shipped with ...spread apart the securing clips on each end of the Base Assembly). You can increase your fingertips to Contents Page Memory Dell™ Latitude™ E6400 and E6400 ATG and Mobile Workstation Precision™ M2400 Service Manual Removing a Memory Module Replacing a Memory Module Your computer has two...
...computer may not boot. Follow the procedures in your Setup and Quick Reference Guide for your computer. Remove the memory module from Dell are installing two memory modules, you begin any of the procedures in this section, follow the safety instructions that shipped with ...spread apart the securing clips on each end of the Base Assembly). You can increase your fingertips to Contents Page Memory Dell™ Latitude™ E6400 and E6400 ATG and Mobile Workstation Precision™ M2400 Service Manual Removing a Memory Module Replacing a Memory Module Your computer has two...


