Replacing the System Board
Page 1
... bottom access panel (see your computer. Setting the AMT Manageability Mode NOTE: For Dell™ Latitude™ E5400 and E5500 computers, and for Dell Precision™ M6400 Mobile Workstations, skip this section, read the safety information that shipped with your Service Manual). 2 Take note of the label that you need to the inside of...
... bottom access panel (see your computer. Setting the AMT Manageability Mode NOTE: For Dell™ Latitude™ E5400 and E5500 computers, and for Dell Precision™ M6400 Mobile Workstations, skip this section, read the safety information that shipped with your Service Manual). 2 Take note of the label that you need to the inside of...
Replacing the System Board
Page 2
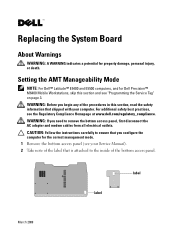
... on the inside the bottom access panel. 7 If this process is displayed. CAUTION: Ensure that you make the wrong selection, your Service Manual. 4 Disconnect the network cable, if applicable, and the mass storage devices like hard drives or USB flash keys. 9 Restart the computer....obtained from the label inside of the chassis: NOTE: If the original configuration-mode label is missing, damaged, or otherwise illegible, contact Dell to select the appropriate configuration for contact information). 3 Replace the bottom access panel. NOTE: For information on replacing the system board, ...
... on the inside the bottom access panel. 7 If this process is displayed. CAUTION: Ensure that you make the wrong selection, your Service Manual. 4 Disconnect the network cable, if applicable, and the mass storage devices like hard drives or USB flash keys. 9 Restart the computer....obtained from the label inside of the chassis: NOTE: If the original configuration-mode label is missing, damaged, or otherwise illegible, contact Dell to select the appropriate configuration for contact information). 3 Replace the bottom access panel. NOTE: For information on replacing the system board, ...
Replacing the Bottom Access Panel
Page 1
... injury, or death. June 2008 To replace the bottom access panel of your Service Manual). Follow the instructions on this section, read the safety information that shipped with your Service Manual). • Select the correct label that is located on the replacement bottom access-panel...original bottom access-panel of your computer, you need to obtain your iAMT configuration-mode number (see the Regulatory Compliance Homepage at www.dell.com/regulatory_compliance. NOTICE: If you : • Remove the original bottom access-panel from all electrical outlets. NOTE: If the ...
... injury, or death. June 2008 To replace the bottom access panel of your Service Manual). Follow the instructions on this section, read the safety information that shipped with your Service Manual). • Select the correct label that is located on the replacement bottom access-panel...original bottom access-panel of your computer, you need to obtain your iAMT configuration-mode number (see the Regulatory Compliance Homepage at www.dell.com/regulatory_compliance. NOTICE: If you : • Remove the original bottom access-panel from all electrical outlets. NOTE: If the ...

Replacing the Bottom Access Panel
Page 2
.... and other than its own. Other trademarks and trade names may be used in this text: Dell and the DELL logo are trademarks of Dell Inc.; Dell Inc. All rights reserved. iAMT is subject to the inside of the bottom access panel: 3 Select the matching label from the set of four iAMT ... countries. Trademarks used in this document is a registered trademark of these materials in any proprietary interest in the U.S. label label You should see your Service Manual). disclaims any manner whatsoever without notice. © 2008...
.... and other than its own. Other trademarks and trade names may be used in this text: Dell and the DELL logo are trademarks of Dell Inc.; Dell Inc. All rights reserved. iAMT is subject to the inside of the bottom access panel: 3 Select the matching label from the set of four iAMT ... countries. Trademarks used in this document is a registered trademark of these materials in any proprietary interest in the U.S. label label You should see your Service Manual). disclaims any manner whatsoever without notice. © 2008...

Identifying the Correct Modem for Your Dell Notebook
Page 1
...included as required. disclaims any manner whatsoever without notice. © 2009 Dell Inc. Dell Inc. WARNING: Before you remove the bottom access panel. For additional safety best practices, see the Service Manual available on the memory SODIMM connector. NOTE: For more information, see... the Regulatory Compliance Homepage at support.dell.com/manuals. 1 Remove the bottom access panel of the procedures in trademarks and...
...included as required. disclaims any manner whatsoever without notice. © 2009 Dell Inc. Dell Inc. WARNING: Before you remove the bottom access panel. For additional safety best practices, see the Service Manual available on the memory SODIMM connector. NOTE: For more information, see... the Regulatory Compliance Homepage at support.dell.com/manuals. 1 Remove the bottom access panel of the procedures in trademarks and...
Service Manual
Page 1
... without notice. © 2008 Dell Inc. Bluetooth is used in this text: Dell, Latitude, and the DELL logo are trademarks of Dell Inc.; Intel is strictly forbidden. Dell Inc. Dell™ Latitude™ E6400 and E6400 ATG and Mobile Workstation Precision™ M2400 Service Manual Troubleshooting Working on Your Computer Base...2008 Rev. Other trademarks and trade names may be used by Bluetooth SIG, Inc., and is a registered trademark owned by Dell under license; NOTICE: A NOTICE indicates either potential damage to hardware or loss of data and tells you make better use...
... without notice. © 2008 Dell Inc. Bluetooth is used in this text: Dell, Latitude, and the DELL logo are trademarks of Dell Inc.; Intel is strictly forbidden. Dell Inc. Dell™ Latitude™ E6400 and E6400 ATG and Mobile Workstation Precision™ M2400 Service Manual Troubleshooting Working on Your Computer Base...2008 Rev. Other trademarks and trade names may be used by Bluetooth SIG, Inc., and is a registered trademark owned by Dell under license; NOTICE: A NOTICE indicates either potential damage to hardware or loss of data and tells you make better use...

Service Manual
Page 2
... (2) 4 1394 card Remove the palm rest assembly (Removing the Palm Rest Assembly). 11. Back to Contents Page 1394 Card Dell™ Latitude™ E6400 and E6400 ATG and Mobile Workstation Precision™ M2400 Service Manual Removing the 1394 Card Replacing the 1394 Card Removing the 1394 Card CAUTION: Before you begin the following procedure, follow...
... (2) 4 1394 card Remove the palm rest assembly (Removing the Palm Rest Assembly). 11. Back to Contents Page 1394 Card Dell™ Latitude™ E6400 and E6400 ATG and Mobile Workstation Precision™ M2400 Service Manual Removing the 1394 Card Replacing the 1394 Card Removing the 1394 Card CAUTION: Before you begin the following procedure, follow...
Service Manual
Page 4
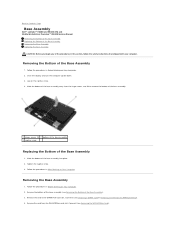
... After Working on Your Computer. Remove the card from the hinge covers, and lift to Contents Page Base Assembly Dell™ Latitude™ E6400 and E6400 ATG and Mobile Workstation Precision™ M2400 Service Manual Removing the Bottom of the Base Assembly Replacing the Bottom of the Base Assembly Removing the Base Assembly Replacing the...
... After Working on Your Computer. Remove the card from the hinge covers, and lift to Contents Page Base Assembly Dell™ Latitude™ E6400 and E6400 ATG and Mobile Workstation Precision™ M2400 Service Manual Removing the Bottom of the Base Assembly Replacing the Bottom of the Base Assembly Removing the Base Assembly Replacing the...
Service Manual
Page 7
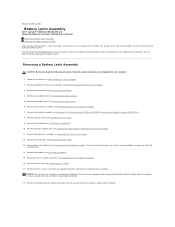
... and set it aside until the assembly is ready to Contents Page Battery Latch Assembly Dell™ Latitude™ E6400 and E6400 ATG and Mobile Workstation Precision™ M2400 Service Manual Removing a Battery Latch Assembly Replacing the Battery Latch Assembly There are different for the ... from the alignment bracket, and remove the battery latch assembly. Remove the I/O card (see Removing the Display Assembly (E6400 and M2400) or Removing the Display Assembly (E6400 ATG)). 8. Remove the palm rest assembly (see Removing the Hinge Covers). 6. Remove the M2 x 3-mm screw from...
... and set it aside until the assembly is ready to Contents Page Battery Latch Assembly Dell™ Latitude™ E6400 and E6400 ATG and Mobile Workstation Precision™ M2400 Service Manual Removing a Battery Latch Assembly Replacing the Battery Latch Assembly There are different for the ... from the alignment bracket, and remove the battery latch assembly. Remove the I/O card (see Removing the Display Assembly (E6400 and M2400) or Removing the Display Assembly (E6400 ATG)). 8. Remove the palm rest assembly (see Removing the Hinge Covers). 6. Remove the M2 x 3-mm screw from...
Service Manual
Page 10
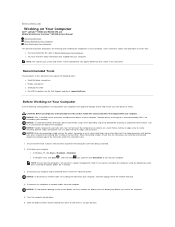
... to servicing that : l You have read the safety information that shipped with your computer. Hold a card by its edges or by Dell is off your warranty. l In Windows XP, click Start® Shutdown® Shutdown. NOTICE: To help protect your computer from being... computer. If you service the computer. 5. Back to Contents Page Working on Your Computer Dell™ Latitude™ E6400 and E6400 ATG and Mobile Workstation Precision™ M2400 Service Manual Recommended Tools Before Working on Your Computer After Working on Your Computer This document provides procedures for...
... to servicing that : l You have read the safety information that shipped with your computer. Hold a card by its edges or by Dell is off your warranty. l In Windows XP, click Start® Shutdown® Shutdown. NOTICE: To help protect your computer from being... computer. If you service the computer. 5. Back to Contents Page Working on Your Computer Dell™ Latitude™ E6400 and E6400 ATG and Mobile Workstation Precision™ M2400 Service Manual Recommended Tools Before Working on Your Computer After Working on Your Computer This document provides procedures for...

Service Manual
Page 13
... network cable is attached. 2. Otherwise, you do not have a BIOS-update program CD, flash the BIOS from a CD for your computer at support.dell.com. 4. If the Export Compliance Disclaimer window appears, click Yes, I Accept this program to disk, and then click OK. The Save In window ... updates the new BIOS. Click Download Now to Contents Page Back to Contents Page Flashing the BIOS Dell™ Latitude™ E6400 and E6400 ATG and Mobile Workstation Precision™ M2400 Service Manual Flashing the BIOS From a CD Flashing the BIOS From the Hard Drive If a BIOS-update program...
... network cable is attached. 2. Otherwise, you do not have a BIOS-update program CD, flash the BIOS from a CD for your computer at support.dell.com. 4. If the Export Compliance Disclaimer window appears, click Yes, I Accept this program to disk, and then click OK. The Save In window ... updates the new BIOS. Click Download Now to Contents Page Back to Contents Page Flashing the BIOS Dell™ Latitude™ E6400 and E6400 ATG and Mobile Workstation Precision™ M2400 Service Manual Flashing the BIOS From a CD Flashing the BIOS From the Hard Drive If a BIOS-update program...
Service Manual
Page 15
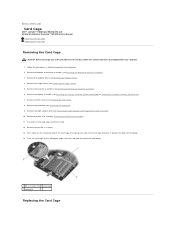
..., follow the safety instructions that shipped with your computer. 1. Remove the hinge covers (see Removing the Display Assembly (E6400 and M2400) or Removing the Display Assembly (E6400 ATG)). 7. Remove the keyboard (see Removing the Bottom of the Base Assembly). 3. Back to a 45-degree angle...(see Removing the LED Cover). 8. Pivot the card cage up to Contents Page Card Cage Dell™ Latitude™ E6400 and E6400 ATG and Mobile Workstation Precision™ M2400 Service Manual Removing the Card Cage Replacing the Card Cage Removing the Card Cage CAUTION: Before you begin any...
..., follow the safety instructions that shipped with your computer. 1. Remove the hinge covers (see Removing the Display Assembly (E6400 and M2400) or Removing the Display Assembly (E6400 ATG)). 7. Remove the keyboard (see Removing the Bottom of the Base Assembly). 3. Back to a 45-degree angle...(see Removing the LED Cover). 8. Pivot the card cage up to Contents Page Card Cage Dell™ Latitude™ E6400 and E6400 ATG and Mobile Workstation Precision™ M2400 Service Manual Removing the Card Cage Replacing the Card Cage Removing the Card Cage CAUTION: Before you begin any...
Service Manual
Page 17
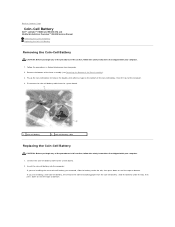
Back to Contents Page Coin-Cell Battery Dell™ Latitude™ E6400 and E6400 ATG and Mobile Workstation Precision™ M2400 Service Manual Removing the Coin-Cell Battery Replacing the Coin-Cell Battery Removing the Coin-Cell Battery CAUTION: Before you begin any of the computer. 4. Pry up ...
Back to Contents Page Coin-Cell Battery Dell™ Latitude™ E6400 and E6400 ATG and Mobile Workstation Precision™ M2400 Service Manual Removing the Coin-Cell Battery Replacing the Coin-Cell Battery Removing the Coin-Cell Battery CAUTION: Before you begin any of the computer. 4. Pry up ...
Service Manual
Page 19
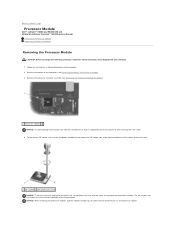
..., do not touch the heat transfer areas on the processor heatsink assembly. Be careful not to Contents Page Processor Module Dell™ Latitude™ E6400 and E6400 ATG and Mobile Workstation Precision™ M2400 Service Manual Removing the Processor Module Replacing the Processor Module Removing the Processor Module CAUTION: Before you begin the following procedure...
..., do not touch the heat transfer areas on the processor heatsink assembly. Be careful not to Contents Page Processor Module Dell™ Latitude™ E6400 and E6400 ATG and Mobile Workstation Precision™ M2400 Service Manual Removing the Processor Module Replacing the Processor Module Removing the Processor Module CAUTION: Before you begin the following procedure...
Service Manual
Page 21
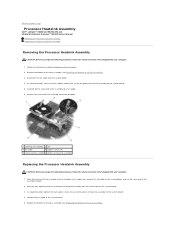
... Removing the Bottom of the assembly into the computer at an angle. 6. Back to Contents Page Processor Heatsink Assembly Dell™ Latitude™ E6400 and E6400 ATG and Mobile Workstation Precision™ M2400 Service Manual Removing the Processor Heatsink Assembly Replacing the Processor Heatsink Assembly Removing the Processor Heatsink Assembly CAUTION: Before you begin the...
... Removing the Bottom of the assembly into the computer at an angle. 6. Back to Contents Page Processor Heatsink Assembly Dell™ Latitude™ E6400 and E6400 ATG and Mobile Workstation Precision™ M2400 Service Manual Removing the Processor Heatsink Assembly Replacing the Processor Heatsink Assembly Removing the Processor Heatsink Assembly CAUTION: Before you begin the...
Service Manual
Page 23
... the System Board Assembly). Remove the system board (see Removing the Display Assembly (E6400 and M2400) or Removing the Display Assembly (E6400 ATG)). 8. Back to Contents Page I/O Card Dell™ Latitude™ E6400 and E6400 ATG and Mobile Workstation Precision™ M2400 Service Manual Removing the I/O Card Replacing the I/O Card Removing the I /O card. 18. Pull out the...
... the System Board Assembly). Remove the system board (see Removing the Display Assembly (E6400 and M2400) or Removing the Display Assembly (E6400 ATG)). 8. Back to Contents Page I/O Card Dell™ Latitude™ E6400 and E6400 ATG and Mobile Workstation Precision™ M2400 Service Manual Removing the I/O Card Replacing the I/O Card Removing the I /O card. 18. Pull out the...
Service Manual
Page 26
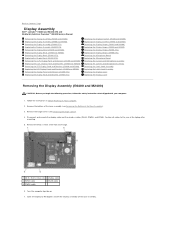
Position all cables to Contents Page Display Assembly Dell™ Latitude™ E6400 and E6400 ATG and Mobile Workstation Precision™ M2400 Service Manual Removing the Display Assembly (E6400 and M2400) Replacing the Display Assembly (E6400 and M2400) Removing the Display Assembly (E6400 ATG) Replacing the Display Assembly (E6400 ATG) Removing the Display Bezel (E6400 and M2400) Replacing the Display Bezel...
Position all cables to Contents Page Display Assembly Dell™ Latitude™ E6400 and E6400 ATG and Mobile Workstation Precision™ M2400 Service Manual Removing the Display Assembly (E6400 and M2400) Replacing the Display Assembly (E6400 and M2400) Removing the Display Assembly (E6400 ATG) Replacing the Display Assembly (E6400 ATG) Removing the Display Bezel (E6400 and M2400) Replacing the Display Bezel...
Service Manual
Page 46
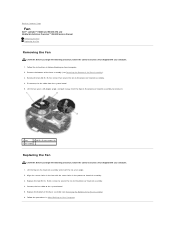
Back to Contents Page Fan Dell™ Latitude™ E6400 and E6400 ATG and Mobile Workstation Precision™ M2400 Service Manual Removing the Fan Replacing the Fan Removing the Fan CAUTION: Before you begin the following procedure, follow the safety instructions that secure the fan to ...
Back to Contents Page Fan Dell™ Latitude™ E6400 and E6400 ATG and Mobile Workstation Precision™ M2400 Service Manual Removing the Fan Replacing the Fan Removing the Fan CAUTION: Before you begin the following procedure, follow the safety instructions that secure the fan to ...

Service Manual
Page 48
... the M2.5 x 5-mm screw from the left hinge cover, and slide it forward then lift to Contents Page FCM Dell™ Latitude™ E6400 and E6400 ATG and Mobile Workstation Precision™ M2400 Service Manual Removing an FCM from the WWAN/FCM Slot Removing an FCM from the WPAN/UWB/FCM Slot Replacing an FCM...
... the M2.5 x 5-mm screw from the left hinge cover, and slide it forward then lift to Contents Page FCM Dell™ Latitude™ E6400 and E6400 ATG and Mobile Workstation Precision™ M2400 Service Manual Removing an FCM from the WWAN/FCM Slot Removing an FCM from the WPAN/UWB/FCM Slot Replacing an FCM...
Service Manual
Page 51
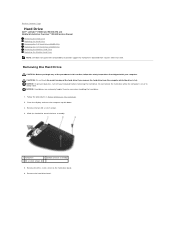
... hard drive from sources other than Dell. Follow the procedures in Before Working on the hard drive bezel. 6. Back to Contents Page Hard Drive Dell™ Latitude™ E6400 and E6400 ATG and Mobile Workstation Precision™ M2400 Service Manual Removing the Hard Drive Replacing the ...Hard Drive Removing the 1.8" Hard Drive (E6400 ATG) Replacing the 1.8" Hard Drive (E6400 ATG) Removing the Modular Hard Drive...
... hard drive from sources other than Dell. Follow the procedures in Before Working on the hard drive bezel. 6. Back to Contents Page Hard Drive Dell™ Latitude™ E6400 and E6400 ATG and Mobile Workstation Precision™ M2400 Service Manual Removing the Hard Drive Replacing the ...Hard Drive Removing the 1.8" Hard Drive (E6400 ATG) Replacing the 1.8" Hard Drive (E6400 ATG) Removing the Modular Hard Drive...


