

Dell Users Guide
Page 10
... machine depending on the machine's firmware/driver version. • The procedures in this guide are mainly based on Windows 7. 2 General icons Icon Text Description Gives users information to printer or MFP. 1. Introduction 10 About this user's guide This user's guide provides information for your basic understanding of the machine function and feature...
... machine depending on the machine's firmware/driver version. • The procedures in this guide are mainly based on Windows 7. 2 General icons Icon Text Description Gives users information to printer or MFP. 1. Introduction 10 About this user's guide This user's guide provides information for your basic understanding of the machine function and feature...

Dell Users Guide
Page 50
Basic printing 10 Canceling a print job If the print job is waiting in the print queue or print spooler, cancel the job as follows: • You can access this window by simply double-clicking the machine icon ( ) in the Windows task bar. • You can also cancel the current job by pressing (Stop/Clear) on the control panel. 2. Menu overview and basic setup 50
Basic printing 10 Canceling a print job If the print job is waiting in the print queue or print spooler, cancel the job as follows: • You can access this window by simply double-clicking the machine icon ( ) in the Windows task bar. • You can also cancel the current job by pressing (Stop/Clear) on the control panel. 2. Menu overview and basic setup 50

Dell Users Guide
Page 104
Appendix 104 Specifications 3 System requirements Microsoft® Windows® Operating system Windows® 2000 Windows® XP Windows Server® 2003 Windows Server® 2008 Windows Vista® Windows® 7 Windows Server® 2008 R2 Windows® 8 Requirement (recommended) CPU Intel® Pentium® II 400 MHz (Pentium III 933 MHz) Intel® Pentium® III 933 MHz (Pentium IV...® Pentium® IV 1 GHz 32-bit or 64-bit processor or higher 1 GB (2 GB) free HDD space 600 MB 1.5 GB 1.25 GB to 2 GB 10 GB 15 GB 16 GB...
Appendix 104 Specifications 3 System requirements Microsoft® Windows® Operating system Windows® 2000 Windows® XP Windows Server® 2003 Windows Server® 2008 Windows Vista® Windows® 7 Windows Server® 2008 R2 Windows® 8 Requirement (recommended) CPU Intel® Pentium® II 400 MHz (Pentium III 933 MHz) Intel® Pentium® III 933 MHz (Pentium IV...® Pentium® IV 1 GHz 32-bit or 64-bit processor or higher 1 GB (2 GB) free HDD space 600 MB 1.5 GB 1.25 GB to 2 GB 10 GB 15 GB 16 GB...

Dell Users Guide
Page 105
... systems. • Users who have administrator rights can install the software. • Windows Terminal Services is compatible with your machine. • For Windows 2000, Services Pack 4 or higher is required. Mac Operating system Mac OS X 10.5 Mac OS X 10.6 Mac OS X 10.7 CPU • Intel® processors • 867 MHz or faster Power PC G4...
... systems. • Users who have administrator rights can install the software. • Windows Terminal Services is compatible with your machine. • For Windows 2000, Services Pack 4 or higher is required. Mac Operating system Mac OS X 10.5 Mac OS X 10.6 Mac OS X 10.7 CPU • Intel® processors • 867 MHz or faster Power PC G4...

Dell Users Guide
Page 108
Items Network interface Network operating system Network protocols Wireless security Specifications • Ethernet 10/100 Base-TX Wired Lan • Windows 2000/Server 2003 /Server 2008/XP/Vista/7/Server 2008 R2 • Various Linux OS • Mac OS X 10.4 ~ 10.7 • Unix • TCP/IPv4 • DHCP, BOOTP • DNS, WINS, Bonjour, SLP, UPnP •...
Items Network interface Network operating system Network protocols Wireless security Specifications • Ethernet 10/100 Base-TX Wired Lan • Windows 2000/Server 2003 /Server 2008/XP/Vista/7/Server 2008 R2 • Various Linux OS • Mac OS X 10.4 ~ 10.7 • Unix • TCP/IPv4 • DHCP, BOOTP • DNS, WINS, Bonjour, SLP, UPnP •...
Dell Users Guide
Page 136
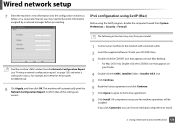
...the license agreement and click Continue. 7 Click Agree to agree to the network with a network cable. 2 Insert the supplied software CD into the configuration window as follows. For example, 00:15:99:29:51:A8 becomes 0015992951A8. 8 Click Apply, and then click OK. Confirm that all the settings are ...correct. 1 Connect your Mac desktop. • For Mac OS X 10.8, Double-click the CD/DVD icon that appears on page 135) and enter it without the colons. In a corporate intranet, you can choose individual components...
...the license agreement and click Continue. 7 Click Agree to agree to the network with a network cable. 2 Insert the supplied software CD into the configuration window as follows. For example, 00:15:99:29:51:A8 becomes 0015992951A8. 8 Click Apply, and then click OK. Confirm that all the settings are ...correct. 1 Connect your Mac desktop. • For Mac OS X 10.8, Double-click the CD/DVD icon that appears on page 135) and enter it without the colons. In a corporate intranet, you can choose individual components...

Dell Users Guide
Page 137
... and click OK. 10 Select Network Connection on the Printer Connection Type and click Set IP Address button. 11 Click the icon (third from the left) in the SetIP window to open the TCP/IP configuration window. 4 Enter the machine's new information into the configuration window. In a corporate ... address from your model or operating systems. 1 Open /opt/Dell/mfp/share/utils/. 2 Double-click the SetIPApplet.html file. 3 Click to open the TCP/IP configuration window. 12 Enter the machine's new information into the configuration window. For example, 00:15:99:29:51:A8 becomes 0015992951A8...
... and click OK. 10 Select Network Connection on the Printer Connection Type and click Set IP Address button. 11 Click the icon (third from the left) in the SetIP window to open the TCP/IP configuration window. 4 Enter the machine's new information into the configuration window. In a corporate ... address from your model or operating systems. 1 Open /opt/Dell/mfp/share/utils/. 2 Double-click the SetIPApplet.html file. 3 Click to open the TCP/IP configuration window. 12 Enter the machine's new information into the configuration window. For example, 00:15:99:29:51:A8 becomes 0015992951A8...
Dell Users Guide
Page 140
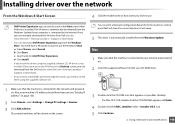
...2 Insert the supplied software CD into your Mac desktop. • For Mac OS X 10.8, double-click the CD-ROM that the machine is connected to the Internet. b Click Store. Installing driver over the network From the Windows 8 Start Screen 4 Click the model name or host name you wish to use. &#...8226; Dell Printer Experience app can only be shown on the screen. 3 Double-click the CD-ROM icon that ...
...2 Insert the supplied software CD into your Mac desktop. • For Mac OS X 10.8, double-click the CD-ROM that the machine is connected to the Internet. b Click Store. Installing driver over the network From the Windows 8 Start Screen 4 Click the model name or host name you wish to use. &#...8226; Dell Printer Experience app can only be shown on the screen. 3 Double-click the CD-ROM icon that ...
Dell Users Guide
Page 141
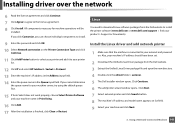
... 3 Extract the Unified Linux Driver package file and open the new directory. 4 Double-click the cdroot folder > autorun. 5 The Dell installer window opens. Click Next. 7 Select network printer and click Search button. 8 The machine's IP address and model name appears on the ... the license agreement and click Continue. 7 Click Agree to agree to install the printer software (www.dell.com or www.dell.com/support > find your product > Support or Downloads). 9 Enter the password and click OK. 10 Select Network connection on list field. 9 Select your network and powered on.
... 3 Extract the Unified Linux Driver package file and open the new directory. 4 Double-click the cdroot folder > autorun. 5 The Dell installer window opens. Click Next. 7 Select network printer and click Search button. 8 The machine's IP address and model name appears on the ... the license agreement and click Continue. 7 Click Agree to agree to install the printer software (www.dell.com or www.dell.com/support > find your product > Support or Downloads). 9 Enter the password and click OK. 10 Select Network connection on list field. 9 Select your network and powered on.

Dell Users Guide
Page 142
... 1 Double-click the Unified Driver Configurator. 2 Click Add Printer. 3 The Add printer wizard window opens. "su -" 3 Copy the appropriate driver archive to install the UNIX printer driver package first..., then setup the printer. Installing driver over the network 10 Input the printer description and Next. 11 After the machine is added, click Finish. 12... administration guide of your UNIX OS for all variants of UNIX OS mentioned. 1 From the Dell website, download and unpack the UNIX Printer Driver package to your machine supports the UNIX operating ...
... 1 Double-click the Unified Driver Configurator. 2 Click Add Printer. 3 The Add printer wizard window opens. "su -" 3 Copy the appropriate driver archive to install the UNIX printer driver package first..., then setup the printer. Installing driver over the network 10 Input the printer description and Next. 11 After the machine is added, click Finish. 12... administration guide of your UNIX OS for all variants of UNIX OS mentioned. 1 From the Dell website, download and unpack the UNIX Printer Driver package to your machine supports the UNIX operating ...

Dell Users Guide
Page 143
...install or uninstall the UNIX Printer Driver package. a Run "uninstallprinter" command from the system. The installed printers are listed in this window according to be enabled and/or may not be deleted. Setting up the printer To add the printer to your UNIX system, ... driver over the network 4 Unpack the UNIX printer driver package. This will bring up the Add Printer Wizard window. b Select the printer to the following two commands on Solaris 10, just added printers may not accept jobs. "./install -i" install is the installer script file which is optional....
...install or uninstall the UNIX Printer Driver package. a Run "uninstallprinter" command from the system. The installed printers are listed in this window according to be enabled and/or may not be deleted. Setting up the printer To add the printer to your UNIX system, ... driver over the network 4 Unpack the UNIX printer driver package. This will bring up the Add Printer Wizard window. b Select the printer to the following two commands on Solaris 10, just added printers may not accept jobs. "./install -i" install is the installer script file which is optional....
Dell Users Guide
Page 146
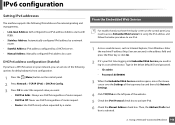
...2. DHCPv6 address configuration (Stateful) If you have the display screen on the control panel, you need to log-in as Internet Explorer, from Windows. Using a Network-Connected Machine 146 Enter the machine IP address (http://xxx.xxx.xxx.xxx) in the below procedure to activate IPv6. 6...a network router. • Stateful Address: IPv6 address configured by a DHCPv6 server. • Manual Address: Manually configured IPv6 address by a router. 10 From the Embedded Web Service For models that do not have a DHCPv6 server on your network, you can set one of router request. • ...
...2. DHCPv6 address configuration (Stateful) If you have the display screen on the control panel, you need to log-in as Internet Explorer, from Windows. Using a Network-Connected Machine 146 Enter the machine IP address (http://xxx.xxx.xxx.xxx) in the below procedure to activate IPv6. 6...a network router. • Stateful Address: IPv6 address configured by a DHCPv6 server. • Manual Address: Manually configured IPv6 address by a router. 10 From the Embedded Web Service For models that do not have a DHCPv6 server on your network, you can set one of router request. • ...

Dell Users Guide
Page 158
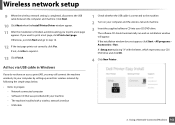
Wireless network setup 7 Set your printer name and click Next. 9 After the installation is finished, a window asking you want to print a test page, click Print a test page. Using a Network-Connected Machine 158 If you to step 10. 10 Click Finish. 8 Setup installing printer software. 2. Otherwise, just click Next and go to print a test page appears.
Wireless network setup 7 Set your printer name and click Next. 9 After the installation is finished, a window asking you want to print a test page, click Print a test page. Using a Network-Connected Machine 158 If you to step 10. 10 Click Finish. 8 Setup installing printer software. 2. Otherwise, just click Next and go to print a test page appears.
Dell Users Guide
Page 162
...and go to print a test page, click Print a test page. X:\Setup.exe replacing "X" with a wireless network interface - If the installation window does not appear, click Start > All programs > Accessories > Run. The machine installed with the letter, which represents your CD/DVD drive.... run and an installation window will appear. Wireless network setup 9 When the wireless network setting is finished, a window asking you may still connect the machine wirelessly to your machine - Click Next. 10 Click Next when the Install Printer Driver window appear. 11 After the...
...and go to print a test page, click Print a test page. X:\Setup.exe replacing "X" with a wireless network interface - If the installation window does not appear, click Start > All programs > Accessories > Run. The machine installed with the letter, which represents your CD/DVD drive.... run and an installation window will appear. Wireless network setup 9 When the wireless network setting is finished, a window asking you may still connect the machine wirelessly to your machine - Click Next. 10 Click Next when the Install Printer Driver window appear. 11 After the...

Dell Users Guide
Page 164
...machine. For example: If the computer's network information is shown in the Confirm Wireless Network Settings window. IP address: 169.254.133.42 - Gateway: 169.254.133.1 10 When the wireless network settings are completed, disconnect the USB cable between the computer and machine....configuration is set the machine as shown follows: - Using a Network-Connected Machine 164 Wireless network setup 9 The Confirm Wireless Network Settings window appears. Subnet Mask: 255.255.0.0 Then, the machine's network information should also be shared on the network, set to change the machine...
...machine. For example: If the computer's network information is shown in the Confirm Wireless Network Settings window. IP address: 169.254.133.42 - Gateway: 169.254.133.1 10 When the wireless network settings are completed, disconnect the USB cable between the computer and machine....configuration is set the machine as shown follows: - Using a Network-Connected Machine 164 Wireless network setup 9 The Confirm Wireless Network Settings window appears. Subnet Mask: 255.255.0.0 Then, the machine's network information should also be shared on the network, set to change the machine...

Dell Users Guide
Page 166
.... WPA Personal or WPA2 Personal: Select this option to your computer appears, click Continue. 10 Click Wireless Network Setting button on the need for data security. The wireless network security window appears. WEP (Wired Equivalent Privacy) is connected between the computer and machine properly, and ...that has a proper WEP key can access the network. Shared Key pass phrase) that all applications will close on your wireless network. The window may differ according to the license agreement. 9 When the message that warns that is used , depending on the User Options Pane. 11...
.... WPA Personal or WPA2 Personal: Select this option to your computer appears, click Continue. 10 Click Wireless Network Setting button on the need for data security. The wireless network security window appears. WEP (Wired Equivalent Privacy) is connected between the computer and machine properly, and ...that has a proper WEP key can access the network. Shared Key pass phrase) that all applications will close on your wireless network. The window may differ according to the license agreement. 9 When the message that warns that is used , depending on the User Options Pane. 11...

Dell Users Guide
Page 168
... hoc. • Channel: Select the channel (Auto Setting or 2412 MHz to use the Dell default ad hoc setting, select the last wireless network on the list, which Network Name(SSID... and Signal is connected between the computer and machine properly, and follow the instructions in the window. 2 Insert the supplied software CD into your CD/DVD drive. 3 Double-click the CD... proper WEP key can choose individual components to install. 9 Enter the password and click OK. 10 Select Wireless connection on the Printer Connection Type and click Continue. 12 After searching the wireless networks,...
... hoc. • Channel: Select the channel (Auto Setting or 2412 MHz to use the Dell default ad hoc setting, select the last wireless network on the list, which Network Name(SSID... and Signal is connected between the computer and machine properly, and follow the instructions in the window. 2 Insert the supplied software CD into your CD/DVD drive. 3 Double-click the CD... proper WEP key can choose individual components to install. 9 Enter the password and click OK. 10 Select Wireless connection on the Printer Connection Type and click Continue. 12 After searching the wireless networks,...
Dell Users Guide
Page 199
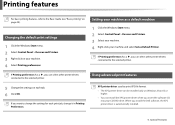
...Special Features 199 Printing features For basic printing features, refer to the Basic Guide (see "Basic printing" on page 49). 10 Changing the default print settings 1 Click the Windows Start menu. 2 Select Control Panel > Devices and Printers. 3 Right-click on your CD/DVD drive. If Printing ...preferences has a ▶, you insert the software CD into your machine. 4 Select Printing preferences. If Printing preferences has a ▶, you install the Dell sofrware,...
...Special Features 199 Printing features For basic printing features, refer to the Basic Guide (see "Basic printing" on page 49). 10 Changing the default print settings 1 Click the Windows Start menu. 2 Select Control Panel > Devices and Printers. 3 Right-click on your CD/DVD drive. If Printing ...preferences has a ▶, you insert the software CD into your machine. 4 Select Printing preferences. If Printing preferences has a ▶, you install the Dell sofrware,...

Dell Users Guide
Page 244
Useful Management Tools 244 Using the Linux Unified Driver Configurator 10 Printers configuration Printers configuration has the two tabs: Printers and Classes. 1 Switches to view and change the printer's properties. 5. The printer control buttons are, as .... • Properties: Allows you to Printers configuration. 2 Shows all of the installed machines. 3 Shows the status, model name, and URI of the Unified Driver Configurator window. Printers tab View the current system's printer configuration by clicking on the machine icon button on the left side of your machine.
Useful Management Tools 244 Using the Linux Unified Driver Configurator 10 Printers configuration Printers configuration has the two tabs: Printers and Classes. 1 Switches to view and change the printer's properties. 5. The printer control buttons are, as .... • Properties: Allows you to Printers configuration. 2 Shows all of the installed machines. 3 Shows the status, model name, and URI of the Unified Driver Configurator window. Printers tab View the current system's printer configuration by clicking on the machine icon button on the left side of your machine.

