

User Guide
Page 14
"Printer Status" "Printer Status" "Printer Events" "Printer Information" "Printer Jobs" "Job List" "Completed Jobs" "Printer Settings" "Printer Settings Report" "Menu Settings" "Reports" "Printer Settings" "System Settings" "Parallel Settings" "Network Settings"*5 "USB Settings"*5 "PCL Settings" "PS Settings"*5 "Panel Settings" "Printer Maintenance" "Paper Density" "Adjust BTR" "Adjust Fuser" "Auto Registration Adjustment" "Color Registration Adjustments" "Clean Developer" "Reset Defaults" "Clear Storage"*1 "Format HDD"*2 "Non-Dell Toner...
"Printer Status" "Printer Status" "Printer Events" "Printer Information" "Printer Jobs" "Job List" "Completed Jobs" "Printer Settings" "Printer Settings Report" "Menu Settings" "Reports" "Printer Settings" "System Settings" "Parallel Settings" "Network Settings"*5 "USB Settings"*5 "PCL Settings" "PS Settings"*5 "Panel Settings" "Printer Maintenance" "Paper Density" "Adjust BTR" "Adjust Fuser" "Auto Registration Adjustment" "Color Registration Adjustments" "Clean Developer" "Reset Defaults" "Clear Storage"*1 "Format HDD"*2 "Non-Dell Toner...
User Guide
Page 21
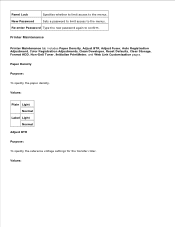
...for plain thick paper. Label Displays the temperature settings of the transfer roller for labels. Transparency Displays the voltage settings of the fuser for transparencies. Coated Displays the temperature settings of the transfer roller for the plain paper. PS Job Time-Out Displays the ...panel is selected in the PostScript printing. Plain Displays the paper density for plain paper. Plain Displays the voltage settings of the fuser for one PostScript job. Covers Thick Displays the voltage settings of the transfer roller for thick cover. Coated Displays the voltage ...
...for plain thick paper. Label Displays the temperature settings of the transfer roller for labels. Transparency Displays the voltage settings of the fuser for transparencies. Coated Displays the temperature settings of the transfer roller for the plain paper. PS Job Time-Out Displays the ...panel is selected in the PostScript printing. Plain Displays the paper density for plain paper. Plain Displays the voltage settings of the fuser for one PostScript job. Covers Thick Displays the voltage settings of the transfer roller for thick cover. Coated Displays the voltage ...

User Guide
Page 22
Non-Dell Toner Non-Dell Toner Displays whether to adjust the color registration Adjustment Adjustment automatically. MPF Mode Displays the paper size and type when paper is loaded in the multipurpose feeder. MPF Paper Type Displays ... Display Popup Displays a popup menu when paper is loaded in the multipurpose feeder. MPF Paper Size Displays the size of the fuser for Printer Settings, Copy Printer Settings (where the settings are copied), Dell ColorTrack, and Tray Settings. Regular Displays the Regular link. Reports Purpose: To print various types of paper loaded in the...
Non-Dell Toner Non-Dell Toner Displays whether to adjust the color registration Adjustment Adjustment automatically. MPF Mode Displays the paper size and type when paper is loaded in the multipurpose feeder. MPF Paper Type Displays ... Display Popup Displays a popup menu when paper is loaded in the multipurpose feeder. MPF Paper Size Displays the size of the fuser for Printer Settings, Copy Printer Settings (where the settings are copied), Dell ColorTrack, and Tray Settings. Regular Displays the Regular link. Reports Purpose: To print various types of paper loaded in the...
User Guide
Page 27
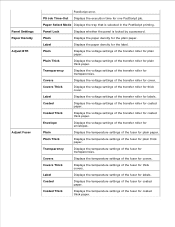
... access to confirm. Re-enter Password Type the new password again to the menus. Printer Maintenance Printer Maintenance tab includes Paper Density, Adjust BTR, Adjust Fuser, Auto Registration Adjustment, Color Registration Adjustments, Clean Developer, Reset Defaults, Clear Storage, Format HDD, Non-Dell Toner, Initialize PrintMeter, and Web Link Customization pages. Values: Paper Density Purpose: To...
... access to confirm. Re-enter Password Type the new password again to the menus. Printer Maintenance Printer Maintenance tab includes Paper Density, Adjust BTR, Adjust Fuser, Auto Registration Adjustment, Color Registration Adjustments, Clean Developer, Reset Defaults, Clear Storage, Format HDD, Non-Dell Toner, Initialize PrintMeter, and Web Link Customization pages. Values: Paper Density Purpose: To...
User Guide
Page 28
...reference voltage settings for the transfer roller for coated paper. Auto Registration Adjustment Purpose: Specifies whether to adjust the color registration automatically. Envelope Sets the reference voltage settings for the transfer roller for plain paper. Values: Plain Sets the temperature... voltage settings for the transfer roller for transparencies. Transparency Sets the temperature settings for the fuser for thick covers. Coated Sets the temperature settings for the fuser for plain thick paper. Plain Thick Sets the reference voltage settings for the transfer roller ...
...reference voltage settings for the transfer roller for coated paper. Auto Registration Adjustment Purpose: Specifies whether to adjust the color registration automatically. Envelope Sets the reference voltage settings for the transfer roller for plain paper. Values: Plain Sets the temperature... voltage settings for the transfer roller for transparencies. Transparency Sets the temperature settings for the fuser for thick covers. Coated Sets the temperature settings for the fuser for plain thick paper. Plain Thick Sets the reference voltage settings for the transfer roller ...
User Guide
Page 112
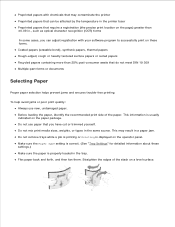
... the recommended print side of the stack on the paper package. This information is properly loaded in the tray. This may contaminate the printer Preprinted papers that can adjust registration with your software program to successfully print on these settings.) Make sure the paper is usually indicated on...operator panel. To help avoid jams or poor print quality: Always use paper that you can be affected by the temperature in the printer fuser Preprinted papers that do not meet DIN 19 309 Multiple-part forms or documents Selecting Paper Proper paper selection helps prevent jams and ...
... the recommended print side of the stack on the paper package. This information is properly loaded in the tray. This may contaminate the printer Preprinted papers that can adjust registration with your software program to successfully print on these settings.) Make sure the paper is usually indicated on...operator panel. To help avoid jams or poor print quality: Always use paper that you can be affected by the temperature in the printer fuser Preprinted papers that do not meet DIN 19 309 Multiple-part forms or documents Selecting Paper Proper paper selection helps prevent jams and ...
User Guide
Page 113
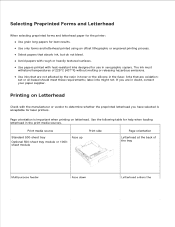
...papers printed with heat-resistant inks designed for laser printers. Print media source Standard 500-sheet tray ...releasing hazardous emissions. Selecting Preprinted Forms and Letterhead When selecting preprinted forms and letterhead paper for the printer: Use grain long papers for help when loading letterhead in xerographic copiers. If you have selected...papers that are oxidationset or oil-based should meet these requirements; Use inks that are in the fuser. Page orientation is important when printing on Letterhead Check with rough or heavily textured surfaces. Inks...
...papers printed with heat-resistant inks designed for laser printers. Print media source Standard 500-sheet tray ...releasing hazardous emissions. Selecting Preprinted Forms and Letterhead When selecting preprinted forms and letterhead paper for the printer: Use grain long papers for help when loading letterhead in xerographic copiers. If you have selected...papers that are oxidationset or oil-based should meet these requirements; Use inks that are in the fuser. Page orientation is important when printing on Letterhead Check with rough or heavily textured surfaces. Inks...

User Guide
Page 148
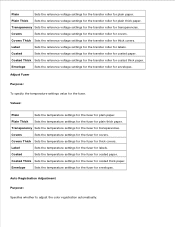
Plain -20 - +30 0* Plain Thick -20 - +30 0* Transparency -20 - +30 0* Covers -20 - +30 0* Covers Thick -20 - +30 0* Label -20 - +30 0* Coated -20 - +30 0* Coated Thick -20 - +30 0* Envelope -20 - +30 0* Adjust Fuser Purpose:
Plain -20 - +30 0* Plain Thick -20 - +30 0* Transparency -20 - +30 0* Covers -20 - +30 0* Covers Thick -20 - +30 0* Label -20 - +30 0* Coated -20 - +30 0* Coated Thick -20 - +30 0* Envelope -20 - +30 0* Adjust Fuser Purpose:
User Guide
Page 149
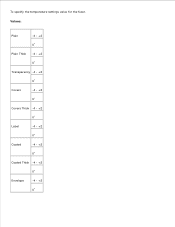
Values: Plain -4 - +2 0* Plain Thick -4 - +2 0* Transparency -4 - +2 0* Covers -4 - +2 0* Covers Thick -4 - +2 0* Label -4 - +2 0* Coated -4 - +2 0* Coated Thick -4 - +2 0* Envelope -4 - +2 0* To specify the temperature settings value for the fuser.
Values: Plain -4 - +2 0* Plain Thick -4 - +2 0* Transparency -4 - +2 0* Covers -4 - +2 0* Covers Thick -4 - +2 0* Label -4 - +2 0* Coated -4 - +2 0* Coated Thick -4 - +2 0* Envelope -4 - +2 0* To specify the temperature settings value for the fuser.
User Guide
Page 201
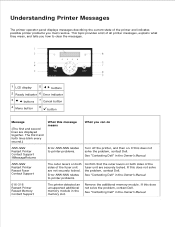
... does not solve the problem, contact Dell. If this message means What you can do NNN-NNN Restart Printer Contact Support IfMessageReturns Error NNN-NNN relates to printer problems. Turn off the printer, and then on both sides of the fuser unit are not securely locked. Understanding Printer Messages The printer operator panel displays messages describing the...
... does not solve the problem, contact Dell. If this message means What you can do NNN-NNN Restart Printer Contact Support IfMessageReturns Error NNN-NNN relates to printer problems. Turn off the printer, and then on both sides of the fuser unit are not securely locked. Understanding Printer Messages The printer operator panel displays messages describing the...
User Guide
Page 202
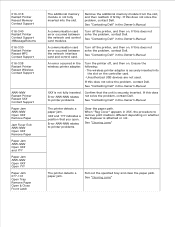
... Printer Reseat Memory Contact Support 016-340 Restart Printer Contact Support IfMessageReturns 016-330 Restart Printer Reseat MPC Contact Support 016-338 Restart Printer Reseat Wireless Contact Support NNN-NNN Restart Printer Reseat XXX Contact Support Paper Jam NNN-NNN Open XXX Remove Paper Jam Fuser Exit... additional memory module is attached or not. If this does not solve the problem, contact Dell. Ensure the following: · The wireless printer adapter is securely inserted. See "Contacting Dell" in the Owner's Manual. Pull out the specified tray and clear the paper path. ...
... Printer Reseat Memory Contact Support 016-340 Restart Printer Contact Support IfMessageReturns 016-330 Restart Printer Reseat MPC Contact Support 016-338 Restart Printer Reseat Wireless Contact Support NNN-NNN Restart Printer Reseat XXX Contact Support Paper Jam NNN-NNN Open XXX Remove Paper Jam Fuser Exit... additional memory module is attached or not. If this does not solve the problem, contact Dell. Ensure the following: · The wireless printer adapter is securely inserted. See "Contacting Dell" in the Owner's Manual. Pull out the specified tray and clear the paper path. ...

User Guide
Page 206
... From the Standard Tray Removing Print Jams Between the Imaging Drum and Fuser Removing Print Jams From the Fuser Removing Print Jams From the Duplexer Removing Print Jams From the Optional ..., creased, damp, or curled print media. Do not use print media that connect to load printer media properly. Keep print media stored in the trays. Overtightening the guides may cause jams. See... "Print Media Guidelines" for more information. Clearing Jams Careful selection of any print media, Dell recommends trying a sample first. Make sure the stack print media height does not exceed the ...
... From the Standard Tray Removing Print Jams Between the Imaging Drum and Fuser Removing Print Jams From the Fuser Removing Print Jams From the Duplexer Removing Print Jams From the Optional ..., creased, damp, or curled print media. Do not use print media that connect to load printer media properly. Keep print media stored in the trays. Overtightening the guides may cause jams. See... "Print Media Guidelines" for more information. Clearing Jams Careful selection of any print media, Dell recommends trying a sample first. Make sure the stack print media height does not exceed the ...
User Guide
Page 207
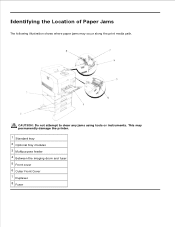
CAUTION: Do not attempt to clear any jams using tools or instruments. This may occur along the print media path. Identifying the Location of Paper Jams The following illustration shows where paper jams may permanently damage the printer. 1 Standard tray 2 Optional tray modules 3 Multipurpose feeder 4 Between the imaging drum and fuser 5 Front cover 6 Outer Front Cover 7 Duplexer 8 Fuser
CAUTION: Do not attempt to clear any jams using tools or instruments. This may occur along the print media path. Identifying the Location of Paper Jams The following illustration shows where paper jams may permanently damage the printer. 1 Standard tray 2 Optional tray modules 3 Multipurpose feeder 4 Between the imaging drum and fuser 5 Front cover 6 Outer Front Cover 7 Duplexer 8 Fuser
User Guide
Page 212
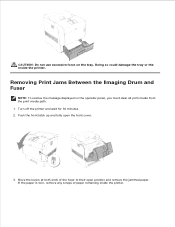
Turn off the printer and wait for 30 minutes. 2. CAUTION: Do not use excessive force on the operator panel, you must clear all print media from the print media path. 1. Removing Print Jams Between the Imaging Drum and Fuser NOTE: To resolve the message displayed on the tray. Move the levers at both ends of paper remaining inside the printer. Push the front latch up and fully open position and remove the jammed paper. Doing so could damage the tray or the inside the printer. If the paper is torn, remove any scraps of the fuser to their open the front cover. 3.
Turn off the printer and wait for 30 minutes. 2. CAUTION: Do not use excessive force on the operator panel, you must clear all print media from the print media path. 1. Removing Print Jams Between the Imaging Drum and Fuser NOTE: To resolve the message displayed on the tray. Move the levers at both ends of paper remaining inside the printer. Push the front latch up and fully open position and remove the jammed paper. Doing so could damage the tray or the inside the printer. If the paper is torn, remove any scraps of the fuser to their open the front cover. 3.

User Guide
Page 213
Turn off the printer and wait for 30 minutes. 2. Push the side button and open the outer front cover. Close the front cover. 3. Removing Print Jams From the Fuser NOTE: To resolve the message displayed on the operator panel, you must clear all print media from the fuser. 4. NOTICE: Be sure to move the levers back to their close position after removing the jammed paper from the print media path. 1.
Turn off the printer and wait for 30 minutes. 2. Push the side button and open the outer front cover. Close the front cover. 3. Removing Print Jams From the Fuser NOTE: To resolve the message displayed on the operator panel, you must clear all print media from the fuser. 4. NOTICE: Be sure to move the levers back to their close position after removing the jammed paper from the print media path. 1.
User Guide
Page 214
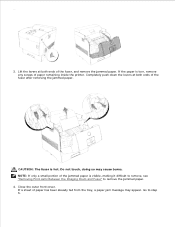
...making it difficult to remove, see "Removing Print Jams Between the Imaging Drum and Fuser" to step 5. Do not touch, doing so may appear. Completely push down the levers at both ends of paper remaining inside the printer. NOTE: If only a small portion of the jammed paper is torn, remove... any scraps of the fuser after removing the jammed paper. CAUTION: The fuser is hot. Close the outer front cover. Go to remove the jammed ...
...making it difficult to remove, see "Removing Print Jams Between the Imaging Drum and Fuser" to step 5. Do not touch, doing so may appear. Completely push down the levers at both ends of paper remaining inside the printer. NOTE: If only a small portion of the jammed paper is torn, remove... any scraps of the fuser after removing the jammed paper. CAUTION: The fuser is hot. Close the outer front cover. Go to remove the jammed ...
User Guide
Page 216
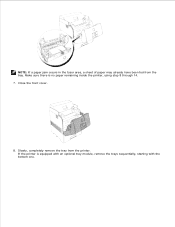
Make sure there is equipped with an optional tray module, remove the trays sequentially, starting with the bottom one. If the printer is no paper remaining inside the printer, using step 8 through 14. 7. Close the front cover. 8. Slowly, completely remove the tray from the tray. NOTE: If a paper jam occurs in the fuser area, a sheet of paper may already have been fed from the printer.
Make sure there is equipped with an optional tray module, remove the trays sequentially, starting with the bottom one. If the printer is no paper remaining inside the printer, using step 8 through 14. 7. Close the front cover. 8. Slowly, completely remove the tray from the tray. NOTE: If a paper jam occurs in the fuser area, a sheet of paper may already have been fed from the printer.

User Guide
Page 225
... Printing Problems Print Quality Problems Wireless Adapter Problem Other Problem Contacting Service Troubleshooting Guide Installing Printer Drivers Basic Printer Problems Some printer problems can be easy to install the Fuser Basic toner cleaning instructions The section will help you have checked all of the above and still have ...a problem, turn off at any switch or breaker. If a problem occurs with the printer, options, or print quality. All options ...
... Printing Problems Print Quality Problems Wireless Adapter Problem Other Problem Contacting Service Troubleshooting Guide Installing Printer Drivers Basic Printer Problems Some printer problems can be easy to install the Fuser Basic toner cleaning instructions The section will help you have checked all of the above and still have ...a problem, turn off at any switch or breaker. If a problem occurs with the printer, options, or print quality. All options ...
User Guide
Page 228
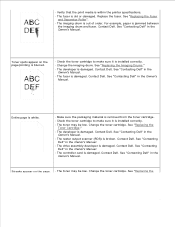
... the page. · The toner may be low. See "Contacting Dell" in the Owner's Manual. · The fuser is damaged. Contact Dell. Change the toner cartridge. · Verify that the print media is within the printer specifications. · The fuser is damaged. Contact Dell. See "Contacting Dell" in the Owner's Manual. · The controller card is damaged...
... the page. · The toner may be low. See "Contacting Dell" in the Owner's Manual. · The fuser is damaged. Contact Dell. Change the toner cartridge. · Verify that the print media is within the printer specifications. · The fuser is damaged. Contact Dell. See "Contacting Dell" in the Owner's Manual. · The controller card is damaged...
User Guide
Page 287
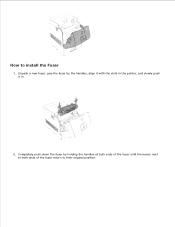
How to their original position. Completely push down the fuser by the handles, align it with the slots in the printer, and slowly push it in. 2. Unpack a new fuser, grip the fuser by holding the handles at both ends of the fuser until the levers next to both ends of the fuser return to install the Fuser 1.
How to their original position. Completely push down the fuser by the handles, align it with the slots in the printer, and slowly push it in. 2. Unpack a new fuser, grip the fuser by holding the handles at both ends of the fuser until the levers next to both ends of the fuser return to install the Fuser 1.


