
User Guide
Page 58
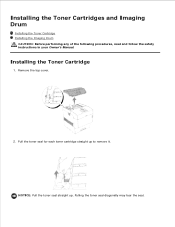
NOTICE: Pull the toner seal straight up to remove it. Installing the Toner Cartridge 1. Remove the top cover. 2. Installing the Toner Cartridges and Imaging Drum Installing the Toner Cartridge Installing the Imaging Drum CAUTION: Before performing any of the following procedures, read and follow the safety instructions in your Owner's Manual. Pull the toner seal for each toner cartridge straight up . Pulling the toner seal diagonally may tear the seal. 3.
NOTICE: Pull the toner seal straight up to remove it. Installing the Toner Cartridge 1. Remove the top cover. 2. Installing the Toner Cartridges and Imaging Drum Installing the Toner Cartridge Installing the Imaging Drum CAUTION: Before performing any of the following procedures, read and follow the safety instructions in your Owner's Manual. Pull the toner seal for each toner cartridge straight up . Pulling the toner seal diagonally may tear the seal. 3.
User Guide
Page 59
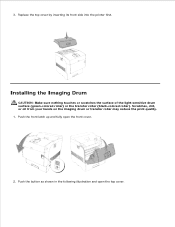
Replace the top cover by inserting its front side into the printer first. Scratches, dirt, or oil from your hands on the imaging drum or transfer roller may reduce the print quality. 1. Push the front latch up and fully open the top cover. Push the button as shown in the following illustration and open the front cover. 2. Installing the Imaging Drum CAUTION: Make sure nothing touches or scratches the surface of the light-sensitive drum surface (green-colored roller) or the transfer roller (black-colored roller). 3.
Replace the top cover by inserting its front side into the printer first. Scratches, dirt, or oil from your hands on the imaging drum or transfer roller may reduce the print quality. 1. Push the front latch up and fully open the top cover. Push the button as shown in the following illustration and open the front cover. 2. Installing the Imaging Drum CAUTION: Make sure nothing touches or scratches the surface of the light-sensitive drum surface (green-colored roller) or the transfer roller (black-colored roller). 3.
User Guide
Page 60
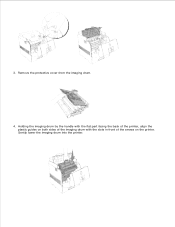
Gently lower the imaging drum into the printer. 3. Holding the imaging drum by the handle with the flat part facing the back of the printer, align the plastic guides on both sides of the imaging drum with the slots in front of the arrows on the printer. Remove the protective cover from the imaging drum. 4.
Gently lower the imaging drum into the printer. 3. Holding the imaging drum by the handle with the flat part facing the back of the printer, align the plastic guides on both sides of the imaging drum with the slots in front of the arrows on the printer. Remove the protective cover from the imaging drum. 4.

User Guide
Page 61
Make sure that nothing touches or scratches the roller surface. NOTICE: Do not allow the surface covered with a protective sheet to remove it. Pull the protective cover on the roller deteriorates print quality. 6. Close the top cover. 7. Close the front cover. NOTICE: Do not touch the transfer roller (black-colored roller). NOTICE: Lowering the cartridge into contact with the slots can damage the cartridge. Scratches or oil from your hands on the imaging drum straight up to come into the printer without correctly aligning the rollers with anything. 5.
Make sure that nothing touches or scratches the roller surface. NOTICE: Do not allow the surface covered with a protective sheet to remove it. Pull the protective cover on the roller deteriorates print quality. 6. Close the top cover. 7. Close the front cover. NOTICE: Do not touch the transfer roller (black-colored roller). NOTICE: Lowering the cartridge into contact with the slots can damage the cartridge. Scratches or oil from your hands on the imaging drum straight up to come into the printer without correctly aligning the rollers with anything. 5.
User Guide
Page 71
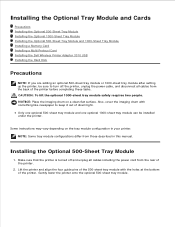
...Module Installing the Optional 500-Sheet Tray Module and 1000-Sheet Tray Module Installing a Memory Card Installing a Multi Protocol Card Installing the Dell Wireless Printer Adapter 3310 USB Installing the Hard Disk Precautions NOTE: If you are adding an optional 500-sheet tray module or 1000-sheet tray ...module after setting up the printer, be installed under the printer. Also, cover the imaging drum with the holes at the bottom of the printer. 2. Only one optional 500-sheet tray module and one optional 1000-sheet tray module ...
...Module Installing the Optional 500-Sheet Tray Module and 1000-Sheet Tray Module Installing a Memory Card Installing a Multi Protocol Card Installing the Dell Wireless Printer Adapter 3310 USB Installing the Hard Disk Precautions NOTE: If you are adding an optional 500-sheet tray module or 1000-sheet tray ...module after setting up the printer, be installed under the printer. Also, cover the imaging drum with the holes at the bottom of the printer. 2. Only one optional 500-sheet tray module and one optional 1000-sheet tray module ...
User Guide
Page 72
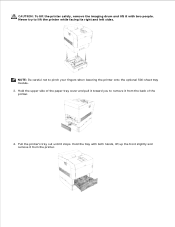
CAUTION: To lift the printer safely, remove the imaging drum and lift it stops. Pull the printer's tray out until it with both hands, lift up the front slightly and remove it from the back of the paper tray cover and pull it toward you to remove it from the printer. 5. NOTE: Be careful not to lift the printer while facing its right and left sides. Hold the upper side of the printer. 4. Never try to pinch your fingers when lowering the printer onto the optional 500-sheet tray module. 3. Hold the tray with two people. 2.
CAUTION: To lift the printer safely, remove the imaging drum and lift it stops. Pull the printer's tray out until it with both hands, lift up the front slightly and remove it from the back of the paper tray cover and pull it toward you to remove it from the printer. 5. NOTE: Be careful not to lift the printer while facing its right and left sides. Hold the upper side of the printer. 4. Never try to pinch your fingers when lowering the printer onto the optional 500-sheet tray module. 3. Hold the tray with two people. 2.
User Guide
Page 77
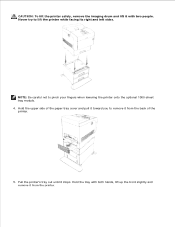
Hold the tray with two people. Never try to pinch your fingers when lowering the printer onto the optional 1000-sheet tray module. 4. Pull the printer's tray out until it from the back of the printer. 5. Hold the upper side of the paper tray cover and pull it toward you to remove it with both hands, lift up the front slightly and remove it stops. NOTE: Be careful not to lift the printer while facing its right and left sides. CAUTION: To lift the printer safely, remove the imaging drum and lift it from the printer. 3.
Hold the tray with two people. Never try to pinch your fingers when lowering the printer onto the optional 1000-sheet tray module. 4. Pull the printer's tray out until it from the back of the printer. 5. Hold the upper side of the paper tray cover and pull it toward you to remove it with both hands, lift up the front slightly and remove it stops. NOTE: Be careful not to lift the printer while facing its right and left sides. CAUTION: To lift the printer safely, remove the imaging drum and lift it from the printer. 3.
User Guide
Page 85
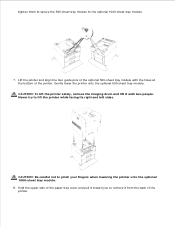
CAUTION: To lift the printer safely, remove the imaging drum and lift it from the back of the printer. CAUTION: Be careful not to the optional 1000-sheet tray module. 7. tighten them to secure the 500-sheet tray module to pinch your fingers when lowering the printer onto the optional 1000-sheet tray module. 8. Lift...
CAUTION: To lift the printer safely, remove the imaging drum and lift it from the back of the printer. CAUTION: Be careful not to the optional 1000-sheet tray module. 7. tighten them to secure the 500-sheet tray module to pinch your fingers when lowering the printer onto the optional 1000-sheet tray module. 8. Lift...

User Guide
Page 203
...; Y · M Error NNN-NNN relates to printer problems. Reinsert the specified toner cartridge. See "Replacing the Toner Cartridge" Replace the drum cartridge. Y is installed. Reinsert the drum cartridge. Order a new toner cartridge at the website (www.dell.com/supplies or www.euro.dell.com/supplies). See "Replacing the Imaging Drums" The toner cartridge is installed. Replace...
...; Y · M Error NNN-NNN relates to printer problems. Reinsert the specified toner cartridge. See "Replacing the Toner Cartridge" Replace the drum cartridge. Y is installed. Reinsert the drum cartridge. Order a new toner cartridge at the website (www.dell.com/supplies or www.euro.dell.com/supplies). See "Replacing the Imaging Drums" The toner cartridge is installed. Replace...

User Guide
Page 205
The drum cartridge needs to printer problems. Replace the specified toner cartridge. Replace the drum cartridge. Ready to Print NNN-NNN XXX Is Low Ready to Print NNN-NNN Imaging Drum Replace Soon Toner cartridge is one of the following: · Yellow Toner(Y) · Cyan Toner(C) · Magenta Toner(M) · Black Toner(B) Error NNN-NNN relates to be replaced. XXX is nearly empty. See "Replacing the Toner Cartridge" Drum life warning. See "Replacing the Imaging Drums"
The drum cartridge needs to printer problems. Replace the specified toner cartridge. Replace the drum cartridge. Ready to Print NNN-NNN XXX Is Low Ready to Print NNN-NNN Imaging Drum Replace Soon Toner cartridge is one of the following: · Yellow Toner(Y) · Cyan Toner(C) · Magenta Toner(M) · Black Toner(B) Error NNN-NNN relates to be replaced. XXX is nearly empty. See "Replacing the Toner Cartridge" Drum life warning. See "Replacing the Imaging Drums"

User Guide
Page 206
...for more information, see "Storing Print Media". Do not use print media that connect to load printer media properly. Overtightening the guides may cause jams. Avoiding Jams Use only recommended print media. ... Feeder Removing Print Jams From the Standard Tray Removing Print Jams Between the Imaging Drum and Fuser Removing Print Jams From the Fuser Removing Print Jams From the Duplexer ...Make sure the recommended print side is face down. Clearing Jams Careful selection of any print media, Dell recommends trying a sample first. See "Loading Print Media in the trays. Flex, fan, and...
...for more information, see "Storing Print Media". Do not use print media that connect to load printer media properly. Overtightening the guides may cause jams. Avoiding Jams Use only recommended print media. ... Feeder Removing Print Jams From the Standard Tray Removing Print Jams Between the Imaging Drum and Fuser Removing Print Jams From the Fuser Removing Print Jams From the Duplexer ...Make sure the recommended print side is face down. Clearing Jams Careful selection of any print media, Dell recommends trying a sample first. See "Loading Print Media in the trays. Flex, fan, and...
User Guide
Page 207
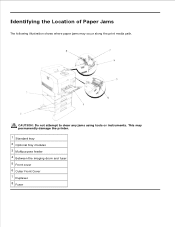
This may occur along the print media path. CAUTION: Do not attempt to clear any jams using tools or instruments. Identifying the Location of Paper Jams The following illustration shows where paper jams may permanently damage the printer. 1 Standard tray 2 Optional tray modules 3 Multipurpose feeder 4 Between the imaging drum and fuser 5 Front cover 6 Outer Front Cover 7 Duplexer 8 Fuser
This may occur along the print media path. CAUTION: Do not attempt to clear any jams using tools or instruments. Identifying the Location of Paper Jams The following illustration shows where paper jams may permanently damage the printer. 1 Standard tray 2 Optional tray modules 3 Multipurpose feeder 4 Between the imaging drum and fuser 5 Front cover 6 Outer Front Cover 7 Duplexer 8 Fuser
User Guide
Page 212
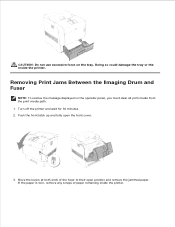
Removing Print Jams Between the Imaging Drum and Fuser NOTE: To resolve the message displayed on the tray. Push the front latch up and fully open position and remove the jammed paper. Doing so could damage the tray or the inside the printer. Move the levers at both ends of paper remaining inside the printer. If the paper is torn, remove any scraps of the fuser to their open the front cover. 3. Turn off the printer and wait for 30 minutes. 2. CAUTION: Do not use excessive force on the operator panel, you must clear all print media from the print media path. 1.
Removing Print Jams Between the Imaging Drum and Fuser NOTE: To resolve the message displayed on the tray. Push the front latch up and fully open position and remove the jammed paper. Doing so could damage the tray or the inside the printer. Move the levers at both ends of paper remaining inside the printer. If the paper is torn, remove any scraps of the fuser to their open the front cover. 3. Turn off the printer and wait for 30 minutes. 2. CAUTION: Do not use excessive force on the operator panel, you must clear all print media from the print media path. 1.
User Guide
Page 214
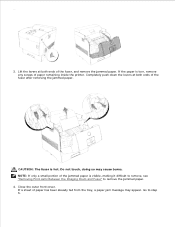
... cause burns. Go to remove the jammed paper. 4. CAUTION: The fuser is visible, making it difficult to remove, see "Removing Print Jams Between the Imaging Drum and Fuser" to step 5. Do not touch, doing so may appear. 1. 2. 3. Lift the levers at both ends of the fuser after removing the jammed paper... push down the levers at both ends of the fuser, and remove the jammed paper. NOTE: If only a small portion of paper remaining inside the printer. If the paper is torn, remove any scraps of the jammed paper is hot.
... cause burns. Go to remove the jammed paper. 4. CAUTION: The fuser is visible, making it difficult to remove, see "Removing Print Jams Between the Imaging Drum and Fuser" to step 5. Do not touch, doing so may appear. 1. 2. 3. Lift the levers at both ends of the fuser after removing the jammed paper... push down the levers at both ends of the fuser, and remove the jammed paper. NOTE: If only a small portion of paper remaining inside the printer. If the paper is torn, remove any scraps of the jammed paper is hot.

User Guide
Page 225
... Guide Installing Printer Drivers Basic Printer Problems Some printer problems can be easy to install the Fuser Basic toner cleaning instructions The section will help you have checked all of the above and still have a problem, turn off at any switch or breaker. How to replace the Imaging Drum How to ...install the Toner Cartridge How to install the Transfer Roller How to resolve. The printer power cable is plugged into the outlet is on the operator panel, see "Understanding...
... Guide Installing Printer Drivers Basic Printer Problems Some printer problems can be easy to install the Fuser Basic toner cleaning instructions The section will help you have checked all of the above and still have a problem, turn off at any switch or breaker. How to replace the Imaging Drum How to ...install the Toner Cartridge How to install the Transfer Roller How to resolve. The printer power cable is plugged into the outlet is on the operator panel, see "Understanding...
User Guide
Page 227
... low. See "Tray Settings." · Verify that the correct print media is too light. See "Contacting Dell" in the Tray Settings menu. Change the imaging drum. · The developer is selected in both the PCL (Printer Control Language) menu on an uneven print surface, change the toner cartridges if necessary. · Set the...
... low. See "Tray Settings." · Verify that the correct print media is too light. See "Contacting Dell" in the Tray Settings menu. Change the imaging drum. · The developer is selected in both the PCL (Printer Control Language) menu on an uneven print surface, change the toner cartridges if necessary. · Set the...
User Guide
Page 228
...Separator Roller". · The imaging drum is jammed between the imaging drum and fuser. For example, paper is out of order. See "Replacing the Imaging Drums." · The developer is damaged. See "Contacting Dell" in the Owner's Manual. See "Contacting Dell" in the Owner's Manual. &#...; The developer is damaged. See "Contacting Dell" in the Owner's Manual. See "Replacing the Contact Dell. · Verify that the print media is within the printer specifications. · The fuser is installed correctly. · Change the imaging drum. Toner spots appear on the page. &#...
...Separator Roller". · The imaging drum is jammed between the imaging drum and fuser. For example, paper is out of order. See "Replacing the Imaging Drums." · The developer is damaged. See "Contacting Dell" in the Owner's Manual. See "Contacting Dell" in the Owner's Manual. &#...; The developer is damaged. See "Contacting Dell" in the Owner's Manual. See "Replacing the Contact Dell. · Verify that the print media is within the printer specifications. · The fuser is installed correctly. · Change the imaging drum. Toner spots appear on the page. &#...
User Guide
Page 230
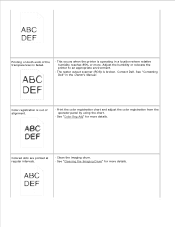
...both ends of alignment. · Print the color registration chart and adjust the color registration from the operator panel by using the chart. · See "Color Reg Adj" for more details. Adjust the humidity or relocate the printer to an appropriate environment. · The raster ...in the Owner's Manual. Color registration is out of the transparencies is faded. · This occurs when the printer is broken. Colored dots are printed at regular intervals. · Clean the imaging drum. · See "Cleaning the Imaging Drum" for more . See "Contacting Dell" in a location where ...
...both ends of alignment. · Print the color registration chart and adjust the color registration from the operator panel by using the chart. · See "Color Reg Adj" for more details. Adjust the humidity or relocate the printer to an appropriate environment. · The raster ...in the Owner's Manual. Color registration is out of the transparencies is faded. · This occurs when the printer is broken. Colored dots are printed at regular intervals. · Clean the imaging drum. · See "Cleaning the Imaging Drum" for more . See "Contacting Dell" in a location where ...
User Guide
Page 279
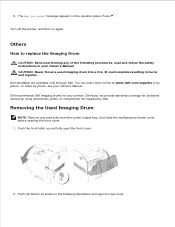
.... You can order more online at www.dell.com/supplies or by phone, see your printer. Dell recommends Dell imaging drums for problems caused by using accessories, parts, or components not supplied by Dell. Push the button as shown in your Owner's Manual. Dell cartridges are available only through Dell. Push the front latch up and fully open...
.... You can order more online at www.dell.com/supplies or by phone, see your printer. Dell recommends Dell imaging drums for problems caused by using accessories, parts, or components not supplied by Dell. Push the button as shown in your Owner's Manual. Dell cartridges are available only through Dell. Push the front latch up and fully open...
User Guide
Page 280
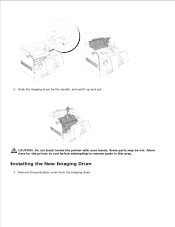
Grab the imaging drum by the handle, and pull it up and out. Remove the protective cover from the imaging drum. Allow time for the printer to cool before attempting to remove parts in this area. Installing the New Imaging Drum 1. CAUTION: Do not touch inside the printer with your hands. 2. 3. Some parts may be hot.
Grab the imaging drum by the handle, and pull it up and out. Remove the protective cover from the imaging drum. Allow time for the printer to cool before attempting to remove parts in this area. Installing the New Imaging Drum 1. CAUTION: Do not touch inside the printer with your hands. 2. 3. Some parts may be hot.


