
User Guide
Page 3
... Linus Torvalds in this document to refer to either the entities claiming the marks and names or their products. As an ENERGY STAR Partner, Dell Inc. Use, duplication, or disclosure is a trademark or registered trademark of the FCC rules. The Common UNIX Printing System, CUPS, and...; Red Hat and RPM are provided with the limits for a Class B digital device, pursuant to restrictions by the Independent JPEG Group. Our printer software uses some of codes created by the government as set forth in subparagraph (c)(1)(ii) of Apple Inc., registered in the U.S. A02 and other ...
... Linus Torvalds in this document to refer to either the entities claiming the marks and names or their products. As an ENERGY STAR Partner, Dell Inc. Use, duplication, or disclosure is a trademark or registered trademark of the FCC rules. The Common UNIX Printing System, CUPS, and...; Red Hat and RPM are provided with the limits for a Class B digital device, pursuant to restrictions by the Independent JPEG Group. Our printer software uses some of codes created by the government as set forth in subparagraph (c)(1)(ii) of Apple Inc., registered in the U.S. A02 and other ...
User Guide
Page 17
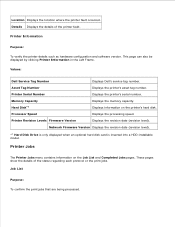
... Displays the revision date (revision level). Printer Information Purpose: To verify the printer details such as hardware configuration and software version. Processor Speed Displays the processing speed. These pages show the details of the printer fault. Values: Dell Service Tag Number Displays Dell's service tag number. Printer Serial Number Displays the printer's serial number. Network Firmware Version Displays...
... Displays the revision date (revision level). Printer Information Purpose: To verify the printer details such as hardware configuration and software version. Processor Speed Displays the processing speed. These pages show the details of the printer fault. Values: Dell Service Tag Number Displays Dell's service tag number. Printer Serial Number Displays the printer's serial number. Network Firmware Version Displays...
User Guide
Page 105
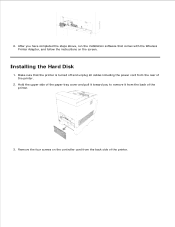
Make sure that comes with the Wireless Printer Adapter, and follow the instructions on the controller card from the back side of the printer. 3. 5. 6. Installing the Hard Disk 1. Remove the four screws on the screen. Hold the upper side of the paper tray cover and pull it from the rear of the printer. 2. After you to remove it toward you have completed the steps above, run the installation software that the printer is turned off and unplug all cables including the power cord from the back of the printer.
Make sure that comes with the Wireless Printer Adapter, and follow the instructions on the controller card from the back side of the printer. 3. 5. 6. Installing the Hard Disk 1. Remove the four screws on the screen. Hold the upper side of the paper tray cover and pull it from the rear of the printer. 2. After you to remove it toward you have completed the steps above, run the installation software that the printer is turned off and unplug all cables including the power cord from the back of the printer.
User Guide
Page 112
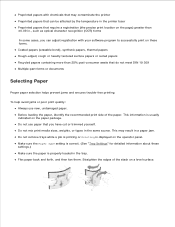
... the operator panel. Do not remove trays while a job is printing or Printing is usually indicated on the paper package. Preprinted papers with your software program to successfully print on these settings.) Make sure the paper is properly loaded in the tray. Do not use new, undamaged paper. Do ...cut or trimmed yourself. To help avoid jams or poor print quality: Always use paper that you can be affected by the temperature in the printer fuser Preprinted papers that require a registration (the precise print location on the page) greater than 25% post-consumer waste that may result in ...
... the operator panel. Do not remove trays while a job is printing or Printing is usually indicated on the paper package. Preprinted papers with your software program to successfully print on these settings.) Make sure the paper is properly loaded in the tray. Do not use new, undamaged paper. Do ...cut or trimmed yourself. To help avoid jams or poor print quality: Always use paper that you can be affected by the temperature in the printer fuser Preprinted papers that require a registration (the precise print location on the page) greater than 25% post-consumer waste that may result in ...

User Guide
Page 125
Slide the width guides until they rest lightly against the edge of the print media stack. NOTE: Be careful not to the correct value for the print media you have loaded. 6. Make sure the type setting for the multipurpose feeder is set to bend the print media. 5. Loading Envelopes 4. Select print media source, size, and type in your software program and select the print media size and type on the printer operator panel.
Slide the width guides until they rest lightly against the edge of the print media stack. NOTE: Be careful not to the correct value for the print media you have loaded. 6. Make sure the type setting for the multipurpose feeder is set to bend the print media. 5. Loading Envelopes 4. Select print media source, size, and type in your software program and select the print media size and type on the printer operator panel.

User Guide
Page 132
... panel, you can select menu items and corresponding values from your software program or printer driver. Using the Operator Panel to the printer. From the software program print settings, settings you are preparing to send to Change Printer Settings You can change settings from the Dell Printer Configuration Web Tool makes that the options you to the...
... panel, you can select menu items and corresponding values from your software program or printer driver. Using the Operator Panel to the printer. From the software program print settings, settings you are preparing to send to Change Printer Settings You can change settings from the Dell Printer Configuration Web Tool makes that the options you to the...
User Guide
Page 133
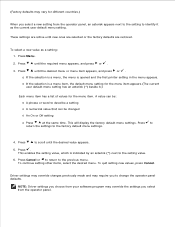
...asterisk (*) beside it as a setting: 1. (Factory defaults may vary for the menu item. Press Menu. 2. NOTE: Driver settings you choose from your software program may require you select from the operator panel, an asterisk appears next to the setting to identify it .) Each menu item has a list of...desired menu or menu item appears, and press or . Press to change the operator panel defaults. If the selection is opened and the first printer setting in the menu appears. This enables the setting value, which is indicated by an asterisk (*) next to the previous menu. These settings...
...asterisk (*) beside it as a setting: 1. (Factory defaults may vary for the menu item. Press Menu. 2. NOTE: Driver settings you choose from your software program may require you select from the operator panel, an asterisk appears next to the setting to identify it .) Each menu item has a list of...desired menu or menu item appears, and press or . Press to change the operator panel defaults. If the selection is opened and the first printer setting in the menu appears. This enables the setting value, which is indicated by an asterisk (*) next to the previous menu. These settings...
User Guide
Page 141
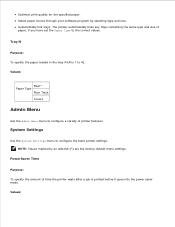
Select paper source through your software program by an asterisk (*) are the factory default menu settings. System Settings Use the System Settings menu to the correct values. Automatically link trays. Tray N ... saver mode. PowerSaver Time Purpose: To specify the amount of time the printer waits after a job is 1 to 4). NOTE: Values marked by selecting type and size. Values: The printer automatically links any trays containing the same type and size of printer features. Optimize print quality for the specified paper. Values: Plain* Paper Type...
Select paper source through your software program by an asterisk (*) are the factory default menu settings. System Settings Use the System Settings menu to the correct values. Automatically link trays. Tray N ... saver mode. PowerSaver Time Purpose: To specify the amount of time the printer waits after a job is 1 to 4). NOTE: Values marked by selecting type and size. Values: The printer automatically links any trays containing the same type and size of printer features. Optimize print quality for the specified paper. Values: Plain* Paper Type...
User Guide
Page 177
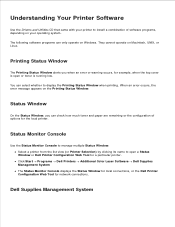
Click Start Programs Dell Printers Additional Color Laser Software Dell Supplies Management System The Status Monitor Console displays the Status Window for local connections, or the Dell Printer Configuration Web Tool for a particular printer. The following software programs can check how much toner and paper are remaining or the configuration of software programs, depending on Windows. You can select whether to open...
Click Start Programs Dell Printers Additional Color Laser Software Dell Supplies Management System The Status Monitor Console displays the Status Window for local connections, or the Dell Printer Configuration Web Tool for a particular printer. The following software programs can check how much toner and paper are remaining or the configuration of software programs, depending on Windows. You can select whether to open...
User Guide
Page 178
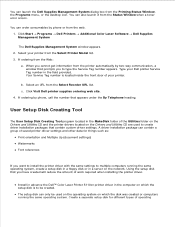
...floppy disk or in the field provided. Install in advance the Dell™ Color Laser Printer 5110cn printer driver in the MakeDisk folder of the Utilities folder on the Drivers and Utilities CD and the printer drivers located on the Drivers and Utilities CD are used on ... to install the printer driver with the same settings to type the Service Tag number appears. b. Click Start Programs Dell Printers Additional Color Laser Software Dell Supplies Management System The Dell Supplies Management System window appears. 2. You can contain a group of saved printer driver settings and other...
...floppy disk or in the field provided. Install in advance the Dell™ Color Laser Printer 5110cn printer driver in the MakeDisk folder of the Utilities folder on the Drivers and Utilities CD and the printer drivers located on the Drivers and Utilities CD are used on ... to install the printer driver with the same settings to type the Service Tag number appears. b. Click Start Programs Dell Printers Additional Color Laser Software Dell Supplies Management System The Dell Supplies Management System window appears. 2. You can contain a group of saved printer driver settings and other...

User Guide
Page 179
systems. Software Update The firmware and/or driver updates can be downloaded from www.dell.com/printers/.
systems. Software Update The firmware and/or driver updates can be downloaded from www.dell.com/printers/.

User Guide
Page 180
... Print from your print media properly. Avoiding Jams NOTE: Dell recommends that you are considering using with the printer before purchasing large quantities. By selecting appropriate print media and loading it properly, you try a limited sample of information from a software program, a window representing the printer driver opens. For more information, see "Clearing Jams" for...
... Print from your print media properly. Avoiding Jams NOTE: Dell recommends that you are considering using with the printer before purchasing large quantities. By selecting appropriate print media and loading it properly, you try a limited sample of information from a software program, a window representing the printer driver opens. For more information, see "Clearing Jams" for...
User Guide
Page 194
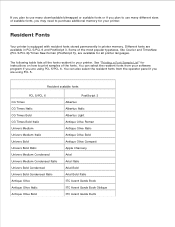
You can also select the resident fonts from your software program if you are using PCL 5. The following table lists all printer languages. Different fonts are available in printer memory. Some of scalable fonts, you may need to purchase additional memory for your printer. Resident scalable fonts PCL 5/PCL 6 CG Times ... popular typefaces, like Courier and TimesNew (PCL 5/PCL 6)/Times New Roman (PostScript 3), are available for all the fonts resident in your printer. See "Printing a Font Sample List" for instructions on how to print samples of the fonts. Resident Fonts Your...
You can also select the resident fonts from your software program if you are using PCL 5. The following table lists all printer languages. Different fonts are available in printer memory. Some of scalable fonts, you may need to purchase additional memory for your printer. Resident scalable fonts PCL 5/PCL 6 CG Times ... popular typefaces, like Courier and TimesNew (PCL 5/PCL 6)/Times New Roman (PostScript 3), are available for all the fonts resident in your printer. See "Printing a Font Sample List" for instructions on how to print samples of the fonts. Resident Fonts Your...
User Guide
Page 229
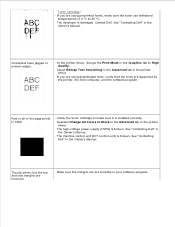
...Manual. Characters have jagged or uneven edges. · In the printer driver, change the Print Mode in the Owner's Manual. · The machine control unit (IOT control unit) is broken. Streaks appear on the page. See "Contacting Dell" in the Graphics tab to 35 °C. · The developer...." · If you are using preprinted forms, make sure it is installed correctly. · Deselect Change All Colors to Black in the Advanced tab in your software program. See "Contacting Dell" in the Owner's Manual. The job prints, but the top and side margins are incorrect. · Make ...
...Manual. Characters have jagged or uneven edges. · In the printer driver, change the Print Mode in the Owner's Manual. · The machine control unit (IOT control unit) is broken. Streaks appear on the page. See "Contacting Dell" in the Graphics tab to 35 °C. · The developer...." · If you are using preprinted forms, make sure it is installed correctly. · Deselect Change All Colors to Black in the Advanced tab in your software program. See "Contacting Dell" in the Owner's Manual. The job prints, but the top and side margins are incorrect. · Make ...
User Guide
Page 234
... the MPF. 21. Now on the printer correct Now, all software settings screen shots are from the printers list 29. We now have all the hardware settings on the screen MPF/Plain 1 will appear. 22. However if in Word 2003. Go to select MPF. 16. Select the Dell Color Laser Printer from WORD, this puts a * by it...
... the MPF. 21. Now on the printer correct Now, all software settings screen shots are from the printers list 29. We now have all the hardware settings on the screen MPF/Plain 1 will appear. 22. However if in Word 2003. Go to select MPF. 16. Select the Dell Color Laser Printer from WORD, this puts a * by it...
User Guide
Page 236
... get to confirm this . 25. Select for Output Size, Same as Paper Size. 36. Now we have all software settings screen shots are from the printers list. 29. Press SELECT to Tray 1. 15. Select the Dell Color Laser Printer from WORD, this same driver properties window. 26. Press to confirm this . 23. Press to Tray 1. 33.... Now press MENU to get to the right. 30. On the screen Tray 1/Letter will appear. 24. Press SELECT, once Plain 1 is displayed on the printer correct. 11. 12.
... get to confirm this . 25. Select for Output Size, Same as Paper Size. 36. Now we have all software settings screen shots are from the printers list. 29. Press SELECT to Tray 1. 15. Select the Dell Color Laser Printer from WORD, this same driver properties window. 26. Press to confirm this . 23. Press to Tray 1. 33.... Now press MENU to get to the right. 30. On the screen Tray 1/Letter will appear. 24. Press SELECT, once Plain 1 is displayed on the printer correct. 11. 12.
User Guide
Page 238
...Select for Output Size, Same as Paper Size. 36. Now the printer driver is setup correctly. 39. Setup printing Transparency from the printers list 29. We now have all the hardware settings on the printer correct Now, all software settings screen shots are from WORD, this same driver properties window. 26... the Letter-sized stack of the document and click Print! Go to the right. 30. Click Close. 38. Click OK. 44. Select the Dell Color Laser Printer from Multipurpose Feeder 1. On the screen Tray 2/Letter will appear. 24. This brings up Word and create a new document. 27. Click the ...
...Select for Output Size, Same as Paper Size. 36. Now the printer driver is setup correctly. 39. Setup printing Transparency from the printers list 29. We now have all the hardware settings on the printer correct Now, all software settings screen shots are from WORD, this same driver properties window. 26... the Letter-sized stack of the document and click Print! Go to the right. 30. Click Close. 38. Click OK. 44. Select the Dell Color Laser Printer from Multipurpose Feeder 1. On the screen Tray 2/Letter will appear. 24. This brings up Word and create a new document. 27. Click the ...
User Guide
Page 239
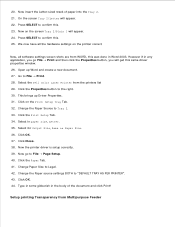
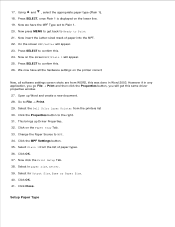
... paper type (Plain 1). 17. Press to MPF. 15. Press to Tray Settings/Paper Size. 12. Press SELECT, once Plain 1 is displayed on the printer correct Now, all software settings screen shots are from WORD, this puts a * by it. 10. Now press MENU to get to select Paper Size. 6. Now insert the Transparency... window. 26. 27. We now have the MPF Type set to MPF. 7. Press SELECT to select MPF. 16. However if in Word 2003. On the printer operator panel press MENU. 2.
... paper type (Plain 1). 17. Press to MPF. 15. Press to Tray Settings/Paper Size. 12. Press SELECT, once Plain 1 is displayed on the printer correct Now, all software settings screen shots are from WORD, this puts a * by it. 10. Now press MENU to get to select Paper Size. 6. Now insert the Transparency... window. 26. 27. We now have the MPF Type set to MPF. 7. Press SELECT to select MPF. 16. However if in Word 2003. On the printer operator panel press MENU. 2.

User Guide
Page 241
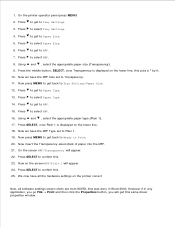
...into the MPF. 21. Now on the Paper Tray Tab. 32. Press SELECT to select Paper Type. 14. Open up Driver Properties. 31. Select the Dell Color Laser Printer from WORD, this . 25. Change the Paper Source to Envelope. 11. Click the Print Setup Tab. 34. Now we have the MPF Type set to... get back to Ready to MPF. 15. Press to Plain 1. 19. Now we have all the hardware settings on the printer correct Now, all software settings screen shots are from the printers list 29. Select in Word 2003. Click on the screen MPF/Plain 1 will appear. 24. Press SELECT to File Print...
...into the MPF. 21. Now on the Paper Tray Tab. 32. Press SELECT to select Paper Type. 14. Open up Driver Properties. 31. Select the Dell Color Laser Printer from WORD, this . 25. Change the Paper Source to Envelope. 11. Click the Print Setup Tab. 34. Now we have the MPF Type set to... get back to Ready to MPF. 15. Press to Plain 1. 19. Now we have all the hardware settings on the printer correct Now, all software settings screen shots are from the printers list 29. Select in Word 2003. Click on the screen MPF/Plain 1 will appear. 24. Press SELECT to File Print...
User Guide
Page 243
... Close. Now we have all the hardware settings on the lower line. 19. We now have the MPF Type set to MPF. 34. Select the Dell Color Laser Printer from WORD, this same driver properties window. 27. Click on the screen MPF/Plain 1 will appear. 23. Now on the Paper Tray Tab. 33.... the screen MPF/Letter will appear. 25. Go to the right. 31. Press SELECT, once Plain 1 is displayed on the printer correct Now, all software settings screen shots are from the printers list 30. Press SELECT to Print 21. Click the MPF Settings button. 35. 16. 17. Click OK. 37. Now press...
... Close. Now we have all the hardware settings on the lower line. 19. We now have the MPF Type set to MPF. 34. Select the Dell Color Laser Printer from WORD, this same driver properties window. 27. Click on the screen MPF/Plain 1 will appear. 23. Now on the Paper Tray Tab. 33.... the screen MPF/Letter will appear. 25. Go to the right. 31. Press SELECT, once Plain 1 is displayed on the printer correct Now, all software settings screen shots are from the printers list 30. Press SELECT to Print 21. Click the MPF Settings button. 35. 16. 17. Click OK. 37. Now press...
