
User Guide
Page 59
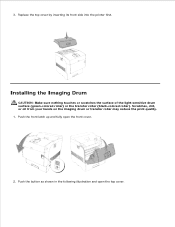
Replace the top cover by inserting its front side into the printer first. Push the front latch up and fully open the top cover. Installing the Imaging Drum CAUTION: Make sure nothing touches or scratches the surface of the light-sensitive drum surface (green-colored roller) or the transfer roller (black-colored roller). Push the button as shown in the following illustration and open the front cover. 2. Scratches, dirt, or oil from your hands on the imaging drum or transfer roller may reduce the print quality. 1. 3.
Replace the top cover by inserting its front side into the printer first. Push the front latch up and fully open the top cover. Installing the Imaging Drum CAUTION: Make sure nothing touches or scratches the surface of the light-sensitive drum surface (green-colored roller) or the transfer roller (black-colored roller). Push the button as shown in the following illustration and open the front cover. 2. Scratches, dirt, or oil from your hands on the imaging drum or transfer roller may reduce the print quality. 1. 3.

User Guide
Page 203
...-NNN Replace Y Toner Imaging Drum 091-935 Replace Imaging Drum Toner Type NNN-NNN Reseat XXX Imaging Drum 091-912 Reseat Imaging Drum The printer detects jammed transparencies. Y is either missing or not fully inserted into the printer. Order a new toner cartridge at the website (www.dell.com/supplies or www.euro.dell.com/supplies). See "Replacing the Toner Cartridge" Replace the drum cartridge. See "Replacing the Imaging Drums" See "Replacing...
...-NNN Replace Y Toner Imaging Drum 091-935 Replace Imaging Drum Toner Type NNN-NNN Reseat XXX Imaging Drum 091-912 Reseat Imaging Drum The printer detects jammed transparencies. Y is either missing or not fully inserted into the printer. Order a new toner cartridge at the website (www.dell.com/supplies or www.euro.dell.com/supplies). See "Replacing the Toner Cartridge" Replace the drum cartridge. See "Replacing the Imaging Drums" See "Replacing...

User Guide
Page 205
See "Replacing the Imaging Drums" Ready to Print NNN-NNN XXX Is Low Ready to printer problems. Replace the specified toner cartridge. XXX is one of the following: · Yellow Toner(Y) · Cyan Toner(C) · Magenta Toner(M) · Black Toner(B) Error NNN-NNN relates to Print NNN-NNN Imaging Drum Replace Soon Toner cartridge is nearly empty. The drum cartridge needs to be replaced. See "Replacing the Toner Cartridge" Drum life warning. Replace the drum cartridge.
See "Replacing the Imaging Drums" Ready to Print NNN-NNN XXX Is Low Ready to printer problems. Replace the specified toner cartridge. XXX is one of the following: · Yellow Toner(Y) · Cyan Toner(C) · Magenta Toner(M) · Black Toner(B) Error NNN-NNN relates to Print NNN-NNN Imaging Drum Replace Soon Toner cartridge is nearly empty. The drum cartridge needs to be replaced. See "Replacing the Toner Cartridge" Drum life warning. Replace the drum cartridge.

User Guide
Page 225
... off at any switch or breaker. Other electrical equipment plugged into the printer and a properly grounded electrical outlet. NOTICE: If an error message appears, see "Understanding Printer Messages." If a problem occurs with the printer, options, or print quality. How to replace the Imaging Drum How to install the Toner Cartridge How to install the Transfer Roller...
... off at any switch or breaker. Other electrical equipment plugged into the printer and a properly grounded electrical outlet. NOTICE: If an error message appears, see "Understanding Printer Messages." If a problem occurs with the printer, options, or print quality. How to replace the Imaging Drum How to install the Toner Cartridge How to install the Transfer Roller...
User Guide
Page 227
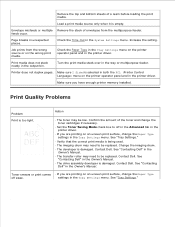
...media stack over in the output bin. Make sure 2 Sided is being used. · The imaging drum may need to be replaced. Check the Paper Type in the Tray Settings menu on the printer operator panel and in the Tray Settings menu. Print media does not stack neatly in the tray...roller may need to be low. Confirm the amount of a ream before loading the print media. Action · The toner may be replaced. Contact Dell. Contact Dell. Remove the top and bottom sheets of the toner and change the toner cartridges if necessary. · Set the Toner Saving Mode check ...
...media stack over in the output bin. Make sure 2 Sided is being used. · The imaging drum may need to be replaced. Check the Paper Type in the Tray Settings menu on the printer operator panel and in the Tray Settings menu. Print media does not stack neatly in the tray...roller may need to be low. Confirm the amount of a ream before loading the print media. Action · The toner may be replaced. Contact Dell. Contact Dell. Remove the top and bottom sheets of the toner and change the toner cartridges if necessary. · Set the Toner Saving Mode check ...
User Guide
Page 228
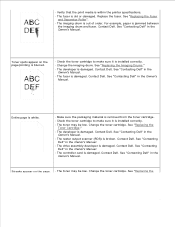
... appear on the page. · The toner may be low. See "Contacting Dell" in the Owner's Manual. See "Replacing the · Verify that the print media is within the printer specifications. · The fuser is installed correctly. · Change the imaging drum. See "Contacting Dell" in the Owner's Manual. · The controller card is jammed between...
... appear on the page. · The toner may be low. See "Contacting Dell" in the Owner's Manual. See "Replacing the · Verify that the print media is within the printer specifications. · The fuser is installed correctly. · Change the imaging drum. See "Contacting Dell" in the Owner's Manual. · The controller card is jammed between...
User Guide
Page 279
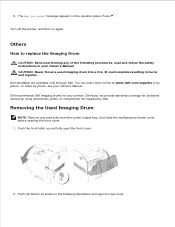
...How to replace the Imaging Drum CAUTION: Before performing any print jobs from the center output tray, and close the multipurpose feeder cover before opening the front cover. 1. It could explode resulting in your Owner's Manual. Dell does not provide warranty coverage for your printer. The... Are you sure? You can order more online at www.dell.com/supplies or by Dell. Dell recommends Dell imaging drums for problems caused by using accessories, parts, or components...
...How to replace the Imaging Drum CAUTION: Before performing any print jobs from the center output tray, and close the multipurpose feeder cover before opening the front cover. 1. It could explode resulting in your Owner's Manual. Dell does not provide warranty coverage for your printer. The... Are you sure? You can order more online at www.dell.com/supplies or by Dell. Dell recommends Dell imaging drums for problems caused by using accessories, parts, or components...
User Guide
Page 295
... Ordering Supplies Storing Print Media Storing Consumables Replacing the Imaging Drums Replacing the Toner Cartridge Replacing the Transfer Roller Replacing the Fuser and Separator Roller Cleaning the Automatic Density Control (ADC) Sensor Cleaning the Imaging Drum Adjusting Color Registration Determining the Status of Supplies If your printer is connected to the network, the Dell Printer Configuration Web Tool can change several people...
... Ordering Supplies Storing Print Media Storing Consumables Replacing the Imaging Drums Replacing the Toner Cartridge Replacing the Transfer Roller Replacing the Fuser and Separator Roller Cleaning the Automatic Density Control (ADC) Sensor Cleaning the Imaging Drum Adjusting Color Registration Determining the Status of Supplies If your printer is connected to the network, the Dell Printer Configuration Web Tool can change several people...
User Guide
Page 297
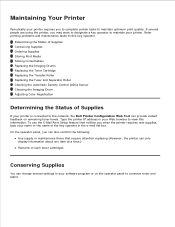
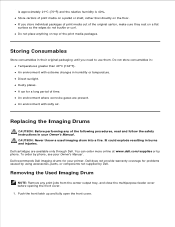
...salty air. You can order more online at www.dell.com/supplies or by phone, see your Owner's Manual . Dusty places. An environment with extreme changes in your printer. Replacing the Imaging Drums CAUTION: Before performing any print jobs from the center... output tray, and close the multipurpose feeder cover before opening the front cover. 1. Dell cartridges are present. Dell recommends Dell imaging drums for problems caused by using accessories...
...salty air. You can order more online at www.dell.com/supplies or by phone, see your Owner's Manual . Dusty places. An environment with extreme changes in your printer. Replacing the Imaging Drums CAUTION: Before performing any print jobs from the center... output tray, and close the multipurpose feeder cover before opening the front cover. 1. Dell cartridges are present. Dell recommends Dell imaging drums for problems caused by using accessories...
User Guide
Page 320
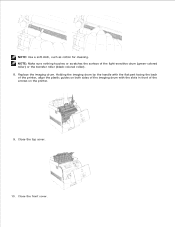
Close the top cover. 10. Replace the imaging drum. Holding the imaging drum by the handle with the flat part facing the back of the printer, align the plastic guides on both sides of the imaging drum with the slots in front of the light-sensitive drum (green-colored roller) or the transfer roller (black-colored roller). 8. Close the front cover. NOTE: Use a soft cloth, such as cotton for cleaning. NOTE: Make sure nothing touches or scratches the surface of the arrows on the printer. 9.
Close the top cover. 10. Replace the imaging drum. Holding the imaging drum by the handle with the flat part facing the back of the printer, align the plastic guides on both sides of the imaging drum with the slots in front of the light-sensitive drum (green-colored roller) or the transfer roller (black-colored roller). 8. Close the front cover. NOTE: Use a soft cloth, such as cotton for cleaning. NOTE: Make sure nothing touches or scratches the surface of the arrows on the printer. 9.
User Guide
Page 323
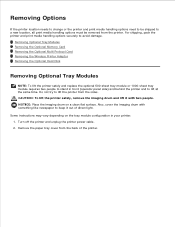
...the same time. CAUTION: To lift the printer safely, remove the imaging drum and lift it out of the printer. 3. NOTICE: Place the imaging drum on the tray module configuration in front (operator panel side) and behind the printer and to lift the printer from the back of direct light. Removing ...Removing the Optional Memory Card Removing the Optional Multi Protocol Card Removing the Wireless Printer Adaptor Removing the Optional Hard Disk Removing Optional Tray Modules NOTE: To lift the printer safely and replace the optional 500-sheet tray module or 1000-sheet tray module requires two ...
...the same time. CAUTION: To lift the printer safely, remove the imaging drum and lift it out of the printer. 3. NOTICE: Place the imaging drum on the tray module configuration in front (operator panel side) and behind the printer and to lift the printer from the back of direct light. Removing ...Removing the Optional Memory Card Removing the Optional Multi Protocol Card Removing the Wireless Printer Adaptor Removing the Optional Hard Disk Removing Optional Tray Modules NOTE: To lift the printer safely and replace the optional 500-sheet tray module or 1000-sheet tray module requires two ...


