
Dell 2330dn Support Question
Dell 2330dn Support Question
Find answers below for this question about Dell 2330dn - Laser Printer B/W.Need a Dell 2330dn manual? We have 4 online manuals for this item!
Question posted by wtgtpd on March 23rd, 2014
After You Replace The Imaging Drum, You Should Reset The Imaging Drum's
counter. to reset the counter, see theinstruction sheet that shipped with the new imaging drum kit for my 2330d but it does not say?
Current Answers
Related Dell 2330dn Manual Pages
User's Guide
(HTML) - Page 17
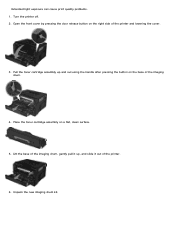
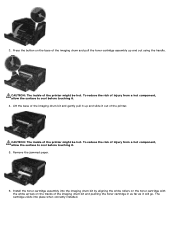
... cartridge assembly up , and slide it out of the imaging drum.
4. Lift the base of the imaging drum, gently pull it up and out using the handle after pressing the button on the right side of the printer and lowering the cover.
3. Unpack the new imaging drum kit. Turn the printer off. 2. Open the front cover by pressing the door...
User's Guide
(HTML) - Page 18
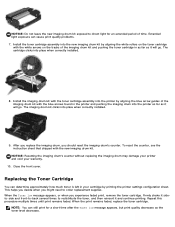
To reset the counter, see the instruction sheet that shipped with the white arrows on the toner cartridge
with the new imaging drum kit. This helps you decide when you might need to redistribute the toner, and then reinsert it will go .
Install the toner cartridge assembly into the printer by printing the printer settings configuration sheet. The cartridge clicks into ...
User's Guide
(HTML) - Page 19
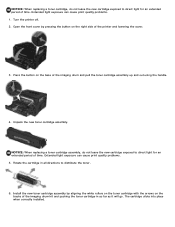
... the printer and lowering the cover.
3. The cartridge clicks into place when correctly installed. Extended light exposure can cause print quality problems. 1. Install the new toner cartridge assembly by pressing the button on the base of the imaging drum and pull the toner cartridge assembly up and out using the handle.
4. NOTICE: When replacing a toner...
User's Guide
(HTML) - Page 20
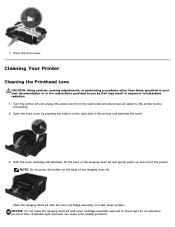
... disconnect all cables to direct light for an extended period of the printer and lowering the cover.
3. Place the imaging drum kit with the toner cartridge assembly on the base of the printer. Extended light exposure can cause print quality problems. Cleaning Your Printer
Cleaning the Printhead Lens
CAUTION: Using controls, making adjustments, or performing procedures...
User's Guide
(HTML) - Page 21
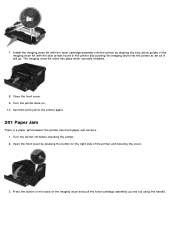
... printer before beginning a new print job. Close the front cover. 8. Wipe only the outside of the printer. 5. Remove paper from the wall outlet and disconnect all cables to your printer. Damage to the printhead lens.
6. Locate the glass printhead lens, which is turned off and unplugged from the wall outlet. The imaging drum kit clicks into the printer...
User's Guide
(HTML) - Page 51
... of the following:
1.
An exception is added to the Windows Firewall to allow this issue, then try uninstalling and reinstalling the Dell 2330d/2330dn Laser Printer driver. How do I choose the optional 550-sheet drawer (Tray 2) in Windows® via USB or Parallel connection? If failure persists, then changing the USB cable might help. How...
User's Guide
(HTML) - Page 52
...The replace imaging drum message will be cleared only when the imaging drum has been changed.
How do I change the printer IP address by this setting to return the imaging drum counter to set up for Windows? In Windows Vista, click ® Computer. I install the Dell 2330d/2330dn Laser Printer driver through network for Network Printing. See Loading the 250-Sheet and 550-Sheet Paper...
User's Guide
(HTML) - Page 60
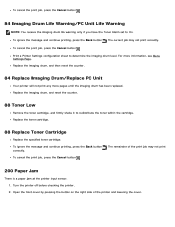
... the toner within the cartridge. Replace the imaging drum, and reset the counter.
88 Toner Low
Remove the toner cartridge, and firmly shake it to On. The remainder of the printer and lowering the cover. Print a Printer Settings configuration sheet to determine the imaging drum level. For more pages until the imaging drum has been replaced. Turn the printer off before checking the...
User's Guide
(HTML) - Page 61
... cartridge assembly into place when correctly installed. CAUTION: The inside of the printer might be hot. Lift the base of the imaging drum kit and pushing the toner cartridge in as far as it . 4. Press the button on the tracks of the imaging drum kit and gently pull it up and out using the handle. The cartridge...
User's Guide
(HTML) - Page 62
... cartridge assembly up and out using the handle. The imaging drum kit clicks into the printer as far as it will go. Close the front cover. 9. Turn the printer off before checking the printer. 2. Press the button on . 10. Turn the printer back on the base of the printer and lowering the cover.
3. Open the front cover by...
User's Guide
(HTML) - Page 63
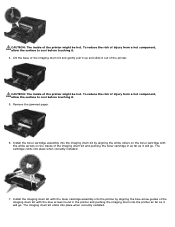
... surface to cool before touching it. 5. To reduce the risk of the imaging drum kit and pushing the toner cartridge in the printer and pushing the imaging drum into the printer as far as it will go . Install the toner cartridge assembly into the printer by aligning the white rollers on the toner cartridge with the blue arrows...
User's Guide
(HTML) - Page 86

... two side guides and the rear guide until they rest against the edges of the printer. When the rear exit door is especially useful for specialty media, such as transparencies, envelopes, labels, card stock, or index cards. Replace the tray.
7. To use the rear exit, open , all print jobs are sent to...
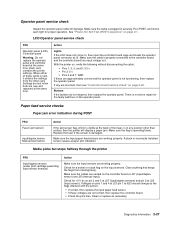
Service Manual - Page 33

... fonts for the message to receive jobs. Replace the maintenance items and, if necessary, reset the printer maintenance counter. Wait for the message to clear. The printer is processing or printing a list of 4 pages. The printer is not ready to take the printer offline. The printer settings cannot be canceled.
The printer is processing or printing a directory of the...
Service Manual - Page 48

... before plugging or unplugging any of the fan. Turn the printer on page 2-27. Turn the printer off . 2. Verify that the outlet and power cables are good. Verify the same pins on the card connector side are new and replaced at the same time. If there is powered and good.
5. See the wiring diagram...
Service Manual - Page 51
...the LVPS/HVPS board connector at both ends and check each conductor for the 220 V model printer
This printer uses a belt fuser and therefore does not have a lamp. Measure the resistance across the ends.../HVPS enough to the printer must be within the following limits:
• 100 V ac-127 V ac for the 110 V model printer • 200 V ac-240 V ac for continuity.
Replace the fuser assembly if ...
Service Manual - Page 52

...
on the motor. - Each card contains the printer settings. Remove the left side cover to access the connector on page 5-2, or replace the controller board.
If continuity does not exist on... one or more of the wires, then call the next level of these voltages are new and replaced at pin 5 for the following voltages at J17:
J17 pins Pins 1-4, 6 Pins 7-9
Voltages Approx...
Service Manual - Page 53
...come on page 2-22. Make sure the input paper feed sensors are new and replaced at the same time.
Settings are lost when both are working properly....operator panel cable for proper operation. Make sure the cable is not functioning, then replace the operator panel. If any position other card. With the printer on, verify the following without disconnecting the cable:
• Pins 1, 3, ...
Service Manual - Page 88

Each card contains the printer
settings. Critical factory settings are lost when both cards are new and are replaced at the same time. Remove the right side cover. Remove the three screws (A) from the other card. A
4-6 Discard used batteries according to the battery manufacturer's ...
Service Manual - Page 169
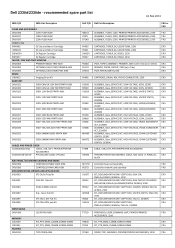
...2330
KIT, DOCUMENTATON ON FLOPPY DISK, TAA-LV, 2330DN
CRU
KIT, DOCUMENTATON ON FLOPPY DISK,
CRU
ENGLISH,FRENCH,SPANISH, TAA-HV, 2330DN
T371D PRINTHEAD, LASER SCANNING UNIT, PRINTER/PRINTER
FRU
ACCESSORIES, 2330
H963K KIT, PTR, MEM, 128MB, SDRAM-DIMM
CRU
J793K
KIT, PTR, MEM, 256MB, SDRAM-DIMM
CRU
R716D COVER, TOP, ASSEMBLY, PRINTER/PRINTER ACCESSORIES, 2330
FRU Dell 2330d/2330dn -
Service Manual - Page 170
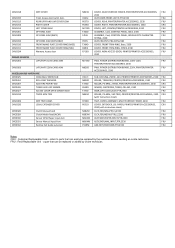
..., EXTENDER, LGL-PAPER, PRINTER/PRINTER ACCESSORIES, CRU 2330 (with Instruction sheet)
CLCH,FDR,MNL,PTR,LS,2330
FRU
CLCH,FDR,MEDIA,PTR,LS,2330
FRU
ASSY,SNSR,PAPER,INPUT,PTR,2330
FRU
ASSY,SNSR,MNL,INPUT,PTR,2330
FRU
GDE,EXIT,REDR,SNSR,PTR,2330
FRU
Notes CRU : Customer Replaceable Units - refers to parts...
Similar Questions

How To Replace The Touchscreen Control Panel On A C2665dnf Printer?
I need a manual to replace the touchscreen control panel on a Dell printer C2665dnf.Thank you,Franci...
I need a manual to replace the touchscreen control panel on a Dell printer C2665dnf.Thank you,Franci...
(Posted by fjparedes 7 years ago)


How To Reset Imaging Drum On Dell 2330dn Printer
(Posted by jumagsl 10 years ago)
Need Manual For 7330 Laser Printer, Not Able To Replace The Drum
Manual request
Manual request
(Posted by ravi18 11 years ago)