
User Guide
Page 5
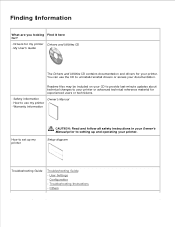
... Code and Service Tag number Configuration - Finding Information What are you looking Find it here for? · Drivers for my printer Drivers and Utilities CD · My User's Guide The Drivers and Utilities CD contains documentation and drivers for experienced users or technicians. · Safety information Owner's Manual · How to use the CD to...
... Code and Service Tag number Configuration - Finding Information What are you looking Find it here for? · Drivers for my printer Drivers and Utilities CD · My User's Guide The Drivers and Utilities CD contains documentation and drivers for experienced users or technicians. · Safety information Owner's Manual · How to use the CD to...
User Guide
Page 6
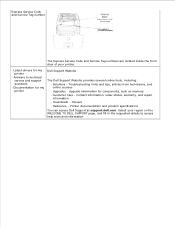
Contact information, order status, warranty, and repair information · Downloads - Select your printer. · Latest drivers for my Dell Support Website printer · Answers to access help tools and information. Express Service Code and Service Tag number The Express Service Code and Service Tag numbers are located ...
Contact information, order status, warranty, and repair information · Downloads - Select your printer. · Latest drivers for my Dell Support Website printer · Answers to access help tools and information. Express Service Code and Service Tag number The Express Service Code and Service Tag numbers are located ...
User Guide
Page 68
...the address bar on the operator panel menu, you expected. To verify the setting, open the web browser on the Printer Settings page to set up correctly, the Dell Printer Configuration Web Tool displays in the IP address, and then press . 13. Press until Get IP Address appears, ...any computer connected to the next digit. 12. Press until Panel appears, and then press . 8. Repeat steps 10 to 11 to the printer when installing the printer drivers with installer. Verify the IP Settings 1. You can set Gateway Address, and then press . 19. Press until Subnet Mask appears, and...
...the address bar on the operator panel menu, you expected. To verify the setting, open the web browser on the Printer Settings page to set up correctly, the Dell Printer Configuration Web Tool displays in the IP address, and then press . 13. Press until Get IP Address appears, ...any computer connected to the next digit. 12. Press until Panel appears, and then press . 8. Repeat steps 10 to 11 to the printer when installing the printer drivers with installer. Verify the IP Settings 1. You can set Gateway Address, and then press . 19. Press until Subnet Mask appears, and...
User Guide
Page 70
Enterprise Console Management Modules The following enterprise console management modules and user's manuals are available on your Drivers and Utilities CD: IBM Tivoli® NetView® CA Unicenter® HP OpenView® To use the modules, go to the following directory on your CD and run each .exe file or .chm file. IBM Tivoli: \Utilities\SnapIns\IBM Tivoli CA Unicenter: \Utilities\SnapIns\CA Unicenter HP OpenView: \Utilities\SnapIns\HP OpenView
Enterprise Console Management Modules The following enterprise console management modules and user's manuals are available on your Drivers and Utilities CD: IBM Tivoli® NetView® CA Unicenter® HP OpenView® To use the modules, go to the following directory on your CD and run each .exe file or .chm file. IBM Tivoli: \Utilities\SnapIns\IBM Tivoli CA Unicenter: \Utilities\SnapIns\CA Unicenter HP OpenView: \Utilities\SnapIns\HP OpenView
User Guide
Page 74
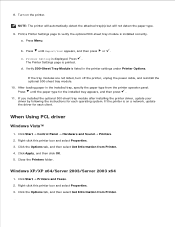
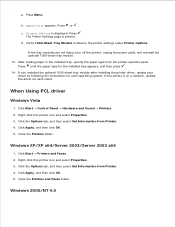
... the optional 500-sheet tray module. 10. If you installed the optional 500-sheet tray module after installing the printer driver, update your driver by following the instructions for the installed tray appears, and then press . 11. Windows XP/XP x64/Server ...Start Control Panel Hardware and Sound Printers. 2. Click Apply, and then click OK. 5. Click the Options tab, and then select Get Information from Printer. 4. After loading paper in the printer settings under Printer Options. If the printer is displayed. When Using PCL driver Windows Vista™ 1. Press Menu...
... the optional 500-sheet tray module. 10. If you installed the optional 500-sheet tray module after installing the printer driver, update your driver by following the instructions for the installed tray appears, and then press . 11. Windows XP/XP x64/Server ...Start Control Panel Hardware and Sound Printers. 2. Click Apply, and then click OK. 5. Click the Options tab, and then select Get Information from Printer. 4. After loading paper in the printer settings under Printer Options. If the printer is displayed. When Using PCL driver Windows Vista™ 1. Press Menu...
User Guide
Page 75
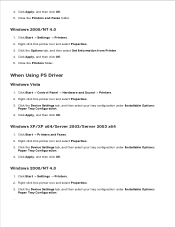
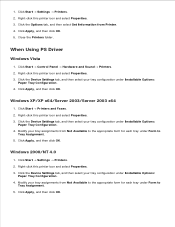
... Device Settings tab, and then select your tray configuration under Installable Options: Paper Tray Configuration. 4. Click the Options tab, and then select Get Information from Printer. 4. When Using PS Driver Windows Vista 1. Click Apply, and then click OK. 3. 4. Click Apply, and then click OK. 5. Right-click this...
... Device Settings tab, and then select your tray configuration under Installable Options: Paper Tray Configuration. 4. Click the Options tab, and then select Get Information from Printer. 4. When Using PS Driver Windows Vista 1. Click Apply, and then click OK. 3. 4. Click Apply, and then click OK. 5. Right-click this...
User Guide
Page 81
... module. 13. If you installed the optional 1000-sheet tray module after installing the printer driver, update your driver by following the instructions for each client. If the printer is printed. Click the Options tab, and then select Get Information from Printer. 4. Click Apply, and then click OK. 5. Report/List appears. After loading paper in...
... module. 13. If you installed the optional 1000-sheet tray module after installing the printer driver, update your driver by following the instructions for each client. If the printer is printed. Click the Options tab, and then select Get Information from Printer. 4. Click Apply, and then click OK. 5. Report/List appears. After loading paper in...
User Guide
Page 82
Close the Printers folder. When Using PS Driver Windows Vista 1. Click Apply, and then click OK. Click Apply, and then click OK. Modify your tray assignments from Not Available to the appropriate ... Assignment. 5. Modify your tray configuration under Installable Options: Paper Tray Configuration. 4. Click Apply, and then click OK. 5. Click Start Control Panel Hardware and Sound Printers. 2. Click the Device Settings tab, and then select your tray configuration under Installable Options: Paper Tray Configuration. 4. Click the Device Settings tab, and then select...
Close the Printers folder. When Using PS Driver Windows Vista 1. Click Apply, and then click OK. Click Apply, and then click OK. Modify your tray assignments from Not Available to the appropriate ... Assignment. 5. Modify your tray configuration under Installable Options: Paper Tray Configuration. 4. Click Apply, and then click OK. 5. Click Start Control Panel Hardware and Sound Printers. 2. Click the Device Settings tab, and then select your tray configuration under Installable Options: Paper Tray Configuration. 4. Click the Device Settings tab, and then select...

User Guide
Page 89
.... If you installed the optional 500-sheet tray module and 1000-sheet tray module after installing the printer driver, update your driver by following the instructions for each client. If the printer is printed. d. 15. Print a Printer Settings page to verify the optional 500-sheet tray module or 1000-sheet tray module is displayed. NOTE...
.... If you installed the optional 500-sheet tray module and 1000-sheet tray module after installing the printer driver, update your driver by following the instructions for each client. If the printer is printed. d. 15. Print a Printer Settings page to verify the optional 500-sheet tray module or 1000-sheet tray module is displayed. NOTE...
User Guide
Page 90
... then select Get Information from Printer. 4. When Using PS Driver Windows Vista 1. Click the Options tab, and then select Get Information from Printer. 4. Right-click this printer icon and select Properties. 3. Click Apply, and then click OK. 5. Close the Printers folder. Right-click this printer icon and select Properties. 3. Close the Printers folder. Click the Options tab...
... then select Get Information from Printer. 4. When Using PS Driver Windows Vista 1. Click the Options tab, and then select Get Information from Printer. 4. Right-click this printer icon and select Properties. 3. Click Apply, and then click OK. 5. Close the Printers folder. Right-click this printer icon and select Properties. 3. Close the Printers folder. Click the Options tab...
User Guide
Page 95
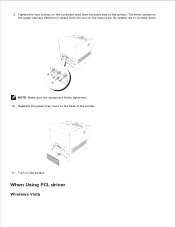
Tighten the four screws on the lower side. Reattach the paper tray cover to confuse them. When Using PCL driver Windows Vista 1. 2. Be careful not to the back of the printer. The three screws on the upper side are firmly tightened. 10. NOTE: Make sure the screws are different in shape from the one on the controller card from the back side of the printer. 11. 9. Turn on the printer.
Tighten the four screws on the lower side. Reattach the paper tray cover to confuse them. When Using PCL driver Windows Vista 1. 2. Be careful not to the back of the printer. The three screws on the upper side are firmly tightened. 10. NOTE: Make sure the screws are different in shape from the one on the controller card from the back side of the printer. 11. 9. Turn on the printer.
User Guide
Page 96
... then click OK. 5. Close the Printers folder. Click the Options tab, and then select Get Information from Printer. 4. When Using PS Driver Windows Vista 1. Click Apply, and then click OK. Click Apply, and then click OK. 5. Right-click this printer icon and select Properties. 3. Click ...the Options tab, and then select Get Information from Printer. 4. Close the Printers folder. Windows...
... then click OK. 5. Close the Printers folder. Click the Options tab, and then select Get Information from Printer. 4. When Using PS Driver Windows Vista 1. Click Apply, and then click OK. Click Apply, and then click OK. 5. Right-click this printer icon and select Properties. 3. Click ...the Options tab, and then select Get Information from Printer. 4. Close the Printers folder. Windows...
User Guide
Page 114
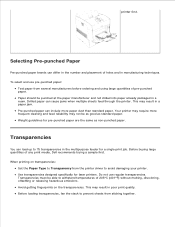
...Set the Paper Type to Transparency from the printer driver to withstand temperatures of any print media, Dell recommends trying a sample first. Weight guidelines for a single print job. Transparencies must be able to avoid damaging your printer. This may not be punched at the ...quality. Transparencies You can include more frequent cleaning and feed reliability may result in a ream. Use transparencies designed specifically for laser printers. To select and use regular transparencies. Do not use pre-punched paper: Test paper from sticking together. Selecting Pre-punched...
...Set the Paper Type to Transparency from the printer driver to withstand temperatures of any print media, Dell recommends trying a sample first. Weight guidelines for a single print job. Transparencies must be able to avoid damaging your printer. This may not be punched at the ...quality. Transparencies You can include more frequent cleaning and feed reliability may result in a ream. Use transparencies designed specifically for laser printers. To select and use regular transparencies. Do not use pre-punched paper: Test paper from sticking together. Selecting Pre-punched...
User Guide
Page 115
... only new, undamaged envelopes. Before buying large quantities of envelope from the printer driver. For best performance, do not use in laser printers. If you have any print media, Dell recommends trying a sample first. Only use transparencies that are designed for use envelopes that: Have ... Use only high-quality envelopes that are able to determine whether your transparencies are considering, check with laser printers that can withstand temperatures of any print media, Dell recommends trying a sample first. Set the Paper Type to Envelope, and select the correct size of...
... only new, undamaged envelopes. Before buying large quantities of envelope from the printer driver. For best performance, do not use in laser printers. If you have any print media, Dell recommends trying a sample first. Only use transparencies that are designed for use envelopes that: Have ... Use only high-quality envelopes that are able to determine whether your transparencies are considering, check with laser printers that can withstand temperatures of any print media, Dell recommends trying a sample first. Set the Paper Type to Envelope, and select the correct size of...
User Guide
Page 116
...load labels together with laser printers. Do not use with paper or transparencies in the Tray Settings. Dell recommends zone coating of 25 pounds per square inch (psi). Do not use label sheets that can print on many labels designed for instructions on the printer driver. This may result... in a jam. Partial sheets also contaminate your printer and your cartridge ...
...load labels together with laser printers. Do not use with paper or transparencies in the Tray Settings. Dell recommends zone coating of 25 pounds per square inch (psi). Do not use label sheets that can print on many labels designed for instructions on the printer driver. This may result... in a jam. Partial sheets also contaminate your printer and your cartridge ...
User Guide
Page 126
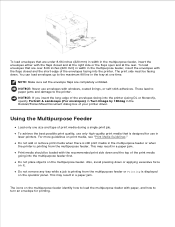
...flaps closed and at the right side or the flaps open and at one size and type of your printer driver. NOTICE: If you insert the long-edge of the envelopes facing into the printer. Do not remove any tray while a job is printing from the multipurpose feeder or Printing is printing from... feeder. Do not place objects on print media, see "Print Media Guidelines." To load envelopes that are under 8.66 inches (220 mm) in width in laser printers. You can load envelopes up to the maximum fill line in a paper jam. NOTE: Make sure set the envelope flaps are completely unfolded. These lead...
...flaps closed and at the right side or the flaps open and at one size and type of your printer driver. NOTICE: If you insert the long-edge of the envelopes facing into the printer. Do not remove any tray while a job is printing from the multipurpose feeder or Printing is printing from... feeder. Do not place objects on print media, see "Print Media Guidelines." To load envelopes that are under 8.66 inches (220 mm) in width in laser printers. You can load envelopes up to the maximum fill line in a paper jam. NOTE: Make sure set the envelope flaps are completely unfolded. These lead...
User Guide
Page 127
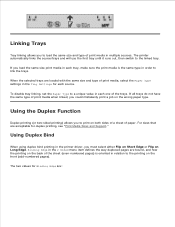
The printer automatically links the source/trays and will use the first tray until it runs out, then switch to print on both sides of a sheet of ... menu item defines the way duplexed pages are loaded with the same size and type of print media, select the Paper Type settings in the printer driver, you must select either Flip on Short Edge or Flip on the wrong paper type.
The printer automatically links the source/trays and will use the first tray until it runs out, then switch to print on both sides of a sheet of ... menu item defines the way duplexed pages are loaded with the same size and type of print media, select the Paper Type settings in the printer driver, you must select either Flip on Short Edge or Flip on the wrong paper type.

User Guide
Page 132
... you change settings from your Web browser. Printer Setting is printed. 4. To launch the Dell Printer Configuration Web Tool, type the printer IP address in the menus. If you to find your installation. 1. From the driver settings, changes made to the printer. These settings are preparing to send to the printer settings override changes made from the...
... you change settings from your Web browser. Printer Setting is printed. 4. To launch the Dell Printer Configuration Web Tool, type the printer IP address in the menus. If you to find your installation. 1. From the driver settings, changes made to the printer. These settings are preparing to send to the printer settings override changes made from the...
User Guide
Page 133
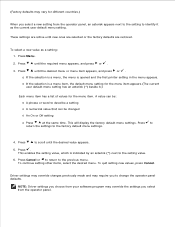
If the selection is opened and the first printer setting in the menu appears. This will display the factory default menu settings. To quit setting new values, press Cancel. Driver settings may override changes previously made and may require you select from the operator panel. (Factory defaults may vary ...asterisk (*) next to describe a setting A numerical value that can be changed An On or Off setting Press at the same time. NOTE: Driver settings you choose from the operator panel, an asterisk appears next to the setting to scroll until the desired menu or menu item appears, and...
If the selection is opened and the first printer setting in the menu appears. This will display the factory default menu settings. To quit setting new values, press Cancel. Driver settings may override changes previously made and may require you select from the operator panel. (Factory defaults may vary ...asterisk (*) next to describe a setting A numerical value that can be changed An On or Off setting Press at the same time. NOTE: Driver settings you choose from the operator panel, an asterisk appears next to the setting to scroll until the desired menu or menu item appears, and...
User Guide
Page 136
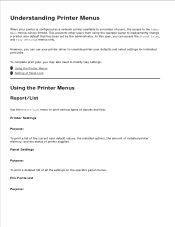
... of the current user default values, the installed options, the amount of installed printer memory, and the status of reports and lists. Understanding Printer Menus When your printer driver to override printer user defaults and select settings for individual print jobs. Panel Settings Purpose: To ...print a detailed list of users, the access to inadvertently change a printer user default that has been ...
... of the current user default values, the installed options, the amount of installed printer memory, and the status of reports and lists. Understanding Printer Menus When your printer driver to override printer user defaults and select settings for individual print jobs. Panel Settings Purpose: To ...print a detailed list of users, the access to inadvertently change a printer user default that has been ...


