
User Guide
Page 68
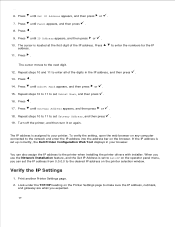
...address bar on the Printer Settings page to ... the desired IP address on the printer selection window. You can set Gateway Address, and... then press . 19. Press until Subnet Mask appears, and then press or . 15. Press . Press . 14. The IP address is set Subnet Mask, and then press . 16. Verify the IP Settings 1. Repeat steps 10 and 11 to the printer when installing the printer drivers.... Print another Printer Settings page. 2. 4. 5. 6. Press . 9. Turn off the printer, and then ... the digits in your printer. When you can also...
...address bar on the Printer Settings page to ... the desired IP address on the printer selection window. You can set Gateway Address, and... then press . 19. Press until Subnet Mask appears, and then press or . 15. Press . Press . 14. The IP address is set Subnet Mask, and then press . 16. Verify the IP Settings 1. Repeat steps 10 and 11 to the printer when installing the printer drivers.... Print another Printer Settings page. 2. 4. 5. 6. Press . 9. Turn off the printer, and then ... the digits in your printer. When you can also...
User Guide
Page 74
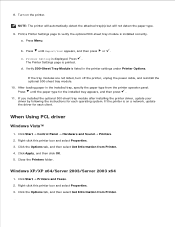
...-sheet tray module after installing the printer driver, update your driver by following the instructions for each operating system. When Using PCL driver Windows Vista™ 1. Click the Options tab, and then select Get Information from Printer. 4. 5. 8. b. Windows XP/XP x64/Server 2003/Server ...2003 x64 1. Click Start Printers and Faxes. 2. NOTE: The printer will automatically detect the attached tray...
...-sheet tray module after installing the printer driver, update your driver by following the instructions for each operating system. When Using PCL driver Windows Vista™ 1. Click the Options tab, and then select Get Information from Printer. 4. 5. 8. b. Windows XP/XP x64/Server 2003/Server ...2003 x64 1. Click Start Printers and Faxes. 2. NOTE: The printer will automatically detect the attached tray...
User Guide
Page 75
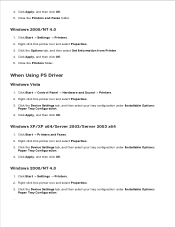
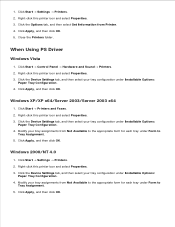
... then select Get Information from Printer. 4. When Using PS Driver Windows Vista 1. Click Start Control Panel Hardware and Sound Printers. 2. Click Apply, and then click OK. Right-click this printer icon and select Properties. 3. Right-click this printer icon and select Properties. 3.... Settings tab, and then select your tray configuration under Installable Options: Paper Tray Configuration. 4. Click Start Printers and Faxes. 2. Windows 2000/NT 4.0 1. Right-click this printer icon and select Properties. 3. Click Apply, and then click OK. 5. 3. 4. Click the Device ...
... then select Get Information from Printer. 4. When Using PS Driver Windows Vista 1. Click Start Control Panel Hardware and Sound Printers. 2. Click Apply, and then click OK. Right-click this printer icon and select Properties. 3. Right-click this printer icon and select Properties. 3.... Settings tab, and then select your tray configuration under Installable Options: Paper Tray Configuration. 4. Click Start Printers and Faxes. 2. Windows 2000/NT 4.0 1. Right-click this printer icon and select Properties. 3. Click Apply, and then click OK. 5. 3. 4. Click the Device ...
User Guide
Page 81
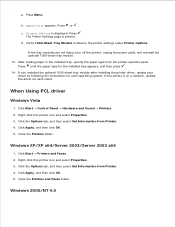
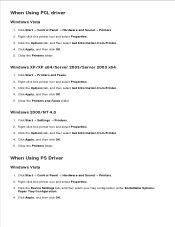
... page is displayed. Click the Options tab, and then select Get Information from Printer. 4. Windows XP/XP x64/Server 2003/Server 2003 x64 1. Windows 2000/NT 4.0 1. 2. Press Menu. d. When Using PCL driver Windows Vista 1. Click Apply, and then click OK. 5. 12. Press or . If you installed the optional 1000-sheet tray module after installing the...
... page is displayed. Click the Options tab, and then select Get Information from Printer. 4. Windows XP/XP x64/Server 2003/Server 2003 x64 1. Windows 2000/NT 4.0 1. 2. Press Menu. d. When Using PCL driver Windows Vista 1. Click Apply, and then click OK. 5. 12. Press or . If you installed the optional 1000-sheet tray module after installing the...
User Guide
Page 82
...Available to Tray Assignment. 5. Click Start Control Panel Hardware and Sound Printers. 2. Windows 2000/NT 4.0 1. Right-click this printer icon and select Properties. 3. Click Start Settings Printers. 2. Click the Device Settings tab, and then select your tray ...printer icon and select Properties. 3. 1. Right-click this printer icon and select Properties. 3. Click the Options tab, and then select Get Information from Printer. 4. Click Apply, and then click OK. 5. Close the Printers folder. When Using PS Driver Windows Vista 1. Click Apply, and then click OK. Windows...
...Available to Tray Assignment. 5. Click Start Control Panel Hardware and Sound Printers. 2. Windows 2000/NT 4.0 1. Right-click this printer icon and select Properties. 3. Click Start Settings Printers. 2. Click the Device Settings tab, and then select your tray ...printer icon and select Properties. 3. 1. Right-click this printer icon and select Properties. 3. Click the Options tab, and then select Get Information from Printer. 4. Click Apply, and then click OK. 5. Close the Printers folder. When Using PS Driver Windows Vista 1. Click Apply, and then click OK. Windows...
User Guide
Page 90
..., and then click OK. 5. When Using PS Driver Windows Vista 1. Click the Options tab, and then select Get Information from Printer. 4. Click Apply, and then click OK. 5. When Using PCL driver Windows Vista 1. Click Start Printers and Faxes. 2. Close the Printers folder. Right-click this printer icon and select Properties. 3. Close the Printers and Faxes folder. Right-click this...
..., and then click OK. 5. When Using PS Driver Windows Vista 1. Click the Options tab, and then select Get Information from Printer. 4. Click Apply, and then click OK. 5. When Using PCL driver Windows Vista 1. Click Start Printers and Faxes. 2. Close the Printers folder. Right-click this printer icon and select Properties. 3. Close the Printers and Faxes folder. Right-click this...
User Guide
Page 95
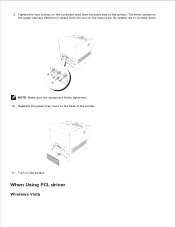
Be careful not to the back of the printer. Reattach the paper tray cover to confuse them. Turn on the lower side. 9. The three screws on the upper side are firmly tightened. 10. When Using PCL driver Windows Vista 1. 2. Tighten the four screws on the controller card from the one on the printer. NOTE: Make sure the screws are different in shape from the back side of the printer. 11.
Be careful not to the back of the printer. Reattach the paper tray cover to confuse them. Turn on the lower side. 9. The three screws on the upper side are firmly tightened. 10. When Using PCL driver Windows Vista 1. 2. Tighten the four screws on the controller card from the one on the printer. NOTE: Make sure the screws are different in shape from the back side of the printer. 11.
User Guide
Page 96
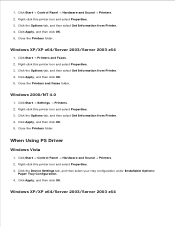
... Properties. 3. Click Apply, and then click OK. 5. Windows XP/XP x64/Server 2003/Server 2003 x64 1. Right-click this printer icon and select Properties. 3. When Using PS Driver Windows Vista 1. Right-click this printer icon and select Properties. 3. Windows XP/XP x64/Server 2003/Server 2003 x64 1. 2. Click Start Printers and Faxes. 2. Click the Options tab, and...
... Properties. 3. Click Apply, and then click OK. 5. Windows XP/XP x64/Server 2003/Server 2003 x64 1. Right-click this printer icon and select Properties. 3. When Using PS Driver Windows Vista 1. Right-click this printer icon and select Properties. 3. Windows XP/XP x64/Server 2003/Server 2003 x64 1. 2. Click Start Printers and Faxes. 2. Click the Options tab, and...
User Guide
Page 115
... large quantities of any exposed adhesive when the flap is in any way Contain windows, holes, perforations, cutouts, embossing Use metal clasps, string ties, or metal ...about the envelopes you have any print media, Dell recommends trying a sample first. See "Loading the Multipurpose Feeder" for use in laser printers. If you are able to Envelope, and ... in laser printers. Before buying large quantities of any doubts about this setting.) Check with laser printers that can withstand temperatures of envelope from the printer driver. Selecting Transparencies The printer can ...
... large quantities of any exposed adhesive when the flap is in any way Contain windows, holes, perforations, cutouts, embossing Use metal clasps, string ties, or metal ...about the envelopes you have any print media, Dell recommends trying a sample first. See "Loading the Multipurpose Feeder" for use in laser printers. If you are able to Envelope, and ... in laser printers. Before buying large quantities of any doubts about this setting.) Check with laser printers that can withstand temperatures of envelope from the printer driver. Selecting Transparencies The printer can ...
User Guide
Page 126
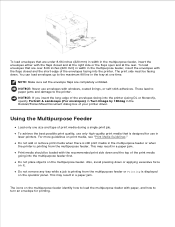
...use envelopes with paper, and how to the printer. To achieve the best possible print quality,...Guidelines." This may result in the multipurpose feeder or when the printer is printing from the multipurpose feeder or Printing is designed for ...windows, coated linings, or self-stick adhesives. To load envelopes that are completely unfolded. NOTE: Make sure set the envelope flaps are under 8.66 inches (220 mm) in width in laser printers... Booklet/Poster/Mixed Document dialog box of the envelopes facing into the printer (using DL or Monarch), specify Portrait & Landscape (For envelopes)...
...use envelopes with paper, and how to the printer. To achieve the best possible print quality,...Guidelines." This may result in the multipurpose feeder or when the printer is printing from the multipurpose feeder or Printing is designed for ...windows, coated linings, or self-stick adhesives. To load envelopes that are completely unfolded. NOTE: Make sure set the envelope flaps are under 8.66 inches (220 mm) in width in laser printers... Booklet/Poster/Mixed Document dialog box of the envelopes facing into the printer (using DL or Monarch), specify Portrait & Landscape (For envelopes)...
User Guide
Page 155
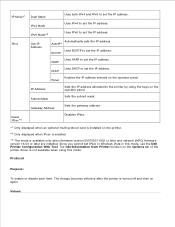
... the IP address. Panel IP Address Sets the IP address allocated to the printer by using this mode, use the Dell Printer Configuration Web Tool. Reset IPsec*2 Gateway Address Sets the gateway address. IP ...This mode is not available when using the keys on the Options tab of the printer driver is available only when firmware version 200705311932 or later and network (MPC) firmware version .... BOOTP Uses RARP to set the IP address. IPv6 Mode*3 Uses IPv6 to set IPsec in Windows Vista in this mode. RARP Uses DHCP to set the IP address. Disables IPsec. *1 Only displayed...
... the IP address. Panel IP Address Sets the IP address allocated to the printer by using this mode, use the Dell Printer Configuration Web Tool. Reset IPsec*2 Gateway Address Sets the gateway address. IP ...This mode is not available when using the keys on the Options tab of the printer driver is available only when firmware version 200705311932 or later and network (MPC) firmware version .... BOOTP Uses RARP to set the IP address. IPv6 Mode*3 Uses IPv6 to set IPsec in Windows Vista in this mode. RARP Uses DHCP to set the IP address. Disables IPsec. *1 Only displayed...
User Guide
Page 161
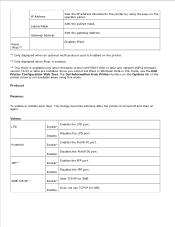
...LPD Port9100 IPP*1 SMB TCP/IP*1 Enables the LPD port. Disable Enables the Port9100 port. Enable* Does not use the Dell Printer Configuration Web Tool. The Get Information from Printer function on the operator panel. Protocol Purpose: To enable or disable each item. Disable Enable* Disables the LPD port. ... Address Sets the IP address allocated to the printer by using the keys on the Options tab of the printer driver is not available when using this mode, use TCP/IP for SMB. Since you cannot set IPsec in Windows Vista in this mode. The change becomes effective...
...LPD Port9100 IPP*1 SMB TCP/IP*1 Enables the LPD port. Disable Enables the Port9100 port. Enable* Does not use the Dell Printer Configuration Web Tool. The Get Information from Printer function on the operator panel. Protocol Purpose: To enable or disable each item. Disable Enable* Disables the LPD port. ... Address Sets the IP address allocated to the printer by using the keys on the Options tab of the printer driver is not available when using this mode, use TCP/IP for SMB. Since you cannot set IPsec in Windows Vista in this mode. The change becomes effective...
User Guide
Page 177
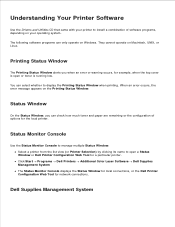
... System Understanding Your Printer Software Use the Drivers and Utilities CD that came with your operating system. The following software programs can only operate on Macintosh, UNIX, or Linux. Click Start Programs Dell Printers Additional Color Laser Software Dell Supplies Management System The Status Monitor Console displays the Status Window for local connections, or the Dell Printer Configuration Web Tool...
... System Understanding Your Printer Software Use the Drivers and Utilities CD that came with your operating system. The following software programs can only operate on Macintosh, UNIX, or Linux. Click Start Programs Dell Printers Additional Color Laser Software Dell Supplies Management System The Status Monitor Console displays the Status Window for local connections, or the Dell Printer Configuration Web Tool...
User Guide
Page 178
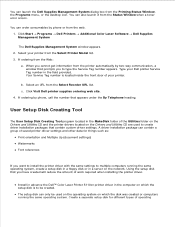
...prompts you cannot get information from the web. 1. b. c. Install in advance the Dell™ Color Laser Printer 5110cn printer driver in a server on which the disk was created or computers running the same operating system...window that you want to install the printer driver with the same settings to create driver installation packages that appears under the By Telephone heading. Click Visit Dell printer supplies ordering web site. 4. Click Start Programs Dell Printers Additional Color Laser Software Dell Supplies Management System The Dell Supplies Management System window...
...prompts you cannot get information from the web. 1. b. c. Install in advance the Dell™ Color Laser Printer 5110cn printer driver in a server on which the disk was created or computers running the same operating system...window that you want to install the printer driver with the same settings to create driver installation packages that appears under the By Telephone heading. Click Visit Dell printer supplies ordering web site. 4. Click Start Programs Dell Printers Additional Color Laser Software Dell Supplies Management System The Dell Supplies Management System window...

User Guide
Page 180
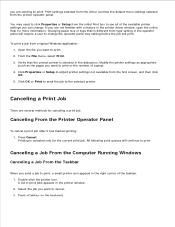
... settings for instructions. Avoiding Jams NOTE: Dell recommends that you try a limited sample of any print media you choose Print from your print media properly. Printing This chapter covers tips for printing, how to print certain lists of information from a software program, a window representing the printer driver opens. Tips for Successful Printing Sending a Job...
... settings for instructions. Avoiding Jams NOTE: Dell recommends that you try a limited sample of any print media you choose Print from your print media properly. Printing This chapter covers tips for printing, how to print certain lists of information from a software program, a window representing the printer driver opens. Tips for Successful Printing Sending a Job...
User Guide
Page 181
If you are not familiar with a feature in the printer driver window, open the online Help for canceling a print job. Canceling a Print Job There are sending to change . Printing is selected in the operator panel will require... the Taskbar When you send a job to cancel. 3. Select the job you want to print, a small printer icon appears in the printer window. 2. Print settings selected from the driver override the default menu settings selected from a typical Windows application: 1. From the File menu, select Print. 3. Press Cancel. you are several methods for more information....
If you are not familiar with a feature in the printer driver window, open the online Help for canceling a print job. Canceling a Print Job There are sending to change . Printing is selected in the operator panel will require... the Taskbar When you send a job to cancel. 3. Select the job you want to print, a small printer icon appears in the printer window. 2. Print settings selected from the driver override the default menu settings selected from a typical Windows application: 1. From the File menu, select Print. 3. Press Cancel. you are several methods for more information....
User Guide
Page 185
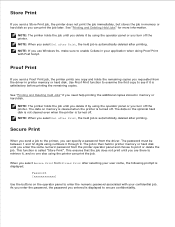
...in your confidential job. The job is then held in printer memory or hard disk until you need help printing the additional copies stored in memory or hard disk. This ensures that the job does not print until you use Windows 9x, make sure to print or delete the job. ...after selecting your user name, the following prompt is called "Store Print". Proof Print If you send a Proof Print job, the printer prints one else using numbers 0 through 9. NOTE: When you requested from the driver in printer memory or hard disk. As you enter the password, the password you turn off the...
...in your confidential job. The job is then held in printer memory or hard disk until you need help printing the additional copies stored in memory or hard disk. This ensures that the job does not print until you use Windows 9x, make sure to print or delete the job. ...after selecting your user name, the following prompt is called "Store Print". Proof Print If you send a Proof Print job, the printer prints one else using numbers 0 through 9. NOTE: When you requested from the driver in printer memory or hard disk. As you enter the password, the password you turn off the...
User Guide
Page 187
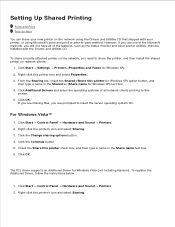
... the status monitor and other printer utilities, that shipped with the Drivers and Utilities CD. Right-click the printer's icon and select Sharing. 3. 4. Click Start Settings Printers (Properties and Faxes for Windows Vista (not including Itanium). Click Start Control Panel Hardware and Sound Printers. 2. To share a locally-attached printer on network clients: 1. For Windows Vista™ 1. Click the...
... the status monitor and other printer utilities, that shipped with the Drivers and Utilities CD. Right-click the printer's icon and select Sharing. 3. 4. Click Start Settings Printers (Properties and Faxes for Windows Vista (not including Itanium). Click Start Control Panel Hardware and Sound Printers. 2. To share a locally-attached printer on network clients: 1. For Windows Vista™ 1. Click the...

User Guide
Page 188
... lets network clients return to verify print installation. 5. The time this printer. 6. Click the Continue button. 5. Now that the printer was successfully shared: Make sure the printer object in the Drivers and Utilities CD. 2. 3. Click the Change sharing options button. 4. For example, in Windows 2000, a hand is just enough information to send a print job to...
... lets network clients return to verify print installation. 5. The time this printer. 6. Click the Continue button. 5. Now that the printer was successfully shared: Make sure the printer object in the Drivers and Utilities CD. 2. 3. Click the Change sharing options button. 4. For example, in Windows 2000, a hand is just enough information to send a print job to...

User Guide
Page 189
... path of the server computer, and then double-click the host name. 3. Wait for the driver information to copy from the Shared printers list (For Windows XP, select A network printer, or a printer attached to the Printers folder. Print a test page to available drivers. 6. If the printer is fully installed on network traffic and other factors. 7. If no system...
... path of the server computer, and then double-click the host name. 3. Wait for the driver information to copy from the Shared printers list (For Windows XP, select A network printer, or a printer attached to the Printers folder. Print a test page to available drivers. 6. If the printer is fully installed on network traffic and other factors. 7. If no system...


