
User Guide
Page 59
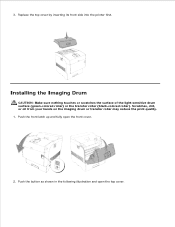
Push the front latch up and fully open the top cover. Push the button as shown in the following illustration and open the front cover. 2. Installing the Imaging Drum CAUTION: Make sure nothing touches or scratches the surface of the light-sensitive drum surface (green-colored roller) or the transfer roller (black-colored roller). Replace the top cover by inserting its front side into the printer first. Scratches, dirt, or oil from your hands on the imaging drum or transfer roller may reduce the print quality. 1. 3.
Push the front latch up and fully open the top cover. Push the button as shown in the following illustration and open the front cover. 2. Installing the Imaging Drum CAUTION: Make sure nothing touches or scratches the surface of the light-sensitive drum surface (green-colored roller) or the transfer roller (black-colored roller). Replace the top cover by inserting its front side into the printer first. Scratches, dirt, or oil from your hands on the imaging drum or transfer roller may reduce the print quality. 1. 3.

User Guide
Page 61
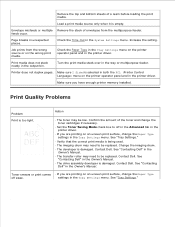
NOTICE: Do not touch the transfer roller (black-colored roller). Make sure that nothing touches or scratches the roller surface. Close the front cover. NOTICE: Do not allow the surface covered with a protective sheet to remove it. Pull the protective cover on the roller deteriorates print quality. 6. Close the top cover. 7. Scratches or oil from your hands on the imaging drum straight up to come into the printer without correctly aligning the rollers with anything. 5. NOTICE: Lowering the cartridge into contact with the slots can damage the cartridge.
NOTICE: Do not touch the transfer roller (black-colored roller). Make sure that nothing touches or scratches the roller surface. Close the front cover. NOTICE: Do not allow the surface covered with a protective sheet to remove it. Pull the protective cover on the roller deteriorates print quality. 6. Close the top cover. 7. Scratches or oil from your hands on the imaging drum straight up to come into the printer without correctly aligning the rollers with anything. 5. NOTICE: Lowering the cartridge into contact with the slots can damage the cartridge.

User Guide
Page 225
If a problem occurs with the printer, options, or print quality. This often fixes the problem. How to replace the Imaging Drum How to install the Toner Cartridge How to install the Transfer Roller How to resolve. The printer power cable is plugged into the outlet is working. The electrical... outlet is on. NOTICE: If an error message appears, see "Understanding Printer Messages." If you...
If a problem occurs with the printer, options, or print quality. This often fixes the problem. How to replace the Imaging Drum How to install the Toner Cartridge How to install the Transfer Roller How to resolve. The printer power cable is plugged into the outlet is working. The electrical... outlet is on. NOTICE: If an error message appears, see "Understanding Printer Messages." If you...
User Guide
Page 227
... the Time-Out in the Owner's Manual. Check the Paper Type in the Owner's Manual. · The transfer roller may need to be replaced. Printer does not duplex pages. See "Contacting Dell" in the Tray Settings menu on the wrong print media. Toner smears or print comes · If you are.... Print Quality Problems Problem Print is empty. Action · The toner may need to off page. Change the imaging drum. · The developer is selected in both the PCL (Printer Control Language) menu on an uneven print surface, change the Paper Type settings in the Tray Settings menu. See ...
... the Time-Out in the Owner's Manual. Check the Paper Type in the Owner's Manual. · The transfer roller may need to be replaced. Printer does not duplex pages. See "Contacting Dell" in the Tray Settings menu on the wrong print media. Toner smears or print comes · If you are.... Print Quality Problems Problem Print is empty. Action · The toner may need to off page. Change the imaging drum. · The developer is selected in both the PCL (Printer Control Language) menu on an uneven print surface, change the Paper Type settings in the Tray Settings menu. See ...
User Guide
Page 281
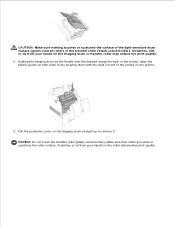
... sure nothing touches or scratches the roller surface. Holding the imaging drum by the handle with the flat part facing the back of the printer, align the plastic guides on both sides of the imaging drum with the slots in front of the light-sensitive drum surface (green-colored roller) or the transfer roller (black-colored roller). Scratches, dirt, or oil from your...
... sure nothing touches or scratches the roller surface. Holding the imaging drum by the handle with the flat part facing the back of the printer, align the plastic guides on both sides of the imaging drum with the slots in front of the light-sensitive drum surface (green-colored roller) or the transfer roller (black-colored roller). Scratches, dirt, or oil from your...
User Guide
Page 295
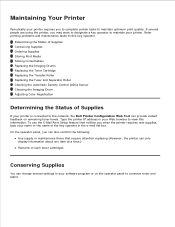
... Supplies Storing Print Media Storing Consumables Replacing the Imaging Drums Replacing the Toner Cartridge Replacing the Transfer Roller Replacing the Fuser and Separator Roller Cleaning the Automatic Density Control (ADC) Sensor Cleaning the Imaging Drum Adjusting Color Registration Determining the Status of Supplies If your printer is connected to the network, the Dell Printer Configuration Web Tool can provide instant feedback...
... Supplies Storing Print Media Storing Consumables Replacing the Imaging Drums Replacing the Toner Cartridge Replacing the Transfer Roller Replacing the Fuser and Separator Roller Cleaning the Automatic Density Control (ADC) Sensor Cleaning the Imaging Drum Adjusting Color Registration Determining the Status of Supplies If your printer is connected to the network, the Dell Printer Configuration Web Tool can provide instant feedback...
User Guide
Page 299
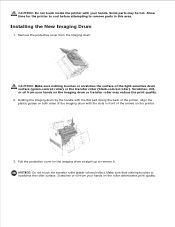
... of the imaging drum with your hands on the roller deteriorates print quality. Pull the protective cover on the printer. 3. Installing the New Imaging Drum 1. Make sure that nothing touches or scratches the surface of the arrows on the imaging drum straight up to remove parts in front of the light-sensitive drum surface (green-colored roller) or the transfer roller (black-colored roller). CAUTION...
... of the imaging drum with your hands on the roller deteriorates print quality. Pull the protective cover on the printer. 3. Installing the New Imaging Drum 1. Make sure that nothing touches or scratches the surface of the arrows on the imaging drum straight up to remove parts in front of the light-sensitive drum surface (green-colored roller) or the transfer roller (black-colored roller). CAUTION...
User Guide
Page 320
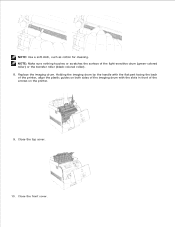
Holding the imaging drum by the handle with the flat part facing the back of the printer, align the plastic guides on both sides of the imaging drum with the slots in front of the light-sensitive drum (green-colored roller) or the transfer roller (black-colored roller). 8. Close the top cover. 10. Close the front cover. NOTE: Use a soft cloth, such as cotton for cleaning. Replace the imaging drum. NOTE: Make sure nothing touches or scratches the surface of the arrows on the printer. 9.
Holding the imaging drum by the handle with the flat part facing the back of the printer, align the plastic guides on both sides of the imaging drum with the slots in front of the light-sensitive drum (green-colored roller) or the transfer roller (black-colored roller). 8. Close the top cover. 10. Close the front cover. NOTE: Use a soft cloth, such as cotton for cleaning. Replace the imaging drum. NOTE: Make sure nothing touches or scratches the surface of the arrows on the printer. 9.


