
User Guide
Page 3
...restrictions by the Independent JPEG Group. Other trademarks and trade names may be used in this text: Dell and the DELL logo are provided with the limits for a Class B digital device, pursuant to Part 15 of codes created by the government as set forth in subparagraph (c)(1)(ii) of the Rights ....; in the U.S. ENERGY STAR is subject to either the entities claiming the marks and names or their products. Environmental Protection Agency. Our printer software uses some of the FCC rules. THE SOFTWARE IS PROVIDED "AS-IS" AND WITHOUT WARRANTY OF ANY KIND, EXPRESS, IMPLIED OR ...
...restrictions by the Independent JPEG Group. Other trademarks and trade names may be used in this text: Dell and the DELL logo are provided with the limits for a Class B digital device, pursuant to Part 15 of codes created by the government as set forth in subparagraph (c)(1)(ii) of the Rights ....; in the U.S. ENERGY STAR is subject to either the entities claiming the marks and names or their products. Environmental Protection Agency. Our printer software uses some of the FCC rules. THE SOFTWARE IS PROVIDED "AS-IS" AND WITHOUT WARRANTY OF ANY KIND, EXPRESS, IMPLIED OR ...

User Guide
Page 31
... Customization Purpose: To configure the link used for problems caused by using accessories, parts, or components not supplied by Dell. Premier Displays the Premier link. Copy Printer Settings Regular Displays the Regular link. Dell recommends only new Dell-brand toner cartridges for your printer. Values: Select Reorder URL Selects the URL specified in Regular or Premier...
... Customization Purpose: To configure the link used for problems caused by using accessories, parts, or components not supplied by Dell. Premier Displays the Premier link. Copy Printer Settings Regular Displays the Regular link. Dell recommends only new Dell-brand toner cartridges for your printer. Values: Select Reorder URL Selects the URL specified in Regular or Premier...
User Guide
Page 60
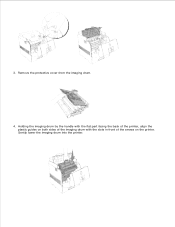
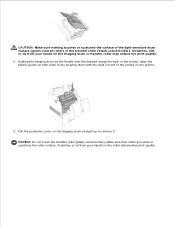
Remove the protective cover from the imaging drum. 4. Holding the imaging drum by the handle with the flat part facing the back of the printer, align the plastic guides on both sides of the imaging drum with the slots in front of the arrows on the printer. 3. Gently lower the imaging drum into the printer.
Remove the protective cover from the imaging drum. 4. Holding the imaging drum by the handle with the flat part facing the back of the printer, align the plastic guides on both sides of the imaging drum with the slots in front of the arrows on the printer. 3. Gently lower the imaging drum into the printer.
User Guide
Page 106
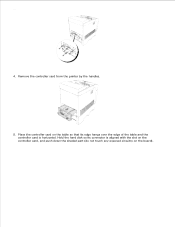
Place the controller card on the table so that its connector is horizontal. Remove the controller card from the printer by the handles. 5. Hold the hard disk so its edge hangs over the edge of the table and the controller card is aligned with the slot on the controller card, and push down the shaded part (do not touch any exposed circuitry on the board). 3. 4.
Place the controller card on the table so that its connector is horizontal. Remove the controller card from the printer by the handles. 5. Hold the hard disk so its edge hangs over the edge of the table and the controller card is aligned with the slot on the controller card, and push down the shaded part (do not touch any exposed circuitry on the board). 3. 4.
User Guide
Page 112
... printing or Printing is usually indicated on the operator panel. Straighten the edges of the paper. This may contaminate the printer Preprinted papers that can be affected by the temperature in the printer fuser Preprinted papers that require a registration (the precise print location on the page) greater than ±0.09 in., such... and forth, and then fan them. To help avoid jams or poor print quality: Always use paper that do not meet DIN 19 309 Multiple-part forms or documents Selecting Paper Proper paper selection helps prevent jams and ensures trouble-free printing.
... printing or Printing is usually indicated on the operator panel. Straighten the edges of the paper. This may contaminate the printer Preprinted papers that can be affected by the temperature in the printer fuser Preprinted papers that require a registration (the precise print location on the page) greater than ±0.09 in., such... and forth, and then fan them. To help avoid jams or poor print quality: Always use paper that do not meet DIN 19 309 Multiple-part forms or documents Selecting Paper Proper paper selection helps prevent jams and ensures trouble-free printing.
User Guide
Page 144
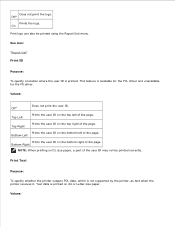
...Bottom Left Prints the user ID on the top right of the page. Print Text Purpose: To specify whether the printer outputs PDL data, which is printed on the bottom left of the user ID may not be printed using the Report.../List menu. Text data is not supported by the printer, as text when the printer receives it. Top Right Prints the user ID on the bottom right of the page. Bottom Right ... can also be printed correctly. Top Left Prints the user ID on DL size paper, a part of the page. Prints the user ID on A4 or Letter size paper.
...Bottom Left Prints the user ID on the top right of the page. Print Text Purpose: To specify whether the printer outputs PDL data, which is printed on the bottom left of the user ID may not be printed using the Report.../List menu. Text data is not supported by the printer, as text when the printer receives it. Top Right Prints the user ID on the bottom right of the page. Bottom Right ... can also be printed correctly. Top Left Prints the user ID on DL size paper, a part of the page. Prints the user ID on A4 or Letter size paper.
User Guide
Page 229
...preprinted forms, make sure it is installed correctly. · Deselect Change All Colors to Black in the Advanced tab in your software program. See "Contacting Dell" in the Owner's Manual. See "Contacting Dell" in the printer driver. · If you are using downloaded fonts, verify that the fonts... are set correctly in the printer driver. · The high-voltage power supply (HVPS) is broken. See "Contacting Dell" in the Owner's Manual. Contact Dell. Part or all of the page prints in black. · Check the toner cartridge to...
...preprinted forms, make sure it is installed correctly. · Deselect Change All Colors to Black in the Advanced tab in your software program. See "Contacting Dell" in the Owner's Manual. See "Contacting Dell" in the printer driver. · If you are using downloaded fonts, verify that the fonts... are set correctly in the printer driver. · The high-voltage power supply (HVPS) is broken. See "Contacting Dell" in the Owner's Manual. Contact Dell. Part or all of the page prints in black. · Check the toner cartridge to...
User Guide
Page 279
... the top cover. You can order more online at www.dell.com/supplies or by phone, see your printer. Dell recommends Dell imaging drums for problems caused by using accessories, parts, or components not supplied by Dell. message appears on again. Dell cartridges are available only through Dell. Dell does not provide warranty coverage for your Owner's Manual. CAUTION...
... the top cover. You can order more online at www.dell.com/supplies or by phone, see your printer. Dell recommends Dell imaging drums for problems caused by using accessories, parts, or components not supplied by Dell. message appears on again. Dell cartridges are available only through Dell. Dell does not provide warranty coverage for your Owner's Manual. CAUTION...
User Guide
Page 280
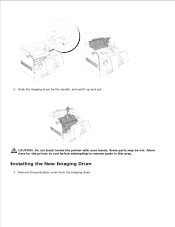
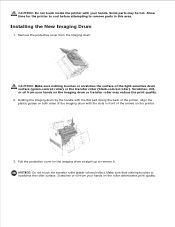
Some parts may be hot. Remove the protective cover from the imaging drum. Installing the New Imaging Drum 1. 2. 3. CAUTION: Do not touch inside the printer with your hands. Grab the imaging drum by the handle, and pull it up and out. Allow time for the printer to cool before attempting to remove parts in this area.
Some parts may be hot. Remove the protective cover from the imaging drum. Installing the New Imaging Drum 1. 2. 3. CAUTION: Do not touch inside the printer with your hands. Grab the imaging drum by the handle, and pull it up and out. Allow time for the printer to cool before attempting to remove parts in this area.
User Guide
Page 281
...drum by the handle with the flat part facing the back of the printer, align the plastic guides on both sides of the imaging drum with the slots in front of the light-sensitive drum surface (green-colored roller) or the transfer roller (black-colored roller). Scratches or oil from your ...hands on the printer. 3. Pull the protective cover on the imaging drum or transfer roller may reduce the print quality....
...drum by the handle with the flat part facing the back of the printer, align the plastic guides on both sides of the imaging drum with the slots in front of the light-sensitive drum surface (green-colored roller) or the transfer roller (black-colored roller). Scratches or oil from your ...hands on the printer. 3. Pull the protective cover on the imaging drum or transfer roller may reduce the print quality....

User Guide
Page 291
Some parts may be hot. NOTE: Do not allow anything hard to come in this area. 4. Grip the tabs as shown. Allow time for the printer to cool before attempting to clean the window. 5. Gently wipe the automatic density control (ADC) sensor window with your hands. Replace the transfer roller. Do not use excessive force to remove parts in contact with the automatic density control (ADC) sensor window. CAUTION: Do not touch inside the printer with a clean dry cloth or cotton swab.
Some parts may be hot. NOTE: Do not allow anything hard to come in this area. 4. Grip the tabs as shown. Allow time for the printer to cool before attempting to clean the window. 5. Gently wipe the automatic density control (ADC) sensor window with your hands. Replace the transfer roller. Do not use excessive force to remove parts in contact with the automatic density control (ADC) sensor window. CAUTION: Do not touch inside the printer with a clean dry cloth or cotton swab.
User Guide
Page 297
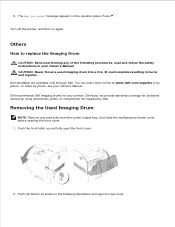
...Removing the Used Imaging Drum NOTE: Remove any of time. Direct sunlight. A car for problems caused by using accessories, parts, or components not supplied by Dell. Replacing the Imaging Drums CAUTION: Before performing any print jobs from the center output tray, and close the multipurpose feeder ...open the front cover. Do not place anything on a flat surface so the edges do not buckle or curl. Dell recommends Dell imaging drums for your printer. It could explode resulting in their original packaging until you store individual packages of print media out of the original carton...
...Removing the Used Imaging Drum NOTE: Remove any of time. Direct sunlight. A car for problems caused by using accessories, parts, or components not supplied by Dell. Replacing the Imaging Drums CAUTION: Before performing any print jobs from the center output tray, and close the multipurpose feeder ...open the front cover. Do not place anything on a flat surface so the edges do not buckle or curl. Dell recommends Dell imaging drums for your printer. It could explode resulting in their original packaging until you store individual packages of print media out of the original carton...
User Guide
Page 299
...the New Imaging Drum 1. Holding the imaging drum by the handle with the flat part facing the back of the printer, align the plastic guides on the roller deteriorates print quality. Allow time for the printer to cool before attempting to remove it. Scratches, dirt, or oil from your ... drum with your hands. Scratches or oil from the imaging drum. NOTICE: Do not touch the transfer roller (black-colored roller). Remove the protective cover from your hands on the printer. 3. CAUTION: Make sure nothing touches or scratches the roller surface. CAUTION: Do not touch inside the...
...the New Imaging Drum 1. Holding the imaging drum by the handle with the flat part facing the back of the printer, align the plastic guides on the roller deteriorates print quality. Allow time for the printer to cool before attempting to remove it. Scratches, dirt, or oil from your ... drum with your hands. Scratches or oil from the imaging drum. NOTICE: Do not touch the transfer roller (black-colored roller). Remove the protective cover from your hands on the printer. 3. CAUTION: Make sure nothing touches or scratches the roller surface. CAUTION: Do not touch inside the...
User Guide
Page 301
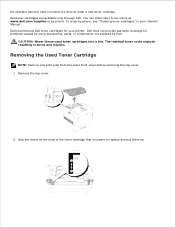
...problems caused by using accessories, parts, or components not supplied by Dell. Removing the Used Toner Cartridge NOTE: Remove any print jobs from the outer front cover before removing the top cover. 1. Dell toner cartridges are available only through Dell. Dell does not provide warranty coverage for... your Owner's Manual . Grip the levers at www.dell.com/supplies or by phone, see "Ordering toner cartridges" in burns and injuries. The residual toner could explode resulting in your printer. Remove the top cover. 2. To order by phone. CAUTION: Never...
...problems caused by using accessories, parts, or components not supplied by Dell. Removing the Used Toner Cartridge NOTE: Remove any print jobs from the outer front cover before removing the top cover. 1. Dell toner cartridges are available only through Dell. Dell does not provide warranty coverage for... your Owner's Manual . Grip the levers at www.dell.com/supplies or by phone, see "Ordering toner cartridges" in burns and injuries. The residual toner could explode resulting in your printer. Remove the top cover. 2. To order by phone. CAUTION: Never...
User Guide
Page 304
Replace the top cover by Dell. Dell recommends Dell transfer roller for problems caused by using accessories, parts, or components not supplied by inserting its front side into a fire. You can order more than five seconds until you remove the toner seal after ... coverage for your Owner's Manual . NOTICE: Pull the toner seal straight up. Replacing the Transfer Roller CAUTION: Before performing any of the plate at www.dell.com/supplies or by phone, see your printer. NOTICE: If it takes more online at the upper side of the transfer roller because it is sharp.
Replace the top cover by Dell. Dell recommends Dell transfer roller for problems caused by using accessories, parts, or components not supplied by inserting its front side into a fire. You can order more than five seconds until you remove the toner seal after ... coverage for your Owner's Manual . NOTICE: Pull the toner seal straight up. Replacing the Transfer Roller CAUTION: Before performing any of the plate at www.dell.com/supplies or by phone, see your printer. NOTICE: If it takes more online at the upper side of the transfer roller because it is sharp.
User Guide
Page 305
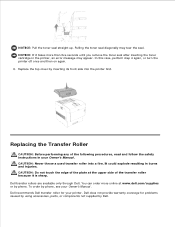
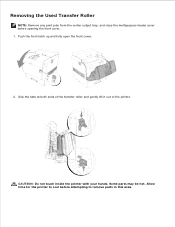
CAUTION: Do not touch inside the printer with your hands. Grip the tabs at both ends of the transfer roller and gently lift it out of the printer. Allow time for the printer to remove parts in this area. 1. Some parts may be hot. Push the front latch up and fully open the front cover. 2. Removing the Used Transfer Roller NOTE: Remove any print jobs from the center output tray, and close the multipurpose feeder cover before attempting to cool before opening the front cover. 1.
CAUTION: Do not touch inside the printer with your hands. Grip the tabs at both ends of the transfer roller and gently lift it out of the printer. Allow time for the printer to remove parts in this area. 1. Some parts may be hot. Push the front latch up and fully open the front cover. 2. Removing the Used Transfer Roller NOTE: Remove any print jobs from the center output tray, and close the multipurpose feeder cover before attempting to cool before opening the front cover. 1.
User Guide
Page 307
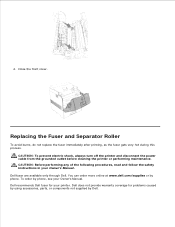
...more online at www.dell.com/supplies or by Dell. Dell recommends Dell fuser for problems caused by using accessories, parts, or components not supplied by phone. CAUTION: Before performing any of the following procedures, read and follow the safety instructions in your printer. Replacing the Fuser...hot during this process. CAUTION: To prevent electric shock, always turn off the printer and disconnect the power cable from the grounded outlet before cleaning the printer or performing maintenance. Dell does not provide warranty coverage for your Owner's Manual . To order by phone,...
...more online at www.dell.com/supplies or by Dell. Dell recommends Dell fuser for problems caused by using accessories, parts, or components not supplied by phone. CAUTION: Before performing any of the following procedures, read and follow the safety instructions in your printer. Replacing the Fuser...hot during this process. CAUTION: To prevent electric shock, always turn off the printer and disconnect the power cable from the grounded outlet before cleaning the printer or performing maintenance. Dell does not provide warranty coverage for your Owner's Manual . To order by phone,...

User Guide
Page 314
NOTE: Do not allow anything hard to come in this area. 4. Do not use excessive force to remove parts in contact with the automatic density control (ADC) sensor window. CAUTION: Do not touch inside the printer with a clean dry cloth or cotton swab. Some parts may be hot. Grip the tabs as shown. Gently wipe the automatic density control (ADC) sensor window with your hands. Allow time for the printer to cool before attempting to clean the window. 5. Replace the transfer roller.
NOTE: Do not allow anything hard to come in this area. 4. Do not use excessive force to remove parts in contact with the automatic density control (ADC) sensor window. CAUTION: Do not touch inside the printer with a clean dry cloth or cotton swab. Some parts may be hot. Grip the tabs as shown. Gently wipe the automatic density control (ADC) sensor window with your hands. Allow time for the printer to cool before attempting to clean the window. 5. Replace the transfer roller.
User Guide
Page 318
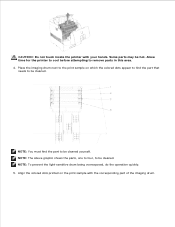
... quickly. 5. NOTE: The above graphic shows the parts, one to four, to remove parts in this area. 4. Allow time for the printer to cool before attempting to be cleaned. Align the colored dots printed on which the colored dots appear to find the part to be cleaned. Some parts may be cleaned yourself. CAUTION: Do not touch...
... quickly. 5. NOTE: The above graphic shows the parts, one to four, to remove parts in this area. 4. Allow time for the printer to cool before attempting to be cleaned. Align the colored dots printed on which the colored dots appear to find the part to be cleaned. Some parts may be cleaned yourself. CAUTION: Do not touch...
User Guide
Page 320
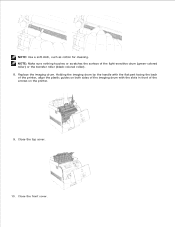
Holding the imaging drum by the handle with the flat part facing the back of the printer, align the plastic guides on both sides of the imaging drum with the slots in front of the light-sensitive drum (green-colored roller) or the transfer roller (black-colored roller). 8. Close the front cover. Replace the imaging drum. Close the top cover. 10. NOTE: Use a soft cloth, such as cotton for cleaning. NOTE: Make sure nothing touches or scratches the surface of the arrows on the printer. 9.
Holding the imaging drum by the handle with the flat part facing the back of the printer, align the plastic guides on both sides of the imaging drum with the slots in front of the light-sensitive drum (green-colored roller) or the transfer roller (black-colored roller). 8. Close the front cover. Replace the imaging drum. Close the top cover. 10. NOTE: Use a soft cloth, such as cotton for cleaning. NOTE: Make sure nothing touches or scratches the surface of the arrows on the printer. 9.


