User Manual
Page 22
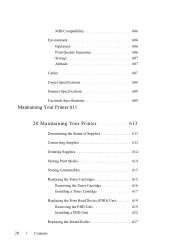
... Print Media 614 Storing Consumables 615 Replacing the Toner Cartridges 615 Removing the Toner Cartridge 616 Installing a Toner Cartridge 617 Replacing the Print Head Device (PHD) Unit 619 Removing the PHD Unit 619 Installing a PHD Unit 622 Replacing the Retard Roller 627 20 Contents
... Print Media 614 Storing Consumables 615 Replacing the Toner Cartridges 615 Removing the Toner Cartridge 616 Installing a Toner Cartridge 617 Replacing the Print Head Device (PHD) Unit 619 Removing the PHD Unit 619 Installing a PHD Unit 622 Replacing the Retard Roller 627 20 Contents
User Manual
Page 178
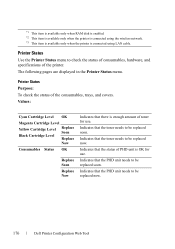
Printer Status Purpose: To check the status of the printer. Indicates that the PHD unit needs to be replaced now. 176 Dell Printer Configuration Web Tool Indicates that the PHD unit needs to be replaced now. Indicates that there is enough amount of PHD unit is connected using the wireless network. *3 This item is available only when the...
Printer Status Purpose: To check the status of the printer. Indicates that the PHD unit needs to be replaced now. 176 Dell Printer Configuration Web Tool Indicates that the PHD unit needs to be replaced now. Indicates that there is enough amount of PHD unit is connected using the wireless network. *3 This item is available only when the...
User Manual
Page 214
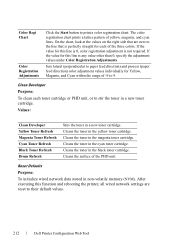
...of the three colors. Clean Developer Purpose: To clean each of -9 to the line that are reset to their default values. 212 Dell Printer Configuration Web Tool Cleans the surface of yellow, magenta, and cyan lines. Color Regi Chart Color Registration Adjustments Click the Start ... Sets lateral (perpendicular to paper feed direction) and process (paper feed direction) color adjustment values individually for each toner cartridge or PHD unit, or to print a color registration chart. Cleans the toner in the magenta toner cartridge. The color registration chart prints a lattice pattern of...
...of the three colors. Clean Developer Purpose: To clean each of -9 to the line that are reset to their default values. 212 Dell Printer Configuration Web Tool Cleans the surface of yellow, magenta, and cyan lines. Color Regi Chart Color Registration Adjustments Click the Start ... Sets lateral (perpendicular to paper feed direction) and process (paper feed direction) color adjustment values individually for each toner cartridge or PHD unit, or to print a color registration chart. Cleans the toner in the magenta toner cartridge. The color registration chart prints a lattice pattern of...

User Manual
Page 469
..., all the menu parameters, except the parameters for the network, are reset to their default values. Refresh Mode Purpose: To use up a toner cartridge or PHD unit when you need to replace it before the end of its life, or to Result. When Using the Tool Box NOTE: Understanding the Tool Box...
..., all the menu parameters, except the parameters for the network, are reset to their default values. Refresh Mode Purpose: To use up a toner cartridge or PHD unit when you need to replace it before the end of its life, or to Result. When Using the Tool Box NOTE: Understanding the Tool Box...

User Manual
Page 519
...the toner in each toner cartridge. No* Does not clean the surface of the PHD unit. No* Does not clean the toner in the Address Book. Drum Refresh Purpose: To clean the surface of the PHD unit. Reset Defaults Purpose: To initialize the non-volatile (NV) memory. Values: Yes... Cleans the surface of the PHD unit. Does not initialize the e-mail and server address entries in each toner cartridge. Does...
...the toner in each toner cartridge. No* Does not clean the surface of the PHD unit. No* Does not clean the toner in the Address Book. Drum Refresh Purpose: To clean the surface of the PHD unit. Reset Defaults Purpose: To initialize the non-volatile (NV) memory. Values: Yes... Cleans the surface of the PHD unit. Does not initialize the e-mail and server address entries in each toner cartridge. Does...
User Manual
Page 601
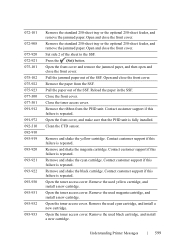
... front cover. Pull the paper out of the sheet to the SSF. Close the front cover. Open the front cover, and make sure that the PHD unit is repeated. Contact customer support if this failure is repeated. Open the toner access cover. D E L L C ON F I D E N T I N A RY 9 / 1 3 / 1 0 - Open and close the .... Pull the jammed paper out of the SSF. Open the toner access cover. Press the (Set) button. Remove the paper from the PHD unit. Contact customer support if this failure is repeated. Contact customer support if this failure is repeated. Reload the paper in the SSF. Remove ...
... front cover. Pull the paper out of the sheet to the SSF. Close the front cover. Open the front cover, and make sure that the PHD unit is repeated. Contact customer support if this failure is repeated. Open the toner access cover. D E L L C ON F I D E N T I N A RY 9 / 1 3 / 1 0 - Open and close the .... Pull the jammed paper out of the SSF. Open the toner access cover. Press the (Set) button. Remove the paper from the PHD unit. Contact customer support if this failure is repeated. Contact customer support if this failure is repeated. Reload the paper in the SSF. Remove ...
User Manual
Page 602
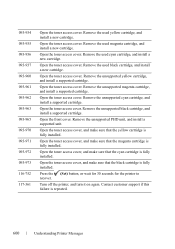
.... Remove the unsupported yellow cartridge, and install a supported cartridge. Remove the unsupported cyan cartridge, and install a supported cartridge. Open the front cover. Remove the unsupported PHD unit, and install a supported unit. Open the toner access cover, and make sure that the black cartridge is fully installed.
.... Remove the unsupported yellow cartridge, and install a supported cartridge. Remove the unsupported cyan cartridge, and install a supported cartridge. Open the front cover. Remove the unsupported PHD unit, and install a supported unit. Open the toner access cover, and make sure that the black cartridge is fully installed.
User Manual
Page 607
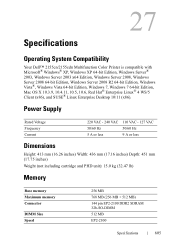
...F O R P R O O F O N LY Specifications 605 P R E L I M I A L - 27 Specifications Operating System Compatibility Your Dell™ 2155cn/2155cdn Multifunction Color Printer is compatible with Microsoft® Windows® XP, Windows XP 64-bit Edition, Windows Server® 2003, Windows Server 2003 x64 Edition,...less Dimensions Height: 413 mm (16.26 inches) Width: 436 mm (17.16 inches) Depth: 451 mm (17.75 inches) Weight (not including cartridge and PHD unit): 15.0 kg (32.47 lb) Memory Base memory 256 MB Maximum memory 768 MB (256 MB + 512 MB) Connector 144 pin EP2-2100 DDR2 SDRAM...
...F O R P R O O F O N LY Specifications 605 P R E L I M I A L - 27 Specifications Operating System Compatibility Your Dell™ 2155cn/2155cdn Multifunction Color Printer is compatible with Microsoft® Windows® XP, Windows XP 64-bit Edition, Windows Server® 2003, Windows Server 2003 x64 Edition,...less Dimensions Height: 413 mm (16.26 inches) Width: 436 mm (17.16 inches) Depth: 451 mm (17.75 inches) Weight (not including cartridge and PHD unit): 15.0 kg (32.47 lb) Memory Base memory 256 MB Maximum memory 768 MB (256 MB + 512 MB) Connector 144 pin EP2-2100 DDR2 SDRAM...

User Manual
Page 621
... that the printer is turned off. 2 Pull the standard 250-sheet tray out of the belt unit may deteriorate. Maintaining Your Printer 619 Replacing the Print Head Device (PHD) Unit CAUTION: Before performing any of the belt unit. NOTICE: Ensure nothing touches or scratches the surface (black-colored film) of the following procedures, read... the front cover remains open for more than three minutes, print quality may reduce print quality. NOTICE: Protect the drums of the Print Head Device (PHD) against bright light.
... that the printer is turned off. 2 Pull the standard 250-sheet tray out of the belt unit may deteriorate. Maintaining Your Printer 619 Replacing the Print Head Device (PHD) Unit CAUTION: Before performing any of the belt unit. NOTICE: Ensure nothing touches or scratches the surface (black-colored film) of the following procedures, read... the front cover remains open for more than three minutes, print quality may reduce print quality. NOTICE: Protect the drums of the Print Head Device (PHD) against bright light.
User Manual
Page 623
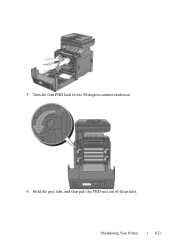
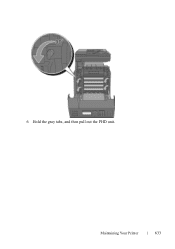
5 Turn the four PHD lock levers 90-degrees counterclockwise. 6 Hold the gray tabs, and then pull the PHD unit out of the printer. Maintaining Your Printer 621
5 Turn the four PHD lock levers 90-degrees counterclockwise. 6 Hold the gray tabs, and then pull the PHD unit out of the printer. Maintaining Your Printer 621
User Manual
Page 624
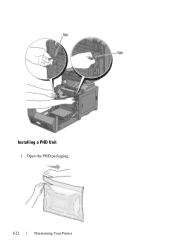
Installing a PHD Unit 1 Open the PHD packaging. 622 Maintaining Your Printer
Installing a PHD Unit 1 Open the PHD packaging. 622 Maintaining Your Printer
User Manual
Page 625
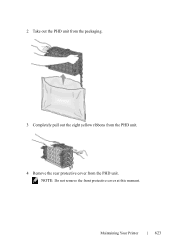
NOTE: Do not remove the front protective cover at this moment. Maintaining Your Printer 623 2 Take out the PHD unit from the packaging. 3 Completely pull out the eight yellow ribbons from the PHD unit. 4 Remove the rear protective cover from the PHD unit.
NOTE: Do not remove the front protective cover at this moment. Maintaining Your Printer 623 2 Take out the PHD unit from the packaging. 3 Completely pull out the eight yellow ribbons from the PHD unit. 4 Remove the rear protective cover from the PHD unit.
User Manual
Page 626
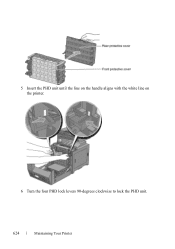
5 Insert the PHD unit until the line on the handle aligns with the white line on the printer. 6 Turn the four PHD lock levers 90-degrees clockwise to lock the PHD unit. 624 Maintaining Your Printer
5 Insert the PHD unit until the line on the handle aligns with the white line on the printer. 6 Turn the four PHD lock levers 90-degrees clockwise to lock the PHD unit. 624 Maintaining Your Printer

User Manual
Page 627
Maintaining Your Printer 625 7 Remove the front protective cover from the PHD unit. NOTICE: Ensure that you do not hit the belt unit when removing the front protective cover.
Maintaining Your Printer 625 7 Remove the front protective cover from the PHD unit. NOTICE: Ensure that you do not hit the belt unit when removing the front protective cover.
User Manual
Page 635
Maintaining Your Printer 633 6 Hold the gray tabs, and then pull out the PHD unit.
Maintaining Your Printer 633 6 Hold the gray tabs, and then pull out the PHD unit.
User Manual
Page 636
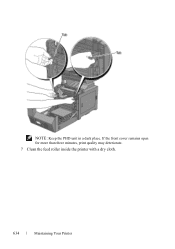
NOTE: Keep the PHD unit in a dark place. If the front cover remains open for more than three minutes, print quality may deteriorate. 7 Clean the feed roller inside the printer with a dry cloth. 634 Maintaining Your Printer
NOTE: Keep the PHD unit in a dark place. If the front cover remains open for more than three minutes, print quality may deteriorate. 7 Clean the feed roller inside the printer with a dry cloth. 634 Maintaining Your Printer
User Manual
Page 637
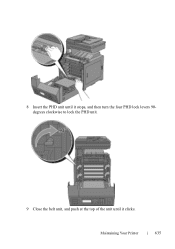
8 Insert the PHD unit until it stops, and then turn the four PHD lock levers 90degrees clockwise to lock the PHD unit. 9 Close the belt unit, and push at the top of the unit until it clicks. Maintaining Your Printer 635
8 Insert the PHD unit until it stops, and then turn the four PHD lock levers 90degrees clockwise to lock the PHD unit. 9 Close the belt unit, and push at the top of the unit until it clicks. Maintaining Your Printer 635
User Manual
Page 692
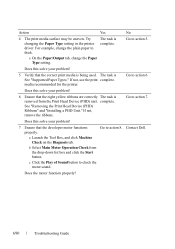
Does this solve your problem? 6 Ensure that the eight yellow ribbons are correctly The task is being used. Contact Dell. c Click the Play of Sound button to action 5. DE LL CONFIDENTIAL - Try changing the Paper Type setting in the printer driver..... If not, remove the ribbons. Does the motor function properly? See "Removing the Print Head Device (PHD) Ribbons" and "Installing a PHD Unit." b Select Main Motor Operation Check from the Print Head Device (PHD) unit. PRE LIMINARY 9/13/10 - For example, change the Paper Type setting. The task is complete. media...
Does this solve your problem? 6 Ensure that the eight yellow ribbons are correctly The task is being used. Contact Dell. c Click the Play of Sound button to action 5. DE LL CONFIDENTIAL - Try changing the Paper Type setting in the printer driver..... If not, remove the ribbons. Does the motor function properly? See "Removing the Print Head Device (PHD) Ribbons" and "Installing a PHD Unit." b Select Main Motor Operation Check from the Print Head Device (PHD) unit. PRE LIMINARY 9/13/10 - For example, change the Paper Type setting. The task is complete. media...
User Manual
Page 694
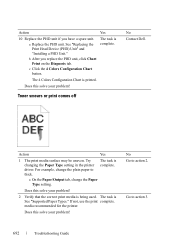
...Go to action 3. FILE LOCATION: C:\Users\fxstdpcadmin\Desktop\0630_UG??\Mioga_AIO_UG_FM\Mioga_AIO_UG_FM\section31.fm Action Yes 10 Replace the PHD unit if you replace the PHD unit, click Chart Print on the Diagnosis tab. Try The task is being used. For example, change the ... After you have a spare unit. DE LL CONFIDENTIAL - a Replace the PHD unit. Does this solve your problem? Toner smears or print comes off No Contact Dell. FOR PROOF ONLY 692 Troubleshooting Guide See "Replacing the Print Head Device (PHD) Unit" and "Installing a PHD Unit." driver. a On the ...
...Go to action 3. FILE LOCATION: C:\Users\fxstdpcadmin\Desktop\0630_UG??\Mioga_AIO_UG_FM\Mioga_AIO_UG_FM\section31.fm Action Yes 10 Replace the PHD unit if you replace the PHD unit, click Chart Print on the Diagnosis tab. Try The task is being used. For example, change the ... After you have a spare unit. DE LL CONFIDENTIAL - a Replace the PHD unit. Does this solve your problem? Toner smears or print comes off No Contact Dell. FOR PROOF ONLY 692 Troubleshooting Guide See "Replacing the Print Head Device (PHD) Unit" and "Installing a PHD Unit." driver. a On the ...

User Manual
Page 695
... Device (PHD) Unit" and "Installing a PHD Unit." Yes The task is See "Replacing the Print Head Device (PHD) Unit" complete. D E L L C ON F I D E N T I N A RY 9 / 1 3 / 1 0 - and "Installing a PHD Unit." b After you have a spare unit. Does this solve your problem? The task is installed correctly. Action Yes 1 Ensure that the PHD unit is complete. F O R P R O O F O N LY Troubleshooting Guide 693 Random spots/Blurred images No Contact Dell. FILE...
... Device (PHD) Unit" and "Installing a PHD Unit." Yes The task is See "Replacing the Print Head Device (PHD) Unit" complete. D E L L C ON F I D E N T I N A RY 9 / 1 3 / 1 0 - and "Installing a PHD Unit." b After you have a spare unit. Does this solve your problem? The task is installed correctly. Action Yes 1 Ensure that the PHD unit is complete. F O R P R O O F O N LY Troubleshooting Guide 693 Random spots/Blurred images No Contact Dell. FILE...


