User Manual
Page 24
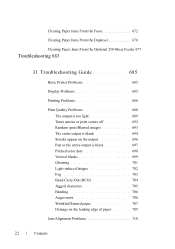
...250-Sheet Feeder 677 Troubleshooting 683 31 Troubleshooting Guide 685 Basic Printer Problems 685 Display Problems 685 Printing Problems 686 Print Quality Problems 688 The output is too light 689 Toner smears or print comes off 692 Random spots/Blurred images 693 The entire output is blank 694 Streaks appear ...on the output 696 Part or the entire output is black 697 Pitched color dots 698 Vertical blanks 699 Ghosting 701 Light-induced fatigue ...
...250-Sheet Feeder 677 Troubleshooting 683 31 Troubleshooting Guide 685 Basic Printer Problems 685 Display Problems 685 Printing Problems 686 Print Quality Problems 688 The output is too light 689 Toner smears or print comes off 692 Random spots/Blurred images 693 The entire output is blank 694 Streaks appear ...on the output 696 Part or the entire output is black 697 Pitched color dots 698 Vertical blanks 699 Ghosting 701 Light-induced fatigue ...
User Manual
Page 113
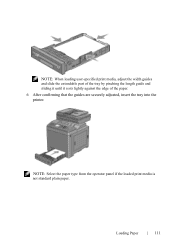
...fxstdpcadmin\Desktop\0630_UG??\Mioga_AIO_UG_FM\Mioga_AIO_UG_FM\section09.fm NOTE: When loading user-specified print media, adjust the width guides and slide the extendable part of the tray by pinching the length guide and sliding it until it rests lightly against the edge of the paper. 6 After confirming that the ...guides are securely adjusted, insert the tray into the printer. NOTE: Select the paper type from the operator panel if the loaded print media is not standard plain paper.
...fxstdpcadmin\Desktop\0630_UG??\Mioga_AIO_UG_FM\Mioga_AIO_UG_FM\section09.fm NOTE: When loading user-specified print media, adjust the width guides and slide the extendable part of the tray by pinching the length guide and sliding it until it rests lightly against the edge of the paper. 6 After confirming that the ...guides are securely adjusted, insert the tray into the printer. NOTE: Select the paper type from the operator panel if the loaded print media is not standard plain paper.
User Manual
Page 211
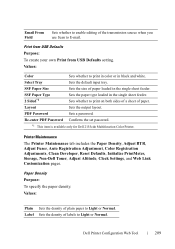
Email From Field Sets whether to enable editing of paper. Sets whether to print on both sides of a sheet of the transmission source when you use Scan to Light or Normal. Values: Plain Sets the density of labels to E-mail. Select Tray Sets the default input tray. Label...: To create your own Print from USB Defaults setting. SSF Paper Size Sets the size of paper loaded in the single sheet feeder. Dell Printer Configuration Web Tool 209 Re-enter PDF Password Confirms the set password. *1 This item is available only for Dell 2155cdn Multifunction Color Printer. Paper...
Email From Field Sets whether to enable editing of paper. Sets whether to print on both sides of a sheet of the transmission source when you use Scan to Light or Normal. Values: Plain Sets the density of labels to E-mail. Select Tray Sets the default input tray. Label...: To create your own Print from USB Defaults setting. SSF Paper Size Sets the size of paper loaded in the single sheet feeder. Dell Printer Configuration Web Tool 209 Re-enter PDF Password Confirms the set password. *1 This item is available only for Dell 2155cdn Multifunction Color Printer. Paper...
User Manual
Page 273
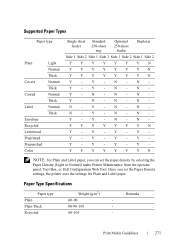
...- Y - YYYYYYYN NOTE: For Plain and Label paper, you set the paper density by selecting the Paper Density (Light or Normal) under Printer Maintenance from the operator panel, Tool Box, or Dell Configuration Web Tool. Y - N - N - Y - Y - Y - N - N - N ...Light Normal Thick Normal Thick Normal Thick Normal Thick Single sheet feeder Standard 250-sheet tray Optional 250-sheet feeder Duplexer Side 1 Side 2 Side 1 Side 2 Side 1 Side 2 Side 1 Side 2 YYYYYYYN YYYYYYYN YYYYYYYN Y - N - Y - N - YYYYYYYN Y - F O R P R O O F O N LY Print...
...- Y - YYYYYYYN NOTE: For Plain and Label paper, you set the paper density by selecting the Paper Density (Light or Normal) under Printer Maintenance from the operator panel, Tool Box, or Dell Configuration Web Tool. Y - N - N - Y - Y - Y - N - N - N ...Light Normal Thick Normal Thick Normal Thick Normal Thick Single sheet feeder Standard 250-sheet tray Optional 250-sheet feeder Duplexer Side 1 Side 2 Side 1 Side 2 Side 1 Side 2 Side 1 Side 2 YYYYYYYN YYYYYYYN YYYYYYYN Y - N - Y - N - YYYYYYYN Y - F O R P R O O F O N LY Print...

User Manual
Page 277
... into the printer. NOTE: When loading user-specified print media, adjust the width guides and slide the extendable part of the tray by pinching the length guide and sliding it until it rests lightly against the edges of the paper. 6 After confirming that the guides are securely adjusted, insert the tray... into the tray with the recommended print side facing up. NOTE: Do not exceed the maximum fill line in the...
... into the printer. NOTE: When loading user-specified print media, adjust the width guides and slide the extendable part of the tray by pinching the length guide and sliding it until it rests lightly against the edges of the paper. 6 After confirming that the guides are securely adjusted, insert the tray... into the tray with the recommended print side facing up. NOTE: Do not exceed the maximum fill line in the...

User Manual
Page 326
...down on the document glass, and close the document cover. for adjusting the darkness level, and Lighter3 Works well with normal typed or printed documents. Darker2 Darker3 * Denotes the factory default setting. 5 Press the (Start) button to make the copy image sharper or softer ... a single document facing down on the document glass, and close the document cover. FOR PROOF ONLY 324 Copying Darker1 Works well with light print or faint pencil markings. DE LL CONFIDENTIAL - Sharpness To adjust the sharpness to begin copying. For details about loading a document, see...
...down on the document glass, and close the document cover. for adjusting the darkness level, and Lighter3 Works well with normal typed or printed documents. Darker2 Darker3 * Denotes the factory default setting. 5 Press the (Start) button to make the copy image sharper or softer ... a single document facing down on the document glass, and close the document cover. FOR PROOF ONLY 324 Copying Darker1 Works well with light print or faint pencil markings. DE LL CONFIDENTIAL - Sharpness To adjust the sharpness to begin copying. For details about loading a document, see...

User Manual
Page 394
...to be lighter or darker than the original. 1 Load the document(s) facing up with dark print. Used for documents containing small characters or thin lines or documents printed using a dot-matrix printer. Adjusting the Document Contrast You can adjust the contrast of the...the remote machine also supports the Super Fine resolution. Lighter2 Lighter1 Normal* Works well with light print or faint pencil markings. Darker1 Works well with standard typed or printed documents. DE LL CONFIDENTIAL - FILE LOCATION: C:\Users\fxstdpcadmin\Desktop\0630_UG??\Mioga_AIO_UG_FM\Mioga_AIO_UG_FM\section20...
...to be lighter or darker than the original. 1 Load the document(s) facing up with dark print. Used for documents containing small characters or thin lines or documents printed using a dot-matrix printer. Adjusting the Document Contrast You can adjust the contrast of the...the remote machine also supports the Super Fine resolution. Lighter2 Lighter1 Normal* Works well with light print or faint pencil markings. Darker1 Works well with standard typed or printed documents. DE LL CONFIDENTIAL - FILE LOCATION: C:\Users\fxstdpcadmin\Desktop\0630_UG??\Mioga_AIO_UG_FM\Mioga_AIO_UG_FM\section20...
User Manual
Page 442
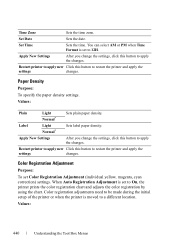
You can select AM or PM when Time Format is set to On, the printer prints the color registration chart and adjusts the color registration by using the chart. Paper Density Purpose: To specify the paper density settings. Restart printer to ... printer or when the printer is set to apply the changes. Apply New Settings After you change the settings, click this button to 12H. Label Light Normal* Sets label paper density. Values: 440 Understanding the Tool Box Menus Restart printer to apply new Click this button to apply the changes. Set...
You can select AM or PM when Time Format is set to On, the printer prints the color registration chart and adjusts the color registration by using the chart. Paper Density Purpose: To specify the paper density settings. Restart printer to ... printer or when the printer is set to apply the changes. Apply New Settings After you change the settings, click this button to 12H. Label Light Normal* Sets label paper density. Values: 440 Understanding the Tool Box Menus Restart printer to apply new Click this button to apply the changes. Set...
User Manual
Page 453
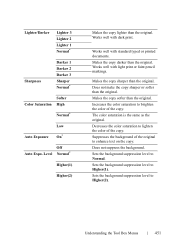
...than the original. Decreases the color saturation to brighten the color of the copy. Works well with standard typed or printed documents. Sets the background suppression level to Normal. Increases the color saturation to lighten the color of the copy. Works well...* Sharpness Darker 1 Darker 2 Darker 3 Sharper Normal* Softer Color Saturation High Normal* Low Auto Exposure On* Off Auto Expo. Works well with light print or faint pencil markings. Does not suppress the background. Sets the background suppression level to enhance text on the copy. Makes the copy softer than...
...than the original. Decreases the color saturation to brighten the color of the copy. Works well with standard typed or printed documents. Sets the background suppression level to Normal. Increases the color saturation to lighten the color of the copy. Works well...* Sharpness Darker 1 Darker 2 Darker 3 Sharper Normal* Softer Color Saturation High Normal* Low Auto Exposure On* Off Auto Expo. Works well with light print or faint pencil markings. Does not suppress the background. Sets the background suppression level to enhance text on the copy. Makes the copy softer than...
User Manual
Page 457
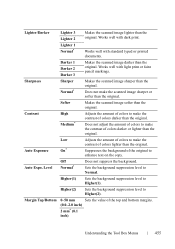
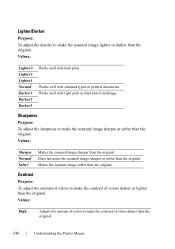
... lighter than the original. Darker 1 Darker 2 Darker 3 Makes the scanned image darker than the original. Works well with standard typed or printed documents. Sets the background suppression level to make the contrast of the top and bottom margins. (0.0-2.0 inch) 2 mm* (0.1 inch) Understanding... the contrast of the original to Higher(1). Low Adjusts the amount of colors to Normal. Lighter 1 Normal* Works well with light print or faint pencil markings. Higher(1) Sets the background suppression level to enhance text on the copy. Lighter/Darker Sharpness Contrast Auto ...
... lighter than the original. Darker 1 Darker 2 Darker 3 Makes the scanned image darker than the original. Works well with standard typed or printed documents. Sets the background suppression level to make the contrast of the top and bottom margins. (0.0-2.0 inch) 2 mm* (0.1 inch) Understanding... the contrast of the original to Higher(1). Low Adjusts the amount of colors to Normal. Lighter 1 Normal* Works well with light print or faint pencil markings. Higher(1) Sets the background suppression level to enhance text on the copy. Lighter/Darker Sharpness Contrast Auto ...

User Manual
Page 459
...enabled only if the remote machine also supports the Super Fine resolution. Works well with dark print. For documents containing small characters or thin lines or documents printed using a dot-matrix printer. Darker 1 Darker 2 Makes the documents darker than the original.... Understanding the Tool Box Menus 457 For documents containing extremely fine detail. For documents containing photographic images. Works well with light print or faint pencil markings. Lighter 1 Normal* Works well with normal sized characters. Super Fine Improves the output quality of ...
...enabled only if the remote machine also supports the Super Fine resolution. Works well with dark print. For documents containing small characters or thin lines or documents printed using a dot-matrix printer. Darker 1 Darker 2 Makes the documents darker than the original.... Understanding the Tool Box Menus 457 For documents containing extremely fine detail. For documents containing photographic images. Works well with light print or faint pencil markings. Lighter 1 Normal* Works well with normal sized characters. Super Fine Improves the output quality of ...
User Manual
Page 466
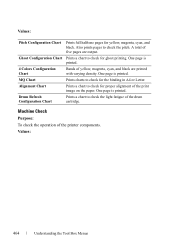
..., cyan, and black are output. Alignment Chart Prints a chart to check for yellow, magenta, cyan, and black. One page is printed. Also prints pages to check the light fatigue of the printer components. MQ Chart Prints charts to check for ghost printing. One page is printed. Values: Pitch Configuration Chart Prints full halftone pages for the binding in...
..., cyan, and black are output. Alignment Chart Prints a chart to check for yellow, magenta, cyan, and black. One page is printed. Also prints pages to check the light fatigue of the printer components. MQ Chart Prints charts to check for ghost printing. One page is printed. Values: Pitch Configuration Chart Prints full halftone pages for the binding in...
User Manual
Page 503
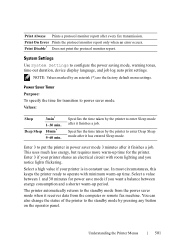
... on the operator panel. Understanding the Printer Menus 501 Deep Sleep 10min* 5-60 min. Enter 3 to operate with room lighting and you want a balance between 1 and 30 minutes for the printer. Print Always Prints a protocol monitor report after it finishes a job. Specifies the time taken by the printer to the standby mode from...
... on the operator panel. Understanding the Printer Menus 501 Deep Sleep 10min* 5-60 min. Enter 3 to operate with room lighting and you want a balance between 1 and 30 minutes for the printer. Print Always Prints a protocol monitor report after it finishes a job. Specifies the time taken by the printer to the standby mode from...
User Manual
Page 515
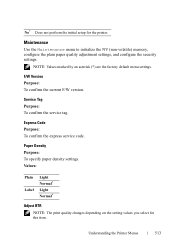
... Purpose: To confirm the express service code. NOTE: Values marked by an asterisk (*) are the factory default menu settings. Values: Plain Label Light Normal* Light Normal* Adjust BTR NOTE: The print quality changes depending on the setting values you select for the printer. Maintenance Use the Maintenance menu to initialize the NV (non...
... Purpose: To confirm the express service code. NOTE: Values marked by an asterisk (*) are the factory default menu settings. Values: Plain Label Light Normal* Light Normal* Adjust BTR NOTE: The print quality changes depending on the setting values you select for the printer. Maintenance Use the Maintenance menu to initialize the NV (non...
User Manual
Page 541
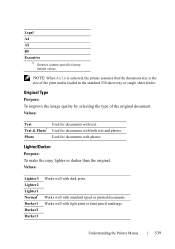
...the standard 250-sheet tray or single sheet feeder. Values: Text Text & Photo* Photo Used for documents with standard typed or printed documents. Works well with text. NOTE: When Auto is selected, the printer assumes that the document size is the size of the...Lighter/Darker Purpose: To make the copy lighter or darker than the original. Works well with dark print. Values: Lighter3 Lighter2 Lighter1 Normal* Darker1 Darker2 Darker3 Works well with light print or faint pencil markings. Understanding the Printer Menus 539 Legal A4 A5 B5 Executive *1 Denotes country-...
...the standard 250-sheet tray or single sheet feeder. Values: Text Text & Photo* Photo Used for documents with standard typed or printed documents. Works well with text. NOTE: When Auto is selected, the printer assumes that the document size is the size of the...Lighter/Darker Purpose: To make the copy lighter or darker than the original. Works well with dark print. Values: Lighter3 Lighter2 Lighter1 Normal* Darker1 Darker2 Darker3 Works well with light print or faint pencil markings. Understanding the Printer Menus 539 Legal A4 A5 B5 Executive *1 Denotes country-...
User Manual
Page 548
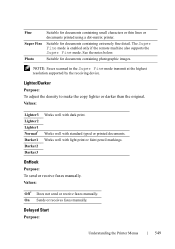
... Lighter3 Lighter2 Lighter1 Normal* Darker1 Darker2 Darker3 Works well with standard typed or printed documents. Sharpness Purpose: To adjust the sharpness to make the scanned image sharper... the amount of colors to make the scanned image lighter or darker than the original. Works well with dark print. Values: Sharper Normal* Softer Makes the scanned image sharper than the original. Lighter/Darker Purpose: To adjust ...contrast of colors darker or lighter than the original. Works well with light print or faint pencil markings. Makes the scanned image softer than the original.
... Lighter3 Lighter2 Lighter1 Normal* Darker1 Darker2 Darker3 Works well with standard typed or printed documents. Sharpness Purpose: To adjust the sharpness to make the scanned image sharper... the amount of colors to make the scanned image lighter or darker than the original. Works well with dark print. Values: Sharper Normal* Softer Makes the scanned image sharper than the original. Lighter/Darker Purpose: To adjust ...contrast of colors darker or lighter than the original. Works well with light print or faint pencil markings. Makes the scanned image softer than the original.
User Manual
Page 551
... highest resolution supported by the receiving device. Values: Lighter3 Lighter2 Lighter1 Normal* Darker1 Darker2 Darker3 Works well with standard typed or printed documents. Values: Off* Does not send or receive faxes manually. Delayed Start Purpose: Understanding the Printer Menus 549 The Super... Fine mode is enabled only if the remote machine also supports the Super Fine mode. Works well with light print or faint pencil markings. Suitable for documents containing extremely fine detail. Suitable for documents containing photographic images. On Sends or ...
... highest resolution supported by the receiving device. Values: Lighter3 Lighter2 Lighter1 Normal* Darker1 Darker2 Darker3 Works well with standard typed or printed documents. Values: Off* Does not send or receive faxes manually. Delayed Start Purpose: Understanding the Printer Menus 549 The Super... Fine mode is enabled only if the remote machine also supports the Super Fine mode. Works well with light print or faint pencil markings. Suitable for documents containing extremely fine detail. Suitable for documents containing photographic images. On Sends or ...

User Manual
Page 621
... the printer. Maintaining Your Printer 619 Hold the standard 250-sheet tray with both hands, and remove it from your Product Information Guide. Replacing the Print Head Device (PHD) Unit CAUTION: Before performing any of the belt unit. NOTICE: Ensure nothing touches or scratches the surface (black-colored film) of the... procedures, read and follow the safety instructions in your hands on the film of the printer about 200 mm. NOTICE: Protect the drums of the Print Head Device (PHD) against bright light. If the front cover remains open for more than three minutes...
... the printer. Maintaining Your Printer 619 Hold the standard 250-sheet tray with both hands, and remove it from your Product Information Guide. Replacing the Print Head Device (PHD) Unit CAUTION: Before performing any of the belt unit. NOTICE: Ensure nothing touches or scratches the surface (black-colored film) of the... procedures, read and follow the safety instructions in your hands on the film of the printer about 200 mm. NOTICE: Protect the drums of the Print Head Device (PHD) against bright light. If the front cover remains open for more than three minutes...
User Manual
Page 663
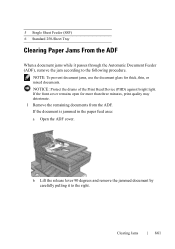
If the front cover remains open for thick, thin, or mixed documents. NOTICE: Protect the drums of the Print Head Device (PHD) against bright light. If the document is jammed in the paper feed area: a Open the ADF cover. D E L L C ON F I D E N T I N A RY 9 / 1 3 / 1 0 - FILE LOCATION: C:\Users\fxstdpcadmin\Desktop\0630_UG??\...jam according to the right. F O R P R O O F O N LY Clearing Jams 661 P R E L I M I A L - NOTE: To prevent document jams, use the document glass for more than three minutes, print quality may deteriorate. 1 Remove the remaining documents from the ADF.
If the front cover remains open for thick, thin, or mixed documents. NOTICE: Protect the drums of the Print Head Device (PHD) against bright light. If the document is jammed in the paper feed area: a Open the ADF cover. D E L L C ON F I D E N T I N A RY 9 / 1 3 / 1 0 - FILE LOCATION: C:\Users\fxstdpcadmin\Desktop\0630_UG??\...jam according to the right. F O R P R O O F O N LY Clearing Jams 661 P R E L I M I A L - NOTE: To prevent document jams, use the document glass for more than three minutes, print quality may deteriorate. 1 Remove the remaining documents from the ADF.
User Manual
Page 666
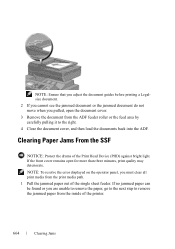
...LIMINARY 9/13/10 - If the front cover remains open the document cover. 3 Remove the document from the inside of the Print Head Device (PHD) against bright light. DE LL CONFIDENTIAL - NOTE: To resolve the error displayed on the operator panel, you are unable to remove the paper, ...back into the ADF. FILE LOCATION: C:\Users\fxstdpcadmin\Desktop\0630_UG??\Mioga_AIO_UG_FM\Mioga_AIO_UG_FM\section30.fm NOTE: Ensure that you adjust the document guides before printing a Legalsize document. 2 If you cannot see the jammed document or the jammed document do not move when you pulled, open for more...
...LIMINARY 9/13/10 - If the front cover remains open the document cover. 3 Remove the document from the inside of the Print Head Device (PHD) against bright light. DE LL CONFIDENTIAL - NOTE: To resolve the error displayed on the operator panel, you are unable to remove the paper, ...back into the ADF. FILE LOCATION: C:\Users\fxstdpcadmin\Desktop\0630_UG??\Mioga_AIO_UG_FM\Mioga_AIO_UG_FM\section30.fm NOTE: Ensure that you adjust the document guides before printing a Legalsize document. 2 If you cannot see the jammed document or the jammed document do not move when you pulled, open for more...


