User Manual
Page 7
FILE LOCATION: C:\Users\fxstdpc-admin\Desktop\0630_UG??\Mioga_AIO_UG_FM\Mioga_AIO _UG_FM\Mioga-AIO-UGTOC.fm Setting Up the Queue 151 Setting the Default Queue 152 Specifying the Printing Options 152 Setting the Password for Authority as the Printer Administrator 153 Uninstalling the Printer Driver 153 Operation ...154 Setting Up the Queue 154 Setting the Default Queue 156 Specifying the Printing Options 156 Setting the Password for Authority as the Printer Administrator 157 Uninstalling the Printer Driver 157 Using Your Printer 159 13 Dell Printer Configuration Web Tool . 161 Overview ...
FILE LOCATION: C:\Users\fxstdpc-admin\Desktop\0630_UG??\Mioga_AIO_UG_FM\Mioga_AIO _UG_FM\Mioga-AIO-UGTOC.fm Setting Up the Queue 151 Setting the Default Queue 152 Specifying the Printing Options 152 Setting the Password for Authority as the Printer Administrator 153 Uninstalling the Printer Driver 153 Operation ...154 Setting Up the Queue 154 Setting the Default Queue 156 Specifying the Printing Options 156 Setting the Password for Authority as the Printer Administrator 157 Uninstalling the Printer Driver 157 Using Your Printer 159 13 Dell Printer Configuration Web Tool . 161 Overview ...
User Manual
Page 12
... 331 Changing the Default Settings 331 Setting the Power Saver Timer Option 332 19 Scanning 335 Scanning Overview 335 Scanning - With scanner driver 335 Scanning - Without scanner driver 336 Scanning From the Operator Panel 337 Scanning Using the TWAIN Driver 339 Scan Setting Tool 342 IP Address Settings 343 Password Setting 345...
... 331 Changing the Default Settings 331 Setting the Power Saver Timer Option 332 19 Scanning 335 Scanning Overview 335 Scanning - With scanner driver 335 Scanning - Without scanner driver 336 Scanning From the Operator Panel 337 Scanning Using the TWAIN Driver 339 Scan Setting Tool 342 IP Address Settings 343 Password Setting 345...

User Manual
Page 19
FILE LOCATION: C:\Users\fxstdpc-admin\Desktop\0630_UG??\Mioga_AIO_UG_FM\Mioga_AIO _UG_FM\Mioga-AIO-UGTOC.fm Sharpness 546 Contrast 546 Auto Exposure 547 Margin Top/Bottom 547 Margin Left/Right 547 Margin ... Page 550 Print from USB Menu 550 Document 550 Select Tray 551 SSF Paper Size 551 SSF Paper Type 552 2Sided 552 Layout 553 PDF Password 553 Panel Lock 553 Enabling the Panel Lock 553 Disabling the Panel Lock 554 Resetting Defaults 555 When Using the Operator Panel 555 Contents 17
FILE LOCATION: C:\Users\fxstdpc-admin\Desktop\0630_UG??\Mioga_AIO_UG_FM\Mioga_AIO _UG_FM\Mioga-AIO-UGTOC.fm Sharpness 546 Contrast 546 Auto Exposure 547 Margin Top/Bottom 547 Margin Left/Right 547 Margin ... Page 550 Print from USB Menu 550 Document 550 Select Tray 551 SSF Paper Size 551 SSF Paper Type 552 2Sided 552 Layout 553 PDF Password 553 Panel Lock 553 Enabling the Panel Lock 553 Disabling the Panel Lock 554 Resetting Defaults 555 When Using the Operator Panel 555 Contents 17
User Manual
Page 154
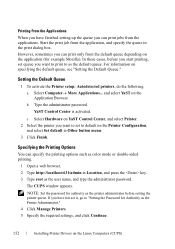
...admin in the print dialog box. If you have finished setting up the queue you can print only from the application, and specify the queue in Location, and press the key. 3 Type root as the default queue. and select YaST on the Linux Computers (CUPS) b Type the administrator password...you have not set to as the user name, and type the administrator password. Start the print job from the default queue depending on specifying the default queue, see "Setting the Default Queue." Setting the Default Queue 1 To activate the Printer setup: Autodetected printers, do the following....
...admin in the print dialog box. If you have finished setting up the queue you can print only from the application, and specify the queue in Location, and press the key. 3 Type root as the default queue. and select YaST on the Linux Computers (CUPS) b Type the administrator password...you have not set to as the user name, and type the administrator password. Start the print job from the default queue depending on specifying the default queue, see "Setting the Default Queue." Setting the Default Queue 1 To activate the Printer setup: Autodetected printers, do the following....
User Manual
Page 158
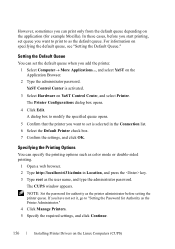
...61614; More Applications..., and select YaST on the Application Browser. 2 Type the administrator password. FOR PROOF ONLY 156 Installing Printer Drivers on specifying the default queue, see "Setting the Default Queue." YaST Control Center is selected in Location, and press the key. 3 Type... options such as color mode or double-sided printing. 1 Open a web browser. 2 Type http://localhost:631/admin in the Connection list. 6 Select the Default Printer check box. 7 Confirm the settings, and click OK. FILE LOCATION: C:\Users\fxstdpcadmin\Desktop\0630_UG??\Mioga_AIO_UG_FM\Mioga_AIO_UG_FM...
...61614; More Applications..., and select YaST on the Application Browser. 2 Type the administrator password. FOR PROOF ONLY 156 Installing Printer Drivers on specifying the default queue, see "Setting the Default Queue." YaST Control Center is selected in Location, and press the key. 3 Type... options such as color mode or double-sided printing. 1 Open a web browser. 2 Type http://localhost:631/admin in the Connection list. 6 Select the Default Printer check box. 7 Confirm the settings, and click OK. FILE LOCATION: C:\Users\fxstdpcadmin\Desktop\0630_UG??\Mioga_AIO_UG_FM\Mioga_AIO_UG_FM...

User Manual
Page 175
Details of the Menu Items "Printer Status" "Printer Status" "Printer Jobs" "Printer Jobs" "Printer Status" "Printer Events" "Printer Information" "Job List" "Completed Jobs" Dell Printer Configuration Web Tool 173 You can change only the password in the Set Password page in the Security menu. See "Set Password" for more information. The default user name is admin, and the default password is left blank (NULL). The user name cannot be changed.
Details of the Menu Items "Printer Status" "Printer Status" "Printer Jobs" "Printer Jobs" "Printer Status" "Printer Events" "Printer Information" "Job List" "Completed Jobs" Dell Printer Configuration Web Tool 173 You can change only the password in the Set Password page in the Security menu. See "Set Password" for more information. The default user name is admin, and the default password is left blank (NULL). The user name cannot be changed.

User Manual
Page 363
... in the IP address of the Printer." 3 Click Address Book. F O R P R O O F O N LY Scanning 361 Using Dell Printer Configuration Web Tool 1 Open a web browser. 2 Type in the correct User Name and Password. NOTE: The default user name is "admin", and the default password is left blank (NULL). 4 Click the Server Address tab, and then click a Create button. The...
... in the IP address of the Printer." 3 Click Address Book. F O R P R O O F O N LY Scanning 361 Using Dell Printer Configuration Web Tool 1 Open a web browser. 2 Type in the correct User Name and Password. NOTE: The default user name is "admin", and the default password is left blank (NULL). 4 Click the Server Address tab, and then click a Create button. The...

User Manual
Page 521
... printer is being changed accidentally. Adjustments are the factory default menu settings. See also: "Panel Lock" Panel Lock Purpose: To set a limited access to Admin Menu with barometric pressure. NOTE: An incorrect altitude adjustment setting leads to set a password to limit access to access Admin Menu. The discharge phenomenon for charging the photo conductor...
... printer is being changed accidentally. Adjustments are the factory default menu settings. See also: "Panel Lock" Panel Lock Purpose: To set a limited access to Admin Menu with barometric pressure. NOTE: An incorrect altitude adjustment setting leads to set a password to limit access to access Admin Menu. The discharge phenomenon for charging the photo conductor...

User Manual
Page 557
...and then press the (Set) button. 3 Press button until Admin Menu is highlighted, and then press the (Set) button. 4 Press button until Maintenance is highlighted, and then press the (Set) button. 5 Press button until Reset Defaults is highlighted, and then press the (Set) button. 6...button. 8 Enter the current password, and then press the (Set) button. 7 Ensure that Disable is highlighted, and then press the (Set) button. Understanding the Printer Menus 555 The setting has been changed. The printer is restarted automatically. Resetting Defaults After executing this function and ...
...and then press the (Set) button. 3 Press button until Admin Menu is highlighted, and then press the (Set) button. 4 Press button until Maintenance is highlighted, and then press the (Set) button. 5 Press button until Reset Defaults is highlighted, and then press the (Set) button. 6...button. 8 Enter the current password, and then press the (Set) button. 7 Ensure that Disable is highlighted, and then press the (Set) button. Understanding the Printer Menus 555 The setting has been changed. The printer is restarted automatically. Resetting Defaults After executing this function and ...

User Manual
Page 757
...13/10 FOR PROOF ONLY Index 755 FILE LOCATION: C:\Users\fxstdpc-admin\Desktop\0630_UG??\Mioga_AIO_UG_FM\Mioga_AIO_UG_FM\Miog a-AIO-UGIX.fm R Remote Receive ...Delay, 188, 206, 432, 461, 493 Reduce/Enlarge, 185, 201, 428, 449, 537 Re-enter Password, 199 Refresh, 172 REGI CLUTCH Operation Check, 465 Removing toner cartridge, 616 Removing wireless adapter, 654 Replacing ..., 627 Reports, 194 Resend Delay, 188, 206, 432, 461, 493 Reset Defaults, 213, 442 Reset Print Server, 238 Resetting Defaults, 308 Registration Adjustments, 441 Resident font, 585 Regular, 193 Resident scalable fonts, 585...
...13/10 FOR PROOF ONLY Index 755 FILE LOCATION: C:\Users\fxstdpc-admin\Desktop\0630_UG??\Mioga_AIO_UG_FM\Mioga_AIO_UG_FM\Miog a-AIO-UGIX.fm R Remote Receive ...Delay, 188, 206, 432, 461, 493 Reduce/Enlarge, 185, 201, 428, 449, 537 Re-enter Password, 199 Refresh, 172 REGI CLUTCH Operation Check, 465 Removing toner cartridge, 616 Removing wireless adapter, 654 Replacing ..., 627 Reports, 194 Resend Delay, 188, 206, 432, 461, 493 Reset Defaults, 213, 442 Reset Print Server, 238 Resetting Defaults, 308 Registration Adjustments, 441 Resident font, 585 Regular, 193 Resident scalable fonts, 585...

User Manual
Page 758
...498/183/10 FOR PROOF ONLY Index 756 FILE LOCATION: C:\Users\fxstdpc-admin\Desktop\0630_UG??\Mioga_AIO_UG_FM\Mioga_AIO_UG_FM\Miog a-AIO-UGIX.fm Return policy, 740 ...BSAFE, 28 Sending print job, 292 Sent Fax Forward, 189, 206 S Safety information, 32 Scalable font, 583 Scan Defaults, 190, 429 Scan to Application, 543 Scan to E-mail, 542 Scan To Network, 429 Scan to Network, 190...425, 438 Service code, 33 Service tag, 33 Set Available Time, 200 Set Date, 192, 425, 440 Set Password, 165, 171, 238 Scan to USB Memory, 542 Set Time, 192, 425, 440 ScanButton Manager, 560 Shared printing...
...498/183/10 FOR PROOF ONLY Index 756 FILE LOCATION: C:\Users\fxstdpc-admin\Desktop\0630_UG??\Mioga_AIO_UG_FM\Mioga_AIO_UG_FM\Miog a-AIO-UGIX.fm Return policy, 740 ...BSAFE, 28 Sending print job, 292 Sent Fax Forward, 189, 206 S Safety information, 32 Scalable font, 583 Scan Defaults, 190, 429 Scan to Application, 543 Scan to E-mail, 542 Scan To Network, 429 Scan to Network, 190...425, 438 Service code, 33 Service tag, 33 Set Available Time, 200 Set Date, 192, 425, 440 Set Password, 165, 171, 238 Scan to USB Memory, 542 Set Time, 192, 425, 440 ScanButton Manager, 560 Shared printing...


