User Manual
Page 674
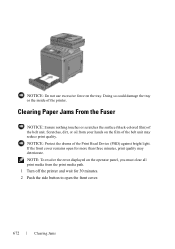
...the error displayed on the operator panel, you must clear all print media from your hands on the tray. Clearing Paper Jams From the Fuser NOTICE: Ensure nothing touches or scratches the surface (black-colored film) of the Print Head Device (PHD) against bright light. NOTICE: ...10 - FILE LOCATION: C:\Users\fxstdpcadmin\Desktop\0630_UG??\Mioga_AIO_UG_FM\Mioga_AIO_UG_FM\section30.fm NOTICE: Do not use excessive force on the film of the belt unit may deteriorate. Doing so could damage the tray or the inside of the printer. DE LL CONFIDENTIAL - FOR PROOF ONLY 672 Clearing Jams ...
...the error displayed on the operator panel, you must clear all print media from your hands on the tray. Clearing Paper Jams From the Fuser NOTICE: Ensure nothing touches or scratches the surface (black-colored film) of the Print Head Device (PHD) against bright light. NOTICE: ...10 - FILE LOCATION: C:\Users\fxstdpcadmin\Desktop\0630_UG??\Mioga_AIO_UG_FM\Mioga_AIO_UG_FM\section30.fm NOTICE: Do not use excessive force on the film of the belt unit may deteriorate. Doing so could damage the tray or the inside of the printer. DE LL CONFIDENTIAL - FOR PROOF ONLY 672 Clearing Jams ...

User Manual
Page 675
FILE LOCATION: C:\Users\fxstdpcadmin\Desktop\0630_UG??\Mioga_AIO_UG_FM\Mioga_AIO_UG_FM\section30.fm 3 Open the belt unit. 4 Lift the levers at both ends of the fuser, and remove the jammed paper. P R E L I M I A L - F O R P R O O F O N LY Clearing Jams 673 If you are still unable to remove the paper, go to the next step. D E L L C ON F I D E N T I N A RY 9 / 1 3 / 1 0 -
FILE LOCATION: C:\Users\fxstdpcadmin\Desktop\0630_UG??\Mioga_AIO_UG_FM\Mioga_AIO_UG_FM\section30.fm 3 Open the belt unit. 4 Lift the levers at both ends of the fuser, and remove the jammed paper. P R E L I M I A L - F O R P R O O F O N LY Clearing Jams 673 If you are still unable to remove the paper, go to the next step. D E L L C ON F I D E N T I N A RY 9 / 1 3 / 1 0 -
User Manual
Page 701
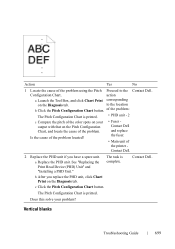
... of the problem located? • Fuser Contact Dell and replace the fuser. • Main unit of the problem using the Pitch Proceed to the location b Click the Pitch Configuration Chart button. See "Replacing the Print Head Device (PHD) Unit" and "Installing a PHD Unit." action a Launch the Tool Box,... cause of the problem: The Pitch Configuration Chart is printed. Contact Dell. 2 Replace the PHD unit if you replace the PHD unit, click Chart Print on your problem? The Pitch Configuration Chart is printed. • PHD unit - 2 c Compare the pitch of the color spots on the ...
... of the problem located? • Fuser Contact Dell and replace the fuser. • Main unit of the problem using the Pitch Proceed to the location b Click the Pitch Configuration Chart button. See "Replacing the Print Head Device (PHD) Unit" and "Installing a PHD Unit." action a Launch the Tool Box,... cause of the problem: The Pitch Configuration Chart is printed. Contact Dell. 2 Replace the PHD unit if you replace the PHD unit, click Chart Print on your problem? The Pitch Configuration Chart is printed. • PHD unit - 2 c Compare the pitch of the color spots on the ...
User Manual
Page 708
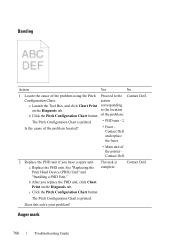
... Chart. See "Replacing the Print Head Device (PHD) Unit" and "Installing a PHD Unit." Auger mark DE LL CONFIDENTIAL - of the problem: The Pitch Configuration Chart is printed. • PHD unit - 2 Is the cause of the problem located? • Fuser Contact Dell and replace the fuser. • Main unit of the problem using the Pitch Proceed to the...
... Chart. See "Replacing the Print Head Device (PHD) Unit" and "Installing a PHD Unit." Auger mark DE LL CONFIDENTIAL - of the problem: The Pitch Configuration Chart is printed. • PHD unit - 2 Is the cause of the problem located? • Fuser Contact Dell and replace the fuser. • Main unit of the problem using the Pitch Proceed to the...


