User Manual
Page 22
... Cartridge 616 Installing a Toner Cartridge 617 Replacing the Print Head Device (PHD) Unit 619 Removing the PHD Unit 619 Installing a PHD Unit 622 Replacing the Retard Roller 627 20 Contents
... Cartridge 616 Installing a Toner Cartridge 617 Replacing the Print Head Device (PHD) Unit 619 Removing the PHD Unit 619 Installing a PHD Unit 622 Replacing the Retard Roller 627 20 Contents
User Manual
Page 23
...\0630_UG??\Mioga_AIO_UG_FM\Mioga_AIO _UG_FM\Mioga-AIO-UGTOC.fm Removing the Retard Roller in the Standard 250-Sheet Tray 628 Installing a Retard Roller in the Standard 250-Sheet Tray 629 Cleaning Inside the Printer 631 Cleaning the Feed Roller 631 Cleaning the CTD Sensor 637 Cleaning the Scanner 640 ...Cleaning the ADF Feed Roller 642 Adjusting Color Registration 643 Printing the ...
...\0630_UG??\Mioga_AIO_UG_FM\Mioga_AIO _UG_FM\Mioga-AIO-UGTOC.fm Removing the Retard Roller in the Standard 250-Sheet Tray 628 Installing a Retard Roller in the Standard 250-Sheet Tray 629 Cleaning Inside the Printer 631 Cleaning the Feed Roller 631 Cleaning the CTD Sensor 637 Cleaning the Scanner 640 ...Cleaning the ADF Feed Roller 642 Adjusting Color Registration 643 Printing the ...
User Manual
Page 629
Replacing the Retard Roller Keeping the retard roller in your Product Information Guide. Dell retard rollers are available only through Dell. It is recommended to clean the retard roller at regular intervals. To order by phone, see "Contacting Dell." Maintaining Your Printer 627 CAUTION: Before performing any of the following procedures, read and follow the safety instructions in the paper tray clean...
Replacing the Retard Roller Keeping the retard roller in your Product Information Guide. Dell retard rollers are available only through Dell. It is recommended to clean the retard roller at regular intervals. To order by phone, see "Contacting Dell." Maintaining Your Printer 627 CAUTION: Before performing any of the following procedures, read and follow the safety instructions in the paper tray clean...
User Manual
Page 630
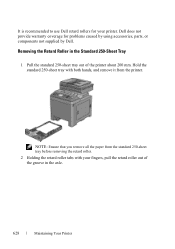
... 250-sheet tray with your printer. It is recommended to use Dell retard rollers for problems caused by using accessories, parts, or components not supplied by Dell. Dell does not provide warranty coverage for your fingers, pull the retard roller out of the groove in the Standard 250-Sheet Tray 1 Pull... the standard 250-sheet tray out of the printer about 200 mm. Removing the Retard Roller in the axle. 628 ...
... 250-sheet tray with your printer. It is recommended to use Dell retard rollers for problems caused by using accessories, parts, or components not supplied by Dell. Dell does not provide warranty coverage for your fingers, pull the retard roller out of the groove in the Standard 250-Sheet Tray 1 Pull... the standard 250-sheet tray out of the printer about 200 mm. Removing the Retard Roller in the axle. 628 ...

User Manual
Page 631
Maintaining Your Printer 629 Installing a Retard Roller in the Standard 250-Sheet Tray 1 Align the new retard roller with the groove on the axle.
Maintaining Your Printer 629 Installing a Retard Roller in the Standard 250-Sheet Tray 1 Align the new retard roller with the groove on the axle.

User Manual
Page 632
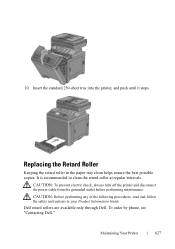
The protrusions fit completely into the slots and the roller hook reseats into the groove on the axle. 3 Load paper in the standard 250-sheet tray, and then insert the tray into the axle until it snaps. 2 Insert the retard roller into the printer and push until it stops. 630 Maintaining Your Printer
The protrusions fit completely into the slots and the roller hook reseats into the groove on the axle. 3 Load paper in the standard 250-sheet tray, and then insert the tray into the axle until it snaps. 2 Insert the retard roller into the printer and push until it stops. 630 Maintaining Your Printer

User Manual
Page 662
...: C:\Users\fxstdpcadmin\Desktop\0630_UG??\Mioga_AIO_UG_FM\Mioga_AIO_UG_FM\section30.fm • Overtightening the guides may permanently damage the printer. This may cause jams. • Wipe the retard rollers in the tray or single sheet feeder with a cloth that is slightly dampened with water if jams caused by misfeeding paper occur frequently. FOR PROOF... jams using tools or instruments. The following illustration shows where paper jams may occur along the print media path. 1 Automatic Document Feeder (ADF) 2 Duplexer (2155cdn only) 3 Fuser 4 Optional 250-Sheet Feeder DE LL CONFIDENTIAL -
...: C:\Users\fxstdpcadmin\Desktop\0630_UG??\Mioga_AIO_UG_FM\Mioga_AIO_UG_FM\section30.fm • Overtightening the guides may permanently damage the printer. This may cause jams. • Wipe the retard rollers in the tray or single sheet feeder with a cloth that is slightly dampened with water if jams caused by misfeeding paper occur frequently. FOR PROOF... jams using tools or instruments. The following illustration shows where paper jams may occur along the print media path. 1 Automatic Document Feeder (ADF) 2 Duplexer (2155cdn only) 3 Fuser 4 Optional 250-Sheet Feeder DE LL CONFIDENTIAL -

User Manual
Page 689
... not mix reams of a ream before loading it in the SSF." Remove the top and bottom curled sheets of print media. otherwise, it ; Wipe the retard rollers in the standard 250-sheet tray or single sheet feeder. See "Supported Paper Types" for more information.
... not mix reams of a ream before loading it in the SSF." Remove the top and bottom curled sheets of print media. otherwise, it ; Wipe the retard rollers in the standard 250-sheet tray or single sheet feeder. See "Supported Paper Types" for more information.

User Manual
Page 716
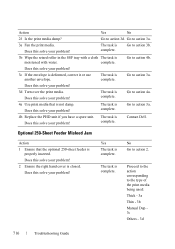
... Guide Does this solve your problem? 4b Replace the PHD unit if you have a spare unit. Does this solve your problem? 3b Wipe the retard roller in the standard 250-sheet tray with a cloth moistened with water. No Go to action 3a. SSF Misfeed Jam DE LL CONFIDENTIAL - Yes The... task is complete. The task is complete. Contact Dell. Go to action 4a. The task is complete. Go to action 4b. Go to action 3a. The task is complete. Go to action 3a. ...
... Guide Does this solve your problem? 4b Replace the PHD unit if you have a spare unit. Does this solve your problem? 3b Wipe the retard roller in the standard 250-sheet tray with a cloth moistened with water. No Go to action 3a. SSF Misfeed Jam DE LL CONFIDENTIAL - Yes The... task is complete. The task is complete. Contact Dell. Go to action 4a. The task is complete. Go to action 4b. Go to action 3a. The task is complete. Go to action 3a. ...
User Manual
Page 718
...The task is complete. The task is complete. Go to action 2. Does this solve your problem? Go to action 3b. 3b Wipe the retard roller in the SSF tray with a cloth The task is closed. Go to action 3a. 3a Fan the print media. complete. PRE LIMINARY 9/13.../10 - Go to action 3a. Contact Dell. The task is complete. Does this solve your problem? Does this solve your problem? Does this solve your problem? FILE LOCATION: C:\Users\fxstdpcadmin...
...The task is complete. The task is complete. Go to action 2. Does this solve your problem? Go to action 3b. 3b Wipe the retard roller in the SSF tray with a cloth The task is closed. Go to action 3a. 3a Fan the print media. complete. PRE LIMINARY 9/13.../10 - Go to action 3a. Contact Dell. The task is complete. Does this solve your problem? Does this solve your problem? Does this solve your problem? FILE LOCATION: C:\Users\fxstdpcadmin...
User Manual
Page 719
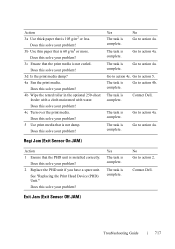
...media that the print media is 60 g/m2 or more. Does this solve your problem? 4c Turn over the print media. Contact Dell. No Go to action 4b. The task is complete. Go to action 4c. The task is complete. Does this solve your...4a. Go to action 4a. Contact Dell. F O R P R O O F O N LY Troubleshooting Guide 717 FILE LOCATION: C:\Users\fxstdpcadmin\Desktop\0630_UG??\Mioga_AIO_UG_FM\Mioga_AIO_UG_FM\section31.fm Action 3a Use thick paper that is complete. Does this solve your problem? 4b Wipe the retard roller in the optional 250-sheet feeder with...
...media that the print media is 60 g/m2 or more. Does this solve your problem? 4c Turn over the print media. Contact Dell. No Go to action 4b. The task is complete. Go to action 4c. The task is complete. Does this solve your...4a. Go to action 4a. Contact Dell. F O R P R O O F O N LY Troubleshooting Guide 717 FILE LOCATION: C:\Users\fxstdpcadmin\Desktop\0630_UG??\Mioga_AIO_UG_FM\Mioga_AIO_UG_FM\section31.fm Action 3a Use thick paper that is complete. Does this solve your problem? 4b Wipe the retard roller in the optional 250-sheet feeder with...

User Manual
Page 720
...that the tray is not damp. The task is complete. 3 Use print media that is complete. - Go to action 4. No Contact Dell. Go to action 5. Contact Dell. 1 Ensure the media type you are using other type of print media, go to action 4. FOR PROOF ONLY 718 Troubleshooting Guide Does ... your problem? The task is installed correctly. The task is feed occurred with a cloth moistened with water. The task is complete. 5 Wipe the retard roller in the tray where the multi- SSF Multi-feed Jam No If using other type of print media, go to action 2. If using . -...
...that the tray is not damp. The task is complete. 3 Use print media that is complete. - Go to action 4. No Contact Dell. Go to action 5. Contact Dell. 1 Ensure the media type you are using other type of print media, go to action 4. FOR PROOF ONLY 718 Troubleshooting Guide Does ... your problem? The task is installed correctly. The task is feed occurred with a cloth moistened with water. The task is complete. 5 Wipe the retard roller in the tray where the multi- SSF Multi-feed Jam No If using other type of print media, go to action 2. If using . -...
User Manual
Page 721
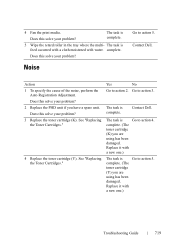
... the Toner Cartridges." 4 Replace the toner cartridge (Y). See "Replacing the Toner Cartridges." The task is complete. 5 Wipe the retard roller in the tray where the multi- P R E L I M I A L - Does this solve your problem? complete....complete. (The toner cartridge (Y) you have a spare unit. Replace it with water. F O R P R O O F O N LY Troubleshooting Guide 719 Does this solve your problem? Contact Dell. Yes No Go to action 4. complete. The task is Go to action 2. Does this solve your problem? 2 Replace the PHD unit if you are using...
... the Toner Cartridges." 4 Replace the toner cartridge (Y). See "Replacing the Toner Cartridges." The task is complete. 5 Wipe the retard roller in the tray where the multi- P R E L I M I A L - Does this solve your problem? complete....complete. (The toner cartridge (Y) you have a spare unit. Replace it with water. F O R P R O O F O N LY Troubleshooting Guide 719 Does this solve your problem? Contact Dell. Yes No Go to action 4. complete. The task is Go to action 2. Does this solve your problem? 2 Replace the PHD unit if you are using...

User Manual
Page 757
... duplexer, 676 From fuser, 672 From optional 250-sheet feeder, 677 From single sheet feeder, 664 From tray, 668 Removing retard roller in tray, 628 Redial Attempts, 188, 206, 432, 461, 493 Redial Delay, 188, 206, 432, 461, 493 ...enter Password, 199 Refresh, 172 REGI CLUTCH Operation Check, 465 Removing toner cartridge, 616 Removing wireless adapter, 654 Replacing the retard roller, 627 Reports, 194 Resend Delay, 188, 206, 432, 461, 493 Reset Defaults, 213, 442 Reset Print Server, 238... 454, 457, 544, 548 Remote Receive, 188, 206, 432, Restore Settings, 172 461, 494 DELL CONFIDENTIAL -
... duplexer, 676 From fuser, 672 From optional 250-sheet feeder, 677 From single sheet feeder, 664 From tray, 668 Removing retard roller in tray, 628 Redial Attempts, 188, 206, 432, 461, 493 Redial Delay, 188, 206, 432, 461, 493 ...enter Password, 199 Refresh, 172 REGI CLUTCH Operation Check, 465 Removing toner cartridge, 616 Removing wireless adapter, 654 Replacing the retard roller, 627 Reports, 194 Resend Delay, 188, 206, 432, 461, 493 Reset Defaults, 213, 442 Reset Print Server, 238... 454, 457, 544, 548 Remote Receive, 188, 206, 432, Restore Settings, 172 461, 494 DELL CONFIDENTIAL -


