Owners Manual
Page 1
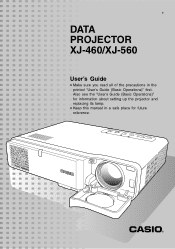
E DATA PROJECTOR XJ-460/XJ-560 User's Guide • Make sure you read all of the precautions in a safe place for future reference. Also see the "User's Guide (Basic Operations)" for information about setting up the projector and replacing its lamp. • Keep this manual in the printed "User's Guide (Basic Operations)" first.
E DATA PROJECTOR XJ-460/XJ-560 User's Guide • Make sure you read all of the precautions in a safe place for future reference. Also see the "User's Guide (Basic Operations)" for information about setting up the projector and replacing its lamp. • Keep this manual in the printed "User's Guide (Basic Operations)" first.
Owners Manual
Page 22
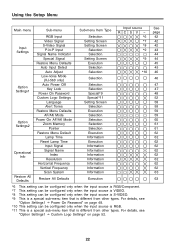
...Input Video Signal S-Video Signal P-in-P Input Signal Name Indicator Special Signal Restore Menu Defaults Auto Input Detect Auto Adjust Low-noise Mode (XJ-560 only) Auto Power Off Key Lock Power On Password Custom Logo Settings Language Alert Tones Restore Menu Defaults AF/AK Mode Power On... AF/AK Mode Zoom Memory Pointer Restore Menu Default Lamp Time Reset Lamp Time Input Signal Signal Name Index Resolution Horizontal Frequency Vertical Frequency Scan System Restore All Defaults Sub-menu Item Type Selection Setting ...
...Input Video Signal S-Video Signal P-in-P Input Signal Name Indicator Special Signal Restore Menu Defaults Auto Input Detect Auto Adjust Low-noise Mode (XJ-560 only) Auto Power Off Key Lock Power On Password Custom Logo Settings Language Alert Tones Restore Menu Defaults AF/AK Mode Power On... AF/AK Mode Zoom Memory Pointer Restore Menu Default Lamp Time Reset Lamp Time Input Signal Signal Name Index Resolution Horizontal Frequency Vertical Frequency Scan System Restore All Defaults Sub-menu Item Type Selection Setting ...

Owners Manual
Page 28
Using the Setup Menu Execution Type Sub-menu Item This type of information that is available using the information type sub-menu items. ) Operational Info J Lamp Time (page 62) ) Operational Info J Input Signal (page 62) ) Operational Info J Signal Name (page 62) ) Operational Info J Index (page...Frequency (page 62) ) Operational Info J Vertical Frequency (page 62) ) Operational Info J Scan System (page 63) 28 Examples: Operational Info J Lamp Time; Operational Info J Input Signal Refer to the following for details about the type of sub-menu item returns a setting to its initial default ...
Using the Setup Menu Execution Type Sub-menu Item This type of information that is available using the information type sub-menu items. ) Operational Info J Lamp Time (page 62) ) Operational Info J Input Signal (page 62) ) Operational Info J Signal Name (page 62) ) Operational Info J Index (page...Frequency (page 62) ) Operational Info J Vertical Frequency (page 62) ) Operational Info J Scan System (page 63) 28 Examples: Operational Info J Lamp Time; Operational Info J Input Signal Refer to the following for details about the type of sub-menu item returns a setting to its initial default ...

Owners Manual
Page 30
...then select the "Restore All Defaults" sub-menu item. 2. Use the [S] and [T] keys to initialize all menu items except for "Language" and "Lamp Time". 30 z Note that initialization does not delete the custom logo. 1. Press the [ENTER] key. z This displays a confirmation message asking if ... select [Yes]. 4. Press the [ENTER] key to initialize all menus, except for the language (Option Settings1 J Language) and the lamp time (Operational Info J Lamp Time). Perform steps 1 through 4 under "Basic Setup Menu Operations" on page 24. Using the Setup Menu To initialize all menu settings...
...then select the "Restore All Defaults" sub-menu item. 2. Use the [S] and [T] keys to initialize all menu items except for "Language" and "Lamp Time". 30 z Note that initialization does not delete the custom logo. 1. Press the [ENTER] key. z This displays a confirmation message asking if ... select [Yes]. 4. Press the [ENTER] key to initialize all menus, except for the language (Option Settings1 J Language) and the lamp time (Operational Info J Lamp Time). Perform steps 1 through 4 under "Basic Setup Menu Operations" on page 24. Using the Setup Menu To initialize all menu settings...

Owners Manual
Page 46
Setting Storage This setting is selected as the input source. IOption Settings1 J Low-noise Mode (XJ-560 only) The low-noise mode reduces the luminosity of the projection lamp and the speed of the cooling fan, allowing quieter projector operation. Input Source Specific Menu Items Input Source RGB Component S-VIDEO VIDEO No Signal Available...
Setting Storage This setting is selected as the input source. IOption Settings1 J Low-noise Mode (XJ-560 only) The low-noise mode reduces the luminosity of the projection lamp and the speed of the cooling fan, allowing quieter projector operation. Input Source Specific Menu Items Input Source RGB Component S-VIDEO VIDEO No Signal Available...
Owners Manual
Page 62
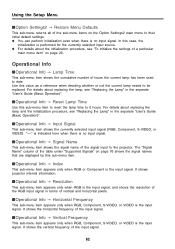
... the input signal. In this sub-menu item. Operational Info IOperational Info J Lamp Time This sub-menu item shows the cumulative number of hours the current lamp has been used to the projector. IOperational Info J Horizontal Frequency This sub-menu item appears only when RGB, ... IOperational Info J Input Signal This sub-menu item shows the currently selected input signal (RGB, Component, S-VIDEO, or VIDEO). It shows projector internal information. The "Signal Name" column of the table under "Supported Signals" on page 29. IOperational Info J Vertical Frequency This sub-menu...
... the input signal. In this sub-menu item. Operational Info IOperational Info J Lamp Time This sub-menu item shows the cumulative number of hours the current lamp has been used to the projector. IOperational Info J Horizontal Frequency This sub-menu item appears only when RGB, ... IOperational Info J Input Signal This sub-menu item shows the currently selected input signal (RGB, Component, S-VIDEO, or VIDEO). It shows projector internal information. The "Signal Name" column of the table under "Supported Signals" on page 29. IOperational Info J Vertical Frequency This sub-menu...
Owners Manual
Page 69
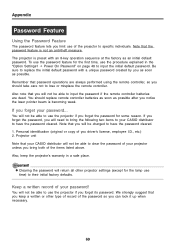
...using the remote controller, so you should replace remote controller batteries as soon as possible. To use the password feature for the lamp use of your CASIO distributor to replace the initial default password with an 8-key operation sequence at the factory as an initial default password. Keep ... (original or copy of your password... Also note that you forget its password. You should take care not to use the projector if you keep the projector's warranty in the "Option Settings1 J Power On Password" on page 48 to input the initial default password. If you notice...
...using the remote controller, so you should replace remote controller batteries as soon as possible. To use the password feature for the lamp use of your CASIO distributor to replace the initial default password with an 8-key operation sequence at the factory as an initial default password. Keep ... (original or copy of your password... Also note that you forget its password. You should take care not to use the projector if you keep the projector's warranty in the "Option Settings1 J Power On Password" on page 48 to input the initial default password. If you notice...

Owners Manual
Page 72
...J See "Error Indicators" under the lens. See User's Guide (Basic Operation) User's Guide (Basic Operation) 72 If the TEMP or LAMP indicator remains flashing or lit, it means some type of the lens cover. If the POWER/STANDBY indicator is connected correctly to the lens cover... when performing the above step. Projector Troubleshooting Check the following items whenever you insert the nub (4) of the right lens cover tab into the depression (2) of the right tab under...
...J See "Error Indicators" under the lens. See User's Guide (Basic Operation) User's Guide (Basic Operation) 72 If the TEMP or LAMP indicator remains flashing or lit, it means some type of the lens cover. If the POWER/STANDBY indicator is connected correctly to the lens cover... when performing the above step. Projector Troubleshooting Check the following items whenever you insert the nub (4) of the right lens cover tab into the depression (2) of the right tab under...
Owners Manual
Page 74
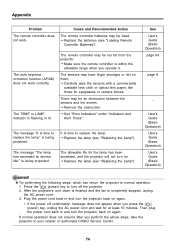
... (Basic Operation) z Try performing the following steps, which can return the projector to your retailer or authorized CASIO Service Center. 74 The sensors may be dead. There may be an obstruction between the sensors and the screen. J Remove the obstruction. J Replace the lamp (see "Loading Remote Controller Batteries"). The allowable life for the...
... (Basic Operation) z Try performing the following steps, which can return the projector to your retailer or authorized CASIO Service Center. 74 The sensors may be dead. There may be an obstruction between the sensors and the screen. J Remove the obstruction. J Replace the lamp (see "Loading Remote Controller Batteries"). The allowable life for the...


