Casio XJ-360 - XGA DLP Projector Support and Manuals
Get Help and Manuals for this Casio item
View All Support Options Below
Free Casio XJ-360 manuals!
Problems with Casio XJ-360?
Ask a Question
Free Casio XJ-360 manuals!
Problems with Casio XJ-360?
Ask a Question
Popular Casio XJ-360 Manual Pages
Owners Manual - Page 1
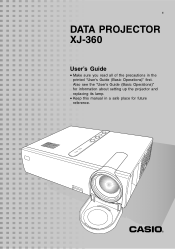
Also see the "User's Guide (Basic Operations)" for future reference. E
DATA PROJECTOR XJ-360
User's Guide
• Make sure you read all of the precautions in a safe place for information about setting up the projector and replacing its lamp.
• Keep this manual in the printed "User's Guide (Basic Operations)" first.
Owners Manual - Page 3
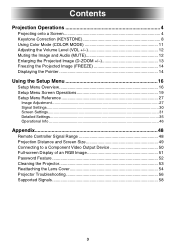
......27 Signal Settings ...30 Screen Settings...31 Detailed Settings ...35 Operational Info ...46
Appendix 48
Remote Controller Signal Range 48 Projection Distance and Screen Size 49 Connecting to a Component Video Output Device 50 Full-screen Display of an RGB Image 51 Password Feature 52 Cleaning the Projector 53 Reattaching the Lens Cover 54 Projector Troubleshooting 56 Supported Signals...
Owners Manual - Page 4

... a Screen
This section explains the basic steps for projecting an image. "Manually Selecting the Input Source" (page 6)
Adjust the projected image size and focus the image.
Basic Flow
Set up the projector and point it at the screen. User's Guide (Basic Operations): Setting Up the Projector
Connect the computer or video device to turn on the...
Owners Manual - Page 6
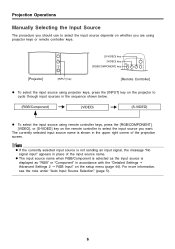
... or remote controller keys.
[S-VIDEO] key [VIDEO] key
[RGB/COMPONENT] key
[Projector]
[INPUT] key
[Remote Controller]
z To select the input source using projector keys, press the [INPUT] key on the projector to cycle through input sources in accordance with the "Detailed Settings J Advanced Settings 2 J RGB Input" on the remote controller to select the input source...
Owners Manual - Page 7
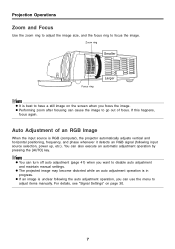
...operation is best to have a still image on page 30.
7 For details, see "Signal Settings" on the screen when you focus the image. Zoom ring
Smaller
Focus ring
Larger
z It is...size, and the focus ring to disable auto adjustment and maintain manual settings.
z If an image is RGB (computer), the projector automatically adjusts vertical and horizontal positioning, frequency, and phase whenever...
Owners Manual - Page 8

...'s Guide (Basic Operations)". The center of the image. This projector comes with the horizontal center of the screen (see "Setting Up the Projector" in the above illustration are subject to the following shows the allowable angle that the projector can cause distortion of the projector's lens should be aligned with functions for automatic as well as manual...
Owners Manual - Page 9
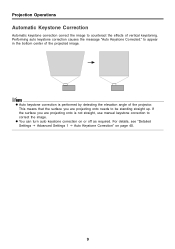
... If the surface you are projecting onto is performed by detecting the elevation angle of the projector. This means that the surface you are projecting onto needs to be standing straight up. Projection...the projected image. z Auto keystone correction is not straight, use manual keystone correction to correct the image. Performing auto keystone correction causes the message "Auto Keystone Corrected."...
Owners Manual - Page 10
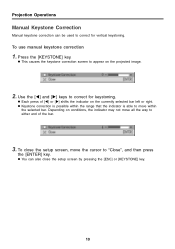
To use manual keystone correction
1. z Each press of the bar.
3.
Press the [KEYSTONE] key. z Keystone ...all the way to correct for vertical keystoning.
To close the setup screen by pressing the [ESC] or [KEYSTONE] key.
10 Projection Operations
Manual Keystone Correction
Manual keystone correction can also close the setup screen, move the cursor to correct for keystoning.
Owners Manual - Page 16
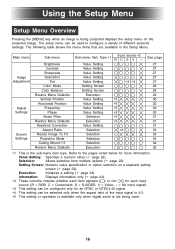
... available in the Setup Menu. Execution: Information:
Initializes a setting () page 24). Setting Screen: Numeric value specification or option selection on the projected image.
Value Setting
Value Setting
Value Setting
Value Setting
Value Setting
∗3 ∗3
Setting Screen
Setting Screen
Execution
Value Setting
∗5
Value Setting
∗5
Value Setting
∗5
Value...
Owners Manual - Page 19
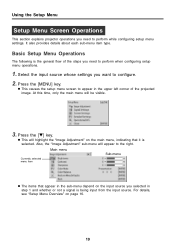
... source you want to configure. 2. Using the Setup Menu
Setup Menu Screen Operations
This section explains projector operations you need to perform while configuring setup menu settings. Press the [T] key. Main menu
Sub-menu... only the main menu will appear to the right.
Select the input source whose settings you selected in the upper left corner of the steps you need to appear in...
Owners Manual - Page 30
... digital zoom
is able to be deleted automatically. z See "Signal Settings J Frequency" for each signal type (XGA/60Hz, SXGA/60Hz, etc.). Normally, the projector is not being used . z Settings are saved for details about how settings are saved.
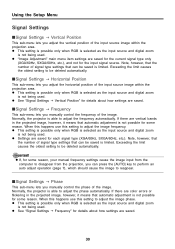
ISignal Settings J Phase
This sub-menu lets you manually control the frequency of the image. When this happens use...
Owners Manual - Page 45
... to the VIDEO or S-VIDEO input terminal.
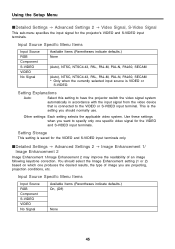
IDetailed Settings J Advanced Settings 2 J Image Enhancement 1/ Image Enhancement 2
Image Enhancement 1/Image Enhancement 2 may improve the readability of image you want to specify only one specific video signal for the projector's VIDEO and S-VIDEO input terminals. Input Source Specific Menu Items
Input Source RGB Component S-VIDEO VIDEO No Signal...
Owners Manual - Page 47
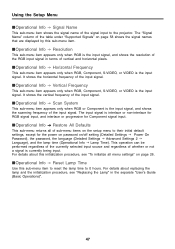
... settings" on /off setting (Detailed Settings J Power On Password), the password, the language (Detailed Settings J Advanced Settings 2 J Language), and the lamp time (Operational Info J Lamp Time). It shows the vertical frequency of the input signal. Using the Setup Menu
IOperational Info J Signal Name
This sub-menu item shows the signal name of the table under "Supported Signals" on the setup...
Owners Manual - Page 56
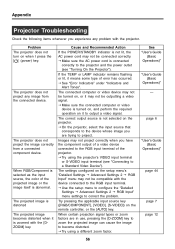
... "Detailed
Settings J Advanced Settings 2 J RGB Input" menu settings to output a video signal.
J See "Error Indicators" under "Indicators and
Alert Tones".
See "User's Guide
(Basic Operations)" "User's Guide
(Basic Operations)"
-
J Make sure the connected computer or video
device is connected
correctly to the RGB input terminal of the projector. Appendix
Projector Troubleshooting
Check...
Owners Manual - Page 57
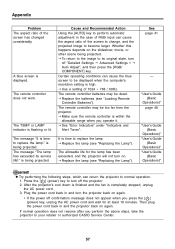
... message does not appear when you operate it. J Replace the batteries (see "Replacing the Lamp"). It is time to your retailer or authorized CASIO Service Center.
57
J See "Error Indicators" under "Indicators and
Alert Tones". J Replace the lamp (see "Replacing the Lamp"). Then plug the power cord back in and the projector back on the slideshow, movie, or other scene being...
Casio XJ-360 Reviews
We have not received any reviews for Casio yet.