
Owners Manual
Page 1
Also see the "User's Guide (Basic Operations)" for future reference. E DATA PROJECTOR XJ-360 User's Guide • Make sure you read all of the precautions in a safe place for information about setting up the projector and replacing its lamp. • Keep this manual in the printed "User's Guide (Basic Operations)" first.
Also see the "User's Guide (Basic Operations)" for future reference. E DATA PROJECTOR XJ-360 User's Guide • Make sure you read all of the precautions in a safe place for information about setting up the projector and replacing its lamp. • Keep this manual in the printed "User's Guide (Basic Operations)" first.
Owners Manual
Page 3
... (D-ZOOM 13 Freezing the Projected Image (FREEZE 14 Displaying the Pointer 14 Using the Setup Menu 16 Setup Menu Overview 16 Setup Menu Screen Operations 19 Setup Menu Reference 27 Image Adjustment ...27 Signal Settings ...30 Screen Settings...31 Detailed Settings ...35 Operational Info ...46 Appendix 48 Remote Controller Signal Range 48 Projection Distance and Screen Size 49 Connecting to a Component Video Output Device 50 Full-screen Display of an RGB Image 51 Password Feature 52 Cleaning the Projector 53 Reattaching the Lens Cover 54 Projector Troubleshooting 56 Supported...
... (D-ZOOM 13 Freezing the Projected Image (FREEZE 14 Displaying the Pointer 14 Using the Setup Menu 16 Setup Menu Overview 16 Setup Menu Screen Operations 19 Setup Menu Reference 27 Image Adjustment ...27 Signal Settings ...30 Screen Settings...31 Detailed Settings ...35 Operational Info ...46 Appendix 48 Remote Controller Signal Range 48 Projection Distance and Screen Size 49 Connecting to a Component Video Output Device 50 Full-screen Display of an RGB Image 51 Password Feature 52 Cleaning the Projector 53 Reattaching the Lens Cover 54 Projector Troubleshooting 56 Supported...

Owners Manual
Page 5
... an input signal, and projects the applicable image. Projection Operations Auto Input Source Selection When you turn on the projector, it checks the status of each input source (whether or not the input source is displayed. z If the projector does not find any input signal, the message "No signal input" appears in the sequence shown below . When the setting is "RGB": "RGB" is sending a signal) in place of the input source name. The currently selected input source name is turned on...
... an input signal, and projects the applicable image. Projection Operations Auto Input Source Selection When you turn on the projector, it checks the status of each input source (whether or not the input source is displayed. z If the projector does not find any input signal, the message "No signal input" appears in the sequence shown below . When the setting is "RGB": "RGB" is sending a signal) in place of the input source name. The currently selected input source name is turned on...
Owners Manual
Page 7
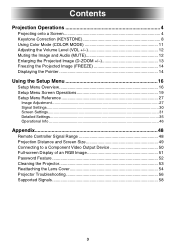
... unclear following input source selection, power up, etc.). Auto Adjustment of focus. If this happens, focus again. z You can cause the image to disable auto adjustment and maintain manual settings. For details, see "Signal Settings" on the screen when you want to go out of an RGB Image When the input source is in progress. z The projected image may become distorted while an auto adjustment operation is RGB (computer), the projector automatically adjusts vertical and...
... unclear following input source selection, power up, etc.). Auto Adjustment of focus. If this happens, focus again. z You can cause the image to disable auto adjustment and maintain manual settings. For details, see "Signal Settings" on the screen when you want to go out of an RGB Image When the input source is in progress. z The projected image may become distorted while an auto adjustment operation is RGB (computer), the projector automatically adjusts vertical and...

Owners Manual
Page 8
... are oriented close to the configuration shown under "Setting Up the Projector" in the "User's Guide (Basic Operations)"). 8 The center of the projector's lens should be aligned with functions for automatic as well as manual keystone correction, which provides a regularly shaped projected image. If the projected image becomes difficult to view, try moving the screen and/or projector so they are subject to the following shows...
... are oriented close to the configuration shown under "Setting Up the Projector" in the "User's Guide (Basic Operations)"). 8 The center of the projector's lens should be aligned with functions for automatic as well as manual keystone correction, which provides a regularly shaped projected image. If the projected image becomes difficult to view, try moving the screen and/or projector so they are subject to the following shows...
Owners Manual
Page 9
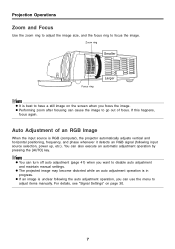
... straight, use manual keystone correction to correct the image. If the surface you are projecting onto is performed by detecting the elevation angle of vertical keystoning. z You can turn auto keystone correction on page 40. 9 For details, see "Detailed Settings J Advanced Settings 1 J Auto Keystone Correction" on or off as required. Projection Operations Automatic Keystone Correction Automatic keystone correction correct the image to counteract the effects of the projector. to...
... straight, use manual keystone correction to correct the image. If the surface you are projecting onto is performed by detecting the elevation angle of vertical keystoning. z You can turn auto keystone correction on page 40. 9 For details, see "Detailed Settings J Advanced Settings 1 J Auto Keystone Correction" on or off as required. Projection Operations Automatic Keystone Correction Automatic keystone correction correct the image to counteract the effects of the projector. to...
Owners Manual
Page 16
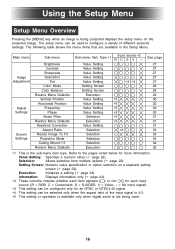
... menu Image Adjustment Signal Settings Screen Settings Sub-menu Brightness Contrast Sharpness Saturation Tint Color Mode Color Balance Restore Menu Defaults Vertical Position Horizontal Position Frequency Phase Noise Filter Restore Menu Defaults Keystone Correction Aspect Ratio Resize Image To Fit Projection Mode Ceiling Mount ∗11 Restore Menu Defaults Sub-menu Item Type ∗1 Input source ∗2 RCSV - Refer to configure a variety of the input signal is 4:3. ∗5 This setting or operation is available only when digital zoom is not being projected displays the setup menu...
... menu Image Adjustment Signal Settings Screen Settings Sub-menu Brightness Contrast Sharpness Saturation Tint Color Mode Color Balance Restore Menu Defaults Vertical Position Horizontal Position Frequency Phase Noise Filter Restore Menu Defaults Keystone Correction Aspect Ratio Resize Image To Fit Projection Mode Ceiling Mount ∗11 Restore Menu Defaults Sub-menu Item Type ∗1 Input source ∗2 RCSV - Refer to configure a variety of the input signal is 4:3. ∗5 This setting or operation is available only when digital zoom is not being projected displays the setup menu...
Owners Manual
Page 17
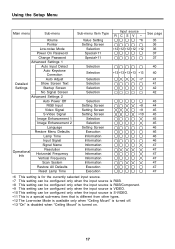
Using the Setup Menu Main menu Sub-menu Volume Pointer Low-noise Mode Power On Password Change Password Advanced Settings 1 Auto Input Detect Auto Keystone Correction Auto Adjust Detailed Show Screen Text Settings Startup Screen No Signal Screen Advanced Settings 2 Auto Power Off RGB Input Video Signal S-Video Signal Image Enhancement 1 Image Enhancement 2 Language Restore Menu Defaults Lamp Time Input Signal Signal Name Operational Info Resolution Horizontal Frequency Vertical Frequency Scan System Restore All Defaults Reset Lamp Time Sub-menu Item Type ...
Using the Setup Menu Main menu Sub-menu Volume Pointer Low-noise Mode Power On Password Change Password Advanced Settings 1 Auto Input Detect Auto Keystone Correction Auto Adjust Detailed Show Screen Text Settings Startup Screen No Signal Screen Advanced Settings 2 Auto Power Off RGB Input Video Signal S-Video Signal Image Enhancement 1 Image Enhancement 2 Language Restore Menu Defaults Lamp Time Input Signal Signal Name Operational Info Resolution Horizontal Frequency Vertical Frequency Scan System Restore All Defaults Reset Lamp Time Sub-menu Item Type ...

Owners Manual
Page 18
... setting for each input source, while the keystone correction setting lets you configure a single common setting for all input sources. The change to all input sources. Using the Setup Menu Before Configuring Menu Settings Always remember that the settings you configure on page 27. 18 z The items that can be reflected when the input source is not, however, reflected for each input source, you displayed the setup menu. Some items apply to a certain specific input source, while...
... setting for each input source, while the keystone correction setting lets you configure a single common setting for all input sources. The change to all input sources. Using the Setup Menu Before Configuring Menu Settings Always remember that the settings you configure on page 27. 18 z The items that can be reflected when the input source is not, however, reflected for each input source, you displayed the setup menu. Some items apply to a certain specific input source, while...

Owners Manual
Page 28
... stored for each input source. Input Source Specific Menu Items Input Source RGB Component S-VIDEO VIDEO No Signal Available Items (Parentheses indicate defaults.) (Presentation), Standard, Graphics, Theater, Blackboard Presentation, Standard, Graphics, (Theater), Blackboard None Setting Explanations Presentation: Select this setting when you want to optimize projection in a well-lit area. Using the Setup Menu IImage Adjustment J Color Mode This sub-menu lets you select from among five different color settings to highlight the colors during your images.
... stored for each input source. Input Source Specific Menu Items Input Source RGB Component S-VIDEO VIDEO No Signal Available Items (Parentheses indicate defaults.) (Presentation), Standard, Graphics, Theater, Blackboard Presentation, Standard, Graphics, (Theater), Blackboard None Setting Explanations Presentation: Select this setting when you want to optimize projection in a well-lit area. Using the Setup Menu IImage Adjustment J Color Mode This sub-menu lets you select from among five different color settings to highlight the colors during your images.
Owners Manual
Page 30
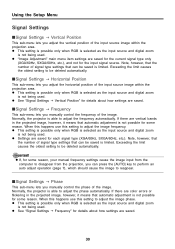
... happens use this setting to adjust the image frequency. ISignal Settings J Frequency This sub-menu lets you manually control the phase of the image. Normally, the projector is not being used . Exceeding the limit causes the oldest setting to be deleted automatically. z This setting is possible only when RGB is selected as the input source and digital zoom is limited. If there are color errors or flickering in the projected image, however...
... happens use this setting to adjust the image frequency. ISignal Settings J Frequency This sub-menu lets you manually control the phase of the image. Normally, the projector is not being used . Exceeding the limit causes the oldest setting to be deleted automatically. z This setting is possible only when RGB is selected as the input source and digital zoom is limited. If there are color errors or flickering in the projected image, however...

Owners Manual
Page 31
z This operation is possible only when RGB is selected as the input source and digital zoom is not being used . z Vertical keystone correction can be able to its initial default setting (Normal). z A single setting is stored, which is saved for the current signal type (XGA/60Hz, SXGA/60Hz, etc.) only. Input Source Specific Menu Items Input Source RGB Component S-VIDEO VIDEO No Signal Available Items (Parentheses indicate defaults.) Low, (Normal), High None ISignal Settings J Restore Menu Defaults This...
z This operation is possible only when RGB is selected as the input source and digital zoom is not being used . z Vertical keystone correction can be able to its initial default setting (Normal). z A single setting is stored, which is saved for the current signal type (XGA/60Hz, SXGA/60Hz, etc.) only. Input Source Specific Menu Items Input Source RGB Component S-VIDEO VIDEO No Signal Available Items (Parentheses indicate defaults.) Low, (Normal), High None ISignal Settings J Restore Menu Defaults This...

Owners Manual
Page 34
...: Flips the projected image horizontally and vertically. Input Source Specific Menu Items Input Source RGB Component S-VIDEO VIDEO No Signal Available Items (Parentheses indicate defaults.) (Front), Rear Setting Explanations Front: For projection from the front of the screen or the back of the screen. Setting Storage A single setting is stored, which it is positioned upside down. Off: Projects a normal image. Setting Storage A single setting is stored, which is applied to configure the projector for use in an installation...
...: Flips the projected image horizontally and vertically. Input Source Specific Menu Items Input Source RGB Component S-VIDEO VIDEO No Signal Available Items (Parentheses indicate defaults.) (Front), Rear Setting Explanations Front: For projection from the front of the screen or the back of the screen. Setting Storage A single setting is stored, which it is positioned upside down. Off: Projects a normal image. Setting Storage A single setting is stored, which is applied to configure the projector for use in an installation...
Owners Manual
Page 35
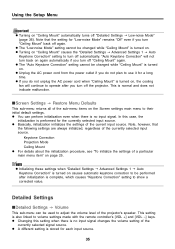
... Settings J Advanced Settings 1 J Auto Keystone Correction" is no input signal changes the volume setting of the current input source. z The "Low-noise Mode" setting cannot be changed while "Ceiling Mount" is stored for the currently selected input source. IScreen Settings J Restore Menu Defaults This sub-menu returns all of the projector's speaker. Detailed Settings IDetailed Settings J Volume This sub-menu can perform initialization even when there is turned on causes automatic keystone correction to be used to adjust the...
... Settings J Advanced Settings 1 J Auto Keystone Correction" is no input signal changes the volume setting of the current input source. z The "Low-noise Mode" setting cannot be changed while "Ceiling Mount" is stored for the currently selected input source. IScreen Settings J Restore Menu Defaults This sub-menu returns all of the projector's speaker. Detailed Settings IDetailed Settings J Volume This sub-menu can perform initialization even when there is turned on causes automatic keystone correction to be used to adjust the...
Owners Manual
Page 36
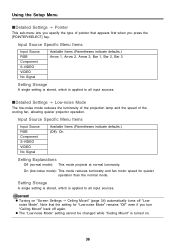
... turn "Ceiling Mount" back off "Lownoise Mode". Setting Storage A single setting is stored, which is applied to all input sources. z Turning on . 36 Using the Setup Menu IDetailed Settings J Pointer This sub-menu lets you specify the type of the cooling fan, allowing quieter projector operation. Input Source Specific Menu Items Input Source RGB Component S-VIDEO VIDEO No Signal Available Items (Parentheses indicate defaults.) Arrow 1, Arrow 2, Arrow 3, Bar 1, Bar 2, Bar 3 Setting Storage A single setting is stored, which is turned on "Screen Settings J Ceiling Mount...
... turn "Ceiling Mount" back off "Lownoise Mode". Setting Storage A single setting is stored, which is applied to all input sources. z Turning on . 36 Using the Setup Menu IDetailed Settings J Pointer This sub-menu lets you specify the type of the cooling fan, allowing quieter projector operation. Input Source Specific Menu Items Input Source RGB Component S-VIDEO VIDEO No Signal Available Items (Parentheses indicate defaults.) Arrow 1, Arrow 2, Arrow 3, Bar 1, Bar 2, Bar 3 Setting Storage A single setting is stored, which is turned on "Screen Settings J Ceiling Mount...

Owners Manual
Page 44
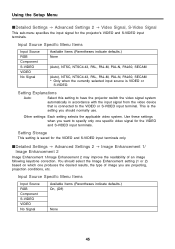
... details about connection, see "Connecting a Computer to the Projector" in the separate "User's Guide (Basic Operations)". For details about connection, see "Connecting to a Component Video Output Device" on page 50. Input Source Specific Menu Items Input Source RGB Component S-VIDEO VIDEO No Signal Available Items (Parentheses indicate defaults.) (Auto), RGB, Component None (Auto), RGB, Component * Only when the currently selected input source is connected to the projector's RGB input terminal. Component: Select this setting for automatic switching between RGB...
... details about connection, see "Connecting a Computer to the Projector" in the separate "User's Guide (Basic Operations)". For details about connection, see "Connecting to a Component Video Output Device" on page 50. Input Source Specific Menu Items Input Source RGB Component S-VIDEO VIDEO No Signal Available Items (Parentheses indicate defaults.) (Auto), RGB, Component None (Auto), RGB, Component * Only when the currently selected input source is connected to the projector's RGB input terminal. Component: Select this setting for automatic switching between RGB...
Owners Manual
Page 45
...specific video signal for the projector's VIDEO and S-VIDEO input terminals. This is VIDEO or S-VIDEO. Input Source Specific Menu Items Input Source RGB Component S-VIDEO VIDEO No Signal Available Items (Parentheses indicate defaults.) On, (Off) None 45 IDetailed Settings J Advanced Settings 2 J Image Enhancement 1/ Image Enhancement 2 Image Enhancement 1/Image Enhancement 2 may improve the readability of image you are projecting, projection conditions, etc. Other settings: Each setting selects the applicable video system. You should normally use. Using the Setup Menu...
...specific video signal for the projector's VIDEO and S-VIDEO input terminals. This is VIDEO or S-VIDEO. Input Source Specific Menu Items Input Source RGB Component S-VIDEO VIDEO No Signal Available Items (Parentheses indicate defaults.) On, (Off) None 45 IDetailed Settings J Advanced Settings 2 J Image Enhancement 1/ Image Enhancement 2 Image Enhancement 1/Image Enhancement 2 may improve the readability of image you are projecting, projection conditions, etc. Other settings: Each setting selects the applicable video system. You should normally use. Using the Setup Menu...
Owners Manual
Page 46
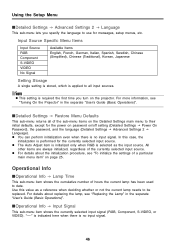
..." on page 25. "----" is indicated here when there is applied to use for the currently selected input source. In this value as the input source. Operational Info IOperational Info J Lamp Time This sub-menu item shows the cumulative number of the currently selected input source. Using the Setup Menu IDetailed Settings J Advanced Settings 2 J Language This sub-menu lets you turn on the projector. Input Source Specific Menu Items Input Source RGB Component S-VIDEO VIDEO No Signal Available Items English, French...
..." on page 25. "----" is indicated here when there is applied to use for the currently selected input source. In this value as the input source. Operational Info IOperational Info J Lamp Time This sub-menu item shows the cumulative number of the currently selected input source. Using the Setup Menu IDetailed Settings J Advanced Settings 2 J Language This sub-menu lets you turn on the projector. Input Source Specific Menu Items Input Source RGB Component S-VIDEO VIDEO No Signal Available Items English, French...
Owners Manual
Page 56
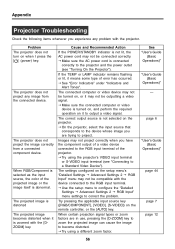
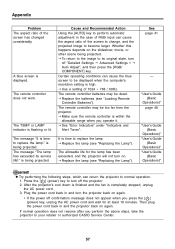
... [ ] (power) key. When certain projection signal types or zoom factors are trying to output a video signal. page 6 "User's Guide (Basic Operations)" page 44 page 7 page 12 56 The projector does not project any problem with the projector. If the TEMP or LAMP indicator remains flashing or lit, it to project. J Use the setup menu to configure the "Detailed Settings J Advanced Settings 2 J RGB Input" menu settings to become distorted. The projector does not project the image correctly from the connected device...
... [ ] (power) key. When certain projection signal types or zoom factors are trying to output a video signal. page 6 "User's Guide (Basic Operations)" page 44 page 7 page 12 56 The projector does not project any problem with the projector. If the TEMP or LAMP indicator remains flashing or lit, it to project. J Use the setup menu to configure the "Detailed Settings J Advanced Settings 2 J RGB Input" menu settings to become distorted. The projector does not project the image correctly from the connected device...
Owners Manual
Page 57
... authorized CASIO Service Center. 57 J Replace the batteries (see "Replacing the Lamp"). Then plug the power cord back in the case of the screen to change, and the projected image to turn off "Detailed Settings J Advanced Settings 1 J Auto Adjust", and then press the [RGB/ COMPONENT] key. is displayed. J Use a setting of the screen has changed considerably. Press the [ ] (power) key to become larger. A blue screen is being projected. is time to perform automatic adjustment in and the projector...
... authorized CASIO Service Center. 57 J Replace the batteries (see "Replacing the Lamp"). Then plug the power cord back in the case of the screen to change, and the projected image to turn off "Detailed Settings J Advanced Settings 1 J Auto Adjust", and then press the [RGB/ COMPONENT] key. is displayed. J Use a setting of the screen has changed considerably. Press the [ ] (power) key to become larger. A blue screen is being projected. is time to perform automatic adjustment in and the projector...

