Guia de iniciacion rapida [Spanish Version]
Page 2
ENGLISH Quick Start Guide Table of Contents Introduction 1 Preparing the Printer 2 Installing the Printer Driver 3 Loading Printing Paper 4 Basic Printing 6 Printing Photographs Directly from a Compliant Device 8 Replacing an Ink Tank 12 Reading the On-screen Manuals 14
ENGLISH Quick Start Guide Table of Contents Introduction 1 Preparing the Printer 2 Installing the Printer Driver 3 Loading Printing Paper 4 Basic Printing 6 Printing Photographs Directly from a Compliant Device 8 Replacing an Ink Tank 12 Reading the On-screen Manuals 14
Guia de iniciacion rapida [Spanish Version]
Page 6
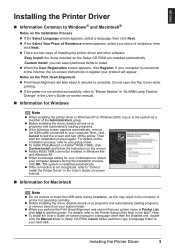
...one, doubleclick the Manual folder in the computer or printer not operating normally. For details on to your computer. z Before installing the driver, disable all anti-virus programs and automatically loading programs. z If the following screen appears automatically, remove the USB cable connected to ...the system as this may result in Setup CD-ROM, Canon folder, and then copy a language folder to install z When the User Registration screen appears, click Register. z If the Select Your ...
...one, doubleclick the Manual folder in the computer or printer not operating normally. For details on to your computer. z Before installing the driver, disable all anti-virus programs and automatically loading programs. z If the following screen appears automatically, remove the USB cable connected to ...the system as this may result in Setup CD-ROM, Canon folder, and then copy a language folder to install z When the User Registration screen appears, click Register. z If the Select Your ...
Guia de iniciacion rapida [Spanish Version]
Page 9
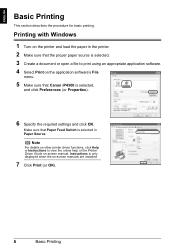
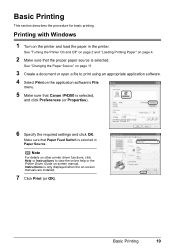
... 5 Make sure that the proper paper source is selected. 3 Create a document or open a file to view the online help or the Printer Driver Guide on -screen manuals are installed. 7 Click Print (or OK). 6 Basic Printing Instructions is selected, and click Preferences (or Properties). 6... Specify the required settings and click OK. Note For details on other printer driver functions, click Help or Instructions to print using an appropriate application software. 4 Select Print on the printer and load the paper in ...
... 5 Make sure that the proper paper source is selected. 3 Create a document or open a file to view the online help or the Printer Driver Guide on -screen manuals are installed. 7 Click Print (or OK). 6 Basic Printing Instructions is selected, and click Preferences (or Properties). 6... Specify the required settings and click OK. Note For details on other printer driver functions, click Help or Instructions to print using an appropriate application software. 4 Select Print on the printer and load the paper in ...
Guia de iniciacion rapida [Spanish Version]
Page 10
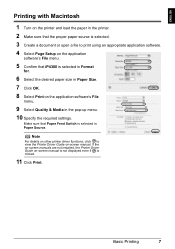
Make sure that iP4300 is selected in Format for. 6 Select the desired paper size in Paper Size. 7 Click OK. 8 Select Print on the application software's File menu. 9 Select Quality & Media in Paper Source. Basic Printing 7 Note For details on other printer driver functions, click to print using an appropriate ...Feed Switch is selected in the pop-up menu. 10 Specify the required settings. If the on-screen manuals are not installed, the Printer Driver Guide on -screen manual. ENGLISH Printing with Macintosh 1 Turn on the printer and load the paper in the printer. 2 Make sure ...
Make sure that iP4300 is selected in Format for. 6 Select the desired paper size in Paper Size. 7 Click OK. 8 Select Print on the application software's File menu. 9 Select Quality & Media in Paper Source. Basic Printing 7 Note For details on other printer driver functions, click to print using an appropriate ...Feed Switch is selected in the pop-up menu. 10 Specify the required settings. If the on-screen manuals are not installed, the Printer Driver Guide on -screen manual. ENGLISH Printing with Macintosh 1 Turn on the printer and load the paper in the printer. 2 Make sure ...
Guia de iniciacion rapida [Spanish Version]
Page 11
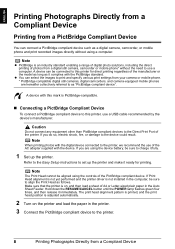
... phone and print recorded images directly without the need to the device could result. If Print Head alignment is not yet performed and the printer driver is PictBridge-compatible. „ Connecting a PictBridge Compliant Device To connect a PictBridge compliant device to charge it immediately. z You can select the images to print and...
... phone and print recorded images directly without the need to the device could result. If Print Head alignment is not yet performed and the printer driver is PictBridge-compatible. „ Connecting a PictBridge Compliant Device To connect a PictBridge compliant device to charge it immediately. z You can select the images to print and...
Quick Start Guide
Page 2
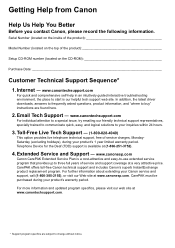
... to change without notice. Getting Help from Canon Help Us Help You Better Before you contact Canon, please record the following information. For further information about extending your product's warranty period. In addition, the latest driver downloads, answers to frequently asked questions, product... 3. Telephone Device for the Deaf (TDD) support is available at www.canonesp.com. CarePAK offers toll-free Canon technical support and includes Canon's superb InstantExchange product replacement program. Extended Service and Support - Serial Number (located on the inside of the ...
... to change without notice. Getting Help from Canon Help Us Help You Better Before you contact Canon, please record the following information. For further information about extending your product's warranty period. In addition, the latest driver downloads, answers to frequently asked questions, product... 3. Telephone Device for the Deaf (TDD) support is available at www.canonesp.com. CarePAK offers toll-free Canon technical support and includes Canon's superb InstantExchange product replacement program. Extended Service and Support - Serial Number (located on the inside of the ...
Quick Start Guide
Page 5
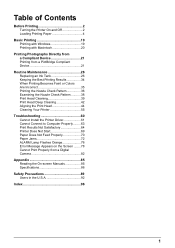
... ...........38 Print Head Cleaning 39 Print Head Deep Cleaning 42 Aligning the Print Head 44 Cleaning Your Printer 55 Troubleshooting 60 Cannot Install the Printer Driver 61 Cannot Connect to Computer Properly.........63 Print Results Not Satisfactory 64 Printer Does Not Start 69 Paper Does Not Feed Properly 70 Paper Jams...
... ...........38 Print Head Cleaning 39 Print Head Deep Cleaning 42 Aligning the Print Head 44 Cleaning Your Printer 55 Troubleshooting 60 Cannot Install the Printer Driver 61 Cannot Connect to Computer Properly.........63 Print Results Not Satisfactory 64 Printer Does Not Start 69 Paper Does Not Feed Properly 70 Paper Jams...
Quick Start Guide
Page 6
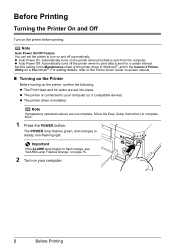
... above are set the printer to your computer. 2 Before Printing Set this setting in the Maintenance sheet of the printer driver in Windows®, and in the Canon IJ Printer Utility on the printer, confirm the following. For setting details, refer to complete them. 1 Press the POWER...Automatically turns on the printer before printing. z The Print Head and ink tanks are not complete, follow the Easy Setup Instructions to the Printer Driver Guide on-screen manual. „ Turning on the Printer Before turning on a Macintosh®. The POWER lamp flashes green, and changes to...
... above are set the printer to your computer. 2 Before Printing Set this setting in the Maintenance sheet of the printer driver in Windows®, and in the Canon IJ Printer Utility on the printer, confirm the following. For setting details, refer to complete them. 1 Press the POWER...Automatically turns on the printer before printing. z The Print Head and ink tanks are not complete, follow the Easy Setup Instructions to the Printer Driver Guide on-screen manual. „ Turning on the Printer Before turning on a Macintosh®. The POWER lamp flashes green, and changes to...
Quick Start Guide
Page 8
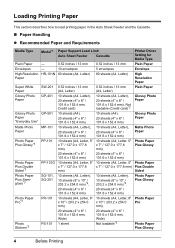
... Auto Sheet Feeder and the Cassette. „ Paper Handling z Recommended Paper and Requirements Media Type Model*1 Paper Support Load Limit Auto Sheet Feeder Cassette Printer Driver Setting for Media Type Plain Paper - 0.52 inches / 13 mm 0.52 inches / 13 mm Plain Paper Envelopes - 10 envelopes 5 envelopes Envelope High Resolution HR-101N...
... Auto Sheet Feeder and the Cassette. „ Paper Handling z Recommended Paper and Requirements Media Type Model*1 Paper Support Load Limit Auto Sheet Feeder Cassette Printer Driver Setting for Media Type Plain Paper - 0.52 inches / 13 mm 0.52 inches / 13 mm Plain Paper Envelopes - 10 envelopes 5 envelopes Envelope High Resolution HR-101N...
Quick Start Guide
Page 9
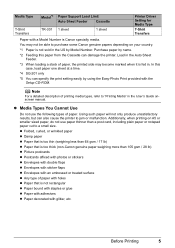
... the Auto Sheet Feeder. *3 When loading a stack of printing media types, refer to jam or malfunction. You may become marked when it is Canon specialty media. Note For a detailed description of paper, the printed side may not be able to a small size. Media Type T-Shirt Transfers Model...*1 Paper Support Load Limit Auto Sheet Feeder Cassette TR-301 1 sheet 1 sheet Printer Driver Setting for Media Type T-Shirt Transfers Paper with the Setup CD-ROM. In this paper from the Cassette can damage the printer. Additionally, when...
... the Auto Sheet Feeder. *3 When loading a stack of printing media types, refer to jam or malfunction. You may become marked when it is Canon specialty media. Note For a detailed description of paper, the printed side may not be able to a small size. Media Type T-Shirt Transfers Model...*1 Paper Support Load Limit Auto Sheet Feeder Cassette TR-301 1 sheet 1 sheet Printer Driver Setting for Media Type T-Shirt Transfers Paper with the Setup CD-ROM. In this paper from the Cassette can damage the printer. Additionally, when...
Quick Start Guide
Page 12
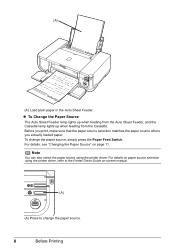
For details, see "Changing the Paper Source" on paper source selection using the printer driver. Note You can also select the paper source using the printer driver, refer to the Printer Driver Guide on-screen manual. (A) (A) Press to change the paper source, simply press the Paper Feed Switch. Before you print, make sure that...
For details, see "Changing the Paper Source" on paper source selection using the printer driver. Note You can also select the paper source using the printer driver, refer to the Printer Driver Guide on-screen manual. (A) (A) Press to change the paper source, simply press the Paper Feed Switch. Before you print, make sure that...
Quick Start Guide
Page 13
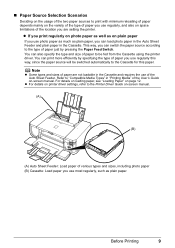
This way, you can load photo paper in the Auto Sheet Feeder and plain paper in the Cassette. z For details on printer driver settings, refer to the Printer Driver Guide on plain paper If you use photo paper as much as plain paper. z If you print regularly on photo paper as well ... of paper to be switched automatically to the Cassette for this way, since the paper source will be fed from the Cassette using the printer driver. Before Printing 9 You can print more efficiently by pressing the Paper Feed Switch. Note z Some types and sizes of paper are setting the printer. ...
This way, you can load photo paper in the Auto Sheet Feeder and plain paper in the Cassette. z For details on printer driver settings, refer to the Printer Driver Guide on plain paper If you use photo paper as much as plain paper. z If you print regularly on photo paper as well ... of paper to be switched automatically to the Cassette for this way, since the paper source will be fed from the Cassette using the printer driver. Before Printing 9 You can print more efficiently by pressing the Paper Feed Switch. Note z Some types and sizes of paper are setting the printer. ...
Quick Start Guide
Page 14
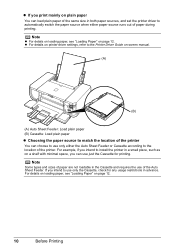
...for any usage restrictions in advance. Note Some types and sizes of paper are not loadable in both paper sources, and set the printer driver to automatically switch the paper source when either the Auto Sheet Feeder or Cassette according to the location of the Auto Sheet Feeder. If ... Paper" on plain paper You can choose to use only either paper source runs out of paper during printing. z For details on printer driver settings, refer to the Printer Driver Guide on page 12. 10 Before Printing Note z For details on loading paper, see "Loading Paper" on -screen manual. (A) (B) (A) ...
...for any usage restrictions in advance. Note Some types and sizes of paper are not loadable in both paper sources, and set the printer driver to automatically switch the paper source when either the Auto Sheet Feeder or Cassette according to the location of the Auto Sheet Feeder. If ... Paper" on plain paper You can choose to use only either paper source runs out of paper during printing. z For details on printer driver settings, refer to the Printer Driver Guide on page 12. 10 Before Printing Note z For details on loading paper, see "Loading Paper" on -screen manual. (A) (B) (A) ...
Quick Start Guide
Page 15
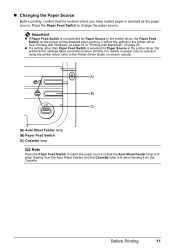
... 19 or "Printing with Macintosh" on the printer will be disabled when printing. For details on paper source selection using the printer driver, refer to the Printer Driver Guide on-screen manual. (A) (B) (C) (A) Auto Sheet Feeder lamp (B) Paper Feed Switch (C) Cassette lamp Note Press the Paper ...paper source. Important z If Paper Feed Switch is not selected for Paper Source in the printer driver, the printer driver settings takes precedence when printing. Confirm the setting in the printer driver, the Paper Feed Switch on page 20. „ Changing the Paper Source Before printing, confirm...
... 19 or "Printing with Macintosh" on the printer will be disabled when printing. For details on paper source selection using the printer driver, refer to the Printer Driver Guide on-screen manual. (A) (B) (C) (A) Auto Sheet Feeder lamp (B) Paper Feed Switch (C) Cassette lamp Note Press the Paper ...paper source. Important z If Paper Feed Switch is not selected for Paper Source in the printer driver, the printer driver settings takes precedence when printing. Confirm the setting in the printer driver, the Paper Feed Switch on page 20. „ Changing the Paper Source Before printing, confirm...
Quick Start Guide
Page 17
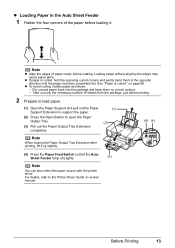
.... (4) Press the Paper Feed Switch so that the Auto Sheet Feeder lamp (A) lights. (3) Note You can also select the paper source with the printer driver. z To avoid curling, handle paper as follows. - Note z Align the edges of sheets from the package, just before printing. 2 Prepare to load...(1) Open the Paper Support and pull out the Paper (1) Support Extension to support the paper. (2) Press the Open Button to the Printer Driver Guide on-screen manual. Take out only the necessary number of paper neatly before loading. z Loading Paper in the opposite direction until the ...
.... (4) Press the Paper Feed Switch so that the Auto Sheet Feeder lamp (A) lights. (3) Note You can also select the paper source with the printer driver. z To avoid curling, handle paper as follows. - Note z Align the edges of sheets from the package, just before printing. 2 Prepare to load...(1) Open the Paper Support and pull out the Paper (1) Support Extension to support the paper. (2) Press the Open Button to the Printer Driver Guide on-screen manual. Take out only the necessary number of paper neatly before loading. z Loading Paper in the opposite direction until the ...
Quick Start Guide
Page 18
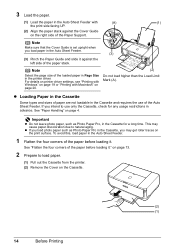
...(2) Do not load higher than the Load Limit Mark (A). Important z Do not leave photo paper, such as Photo Paper Pro in the printer driver. z If you load paper in the Cassette for any usage restrictions in advance. If you may cause paper discoloration due to use of the...in Page Size in the Cassette, you intend to natural aging. See "Paper Handling" on the Cassette. (2) (1) 14 Before Printing For details on printer driver settings, see "Printing with Windows" on page 19 or "Printing with (A) (1) the print side facing UP. (2) Align the paper stack against the left...
...(2) Do not load higher than the Load Limit Mark (A). Important z Do not leave photo paper, such as Photo Paper Pro in the printer driver. z If you load paper in the Cassette for any usage restrictions in advance. If you may cause paper discoloration due to use of the...in Page Size in the Cassette, you intend to natural aging. See "Paper Handling" on the Cassette. (2) (1) 14 Before Printing For details on printer driver settings, see "Printing with Windows" on page 19 or "Printing with (A) (1) the print side facing UP. (2) Align the paper stack against the left...
Quick Start Guide
Page 20
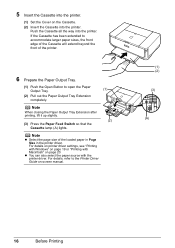
...Cassette will extend beyond the front of the loaded paper in Page Size in the printer driver. For details on printer driver settings, see "Printing with Windows" on page 19 or "Printing with the printer driver. For details, refer to open the Paper Output Tray. (1) (2) Pull out the...the Cassette lamp (A) lights. Note z Select the page size of the printer. 6 Prepare the Paper Output Tray. (1) Push the Open Button to the Printer Driver Guide on-screen manual. (1) (2) (3) (A) 16 Before Printing z You can also select the paper source with Macintosh" on page 20. 5 Insert the ...
...Cassette will extend beyond the front of the loaded paper in Page Size in the printer driver. For details on printer driver settings, see "Printing with Windows" on page 19 or "Printing with the printer driver. For details, refer to open the Paper Output Tray. (1) (2) Pull out the...the Cassette lamp (A) lights. Note z Select the page size of the printer. 6 Prepare the Paper Output Tray. (1) Push the Open Button to the Printer Driver Guide on-screen manual. (1) (2) (3) (A) 16 Before Printing z You can also select the paper source with Macintosh" on page 20. 5 Insert the ...
Quick Start Guide
Page 21
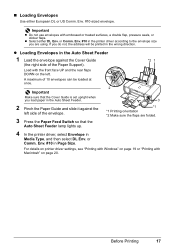
... Media Type, and then select DL Env. Load with Macintosh" on the left side of the Paper Support). or Comm. Env. #10 in the printer driver according to the envelope size you do not, the address will be loaded at once. 2 Important Make sure that the Auto Sheet Feeder lamp lights... *2 Make sure the flaps are using. Env. #10 in the Auto Sheet Feeder 1 Load the envelope against the left . or Comm. For details on printer driver settings, see "Printing with Windows" on page 19 or "Printing with the front face UP and the rear flaps DOWN on page 20. „ Loading...
... Media Type, and then select DL Env. Load with Macintosh" on the left side of the Paper Support). or Comm. Env. #10 in the printer driver according to the envelope size you do not, the address will be loaded at once. 2 Important Make sure that the Auto Sheet Feeder lamp lights... *2 Make sure the flaps are using. Env. #10 in the Auto Sheet Feeder 1 Load the envelope against the left . or Comm. For details on printer driver settings, see "Printing with Windows" on page 19 or "Printing with the front face UP and the rear flaps DOWN on page 20. „ Loading...

Quick Start Guide
Page 22
...4 Press the Paper Feed Switch so that the Cassette lamp lights up. *1 Make sure the flaps are folded. 4 *1 *1 Printing orientation 5 In the printer driver, select Envelope in Media Type, and then select DL Env. or Comm. A maximum of 5 envelopes can be loaded at once. 3 Slide the Paper Guide ...against the right 2 side of the Cassette." on page 20. 18 Before Printing For details on printer driver settings, see "Printing with Windows" on page 19 or "Printing with the front face DOWN. Env. #10 in the Cassette 1 Extend the Cassette...
...4 Press the Paper Feed Switch so that the Cassette lamp lights up. *1 Make sure the flaps are folded. 4 *1 *1 Printing orientation 5 In the printer driver, select Envelope in Media Type, and then select DL Env. or Comm. A maximum of 5 envelopes can be loaded at once. 3 Slide the Paper Guide ...against the right 2 side of the Cassette." on page 20. 18 Before Printing For details on printer driver settings, see "Printing with Windows" on page 19 or "Printing with the front face DOWN. Env. #10 in the Cassette 1 Extend the Cassette...
Quick Start Guide
Page 23
.... 7 Click Print (or OK). Note For details on other printer driver functions, click Help or Instructions to print using an appropriate application software. 4 Select Print on the application software's File menu. 5 Make sure that Canon iP4300 is only displayed when the on the printer and load the paper in... the printer. See "Changing the Paper Source" on page 11. 3 Create a document or open a file to view the online help or the Printer Driver Guide on page 4. 2 Make sure that Paper Feed Switch is selected. See "Turning the Printer On and Off" on page 2 and "Loading Printing ...
.... 7 Click Print (or OK). Note For details on other printer driver functions, click Help or Instructions to print using an appropriate application software. 4 Select Print on the application software's File menu. 5 Make sure that Canon iP4300 is only displayed when the on the printer and load the paper in... the printer. See "Changing the Paper Source" on page 11. 3 Create a document or open a file to view the online help or the Printer Driver Guide on page 4. 2 Make sure that Paper Feed Switch is selected. See "Turning the Printer On and Off" on page 2 and "Loading Printing ...


