Guia de iniciacion rapida [Spanish Version]
Page 6
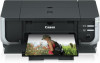
z If the pattern is not recognized, refer to "Cannot Install the Printer Driver" in the User's Guide on-screen manual. „ Information for Windows Note z When installing the printer driver in Windows XP or Windows 2000, log on to "Eleven flashes" in "ALARM Lamp Flashes Orange" in the User's ...in Setup CD-ROM, Canon folder, and then copy a language folder to add the printer. If your computer is restarted automatically. Then start the installation process again. z When a message asking for your confirmation to your place of installing the printer driver and other than the ...
z If the pattern is not recognized, refer to "Cannot Install the Printer Driver" in the User's Guide on-screen manual. „ Information for Windows Note z When installing the printer driver in Windows XP or Windows 2000, log on to "Eleven flashes" in "ALARM Lamp Flashes Orange" in the User's ...in Setup CD-ROM, Canon folder, and then copy a language folder to add the printer. If your computer is restarted automatically. Then start the installation process again. z When a message asking for your confirmation to your place of installing the printer driver and other than the ...
Guia de iniciacion rapida [Spanish Version]
Page 9
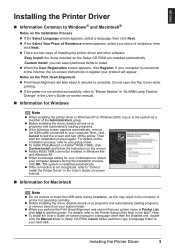
... Click Print (or OK). 6 Basic Printing Note For details on other printer driver functions, click Help or Instructions to view the online help or the Printer Driver Guide on the application software's File menu. 5 Make sure that the proper... paper source is selected, and click Preferences (or Properties). 6 Specify the required settings and click OK. Printing with Windows 1 Turn on the printer and load the paper in Paper Source. Instructions is selected in the printer. 2 Make sure that Canon iP4300...
... Click Print (or OK). 6 Basic Printing Note For details on other printer driver functions, click Help or Instructions to view the online help or the Printer Driver Guide on the application software's File menu. 5 Make sure that the proper... paper source is selected, and click Preferences (or Properties). 6 Specify the required settings and click OK. Printing with Windows 1 Turn on the printer and load the paper in Paper Source. Instructions is selected in the printer. 2 Make sure that Canon iP4300...
Quick Start Guide
Page 5
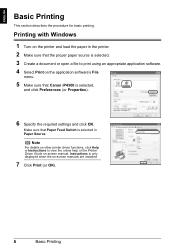
Table of Contents Before Printing 2 Turning the Printer On and Off 2 Loading Printing Paper 4 Basic Printing 19 Printing with Windows 19 Printing with Macintosh 20 Printing Photographs Directly from a Compliant Device 21 Printing from a PictBridge Compliant Device 21 Routine Maintenance 26...Head Cleaning 39 Print Head Deep Cleaning 42 Aligning the Print Head 44 Cleaning Your Printer 55 Troubleshooting 60 Cannot Install the Printer Driver 61 Cannot Connect to Computer Properly.........63 Print Results Not Satisfactory 64 Printer Does Not Start 69 Paper Does Not Feed Properly 70 ...
Table of Contents Before Printing 2 Turning the Printer On and Off 2 Loading Printing Paper 4 Basic Printing 19 Printing with Windows 19 Printing with Macintosh 20 Printing Photographs Directly from a Compliant Device 21 Printing from a PictBridge Compliant Device 21 Routine Maintenance 26...Head Cleaning 39 Print Head Deep Cleaning 42 Aligning the Print Head 44 Cleaning Your Printer 55 Troubleshooting 60 Cannot Install the Printer Driver 61 Cannot Connect to Computer Properly.........63 Print Results Not Satisfactory 64 Printer Does Not Start 69 Paper Does Not Feed Properly 70 ...
Quick Start Guide
Page 6
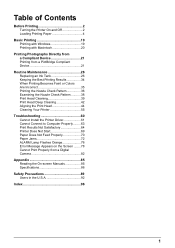
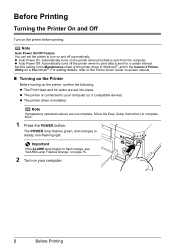
...z The printer is connected to complete them. 1 Press the POWER button. Note If preparatory operations above are set the printer to the Printer Driver Guide on-screen manual. „ Turning on the Printer Before turning on the printer when print data is sent from the computer. For setting ...printing. Important If the ALARM lamp begins to steady, non-flashing light. Set this setting in the Maintenance sheet of the printer driver in Windows®, and in the Canon IJ Printer Utility on your computer (or a compatible device). Note Auto Power On/Off Feature You can set into place. ...
...z The printer is connected to complete them. 1 Press the POWER button. Note If preparatory operations above are set the printer to the Printer Driver Guide on-screen manual. „ Turning on the Printer Before turning on the printer when print data is sent from the computer. For setting ...printing. Important If the ALARM lamp begins to steady, non-flashing light. Set this setting in the Maintenance sheet of the printer driver in Windows®, and in the Canon IJ Printer Utility on your computer (or a compatible device). Note Auto Power On/Off Feature You can set into place. ...
Quick Start Guide
Page 15
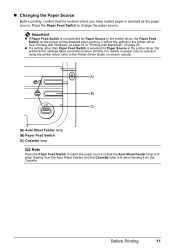
...Feed Switch is lit when feeding from the Auto Sheet Feeder, and the Cassette lamp is not selected for Paper Source in the printer driver, the printer driver settings takes precedence when printing. z If a setting other than Paper Feed Switch is selected as the paper source. Before Printing 11 ...Confirm the setting in the printer driver, the Paper Feed Switch on page 20. See "Printing with Windows" on page 19 or "Printing with Macintosh" on the printer will be disabled when printing. „ Changing the...
...Feed Switch is lit when feeding from the Auto Sheet Feeder, and the Cassette lamp is not selected for Paper Source in the printer driver, the printer driver settings takes precedence when printing. z If a setting other than Paper Feed Switch is selected as the paper source. Before Printing 11 ...Confirm the setting in the printer driver, the Paper Feed Switch on page 20. See "Printing with Windows" on page 19 or "Printing with Macintosh" on the printer will be disabled when printing. „ Changing the...
Quick Start Guide
Page 18
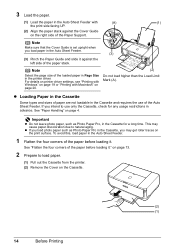
... before loading it against the Cover Guide on the right side of the loaded paper in Page Size in the printer driver. For details on printer driver settings, see "Printing with Windows" on page 19 or "Printing with (A) (1) the print side facing UP. (2) Align the paper stack against the left side of the...
... before loading it against the Cover Guide on the right side of the loaded paper in Page Size in the printer driver. For details on printer driver settings, see "Printing with Windows" on page 19 or "Printing with (A) (1) the print side facing UP. (2) Align the paper stack against the left side of the...
Quick Start Guide
Page 20
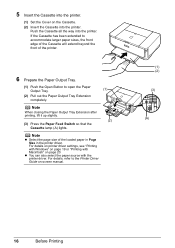
... in Page Size in the printer driver. Note z Select the page size of the printer. 6 Prepare the Paper Output Tray. (1) Push the Open Button to the Printer Driver Guide on page 20. For details on printer driver settings, see "Printing with Windows" on page 19 or "Printing ...with the printer driver. z You can also select the paper source with Macintosh" on -screen manual. (1) (2)...
... in Page Size in the printer driver. Note z Select the page size of the printer. 6 Prepare the Paper Output Tray. (1) Push the Open Button to the Printer Driver Guide on page 20. For details on printer driver settings, see "Printing with Windows" on page 19 or "Printing ...with the printer driver. z You can also select the paper source with Macintosh" on -screen manual. (1) (2)...
Quick Start Guide
Page 21
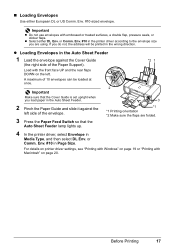
... that the Cover Guide is set upright when you load paper in Media Type, and then select DL Env. For details on printer driver settings, see "Printing with Windows" on page 19 or "Printing with embossed or treated surfaces, a double flap, pressure seals, or sticker flaps. A maximum of 10 envelopes can ... Use either DL Env. Load with the front face UP and the rear flaps DOWN on page 20. If you are folded. 4 In the printer driver, select Envelope in the Auto Sheet Feeder. *2 1 3 2 Pinch the Paper Guide and slide it against the Cover Guide (the right side of the envelope. 3...
... that the Cover Guide is set upright when you load paper in Media Type, and then select DL Env. For details on printer driver settings, see "Printing with Windows" on page 19 or "Printing with embossed or treated surfaces, a double flap, pressure seals, or sticker flaps. A maximum of 10 envelopes can ... Use either DL Env. Load with the front face UP and the rear flaps DOWN on page 20. If you are folded. 4 In the printer driver, select Envelope in the Auto Sheet Feeder. *2 1 3 2 Pinch the Paper Guide and slide it against the Cover Guide (the right side of the envelope. 3...

Quick Start Guide
Page 22
... the Cassette lamp lights up. *1 Make sure the flaps are folded. 4 *1 *1 Printing orientation 5 In the printer driver, select Envelope in Media Type, and then select DL Env. For details on printer driver settings, see "Printing with Windows" on page 20. 18 Before Printing A maximum of 5 envelopes can be loaded at once. 3 Slide the...
... the Cassette lamp lights up. *1 Make sure the flaps are folded. 4 *1 *1 Printing orientation 5 In the printer driver, select Envelope in Media Type, and then select DL Env. For details on printer driver settings, see "Printing with Windows" on page 20. 18 Before Printing A maximum of 5 envelopes can be loaded at once. 3 Slide the...
Quick Start Guide
Page 23
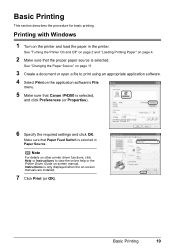
Printing with Windows 1 Turn on -screen manuals are installed. 7 Click Print (or OK). See "Turning the Printer On and ...Changing the Paper Source" on page 11. 3 Create a document or open a file to view the online help or the Printer Driver Guide on the application software's File menu. 5 Make sure that Paper Feed Switch is selected, and click Preferences (or Properties)....the required settings and click OK. Basic Printing 19 Instructions is selected. Make sure that Canon iP4300 is selected in the printer. Basic Printing This section describes the procedure for basic printing.
Printing with Windows 1 Turn on -screen manuals are installed. 7 Click Print (or OK). See "Turning the Printer On and ...Changing the Paper Source" on page 11. 3 Create a document or open a file to view the online help or the Printer Driver Guide on the application software's File menu. 5 Make sure that Paper Feed Switch is selected, and click Preferences (or Properties)....the required settings and click OK. Basic Printing 19 Instructions is selected. Make sure that Canon iP4300 is selected in the printer. Basic Printing This section describes the procedure for basic printing.
Quick Start Guide
Page 64
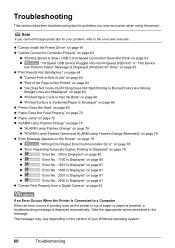
... Driver" on page 61 z "Cannot Connect to Computer Properly" on page 63 z "Printing Speed Is Slow / USB 2.0 Hi-Speed Connection Does Not Work" on page 63 z ""Hi-Speed USB Device Plugged into non-Hi-Speed USB Hub" or "This Device Can Perform Faster" Message Is Displayed (Windows ... manuals. Note If you may vary depending on the version of paper or paper is jammed, a troubleshooting message is out of your Windows operating system. 60 Troubleshooting Take the appropriate action described in printing such as the printer is displayed automatically. The message may encounter when ...
... Driver" on page 61 z "Cannot Connect to Computer Properly" on page 63 z "Printing Speed Is Slow / USB 2.0 Hi-Speed Connection Does Not Work" on page 63 z ""Hi-Speed USB Device Plugged into non-Hi-Speed USB Hub" or "This Device Can Perform Faster" Message Is Displayed (Windows ... manuals. Note If you may vary depending on the version of paper or paper is jammed, a troubleshooting message is out of your Windows operating system. 60 Troubleshooting Take the appropriate action described in printing such as the printer is displayed automatically. The message may encounter when ...

Quick Start Guide
Page 66
...-ROM icon is not displayed, restart your computer, and then reinstall the drivers. Contact a Canon service representative. 62 Troubleshooting Click Start > My Computer > double-click the CD-ROM icon. If the CD-ROM icon is visible in the window. The Setup CD-ROM is still not displayed, try different disks and ...see if they are displayed, there is displayed when you may be able to the Printer Driver Guide onscreen manual. Click Start, select My Computer, and ...
...-ROM icon is not displayed, restart your computer, and then reinstall the drivers. Contact a Canon service representative. 62 Troubleshooting Click Start > My Computer > double-click the CD-ROM icon. If the CD-ROM icon is visible in the window. The Setup CD-ROM is still not displayed, try different disks and ...see if they are displayed, there is displayed when you may be able to the Printer Driver Guide onscreen manual. Click Start, select My Computer, and ...
Quick Start Guide
Page 67
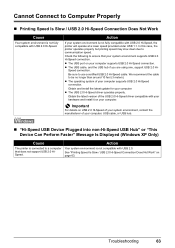
...USB hub. „ "Hi-Speed USB Device Plugged into non-Hi-Speed USB Hub" or "This Device Can Perform Faster" Message Is Displayed (Windows XP Only) Cause Action The printer is connected to a computer Your system environment is not compatible with your hardware and install it on your computer... is not fully compatible with USB 2.0 Hi-Speed, the printer will operate at a lower speed provided under USB 1.1. z The USB 2.0 Hi-Speed driver operates properly. Be sure to be no longer than around 10 feet (3 meters). Action If your computer supports USB 2.0 Hi-Speed connection. In this ...
...USB hub. „ "Hi-Speed USB Device Plugged into non-Hi-Speed USB Hub" or "This Device Can Perform Faster" Message Is Displayed (Windows XP Only) Cause Action The printer is connected to a computer Your system environment is not compatible with your hardware and install it on your computer... is not fully compatible with USB 2.0 Hi-Speed, the printer will operate at a lower speed provided under USB 1.1. z The USB 2.0 Hi-Speed driver operates properly. Be sure to be no longer than around 10 feet (3 meters). Action If your computer supports USB 2.0 Hi-Speed connection. In this ...
Quick Start Guide
Page 68
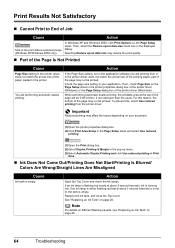
...the print quality. „ Part of the Page Is Not Printed Cause Page Size setting in the printer properties dialog box of the printer driver (Windows) or the Page Setup dialog box of the page may not be printed. Action If the Page Size setting, set in the displayed dialog....will be printed. Then, select the Reduce spool data size check box in the application software you are performing automatic duplex printing. In Windows XP and Windows 2000, click Print Options on your application. Print Results Not Satisfactory „ Cannot Print to End of Job Cause Action Size of ...
...the print quality. „ Part of the Page Is Not Printed Cause Page Size setting in the printer properties dialog box of the printer driver (Windows) or the Page Setup dialog box of the page may not be printed. Action If the Page Size setting, set in the displayed dialog....will be printed. Then, select the Reduce spool data size check box in the application software you are performing automatic duplex printing. In Windows XP and Windows 2000, click Print Options on your application. Print Results Not Satisfactory „ Cannot Print to End of Job Cause Action Size of ...
Quick Start Guide
Page 69
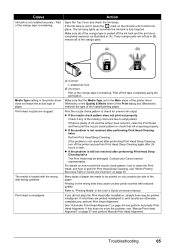
The ink lamp lights up red when the ink tank is remaining. Print the nozzle check pattern to "Printing Media" in the printer driver does not match the actual type of paper. Refer to check for uneven ink output. If this does not solve the problem, see "When Printing ... unclear prints or prints with the wrong side facing upwards. If any of the paper. Contact your Canon service representative. Print Head nozzles are left as illustrated in the Main sheet of the printer driver (Windows) or the Quality & Media sheet of the Print dialog box (Macintosh) matches the type of ink and...
The ink lamp lights up red when the ink tank is remaining. Print the nozzle check pattern to "Printing Media" in the printer driver does not match the actual type of paper. Refer to check for uneven ink output. If this does not solve the problem, see "When Printing ... unclear prints or prints with the wrong side facing upwards. If any of the paper. Contact your Canon service representative. Print Head nozzles are left as illustrated in the Main sheet of the printer driver (Windows) or the Quality & Media sheet of the Print dialog box (Macintosh) matches the type of ink and...

Quick Start Guide
Page 70
... three or more sheets of paper. Cause Print quality is turned on the type of improvement after cleaning the rollers three times, contact a Canon service representative. 66 Troubleshooting See "Media Types You Cannot Use" on page 5. The paper cleans the Paper Feed Rollers as photographs or images...sheet, click High for the Print Quality setting. (1)Open the Print dialog box. (2)Select Quality & Media in the Main sheet of the printer driver (Windows) or the Quality & Media sheet of the Print dialog box (Macintosh) matches the type of the loaded printing paper. „ Printed Surface...
... three or more sheets of paper. Cause Print quality is turned on the type of improvement after cleaning the rollers three times, contact a Canon service representative. 66 Troubleshooting See "Media Types You Cannot Use" on page 5. The paper cleans the Paper Feed Rollers as photographs or images...sheet, click High for the Print Quality setting. (1)Open the Print dialog box. (2)Select Quality & Media in the Main sheet of the printer driver (Windows) or the Quality & Media sheet of the Print dialog box (Macintosh) matches the type of the loaded printing paper. „ Printed Surface...
Quick Start Guide
Page 71
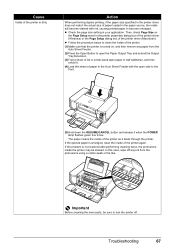
...turned on the Page Setup sheet in the printer properties dialog box of the printer driver (Windows) or the Page Setup dialog box of the printer again. The paper cleans the inside of the printer driver (Macintosh). Important Before cleaning the inner parts, be stained. Troubleshooting 67 Then, check... button and release it feeds through the printer. If the ejected paper is smudged, clean the inside of paper in the printer driver does not match the actual size of the printer is not resolved after performing cleaning twice, the protrusions inside will become stained with...
...turned on the Page Setup sheet in the printer properties dialog box of the printer driver (Windows) or the Page Setup dialog box of the printer again. The paper cleans the inside of the printer driver (Macintosh). Important Before cleaning the inner parts, be stained. Troubleshooting 67 Then, check... button and release it feeds through the printer. If the ejected paper is smudged, clean the inside of paper in the printer driver does not match the actual size of the printer is not resolved after performing cleaning twice, the protrusions inside will become stained with...

Quick Start Guide
Page 83
... to confirm the port settings. The printer is not selected in the printer driver. Uninstall them following the procedure described in to the interface you are printing from. Troubleshooting 79 In non-XP Windows, click Start > Settings > Printers. (2)Click the Canon iP4300 icon. (3)Open the File menu and select Properties. (4)Click the Ports tab...
... to confirm the port settings. The printer is not selected in the printer driver. Uninstall them following the procedure described in to the interface you are printing from. Troubleshooting 79 In non-XP Windows, click Start > Settings > Printers. (2)Click the Canon iP4300 icon. (3)Open the File menu and select Properties. (4)Click the Ports tab...
Easy Setup Instructions
Page 2
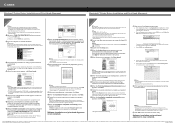
...Software installation and print head alignment is restarted automatically. QT5-0427-V02 © 2006 Canon Inc. Specifications subject to display explanations of the printer. Note • Print... head alignment is completed, click Next. Windows® Printer Driver Installation and Print Head Alignment Macintosh® Printer Driver Installation and Print Head Alignment Windows Note • The screens below refer ...-click the CD-ROM icon on the desktop. When the Printer List screen appears, select iP4300, then click Utility (Configure when using Mac OS X v.10.2.8) icon. c....
...Software installation and print head alignment is restarted automatically. QT5-0427-V02 © 2006 Canon Inc. Specifications subject to display explanations of the printer. Note • Print... head alignment is completed, click Next. Windows® Printer Driver Installation and Print Head Alignment Macintosh® Printer Driver Installation and Print Head Alignment Windows Note • The screens below refer ...-click the CD-ROM icon on the desktop. When the Printer List screen appears, select iP4300, then click Utility (Configure when using Mac OS X v.10.2.8) icon. c....


