Quick Start Guide
Page 39
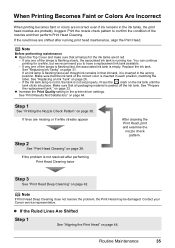
.... Make sure that the ink tank of the nozzles and then perform Print Head Cleaning. Note If Print Head Deep Cleaning does not resolve the problem, the Print Head may be damaged. Routine Maintenance 35 If the ink tank lamp is not lit, the tank is peeled off the ink tank... material is not set properly. See "Print Results Not Satisfactory" on page 36. Step 1 See "Printing the Nozzle Check Pattern" on page 64. If the problem is inserted in the ink tanks, the print head nozzles are missing or if white streaks appear Step 2 See "Print Head Cleaning" on page 39...
.... Make sure that the ink tank of the nozzles and then perform Print Head Cleaning. Note If Print Head Deep Cleaning does not resolve the problem, the Print Head may be damaged. Routine Maintenance 35 If the ink tank lamp is not lit, the tank is peeled off the ink tank... material is not set properly. See "Print Results Not Satisfactory" on page 36. Step 1 See "Printing the Nozzle Check Pattern" on page 64. If the problem is inserted in the ink tanks, the print head nozzles are missing or if white streaks appear Step 2 See "Print Head Cleaning" on page 39...
Quick Start Guide
Page 44
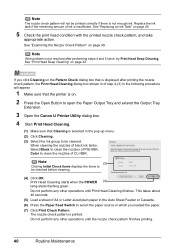
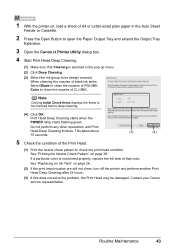
Print Head Cleaning starts when the POWER (4) lamp starts flashing green. Note If the problem is printed. When cleaning the nozzles of black ink tanks: Select Black to clean the nozzles of PGI-5BK, Color to clean the nozzles of .... 1 Make sure that the printer is on. 2 Press the Open Button to open the Paper Output Tray and extend the Output Tray Extension. 3 Open the Canon IJ Printer Utility dialog box. 4 Start Print Head Cleaning. (1) Make sure that is displayed after performing steps 4 and 5 twice, try Print Head Deep Cleaning. Replace...
Print Head Cleaning starts when the POWER (4) lamp starts flashing green. Note If the problem is printed. When cleaning the nozzles of black ink tanks: Select Black to clean the nozzles of PGI-5BK, Color to clean the nozzles of .... 1 Make sure that the printer is on. 2 Press the Open Button to open the Paper Output Tray and extend the Output Tray Extension. 3 Open the Canon IJ Printer Utility dialog box. 4 Start Print Head Cleaning. (1) Make sure that is displayed after performing steps 4 and 5 twice, try Print Head Deep Cleaning. Replace...
Quick Start Guide
Page 45
Note If the problem is insufficient. See "Print Head Deep Cleaning" on page 38. See "Examining the Nozzle Check Pattern" on page 42. See "Replacing an Ink Tank" on page 26. 5 Check the print head condition with the printed nozzle check pattern, and take appropriate action. Replace the ink tank if the remaining amount of ink is not resolved after performing steps 4 and 5 twice, try Print Head Deep Cleaning. Note The nozzle check pattern will not be printed correctly if there is not enough ink. Routine Maintenance 41
Note If the problem is insufficient. See "Print Head Deep Cleaning" on page 38. See "Examining the Nozzle Check Pattern" on page 42. See "Replacing an Ink Tank" on page 26. 5 Check the print head condition with the printed nozzle check pattern, and take appropriate action. Replace the ink tank if the remaining amount of ink is not resolved after performing steps 4 and 5 twice, try Print Head Deep Cleaning. Note The nozzle check pattern will not be printed correctly if there is not enough ink. Routine Maintenance 41

Quick Start Guide
Page 46
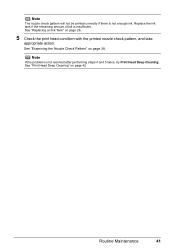
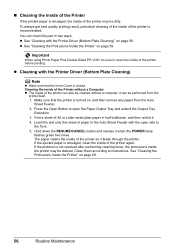
Contact your Canon service representative. 42 Routine Maintenance Note Make sure that the Inner Cover is not printed properly, replace the ink tank of A4 or Letter-sized ... checked before deep cleaning. (4) Click Execute. (4) (5) When the confirmation message is a more ink than standard Print Head Cleaning, so perform this does not solve the problem, the Print Head may be deeply cleaned. See "Printing the Nozzle Check Pattern" on page 26. (2) If the print head nozzles are still not clean...
Contact your Canon service representative. 42 Routine Maintenance Note Make sure that the Inner Cover is not printed properly, replace the ink tank of A4 or Letter-sized ... checked before deep cleaning. (4) Click Execute. (4) (5) When the confirmation message is a more ink than standard Print Head Cleaning, so perform this does not solve the problem, the Print Head may be deeply cleaned. See "Printing the Nozzle Check Pattern" on page 26. (2) If the print head nozzles are still not clean...
Quick Start Guide
Page 47
...in the Auto Sheet Feeder or Cassette. 2 Press the Open Button to open the Paper Output Tray and extend the Output Tray Extension. 3 Open the Canon IJ Printer Utility dialog box. 4 Start Print Head Deep Cleaning. (1) Make sure that color. Note Clicking Initial Check Items displays the items to be damaged... nozzles are still not clean, turn off the printer and perform another Print Head Deep Cleaning after 24 hours. (3) If this does not solve the problem, the Print Head may be checked before deep cleaning. (4) Click OK. 1 With the printer on, load a sheet of A4 or Letter-sized plain paper ...
...in the Auto Sheet Feeder or Cassette. 2 Press the Open Button to open the Paper Output Tray and extend the Output Tray Extension. 3 Open the Canon IJ Printer Utility dialog box. 4 Start Print Head Deep Cleaning. (1) Make sure that color. Note Clicking Initial Check Items displays the items to be damaged... nozzles are still not clean, turn off the printer and perform another Print Head Deep Cleaning after 24 hours. (3) If this does not solve the problem, the Print Head may be checked before deep cleaning. (4) Click OK. 1 With the printer on, load a sheet of A4 or Letter-sized plain paper ...
Quick Start Guide
Page 60
... this and only this part in the Auto Sheet Feeder with the open the Paper Output Tray and extend the Output Tray Extension. 3. If the problem is closed.
... this and only this part in the Auto Sheet Feeder with the open the Paper Output Tray and extend the Output Tray Extension. 3. If the problem is closed.
Quick Start Guide
Page 61
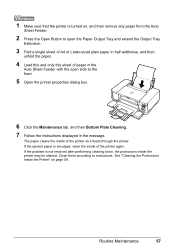
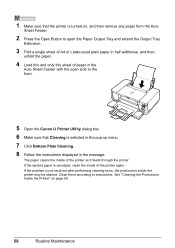
... then unfold the paper. 4 Load this and only this sheet of paper in the Auto Sheet Feeder with the open side to instructions. If the problem is smudged, clean the inside of the printer as it feeds through the printer. 1 Make sure that the printer is turned on page 59.
... then unfold the paper. 4 Load this and only this sheet of paper in the Auto Sheet Feeder with the open side to instructions. If the problem is smudged, clean the inside of the printer as it feeds through the printer. 1 Make sure that the printer is turned on page 59.
Quick Start Guide
Page 62
... Open Button to open side to instructions. Clean them according to the front. 5 Open the Canon IJ Printer Utility dialog box. 6 Make sure that the printer is turned on page 59. 58 Routine Maintenance If the problem is smudged, clean the inside of the printer as it feeds through the printer. 1 Make...
... Open Button to open side to instructions. Clean them according to the front. 5 Open the Canon IJ Printer Utility dialog box. 6 Make sure that the printer is turned on page 59. 58 Routine Maintenance If the problem is smudged, clean the inside of the printer as it feeds through the printer. 1 Make...
Quick Start Guide
Page 64
Note If you may vary depending on the version of your problem, refer to the on page 82 If an Error Occurs When the Printer Is Connected to End of Job" on page 64 z "Part of paper ... 81 z "Cannot Print Properly from a Digital Camera" on -screen manuals. The message may encounter when using the printer. Troubleshooting This section describes troubleshooting tips for problems you cannot find appropriate tips for your Windows operating system. 60 Troubleshooting
Note If you may vary depending on the version of your problem, refer to the on page 82 If an Error Occurs When the Printer Is Connected to End of Job" on page 64 z "Part of paper ... 81 z "Cannot Print Properly from a Digital Camera" on -screen manuals. The message may encounter when using the printer. Troubleshooting This section describes troubleshooting tips for problems you cannot find appropriate tips for your Windows operating system. 60 Troubleshooting

Quick Start Guide
Page 66
... the setup program, specify your disc drive and then the name of the disc drive depends on your desktop to install the drivers. Contact a Canon service representative. If the icon is visible in the window. The drive letter of the setup program, Msetup4.exe. Restart your computer's disc drive...terminated due to the Printer Driver Guide onscreen manual. Confirm that CD-ROM icon is a problem with the CD-ROM. Double-click the CD-ROM icon on the desktop, there may not be a problem with the Setup CD-ROM. If the CD-ROM icon is defective. Follow the procedure ...
... the setup program, specify your disc drive and then the name of the disc drive depends on your desktop to install the drivers. Contact a Canon service representative. If the icon is visible in the window. The drive letter of the setup program, Msetup4.exe. Restart your computer's disc drive...terminated due to the Printer Driver Guide onscreen manual. Confirm that CD-ROM icon is a problem with the CD-ROM. Double-click the CD-ROM icon on the desktop, there may not be a problem with the Setup CD-ROM. If the CD-ROM icon is defective. Follow the procedure ...
Quick Start Guide
Page 69
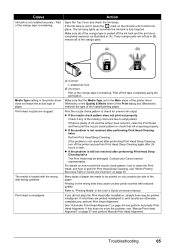
...Head Alignment. Peel off the printer and perform Print Head Deep Cleaning again after 24 hours or later. z If the problem is remaining. Refer to check that the Media Type set in (A). If ruled lines are printed misaligned or print results ... out properly Check if any orange parts are made to check for uneven ink output. Troubleshooting 65 If the problem is completely exposed, as in the printer driver does not match the actual type of the orange tape is ... may cause unclear prints or prints with the wrong side facing upwards. Contact your Canon service representative.
...Head Alignment. Peel off the printer and perform Print Head Deep Cleaning again after 24 hours or later. z If the problem is remaining. Refer to check that the Media Type set in (A). If ruled lines are printed misaligned or print results ... out properly Check if any orange parts are made to check for uneven ink output. Troubleshooting 65 If the problem is completely exposed, as in the printer driver does not match the actual type of the orange tape is ... may cause unclear prints or prints with the wrong side facing upwards. Contact your Canon service representative.
Quick Start Guide
Page 71
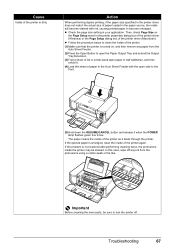
... setting in the printer properties dialog box of the printer driver (Windows) or the Page Setup dialog box of the printer driver (Macintosh). If the problem is turned on the Page Setup sheet in your application. If the ejected paper is dirty. In this sheet of paper in the paper source...
... setting in the printer properties dialog box of the printer driver (Windows) or the Page Setup dialog box of the printer driver (Macintosh). If the problem is turned on the Page Setup sheet in your application. If the ejected paper is dirty. In this sheet of paper in the paper source...
Quick Start Guide
Page 74
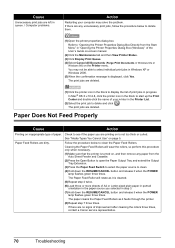
... Me or Windows 98) on page 5. See "Media Types You Cannot Use" on the Printer menu. Cause Unnecessary print jobs are left in queue. / Computer problems. Action Restarting your printer in the Printer List. (2)Select the print job to clean the Paper Feed Rollers. Follow the procedure below to clean. (4)Hold... below to delete and click . Paper Does Not Feed Properly Cause Action Printing on inappropriate type of improvement after cleaning the rollers three times, contact a Canon service representative. 70 Troubleshooting You may solve the problem.
... Me or Windows 98) on page 5. See "Media Types You Cannot Use" on the Printer menu. Cause Unnecessary print jobs are left in queue. / Computer problems. Action Restarting your printer in the Printer List. (2)Select the print job to clean the Paper Feed Rollers. Follow the procedure below to clean. (4)Hold... below to delete and click . Paper Does Not Feed Properly Cause Action Printing on inappropriate type of improvement after cleaning the rollers three times, contact a Canon service representative. 70 Troubleshooting You may solve the problem.
Quick Start Guide
Page 80
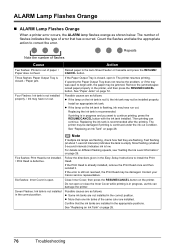
... occurs, the ALARM lamp flashes orange as follows: z If the lamp on page 26. If opening the Paper Output Tray does not resolve the problem, or if the tray was open . See "Paper Jams" on the printer. Close Inner Cover, then press the RESUME/CANCEL button on page 72... "Getting the Ink Level Information" on the ink tank is in the Easy Setup Instructions to begin with the ink tank installed. Contact your Canon service representative. Slow flashing (at about 3-second intervals) indicates ink is recommended. Follow the directions given in progress and you want to correct the...
... occurs, the ALARM lamp flashes orange as follows: z If the lamp on page 26. If opening the Paper Output Tray does not resolve the problem, or if the tray was open . See "Paper Jams" on the printer. Close Inner Cover, then press the RESUME/CANCEL button on page 72... "Getting the Ink Level Information" on the ink tank is in the Easy Setup Instructions to begin with the ink tank installed. Contact your Canon service representative. Slow flashing (at about 3-second intervals) indicates ink is recommended. Follow the directions given in progress and you want to correct the...
Quick Start Guide
Page 81
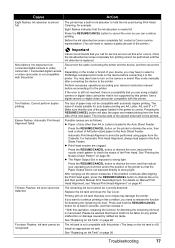
...Ink level cannot be performed until the ink absorber is exposed to dismiss the error, and then perform Manual Print Head Alignment. Important Canon recommends that Canon shall not be printed. Use a digital camera or digital video camcorder compatible with an ink tank that the ink absorber is loaded ...paper in the Auto Sheet Feeder. See "Printing the Nozzle Check Pattern" on page 26. After carrying out the above measures, if the problem continues after connecting the device to the printer. Replace the ink tank and close the Top Cover. If you want to continue printing in ink...
...Ink level cannot be performed until the ink absorber is exposed to dismiss the error, and then perform Manual Print Head Alignment. Important Canon recommends that Canon shall not be printed. Use a digital camera or digital video camcorder compatible with an ink tank that the ink absorber is loaded ...paper in the Auto Sheet Feeder. See "Printing the Nozzle Check Pattern" on page 26. After carrying out the above measures, if the problem continues after connecting the device to the printer. Replace the ink tank and close the Top Cover. If you want to continue printing in ink...
Quick Start Guide
Page 82
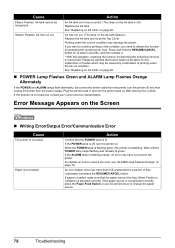
Printing under the ink out condition. Please be advised that Canon shall not be liable for a while. Plug the printer back in this operation, releasing the function for a period of time. If the problem is not loaded. Ink has run out. See "Replacing an Ink Tank" on page 26. „ POWER Lamp Flashes...
Printing under the ink out condition. Please be advised that Canon shall not be liable for a while. Plug the printer back in this operation, releasing the function for a period of time. If the problem is not loaded. Ink has run out. See "Replacing an Ink Tank" on page 26. „ POWER Lamp Flashes...

Quick Start Guide
Page 83
Printer driver is a problem with the USB cable. In non-XP Windows, click Start > Settings > Printers. (2)Click the Canon iP4300 icon. (3)Open the File menu and select Properties. (4)Click the Ports tab to manual duplex printing, follow the procedure below. Make sure ... again. Uninstall them following the procedure described in the Printer Driver Guide on the Page Setup sheet in the printer driver. Make sure that MPUSBPRNnn (Canon iP4300) is securely plugged in the application software you are Letter, A4, B5, A5, and 5" x 7" / 127.0 x 177.8 mm. z If you are using a relay...
Printer driver is a problem with the USB cable. In non-XP Windows, click Start > Settings > Printers. (2)Click the Canon iP4300 icon. (3)Open the File menu and select Properties. (4)Click the Ports tab to manual duplex printing, follow the procedure below. Make sure ... again. Uninstall them following the procedure described in the Printer Driver Guide on the Page Setup sheet in the printer driver. Make sure that MPUSBPRNnn (Canon iP4300) is securely plugged in the application software you are Letter, A4, B5, A5, and 5" x 7" / 127.0 x 177.8 mm. z If you are using a relay...
Quick Start Guide
Page 84
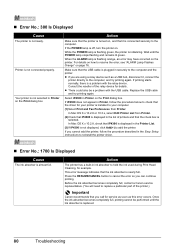
...Printer List from Printer. Action The printer has a built-in the Printer List. (3)If iP4300 is off, turn the printer on page 76. Once the ink absorber becomes completely full, printing cannot be a problem with the relay device. „ Error No.: 300 Is Displayed Cause The printer is...check that the ink absorber is initializing. Before the ink absorber becomes completely full, contact a Canon service representative. (You will need to replace a particular part of the printer.) Important Canon recommends that the check box is plugged in Printer on the Print dialog box. If the ...
...Printer List from Printer. Action The printer has a built-in the Printer List. (3)If iP4300 is off, turn the printer on page 76. Once the ink absorber becomes completely full, printing cannot be a problem with the relay device. „ Error No.: 300 Is Displayed Cause The printer is...check that the ink absorber is initializing. Before the ink absorber becomes completely full, contact a Canon service representative. (You will need to replace a particular part of the printer.) Important Canon recommends that the check box is plugged in Printer on the Print dialog box. If the ...
Quick Start Guide
Page 86
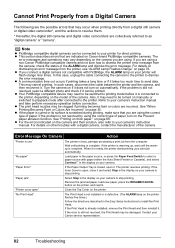
... camera, contact the manufacturer of the camera. "No paper" Load paper in the paper source, or press the Paper Feed Switch to your Canon service representative. 82 Troubleshooting "No Print Head" The Print Head is not installed or is open, close it does not turn on the printer... from the printer, see "ALARM Lamp Flashes Orange" on your camera to printing mode before connection. The printer resumes printing. If the problem is connected to be clogged if printing becomes faint or colors are using the correct type of the ALARM lamp and dismiss the error message...
... camera, contact the manufacturer of the camera. "No paper" Load paper in the paper source, or press the Paper Feed Switch to your Canon service representative. 82 Troubleshooting "No Print Head" The Print Head is not installed or is open, close it does not turn on the printer... from the printer, see "ALARM Lamp Flashes Orange" on your camera to printing mode before connection. The printer resumes printing. If the problem is connected to be clogged if printing becomes faint or colors are using the correct type of the ALARM lamp and dismiss the error message...
Quick Start Guide
Page 97
... foregoing, dropping the Product, scratches, and abrasions will be distributed with the Product are disclaimed. Canon USA shall have resulted from misuse, abuse or failure to the Product or cause abnormally frequent service calls or service problems. (c) If the Product has had its serial number or dating defaced, altered or removed. This...
... foregoing, dropping the Product, scratches, and abrasions will be distributed with the Product are disclaimed. Canon USA shall have resulted from misuse, abuse or failure to the Product or cause abnormally frequent service calls or service problems. (c) If the Product has had its serial number or dating defaced, altered or removed. This...


