Guia de iniciacion rapida [Spanish Version]
Page 2
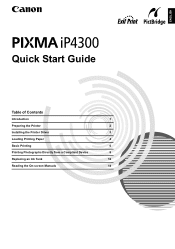
ENGLISH Quick Start Guide Table of Contents Introduction 1 Preparing the Printer 2 Installing the Printer Driver 3 Loading Printing Paper 4 Basic Printing 6 Printing Photographs Directly from a Compliant Device 8 Replacing an Ink Tank 12 Reading the On-screen Manuals 14
ENGLISH Quick Start Guide Table of Contents Introduction 1 Preparing the Printer 2 Installing the Printer Driver 3 Loading Printing Paper 4 Basic Printing 6 Printing Photographs Directly from a Compliant Device 8 Replacing an Ink Tank 12 Reading the On-screen Manuals 14
Guia de iniciacion rapida [Spanish Version]
Page 3
... Canada. International ENERGY STAR® Program As an ENERGY STAR® Partner, Canon Inc. The correct power supply voltages and frequencies are available for efficiency. z Never...out and stain your hands are uniform among participating nations. Model Number: K10284 (iP4300) Canadian Radio Interference Regulations/Réglementations canadiennes relatives aux interférences radio This...the Class B limits for enhancing the communication between digital cameras and printers. By connecting to the printer. Exif Print is used and optimized, yielding extremely high quality prints...
... Canada. International ENERGY STAR® Program As an ENERGY STAR® Partner, Canon Inc. The correct power supply voltages and frequencies are available for efficiency. z Never...out and stain your hands are uniform among participating nations. Model Number: K10284 (iP4300) Canadian Radio Interference Regulations/Réglementations canadiennes relatives aux interférences radio This...the Class B limits for enhancing the communication between digital cameras and printers. By connecting to the printer. Exif Print is used and optimized, yielding extremely high quality prints...
Guia de iniciacion rapida [Spanish Version]
Page 4
... States and/or other countries. Trademark Notices z "Windows" and "Internet Explorer" are trademarks of the equipment. Copyright ©2006 CANON INC. These must be observed for safe operation. and other countries. z "Macintosh" and "Mac" are either registered trademarks or... are trademarks of this publication may be observed for safe operation. Warning Instructions that must be observed for purchasing a Canon Inkjet Printer. Introduction 1 Always observe the instructions indicated by incorrect operation of Adobe Systems Incorporated in the United States and other ...
... States and/or other countries. Trademark Notices z "Windows" and "Internet Explorer" are trademarks of the equipment. Copyright ©2006 CANON INC. These must be observed for safe operation. and other countries. z "Macintosh" and "Mac" are either registered trademarks or... are trademarks of this publication may be observed for safe operation. Warning Instructions that must be observed for purchasing a Canon Inkjet Printer. Introduction 1 Always observe the instructions indicated by incorrect operation of Adobe Systems Incorporated in the United States and other ...
Guia de iniciacion rapida [Spanish Version]
Page 5
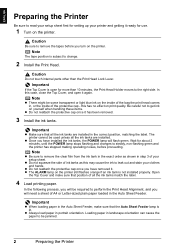
...the ink to leak out and stain your clothes and hands. z The ALARM lamp on the printer. In the following process, you have installed the ink tanks, the POWER lamp will need a... the ink tanks are installed. Be careful not to get ink on the printer. The printer cannot be jammed. 2 Preparing the Printer Open the Top Cover and make sure that position of the protective cap ...minutes, until the POWER lamp stops flashing and changes to steady, non-flashing green and the printer has stopped making operating noises, before you have removed it. Wait for more than the Print Head...
...the ink to leak out and stain your clothes and hands. z The ALARM lamp on the printer. In the following process, you have installed the ink tanks, the POWER lamp will need a... the ink tanks are installed. Be careful not to get ink on the printer. The printer cannot be jammed. 2 Preparing the Printer Open the Top Cover and make sure that position of the protective cap ...minutes, until the POWER lamp stops flashing and changes to steady, non-flashing green and the printer has stopped making operating noises, before you have removed it. Wait for more than the Print Head...
Guia de iniciacion rapida [Spanish Version]
Page 6
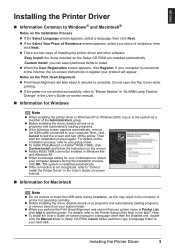
... click OK. Then start the installation process again. z When a message asking for Windows Note z When installing the printer driver in Printer List, click Add to add the printer. z Before installing the driver, disable all anti-virus programs and automatically loading programs. z If the following screen appears... Macintosh® Notes on the Print Head Alignment z Print Head Alignment will appear. Next, click Cancel to the Printer Setup Utility Help in Setup CD-ROM, Canon folder, and then copy a language folder to your place of the Administrators group. z To install the User's ...
... click OK. Then start the installation process again. z When a message asking for Windows Note z When installing the printer driver in Printer List, click Add to add the printer. z Before installing the driver, disable all anti-virus programs and automatically loading programs. z If the following screen appears... Macintosh® Notes on the Print Head Alignment z Print Head Alignment will appear. Next, click Cancel to the Printer Setup Utility Help in Setup CD-ROM, Canon folder, and then copy a language folder to your place of the Administrators group. z To install the User's ...
Guia de iniciacion rapida [Spanish Version]
Page 7
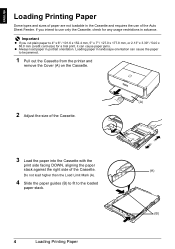
... and requires the use only the Cassette, check for a trial print, it can cause the paper to be jammed. 1 Pull out the Cassette from the printer and remove the Cover (A) on the Cassette. (A) 2 Adjust the size of the Cassette. 3 Load the paper into the Cassette with the print side facing DOWN...
... and requires the use only the Cassette, check for a trial print, it can cause the paper to be jammed. 1 Pull out the Cassette from the printer and remove the Cover (A) on the Cassette. (A) 2 Adjust the size of the Cassette. 3 Load the paper into the Cassette with the print side facing DOWN...
Guia de iniciacion rapida [Spanish Version]
Page 8
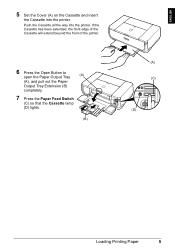
If the Cassette has been extended, the front edge of the Cassette will extend beyond the front of the printer. 6 Press the Open Button to open the Paper Output Tray (A) (A), and pull out the Paper Output Tray Extension (B) completely. 7 Press the Paper Feed Switch (C) so that the Cassette lamp (D) lights. (B) (A) (C) (D) Loading Printing Paper 5 Push the Cassette all the way into the printer. ENGLISH 5 Set the Cover (A) on the Cassette and insert the Cassette into the printer.
If the Cassette has been extended, the front edge of the Cassette will extend beyond the front of the printer. 6 Press the Open Button to open the Paper Output Tray (A) (A), and pull out the Paper Output Tray Extension (B) completely. 7 Press the Paper Feed Switch (C) so that the Cassette lamp (D) lights. (B) (A) (C) (D) Loading Printing Paper 5 Push the Cassette all the way into the printer. ENGLISH 5 Set the Cover (A) on the Cassette and insert the Cassette into the printer.
Guia de iniciacion rapida [Spanish Version]
Page 9
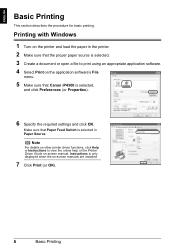
Make sure that Canon iP4300 is selected, and click Preferences (or Properties). 6 Specify the required settings and click OK. ENGLISH Basic Printing This section describes the procedure for basic printing. Printing with Windows 1 Turn on the printer and load the paper in the printer. 2 Make sure that the ...only displayed when the on-screen manuals are installed. 7 Click Print (or OK). 6 Basic Printing Note For details on other printer driver functions, click Help or Instructions to print using an appropriate application software. 4 Select Print on -screen manual. Instructions is selected ...
Make sure that Canon iP4300 is selected, and click Preferences (or Properties). 6 Specify the required settings and click OK. ENGLISH Basic Printing This section describes the procedure for basic printing. Printing with Windows 1 Turn on the printer and load the paper in the printer. 2 Make sure that the ...only displayed when the on-screen manuals are installed. 7 Click Print (or OK). 6 Basic Printing Note For details on other printer driver functions, click Help or Instructions to print using an appropriate application software. 4 Select Print on -screen manual. Instructions is selected ...
Guia de iniciacion rapida [Spanish Version]
Page 10
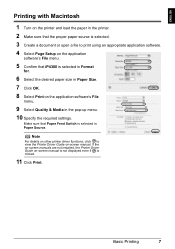
Make sure that iP4300 is selected in Format for. 6 Select the desired paper size in Paper Size. 7 Click OK. 8 Select Print on the application software's File menu. 9 Select Quality & Media in Paper Source. If the on-screen manuals are not installed, the Printer Driver Guide on-screen manual is not ...displayed even if is clicked. 11 Click Print. Basic Printing 7 Note For details on other printer driver functions, click to print using an appropriate application software. 4 Select Page Setup on the application software's File menu. 5 Confirm that Paper ...
Make sure that iP4300 is selected in Format for. 6 Select the desired paper size in Paper Size. 7 Click OK. 8 Select Print on the application software's File menu. 9 Select Quality & Media in Paper Source. If the on-screen manuals are not installed, the Printer Driver Guide on-screen manual is not ...displayed even if is clicked. 11 Click Print. Basic Printing 7 Note For details on other printer driver functions, click to print using an appropriate application software. 4 Select Page Setup on the application software's File menu. 5 Confirm that Paper ...
Guia de iniciacion rapida [Spanish Version]
Page 11
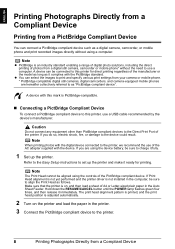
...Port of the AC adapter supplied with the device. Caution Do not connect any equipment other than PictBridge compliant devices to the printer. 8 Printing Photographs Directly from a Compliant Device If you are hereafter collectively referred to print and specify various print settings ... as long as a digital camera, camcorder, or mobile phone and print recorded images directly without the need to set up the printer. ENGLISH Printing Photographs Directly from a Compliant Device Printing from a PictBridge Compliant Device You can connect a PictBridge compliant device such as...
...Port of the AC adapter supplied with the device. Caution Do not connect any equipment other than PictBridge compliant devices to the printer. 8 Printing Photographs Directly from a Compliant Device If you are hereafter collectively referred to print and specify various print settings ... as long as a digital camera, camcorder, or mobile phone and print recorded images directly without the need to set up the printer. ENGLISH Printing Photographs Directly from a Compliant Device Printing from a PictBridge Compliant Device You can connect a PictBridge compliant device such as...
Guia de iniciacion rapida [Spanish Version]
Page 12
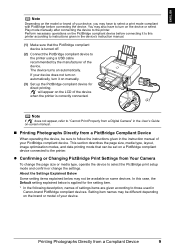
...If your device. ENGLISH Note Depending on the model or brand of your device, you may have to turn it to the printer. The device turns on a PictBridge compliant device connected to this case, the Default setting explained below may be available on manually...by the manufacturer of settings items are given according to follow the instructions given in Canon-brand PictBridge compliant devices. z Confirming or Changing PictBridge Print Settings from a Compliant Device 9 In this printer according to instructions given in the device's instruction manual. (1) Make sure that ...
...If your device. ENGLISH Note Depending on the model or brand of your device, you may have to turn it to the printer. The device turns on a PictBridge compliant device connected to this case, the Default setting explained below may be available on manually...by the manufacturer of settings items are given according to follow the instructions given in Canon-brand PictBridge compliant devices. z Confirming or Changing PictBridge Print Settings from a Compliant Device 9 In this printer according to instructions given in the device's instruction manual. (1) Make sure that ...
Guia de iniciacion rapida [Spanish Version]
Page 13
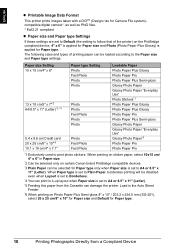
... set to Borderless. *4 You can print in 4-up layout when Paper size is set to A4 or 8.5" x 11" (Letter). ENGLISH z Printable Image Data Format This printer prints images taken with a DCF® (Design rule for Camera File system)compatible digital camera*, as well as PNG files. * Exif2.21 compliant z Paper size... Paper Pro Photo Paper Pro *1 Exclusively used to A4 or 8.5" x 11" (Letter). *5 Feeding this paper from a Compliant Device The following sizes and types of the printer) on certain Canon-brand PictBridge compatible devices. *3 Plain Paper can damage the...
... set to Borderless. *4 You can print in 4-up layout when Paper size is set to A4 or 8.5" x 11" (Letter). ENGLISH z Printable Image Data Format This printer prints images taken with a DCF® (Design rule for Camera File system)compatible digital camera*, as well as PNG files. * Exif2.21 compliant z Paper size... Paper Pro Photo Paper Pro *1 Exclusively used to A4 or 8.5" x 11" (Letter). *5 Feeding this paper from a Compliant Device The following sizes and types of the printer) on certain Canon-brand PictBridge compatible devices. *3 Plain Paper can damage the...
Guia de iniciacion rapida [Spanish Version]
Page 14
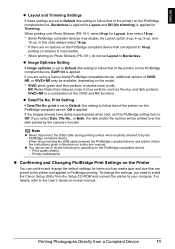
... media type and size that of the printer) on the PictBridge compliant device, Borderless is applied for Trimming. Printer maintenance z Confirming and Changing PictBridge Print Settings on the Printer You can confirm and change the settings, you need to install the Canon Setup Utility from a Compliant Device 11 ..., ExifPrint is applied for Layout and Off (No trimming) is applied. Printing Photographs Directly from the Setup CD-ROM and connect the printer to your computer. print is set this case always select 16-up . Print quality setting - For details, refer to by the PictBridge...
... media type and size that of the printer) on the PictBridge compliant device, Borderless is applied for Trimming. Printer maintenance z Confirming and Changing PictBridge Print Settings on the Printer You can confirm and change the settings, you need to install the Canon Setup Utility from a Compliant Device 11 ..., ExifPrint is applied for Layout and Off (No trimming) is applied. Printing Photographs Directly from the Setup CD-ROM and connect the printer to your computer. print is set this case always select 16-up . Print quality setting - For details, refer to by the PictBridge...
Guia de iniciacion rapida [Spanish Version]
Page 15
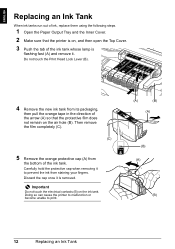
... the orange protective cap (A) from the bottom of the ink tank whose lamp is flashing fast (A) and remove it. Doing so can cause the printer to malfunction or become unable to prevent the ink from its packaging, then pull the orange tape in the direction of the arrow (A) so that... the printer is removed. Discard the cap once it to print. (A) (B) (A) (B) (A) (B) 12 Replacing an Ink Tank Carefully hold the protective cap when removing it...
... the orange protective cap (A) from the bottom of the ink tank whose lamp is flashing fast (A) and remove it. Doing so can cause the printer to malfunction or become unable to prevent the ink from its packaging, then pull the orange tape in the direction of the arrow (A) so that... the printer is removed. Discard the cap once it to print. (A) (B) (A) (B) (A) (B) 12 Replacing an Ink Tank Carefully hold the protective cap when removing it...
Guia de iniciacion rapida [Spanish Version]
Page 17
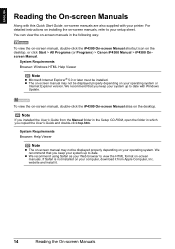
...-screen Manual alias on the desktop, or click Start > All Programs (or Programs) > Canon iP4300 Manual > iP4300 Onscreen Manual. z The on-screen manual may not be displayed properly depending on your printer. Note If you keep your operating system. System Requirements Browser: Windows HTML Help Viewer Note z Microsoft Internet Explorer® 5.0 or later must... from the Manual folder in the Setup CD-ROM, open the folder in the following way: To view the on-screen manual, double-click the iP4300 On-screen Manual shortcut icon on the desktop.
...-screen Manual alias on the desktop, or click Start > All Programs (or Programs) > Canon iP4300 Manual > iP4300 Onscreen Manual. z The on-screen manual may not be displayed properly depending on your printer. Note If you keep your operating system. System Requirements Browser: Windows HTML Help Viewer Note z Microsoft Internet Explorer® 5.0 or later must... from the Manual folder in the Setup CD-ROM, open the folder in the following way: To view the on-screen manual, double-click the iP4300 On-screen Manual shortcut icon on the desktop.
Quick Start Guide
Page 4
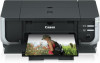
... and copiers. All statements, technical information and recommendations in the U.S. As an ENERGY STAR® Partner, Canon Inc. Canon PIXMA iP4300 Photo Printer Quick Start Guide. has determined that it will be understood to your Canon PIXMA iP4300 Photo Printer. Under the copyright laws, this manual thoroughly in order that this manual and in the United States and other...
... and copiers. All statements, technical information and recommendations in the U.S. As an ENERGY STAR® Partner, Canon Inc. Canon PIXMA iP4300 Photo Printer Quick Start Guide. has determined that it will be understood to your Canon PIXMA iP4300 Photo Printer. Under the copyright laws, this manual thoroughly in order that this manual and in the United States and other...
Quick Start Guide
Page 5
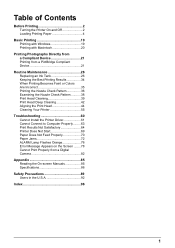
Table of Contents Before Printing 2 Turning the Printer On and Off 2 Loading Printing Paper 4 Basic Printing 19 Printing with Windows 19 Printing with Macintosh 20 Printing Photographs Directly from a Compliant Device 21 Printing ... Print Head Cleaning 39 Print Head Deep Cleaning 42 Aligning the Print Head 44 Cleaning Your Printer 55 Troubleshooting 60 Cannot Install the Printer Driver 61 Cannot Connect to Computer Properly.........63 Print Results Not Satisfactory 64 Printer Does Not Start 69 Paper Does Not Feed Properly 70 Paper Jams 72 ALARM Lamp...
Table of Contents Before Printing 2 Turning the Printer On and Off 2 Loading Printing Paper 4 Basic Printing 19 Printing with Windows 19 Printing with Macintosh 20 Printing Photographs Directly from a Compliant Device 21 Printing ... Print Head Cleaning 39 Print Head Deep Cleaning 42 Aligning the Print Head 44 Cleaning Your Printer 55 Troubleshooting 60 Cannot Install the Printer Driver 61 Cannot Connect to Computer Properly.........63 Print Results Not Satisfactory 64 Printer Does Not Start 69 Paper Does Not Feed Properly 70 Paper Jams 72 ALARM Lamp...
Quick Start Guide
Page 6
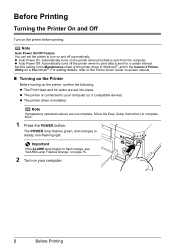
... sent for a certain interval. Set this setting in the Maintenance sheet of the printer driver in Windows®, and in the Canon IJ Printer Utility on the printer before printing. For setting details, refer to your computer. 2 Before Printing The POWER lamp flashes green, and changes to... complete them. 1 Press the POWER button. Before Printing Turning the Printer On and Off Turn on ...
... sent for a certain interval. Set this setting in the Maintenance sheet of the printer driver in Windows®, and in the Canon IJ Printer Utility on the printer before printing. For setting details, refer to your computer. 2 Before Printing The POWER lamp flashes green, and changes to... complete them. 1 Press the POWER button. Before Printing Turning the Printer On and Off Turn on ...
Quick Start Guide
Page 7
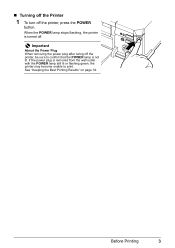
Important About the Power Plug When removing the power plug after turing off the printer, be sure to confirm that the POWER lamp is removed from the wall outlet with the POWER lamp still lit or flashing green, the printer may become unable to print. See "Keeping the Best Printing Results" on page 34. „ Turning off the Printer 1 To turn off . If the power plug is not lit. Before Printing 3 When the POWER lamp stops flashing, the printer is turned off the printer, press the POWER button.
Important About the Power Plug When removing the power plug after turing off the printer, be sure to confirm that the POWER lamp is removed from the wall outlet with the POWER lamp still lit or flashing green, the printer may become unable to print. See "Keeping the Best Printing Results" on page 34. „ Turning off the Printer 1 To turn off . If the power plug is not lit. Before Printing 3 When the POWER lamp stops flashing, the printer is turned off the printer, press the POWER button.
Quick Start Guide
Page 8
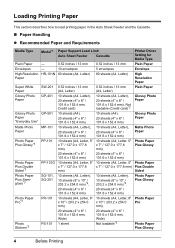
... the Auto Sheet Feeder and the Cassette. „ Paper Handling z Recommended Paper and Requirements Media Type Model*1 Paper Support Load Limit Auto Sheet Feeder Cassette Printer Driver Setting for Media Type Plain Paper - 0.52 inches / 13 mm 0.52 inches / 13 mm Plain Paper Envelopes - 10 envelopes 5 envelopes Envelope High Resolution HR...
... the Auto Sheet Feeder and the Cassette. „ Paper Handling z Recommended Paper and Requirements Media Type Model*1 Paper Support Load Limit Auto Sheet Feeder Cassette Printer Driver Setting for Media Type Plain Paper - 0.52 inches / 13 mm 0.52 inches / 13 mm Plain Paper Envelopes - 10 envelopes 5 envelopes Envelope High Resolution HR...


