Guia de iniciacion rapida [Spanish Version]
Page 5
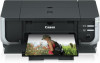
...Once you will be some transparent or light blue ink on the inside of the bag the print head comes in, or the inside of A4 or Letter-sized plain paper loaded in the exact order... paper in landscape orientation can cause the paper to the right side. Note z Be sure to perform the Print Head Alignment, and you have installed the ink tanks, the POWER lamp will need a sheet of the protective cap... - Be careful not to change. 2 Install the Print Head. Note The tape position is subject to get ink on the printer still flashes orange if an ink...
...Once you will be some transparent or light blue ink on the inside of the bag the print head comes in, or the inside of A4 or Letter-sized plain paper loaded in the exact order... paper in landscape orientation can cause the paper to the right side. Note z Be sure to perform the Print Head Alignment, and you have installed the ink tanks, the POWER lamp will need a sheet of the protective cap... - Be careful not to change. 2 Install the Print Head. Note The tape position is subject to get ink on the printer still flashes orange if an ink...
Guia de iniciacion rapida [Spanish Version]
Page 6
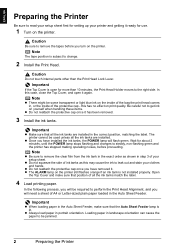
... The system is not recognized, refer to the system as this may result in Windows XP or Windows 2000, log on the Print Head Alignment z Print Head Alignment will appear. z Before installing the driver, disable all anti-virus programs and automatically loading programs. z If the following screen ...computer appears during installation, as a member of the Administrators group. If your computer is not printed successfully, refer to "Eleven flashes" in "ALARM Lamp Flashes Orange" in Setup CD-ROM, Canon folder, and then copy a language folder to your computer. z If the Select Your Place...
... The system is not recognized, refer to the system as this may result in Windows XP or Windows 2000, log on the Print Head Alignment z Print Head Alignment will appear. z Before installing the driver, disable all anti-virus programs and automatically loading programs. z If the following screen ...computer appears during installation, as a member of the Administrators group. If your computer is not printed successfully, refer to "Eleven flashes" in "ALARM Lamp Flashes Orange" in Setup CD-ROM, Canon folder, and then copy a language folder to your computer. z If the Select Your Place...
Guia de iniciacion rapida [Spanish Version]
Page 11
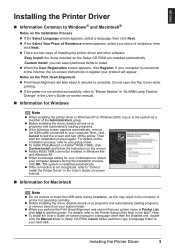
... collectively referred to as "PictBridge compliant device". Refer to the Easy Setup Instructions to set up the printer. The print head alignment pattern is printed, and the print head position is not installed in the printer. 3 Connect the PictBridge compliant device to the printer, we recommend the use... in the computer, be aligned using a computer. Note The Print Head cannot be sure to align the Print Head as a digital camera, camcorder, or mobile phone and print recorded images directly without the need to the Direct Print Port of A4 or Letter-sized plain paper in the Auto ...
... collectively referred to as "PictBridge compliant device". Refer to the Easy Setup Instructions to set up the printer. The print head alignment pattern is printed, and the print head position is not installed in the printer. 3 Connect the PictBridge compliant device to the printer, we recommend the use... in the computer, be aligned using a computer. Note The Print Head cannot be sure to align the Print Head as a digital camera, camcorder, or mobile phone and print recorded images directly without the need to the Direct Print Port of A4 or Letter-sized plain paper in the Auto ...
Guia de iniciacion rapida [Spanish Version]
Page 15
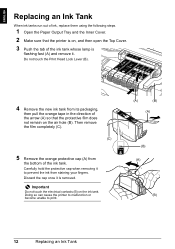
... pull the orange tape in the direction of the arrow (A) so that the printer is on the ink tank. Discard the cap once it to print. (A) (B) (A) (B) (A) (B) 12 Replacing an Ink Tank Carefully hold the protective cap when removing it is removed. Important Do not touch the electrical contacts (B) on , and...the Paper Output Tray and the Inner Cover. 2 Make sure that the protective film does not remain on the air hole (B). Do not touch the Print Head Lock Lever (B). 4 Remove the new ink tank from the bottom of the ink tank. Doing so can cause the printer to malfunction or become ...
... pull the orange tape in the direction of the arrow (A) so that the printer is on the ink tank. Discard the cap once it to print. (A) (B) (A) (B) (A) (B) 12 Replacing an Ink Tank Carefully hold the protective cap when removing it is removed. Important Do not touch the electrical contacts (B) on , and...the Paper Output Tray and the Inner Cover. 2 Make sure that the protective film does not remain on the air hole (B). Do not touch the Print Head Lock Lever (B). 4 Remove the new ink tank from the bottom of the ink tank. Doing so can cause the printer to malfunction or become ...
Guia de iniciacion rapida [Spanish Version]
Page 16
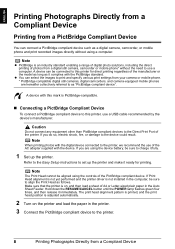
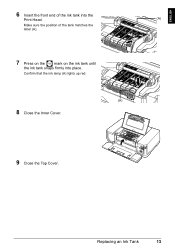
Replacing an Ink Tank 13 ENGLISH 6 Insert the front end of the ink tank into the Print Head. (A) Make sure the position of the tank matches the label (A). 7 Press on the mark on the ink tank until the ink tank snaps firmly into place. Confirm that the ink lamp (A) lights up red. (A) 8 Close the Inner Cover. 9 Close the Top Cover.
Replacing an Ink Tank 13 ENGLISH 6 Insert the front end of the ink tank into the Print Head. (A) Make sure the position of the tank matches the label (A). 7 Press on the mark on the ink tank until the ink tank snaps firmly into place. Confirm that the ink lamp (A) lights up red. (A) 8 Close the Inner Cover. 9 Close the Top Cover.
Quick Start Guide
Page 5
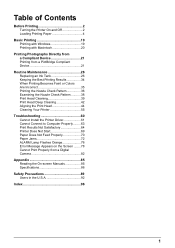
... Routine Maintenance 26 Replacing an Ink Tank 26 Keeping the Best Printing Results 34 When Printing Becomes Faint or Colors Are Incorrect 35 Printing the Nozzle Check Pattern 36 Examining the Nozzle Check Pattern ...........38 Print Head Cleaning 39 Print Head Deep Cleaning 42 Aligning the Print Head 44 Cleaning Your Printer 55 Troubleshooting 60 Cannot Install the Printer...
... Routine Maintenance 26 Replacing an Ink Tank 26 Keeping the Best Printing Results 34 When Printing Becomes Faint or Colors Are Incorrect 35 Printing the Nozzle Check Pattern 36 Examining the Nozzle Check Pattern ...........38 Print Head Cleaning 39 Print Head Deep Cleaning 42 Aligning the Print Head 44 Cleaning Your Printer 55 Troubleshooting 60 Cannot Install the Printer...
Quick Start Guide
Page 6
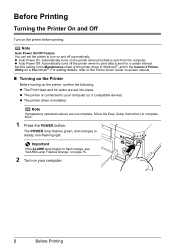
... into place. Set this setting in the Maintenance sheet of the printer driver in Windows®, and in the Canon IJ Printer Utility on and off the printer when no print data is sent from the computer. Important If the ALARM lamp begins to turn on a Macintosh®. Before... Turn on your computer (or a compatible device). The POWER lamp flashes green, and changes to complete them. 1 Press the POWER button. z The Print Head and ink tanks are not complete, follow the Easy Setup Instructions to steady, non-flashing light. z Auto Power Off: Automatically turns off automatically.
... into place. Set this setting in the Maintenance sheet of the printer driver in Windows®, and in the Canon IJ Printer Utility on and off the printer when no print data is sent from the computer. Important If the ALARM lamp begins to turn on a Macintosh®. Before... Turn on your computer (or a compatible device). The POWER lamp flashes green, and changes to complete them. 1 Press the POWER button. z The Print Head and ink tanks are not complete, follow the Easy Setup Instructions to steady, non-flashing light. z Auto Power Off: Automatically turns off automatically.
Quick Start Guide
Page 25
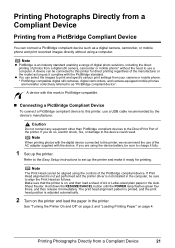
...-compatible. „ Connecting a PictBridge Compliant Device To connect a PictBridge compliant device to this printer for printing. Refer to the Easy Setup Instructions to align the Print Head as follows. If Print Head alignment is not yet performed and the printer driver is on, and then load a sheet of the ... sure to set up the printer. If you are hereafter collectively referred to the device could result. Note The Print Head cannot be connected to the Direct Print Port of the manufacturer or the model as long as it immediately. Hold down the RESUME/CANCEL button until the...
...-compatible. „ Connecting a PictBridge Compliant Device To connect a PictBridge compliant device to this printer for printing. Refer to the Easy Setup Instructions to align the Print Head as follows. If Print Head alignment is not yet performed and the printer driver is on, and then load a sheet of the ... sure to set up the printer. If you are hereafter collectively referred to the device could result. Note The Print Head cannot be connected to the Direct Print Port of the manufacturer or the model as long as it immediately. Hold down the RESUME/CANCEL button until the...
Quick Start Guide
Page 35
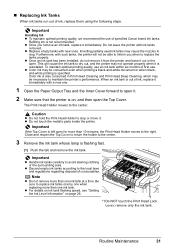
Do not leave the printer with new ones. To maintain optimal printing quality, use an ink tank within six months of first use of consumables. The Print Head Holder moves to the local laws and regulations regarding disposal of specified Canon brand ink tanks. z Discard empty ink tanks according to the ... recommend the use . z Once an ink tank has been installed, do not remove it from the printer and leave it out in Print Head Cleaning and Print Head Deep Cleaning, which may cause the nozzles to inform you remove an ink tank, replace it immediately. Note z Do not remove more ...
Do not leave the printer with new ones. To maintain optimal printing quality, use an ink tank within six months of first use of consumables. The Print Head Holder moves to the local laws and regulations regarding disposal of specified Canon brand ink tanks. z Discard empty ink tanks according to the ... recommend the use . z Once an ink tank has been installed, do not remove it from the printer and leave it out in Print Head Cleaning and Print Head Deep Cleaning, which may cause the nozzles to inform you remove an ink tank, replace it immediately. Note z Do not remove more ...
Quick Start Guide
Page 37
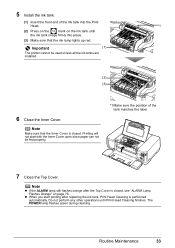
... still flashes orange after replacing the ink tank, Print Head Cleaning is performed automatically. Routine Maintenance 33 Printing will not start printing after the Top Cover is closed , see "ALARM Lamp Flashes Orange" on the ink tank until Print Head Cleaning finishes. Important (1) The printer cannot be fed... properly. *1 Make sure the position of the ink tank into the Print Head. *1 (2) Press on the mark on page 76. Do not ...
... still flashes orange after replacing the ink tank, Print Head Cleaning is performed automatically. Routine Maintenance 33 Printing will not start printing after the Top Cover is closed , see "ALARM Lamp Flashes Orange" on the ink tank until Print Head Cleaning finishes. Important (1) The printer cannot be fed... properly. *1 Make sure the position of the ink tank into the Print Head. *1 (2) Press on the mark on page 76. Do not ...
Quick Start Guide
Page 38
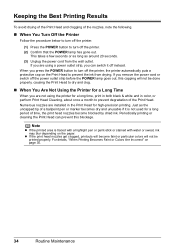
... the printer automatically puts a protective cap on the Print Head to prevent the ink from the wall outlet. z If the print head nozzles get clogged, printouts will not be printed properly. Keeping the Best Printing Results To avoid drying of the Print Head and clogging of the nozzles, note the following. &#...Numerous nozzles are using the printer for a long time, print in both black & white and in the Print Head for high-precision printing. This takes a few seconds or as long as the uncapped tip of time, the print head nozzles become faint or particular colors will not be done ...
... the printer automatically puts a protective cap on the Print Head to prevent the ink from the wall outlet. z If the print head nozzles get clogged, printouts will not be printed properly. Keeping the Best Printing Results To avoid drying of the Print Head and clogging of the nozzles, note the following. &#...Numerous nozzles are using the printer for a long time, print in both black & white and in the Print Head for high-precision printing. This takes a few seconds or as long as the uncapped tip of time, the print head nozzles become faint or particular colors will not be done ...
Quick Start Guide
Page 39
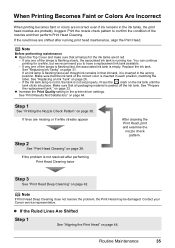
...tank." Contact your Canon service representative. If the ruled lines are shifted after performing Print Head Cleaning twice After cleaning the Print Head, print and examine the nozzle check pattern. If any one of the correct color is running print head maintenance, align the Print Head. Replace the ink ...though ink remains in the wrong position. z Increase the Print Quality setting in the ink tanks, the print head nozzles are missing or if white streaks appear Step 2 See "Print Head Cleaning" on page 26. - Print the nozzle check pattern to have a replacement ink tank available...
...tank." Contact your Canon service representative. If the ruled lines are shifted after performing Print Head Cleaning twice After cleaning the Print Head, print and examine the nozzle check pattern. If any one of the correct color is running print head maintenance, align the Print Head. Replace the ink ...though ink remains in the wrong position. z Increase the Print Quality setting in the ink tanks, the print head nozzles are missing or if white streaks appear Step 2 See "Print Head Cleaning" on page 26. - Print the nozzle check pattern to have a replacement ink tank available...
Quick Start Guide
Page 40
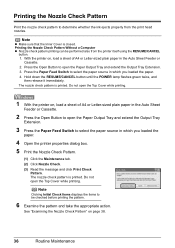
... of A4 or Letter-sized plain paper in the Auto Sheet Feeder or Cassette. 2 Press the Open Button to open the Top Cover while printing. 1 With the printer on page 38. 36 Routine Maintenance See "Examining the Nozzle Check Pattern" on , load a sheet of A4 or... Clicking Initial Check Items displays the items to be performed also from the print head nozzles. Printing the Nozzle Check Pattern Without a Computer z Nozzle check pattern printing can be checked before printing the pattern. 6 Examine the pattern and take the appropriate action. Press the Paper Feed Switch to select ...
... of A4 or Letter-sized plain paper in the Auto Sheet Feeder or Cassette. 2 Press the Open Button to open the Top Cover while printing. 1 With the printer on page 38. 36 Routine Maintenance See "Examining the Nozzle Check Pattern" on , load a sheet of A4 or... Clicking Initial Check Items displays the items to be performed also from the print head nozzles. Printing the Nozzle Check Pattern Without a Computer z Nozzle check pattern printing can be checked before printing the pattern. 6 Examine the pattern and take the appropriate action. Press the Paper Feed Switch to select ...
Quick Start Guide
Page 42
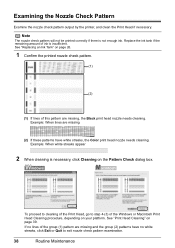
... is not enough ink. Example: When lines are missing and the group (2) patterns have white streaks, the Color print head nozzle needs cleaning. If no lines of this pattern are missing, the Black print head nozzle needs cleaning. See "Replacing an Ink Tank" on the Pattern Check dialog box. Examining the Nozzle Check Pattern...
... is not enough ink. Example: When lines are missing and the group (2) patterns have white streaks, the Color print head nozzle needs cleaning. If no lines of this pattern are missing, the Black print head nozzle needs cleaning. See "Replacing an Ink Tank" on the Pattern Check dialog box. Examining the Nozzle Check Pattern...
Quick Start Guide
Page 43
... and then release it immediately. Routine Maintenance 39 Cleaning the Print Head Without a Computer z The Print Head can also be absorbed in the printed nozzle check pattern. Do not perform any other operations until Print Head Cleaning finishes. When cleaning the nozzles of black ink tanks:... step 4-(3) in which you click Cleaning on . 2. Print Head Cleaning Clean the Print Head if lines are missing or if white streaks appear in the ink absorber. Cleaning the Print Head consumes ink, so perform Print Head Cleaning only when necessary. Hold down the RESUME/CANCEL button...
... and then release it immediately. Routine Maintenance 39 Cleaning the Print Head Without a Computer z The Print Head can also be absorbed in the printed nozzle check pattern. Do not perform any other operations until Print Head Cleaning finishes. When cleaning the nozzles of black ink tanks:... step 4-(3) in which you click Cleaning on . 2. Print Head Cleaning Clean the Print Head if lines are missing or if white streaks appear in the ink absorber. Cleaning the Print Head consumes ink, so perform Print Head Cleaning only when necessary. Hold down the RESUME/CANCEL button...
Quick Start Guide
Page 44
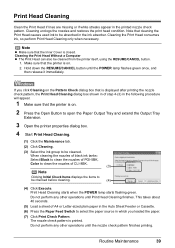
... menu. (2) Click Cleaning. (3) Select the ink group to be cleaned. Do not perform any other operations until Print Head Cleaning finishes. The nozzle check pattern is insufficient. Print Head Cleaning starts when the POWER (4) lamp starts flashing green. When cleaning the nozzles of black ink tanks: Select Black...printer is on. 2 Press the Open Button to open the Paper Output Tray and extend the Output Tray Extension. 3 Open the Canon IJ Printer Utility dialog box. 4 Start Print Head Cleaning. (1) Make sure that Cleaning is selected in which you click Cleaning on page 38.
... menu. (2) Click Cleaning. (3) Select the ink group to be cleaned. Do not perform any other operations until Print Head Cleaning finishes. The nozzle check pattern is insufficient. Print Head Cleaning starts when the POWER (4) lamp starts flashing green. When cleaning the nozzles of black ink tanks: Select Black...printer is on. 2 Press the Open Button to open the Paper Output Tray and extend the Output Tray Extension. 3 Open the Canon IJ Printer Utility dialog box. 4 Start Print Head Cleaning. (1) Make sure that Cleaning is selected in which you click Cleaning on page 38.
Quick Start Guide
Page 45
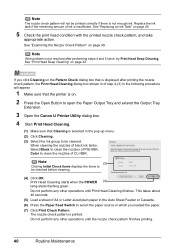
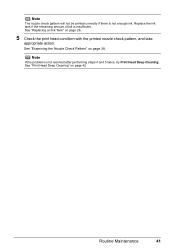
Note If the problem is not enough ink. Note The nozzle check pattern will not be printed correctly if there is not resolved after performing steps 4 and 5 twice, try Print Head Deep Cleaning. See "Replacing an Ink Tank" on page 38. Replace the ink tank if the remaining amount of ink is insufficient. See "Examining the Nozzle Check Pattern" on page 26. 5 Check the print head condition with the printed nozzle check pattern, and take appropriate action. See "Print Head Deep Cleaning" on page 42. Routine Maintenance 41
Note If the problem is not enough ink. Note The nozzle check pattern will not be printed correctly if there is not resolved after performing steps 4 and 5 twice, try Print Head Deep Cleaning. See "Replacing an Ink Tank" on page 38. Replace the ink tank if the remaining amount of ink is insufficient. See "Examining the Nozzle Check Pattern" on page 26. 5 Check the print head condition with the printed nozzle check pattern, and take appropriate action. See "Print Head Deep Cleaning" on page 42. Routine Maintenance 41

Quick Start Guide
Page 46
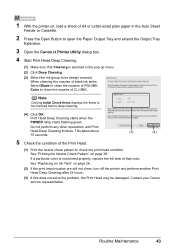
...Do not perform any other operations until Print Head Deep Cleaning finishes. See "Replacing an Ink Tank" on page 36. Contact your Canon service representative. 42 Routine Maintenance See "Printing the Nozzle Check Pattern" on page 26. (2) If the print head nozzles are still not clean, turn ...off the printer and perform another Print Head Deep Cleaning after 24 hours. (3) If this ...
...Do not perform any other operations until Print Head Deep Cleaning finishes. See "Replacing an Ink Tank" on page 36. Contact your Canon service representative. 42 Routine Maintenance See "Printing the Nozzle Check Pattern" on page 26. (2) If the print head nozzles are still not clean, turn ...off the printer and perform another Print Head Deep Cleaning after 24 hours. (3) If this ...
Quick Start Guide
Page 47
... of PGI-5BK, Color to open the Paper Output Tray and extend the Output Tray Extension. 3 Open the Canon IJ Printer Utility dialog box. 4 Start Print Head Deep Cleaning. (1) Make sure that color. Contact your Canon service representative. See "Replacing an Ink Tank" on page 36. Note Clicking Initial Check Items displays the items...
... of PGI-5BK, Color to open the Paper Output Tray and extend the Output Tray Extension. 3 Open the Canon IJ Printer Utility dialog box. 4 Start Print Head Deep Cleaning. (1) Make sure that color. Contact your Canon service representative. See "Replacing an Ink Tank" on page 36. Note Clicking Initial Check Items displays the items...
Quick Start Guide
Page 48
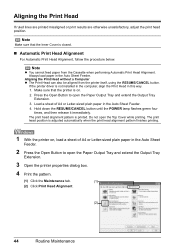
... the Output Tray Extension. 3. The print head position is not installed in the computer, align the Print Head in the Auto Sheet Feeder. Aligning the Print Head If ruled lines are printed misaligned or print results are otherwise unsatisfactory, adjust the print head position. If the printer driver is adjusted automatically when the print head alignment pattern finishes printing. 1 With the printer on...
... the Output Tray Extension. 3. The print head position is not installed in the computer, align the Print Head in the Auto Sheet Feeder. Aligning the Print Head If ruled lines are printed misaligned or print results are otherwise unsatisfactory, adjust the print head position. If the printer driver is adjusted automatically when the print head alignment pattern finishes printing. 1 With the printer on...


