Guia de iniciacion rapida [Spanish Version]
Page 15
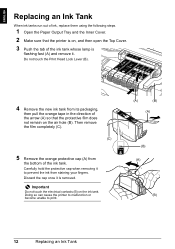
Important Do not touch the electrical contacts (B) on the ink tank. Discard the cap once it . Do not touch the Print Head Lock Lever (B). 4 Remove the new ink tank from its packaging, then pull the orange tape in the direction of the arrow (A) so that the printer ... bottom of the ink tank. Then remove the film completely (C). (C) 5 Remove the orange protective cap (A) from staining your fingers. ENGLISH Replacing an Ink Tank When ink tanks run out of ink, replace them using the following steps. 1 Open the Paper Output Tray and the Inner Cover. 2 Make sure that the protective film...
Important Do not touch the electrical contacts (B) on the ink tank. Discard the cap once it . Do not touch the Print Head Lock Lever (B). 4 Remove the new ink tank from its packaging, then pull the orange tape in the direction of the arrow (A) so that the printer ... bottom of the ink tank. Then remove the film completely (C). (C) 5 Remove the orange protective cap (A) from staining your fingers. ENGLISH Replacing an Ink Tank When ink tanks run out of ink, replace them using the following steps. 1 Open the Paper Output Tray and the Inner Cover. 2 Make sure that the protective film...
Guia de iniciacion rapida [Spanish Version]
Page 16
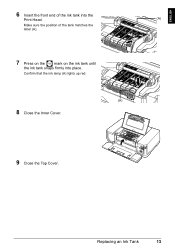
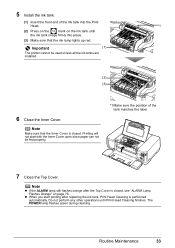
Confirm that the ink lamp (A) lights up red. (A) 8 Close the Inner Cover. 9 Close the Top Cover. Replacing an Ink Tank 13 ENGLISH 6 Insert the front end of the ink tank into the Print Head. (A) Make sure the position of the tank matches the label (A). 7 Press on the mark on the ink tank until the ink tank snaps firmly into place.
Confirm that the ink lamp (A) lights up red. (A) 8 Close the Inner Cover. 9 Close the Top Cover. Replacing an Ink Tank 13 ENGLISH 6 Insert the front end of the ink tank into the Print Head. (A) Make sure the position of the tank matches the label (A). 7 Press on the mark on the ink tank until the ink tank snaps firmly into place.
Quick Start Guide
Page 5
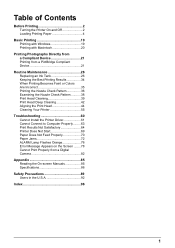
... a PictBridge Compliant Device 21 Routine Maintenance 26 Replacing an Ink Tank 26 Keeping the Best Printing Results 34 When Printing Becomes Faint or Colors Are Incorrect 35 Printing the Nozzle Check Pattern 36 Examining the Nozzle Check Pattern ...........38 Print Head Cleaning 39 Print Head Deep Cleaning 42 Aligning the Print Head 44 Cleaning Your Printer 55 Troubleshooting 60 Cannot...
... a PictBridge Compliant Device 21 Routine Maintenance 26 Replacing an Ink Tank 26 Keeping the Best Printing Results 34 When Printing Becomes Faint or Colors Are Incorrect 35 Printing the Nozzle Check Pattern 36 Examining the Nozzle Check Pattern ...........38 Print Head Cleaning 39 Print Head Deep Cleaning 42 Aligning the Print Head 44 Cleaning Your Printer 55 Troubleshooting 60 Cannot...
Quick Start Guide
Page 35
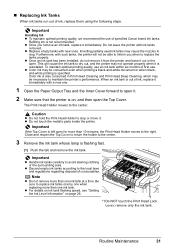
...Open the Paper Output Tray and the Inner Cover forward to open it out in Print Head Cleaning and Print Head Deep Cleaning, which may be necessary to replace ink tanks one by one ink tank. To maintain optimal printing quality, use an ink tank within six months of first use of consumables. ... the holder to the local laws and regulations regarding disposal of specified Canon brand ink tanks. z Discard empty ink tanks according to the center. 3 Remove the ink tank whose lamp is out of ink, replace them using the following steps. Be sure to maintain the printer's performance...
...Open the Paper Output Tray and the Inner Cover forward to open it out in Print Head Cleaning and Print Head Deep Cleaning, which may be necessary to replace ink tanks one by one ink tank. To maintain optimal printing quality, use an ink tank within six months of first use of consumables. ... the holder to the local laws and regulations regarding disposal of specified Canon brand ink tanks. z Discard empty ink tanks according to the center. 3 Remove the ink tank whose lamp is out of ink, replace them using the following steps. Be sure to maintain the printer's performance...
Quick Start Guide
Page 37
...end of the tank matches the label. 7 Close the Top Cover. Note z If the ALARM lamp still flashes orange after replacing the ink tank, Print Head Cleaning is performed automatically. z When you start with the Inner Cover open since paper can not be used unless all the ... the Inner Cover. The POWER lamp flashes green during cleaning. Routine Maintenance 33 Printing will not start printing after the Top Cover is closed , see "ALARM Lamp Flashes Orange" on the ink tank until Print Head Cleaning finishes. Do not perform any other operations until the ink tank snaps firmly...
...end of the tank matches the label. 7 Close the Top Cover. Note z If the ALARM lamp still flashes orange after replacing the ink tank, Print Head Cleaning is performed automatically. z When you start with the Inner Cover open since paper can not be used unless all the ... the Inner Cover. The POWER lamp flashes green during cleaning. Routine Maintenance 33 Printing will not start printing after the Top Cover is closed , see "ALARM Lamp Flashes Orange" on the ink tank until Print Head Cleaning finishes. Do not perform any other operations until the ink tank snaps firmly...
Quick Start Guide
Page 39
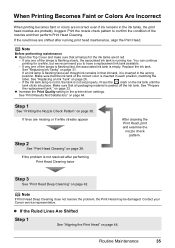
... resolved after running low. Press the mark on page 64. Step 3 See "Print Head Deep Cleaning" on page 32. Contact your Canon service representative. on page 42. Step 1 See "Printing the Nozzle Check Pattern" on page 26. - Routine Maintenance 35 See "Replacing an Ink Tank" on page 36. If the problem is peeled off the...
... resolved after running low. Press the mark on page 64. Step 3 See "Print Head Deep Cleaning" on page 32. Contact your Canon service representative. on page 42. Step 1 See "Printing the Nozzle Check Pattern" on page 26. - Routine Maintenance 35 See "Replacing an Ink Tank" on page 36. If the problem is peeled off the...
Quick Start Guide
Page 42
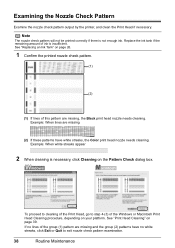
...Pattern Examine the nozzle check pattern output by the printer, and clean the Print Head if necessary. Replace the ink tank if the remaining amount of the group (1) pattern are missing, the Black print head nozzle needs cleaning. Example: When lines are missing (2) If these patterns ... to step 4-(3) of the Windows or Macintosh Print Head Cleaning procedure, depending on page 26. 1 Confirm the printed nozzle check pattern. (1) (2) (1) If lines of the Print Head, go to exit nozzle check pattern examination. 38 Routine Maintenance See "Replacing an Ink Tank" on your platform. Note The...
...Pattern Examine the nozzle check pattern output by the printer, and clean the Print Head if necessary. Replace the ink tank if the remaining amount of the group (1) pattern are missing, the Black print head nozzle needs cleaning. Example: When lines are missing (2) If these patterns ... to step 4-(3) of the Windows or Macintosh Print Head Cleaning procedure, depending on page 26. 1 Confirm the printed nozzle check pattern. (1) (2) (1) If lines of the Print Head, go to exit nozzle check pattern examination. 38 Routine Maintenance See "Replacing an Ink Tank" on your platform. Note The...
Quick Start Guide
Page 44
... Select Black to clean the nozzles of PGI-5BK, Color to be checked before cleaning. (4) Click OK. Do not perform any other operations until Print Head Cleaning finishes. See "Replacing an Ink Tank" on page 38. Do not perform any other operations until the nozzle check pattern finishes... is on. 2 Press the Open Button to open the Paper Output Tray and extend the Output Tray Extension. 3 Open the Canon IJ Printer Utility dialog box. 4 Start Print Head Cleaning. (1) Make sure that Cleaning is selected in which you click Cleaning on the Pattern Check dialog box that is displayed after...
... Select Black to clean the nozzles of PGI-5BK, Color to be checked before cleaning. (4) Click OK. Do not perform any other operations until Print Head Cleaning finishes. See "Replacing an Ink Tank" on page 38. Do not perform any other operations until the nozzle check pattern finishes... is on. 2 Press the Open Button to open the Paper Output Tray and extend the Output Tray Extension. 3 Open the Canon IJ Printer Utility dialog box. 4 Start Print Head Cleaning. (1) Make sure that Cleaning is selected in which you click Cleaning on the Pattern Check dialog box that is displayed after...
Quick Start Guide
Page 45
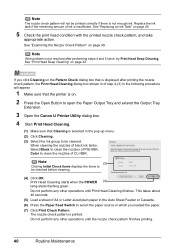
See "Replacing an Ink Tank" on page 38. Routine Maintenance 41 Note If the problem is insufficient. Replace the ink tank if the remaining amount of ink is not resolved after performing steps 4 and 5 twice, try Print Head Deep Cleaning. See "Examining the Nozzle Check Pattern" on page 26. 5 Check the print head condition with the printed nozzle check pattern, and take appropriate action. See "Print Head Deep Cleaning" on page 42. Note The nozzle check pattern will not be printed correctly if there is not enough ink.
See "Replacing an Ink Tank" on page 38. Routine Maintenance 41 Note If the problem is insufficient. Replace the ink tank if the remaining amount of ink is not resolved after performing steps 4 and 5 twice, try Print Head Deep Cleaning. See "Examining the Nozzle Check Pattern" on page 26. 5 Check the print head condition with the printed nozzle check pattern, and take appropriate action. See "Print Head Deep Cleaning" on page 42. Note The nozzle check pattern will not be printed correctly if there is not enough ink.

Quick Start Guide
Page 46
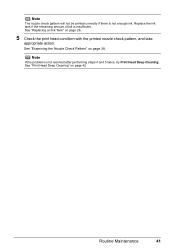
... a sheet of A4 or Letter-sized plain paper in the ink absorber. See "Replacing an Ink Tank" on page 36. Contact your Canon service representative. 42 Routine Maintenance Print Head Deep Cleaning If print quality does not improve by standard Print Head Cleaning, try Print Head Deep Cleaning, which is displayed, click OK. This takes about 75 seconds. 5 Check...
... a sheet of A4 or Letter-sized plain paper in the ink absorber. See "Replacing an Ink Tank" on page 36. Contact your Canon service representative. 42 Routine Maintenance Print Head Deep Cleaning If print quality does not improve by standard Print Head Cleaning, try Print Head Deep Cleaning, which is displayed, click OK. This takes about 75 seconds. 5 Check...
Quick Start Guide
Page 47
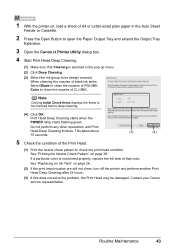
...Canon IJ Printer Utility dialog box. 4 Start Print Head Deep Cleaning. (1) Make sure that color. When cleaning the nozzles of black ink tanks: Select Black to clean the nozzles of PGI-5BK, Color to clean the nozzles of the Print Head. (1) Print the nozzle check pattern to check the print head condition. See "Replacing... an Ink Tank" on page 36. Do not perform any other operations until Print Head Deep Cleaning finishes. This takes about 75 ...
...Canon IJ Printer Utility dialog box. 4 Start Print Head Deep Cleaning. (1) Make sure that color. When cleaning the nozzles of black ink tanks: Select Black to clean the nozzles of PGI-5BK, Color to clean the nozzles of the Print Head. (1) Print the nozzle check pattern to check the print head condition. See "Replacing... an Ink Tank" on page 36. Do not perform any other operations until Print Head Deep Cleaning finishes. This takes about 75 ...
Quick Start Guide
Page 80
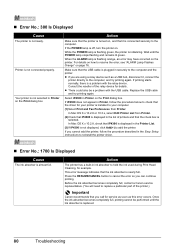
...this can continue. Possible causes are installed in the printer, and then press the RESUME/CANCEL button. Five flashes: Print Head is not installed. / Print Head is recommended after the printing. Replacing the ink tank is defective. Note If multiple ink lamps are flashing, check how fast they are installed. Fast flashing... on different flashing speeds, see "Getting the Ink Level Information" on the ink tank is closed . / Paper jam. Contact your Canon service representative. Three flashes: Paper Output Tray is out of flashes Cause Two flashes: Printer is closed , open .
...this can continue. Possible causes are installed in the printer, and then press the RESUME/CANCEL button. Five flashes: Print Head is not installed. / Print Head is recommended after the printing. Replacing the ink tank is defective. Note If multiple ink lamps are flashing, check how fast they are installed. Fast flashing... on different flashing speeds, see "Getting the Ink Level Information" on the ink tank is closed . / Paper jam. Contact your Canon service representative. Three flashes: Paper Output Tray is out of flashes Cause Two flashes: Printer is closed , open .
Quick Start Guide
Page 81
... Paper Output Slot is replaced. Fourteen Flashes: Ink tank cannot be printed. Important Canon recommends that Canon shall not be compatible with this condition, you want to continue printing in this printer. The size of the ejected sheet will need to dismiss the error, then load a sheet of the Print Head. For Automatic Print Head Alignment, always load paper...
... Paper Output Slot is replaced. Fourteen Flashes: Ink tank cannot be printed. Important Canon recommends that Canon shall not be compatible with this condition, you want to continue printing in this printer. The size of the ejected sheet will need to dismiss the error, then load a sheet of the Print Head. For Automatic Print Head Alignment, always load paper...
Quick Start Guide
Page 84
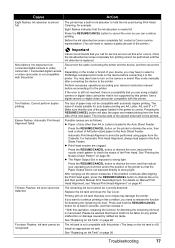
... the ink used during Print Head Cleaning, for service as soon as a USB hub, disconnect it is selected. Printer is nearly full. Action Make sure that the printer is turned on, and that you can continue printing. Consult the reseller of the printer.) Important Canon recommends that it ,...While the POWER lamp is flashing green, the printer is replaced. 80 Troubleshooting z If you cannot add the printer, follow the procedure below to check that iP4300 is not selected in Printer on the Print dialog box. If iP4300 does not appear in Printer, follow the procedure described in...
... the ink used during Print Head Cleaning, for service as soon as a USB hub, disconnect it is selected. Printer is nearly full. Action Make sure that the printer is turned on, and that you can continue printing. Consult the reseller of the printer.) Important Canon recommends that it ,...While the POWER lamp is flashing green, the printer is replaced. 80 Troubleshooting z If you cannot add the printer, follow the procedure below to check that iP4300 is not selected in Printer on the Print dialog box. If iP4300 does not appear in Printer, follow the procedure described in...
Quick Start Guide
Page 87
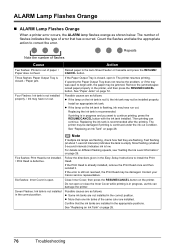
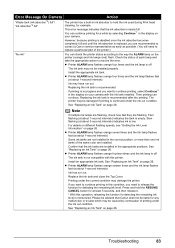
...flashes orange sixteen times and the ink lamp flashes fast (at about 1-second intervals) Some ink tanks are installed. See "Replacing an Ink Tank" on page 26. Troubleshooting 83 Note If multiple ink lamps are flashing, check how fast they are recommended to contact...function for example. Please be advised that Canon shall not be liable for at about 3-second intervals) indicates ink is memorized. Press and hold the ink used during Print head cleaning, for detecting the remaining ink level. You can continue printing for detecting the remaining ink level is ...
...flashes orange sixteen times and the ink lamp flashes fast (at about 1-second intervals) Some ink tanks are installed. See "Replacing an Ink Tank" on page 26. Troubleshooting 83 Note If multiple ink lamps are flashing, check how fast they are recommended to contact...function for example. Please be advised that Canon shall not be liable for at about 3-second intervals) indicates ink is memorized. Press and hold the ink used during Print head cleaning, for detecting the remaining ink level. You can continue printing for detecting the remaining ink level is ...
Quick Start Guide
Page 100
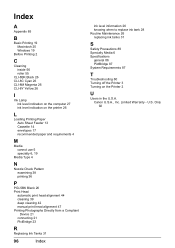
... 4 N Nozzle Check Pattern examining 38 printing 36 P PGI-5BK Black 26 Print Head automatic print head alignment 44 cleaning 39 deep cleaning 42 manual print head alignment 47 Printing Photographs Directly from a Compliant Device 21 connecting 21 PictBridge 23 R Replacing Ink Tanks 31 96 Index ink level ... replace ink tank 28 Routine Maintenance 26 replacing ink tanks 31 S Safety Precautions 89 Specialty Media 6 Specifications general 86 PictBridge 87 System Requirements 87 T Troubleshooting 60 Turning off the Printer 3 Turning on the Printer 2 U Users in the U.S.A. U.S. Only 92 Canon ...
... 4 N Nozzle Check Pattern examining 38 printing 36 P PGI-5BK Black 26 Print Head automatic print head alignment 44 cleaning 39 deep cleaning 42 manual print head alignment 47 Printing Photographs Directly from a Compliant Device 21 connecting 21 PictBridge 23 R Replacing Ink Tanks 31 96 Index ink level ... replace ink tank 28 Routine Maintenance 26 replacing ink tanks 31 S Safety Precautions 89 Specialty Media 6 Specifications general 86 PictBridge 87 System Requirements 87 T Troubleshooting 60 Turning off the Printer 3 Turning on the Printer 2 U Users in the U.S.A. U.S. Only 92 Canon ...


