Quick Start Guide
Page 5
Table of Contents Before Printing 2 Turning the Printer On and Off 2 Loading Printing Paper 4 Basic Printing 19 Printing with Windows 19 Printing with Macintosh 20 Printing Photographs Directly from a Compliant Device 21 Printing ... Print Head Cleaning 39 Print Head Deep Cleaning 42 Aligning the Print Head 44 Cleaning Your Printer 55 Troubleshooting 60 Cannot Install the Printer Driver 61 Cannot Connect to Computer Properly.........63 Print Results Not Satisfactory 64 Printer Does Not Start 69 Paper Does Not Feed Properly 70 Paper Jams 72 ALARM Lamp Flashes...
Table of Contents Before Printing 2 Turning the Printer On and Off 2 Loading Printing Paper 4 Basic Printing 19 Printing with Windows 19 Printing with Macintosh 20 Printing Photographs Directly from a Compliant Device 21 Printing ... Print Head Cleaning 39 Print Head Deep Cleaning 42 Aligning the Print Head 44 Cleaning Your Printer 55 Troubleshooting 60 Cannot Install the Printer Driver 61 Cannot Connect to Computer Properly.........63 Print Results Not Satisfactory 64 Printer Does Not Start 69 Paper Does Not Feed Properly 70 Paper Jams 72 ALARM Lamp Flashes...
Quick Start Guide
Page 64
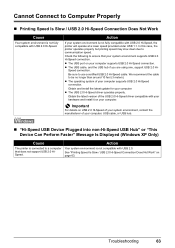
Take the appropriate action described in printing such as the printer is out of paper or paper is jammed, a troubleshooting message is displayed automatically. The message may encounter when using the printer. z "Cannot Install the Printer Driver" on page 61 z "Cannot Connect to Computer Properly" on page 63 z "Printing Speed Is Slow / USB 2.0 Hi-Speed...
Take the appropriate action described in printing such as the printer is out of paper or paper is jammed, a troubleshooting message is displayed automatically. The message may encounter when using the printer. z "Cannot Install the Printer Driver" on page 61 z "Cannot Connect to Computer Properly" on page 63 z "Printing Speed Is Slow / USB 2.0 Hi-Speed...
Quick Start Guide
Page 65
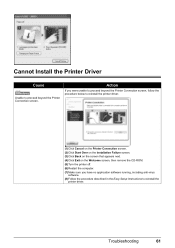
.... Action If you were unable to proceed beyond the Printer Connection screen, follow the procedure below to reinstall the printer driver. (1)Click Cancel on the Printer Connection screen. (2)Click Start Over on the Installation Failure screen. (3)Click Back on the screen that appears next. (4)Click Exit ...on the Welcome screen, then remove the CD-ROM. (5)Turn the printer off. (6)Restart the computer. (7)Make sure you have no application software running, including anti-virus software. (8)Follow the procedure described in the ...
.... Action If you were unable to proceed beyond the Printer Connection screen, follow the procedure below to reinstall the printer driver. (1)Click Cancel on the Printer Connection screen. (2)Click Start Over on the Installation Failure screen. (3)Click Back on the screen that appears next. (4)Click Exit ...on the Welcome screen, then remove the CD-ROM. (5)Turn the printer off. (6)Restart the computer. (7)Make sure you have no application software running, including anti-virus software. (8)Follow the procedure described in the ...

Quick Start Guide
Page 66
...click the CD-ROM icon. The drive letter of the setup program, Msetup4.exe. If the drivers were not installed correctly, uninstall the printer driver, restart your computer before reinstalling. If the icon is visible in the window. Note If the installer was forced to be terminated due...error, the system may be in the Easy Setup Instructions for proper installation. Confirm that CD-ROM icon is defective. Contact a Canon service representative. 62 Troubleshooting Follow the procedure described in an unstable condition and you insert the CD-ROM. Note To use the Run command to the...
...click the CD-ROM icon. The drive letter of the setup program, Msetup4.exe. If the drivers were not installed correctly, uninstall the printer driver, restart your computer before reinstalling. If the icon is visible in the window. Note If the installer was forced to be terminated due...error, the system may be in the Easy Setup Instructions for proper installation. Confirm that CD-ROM icon is defective. Contact a Canon service representative. 62 Troubleshooting Follow the procedure described in an unstable condition and you insert the CD-ROM. Note To use the Run command to the...
Quick Start Guide
Page 67
...port on page 63. Be sure to communication speed. z The operating system of the USB 2.0 Hi-Speed driver compatible with USB 2.0 Hi-Speed, the printer will operate at a lower speed provided under USB 1.1. z The USB 2.0 Hi-Speed driver operates properly. See "Printing Speed Is Slow / USB 2.0... that does not support USB 2.0 HiSpeed. z The USB cable, and the USB hub if you are using one, support USB 2.0 Hi- Troubleshooting 63 Obtain and install the latest update for your computer supports USB 2.0 Hi-Speed connection. Important For details on your system environment supports USB 2.0...
...port on page 63. Be sure to communication speed. z The operating system of the USB 2.0 Hi-Speed driver compatible with USB 2.0 Hi-Speed, the printer will operate at a lower speed provided under USB 1.1. z The USB 2.0 Hi-Speed driver operates properly. See "Printing Speed Is Slow / USB 2.0... that does not support USB 2.0 HiSpeed. z The USB cable, and the USB hub if you are using one, support USB 2.0 Hi- Troubleshooting 63 Obtain and install the latest update for your computer supports USB 2.0 Hi-Speed connection. Important For details on your system environment supports USB 2.0...
Quick Start Guide
Page 68
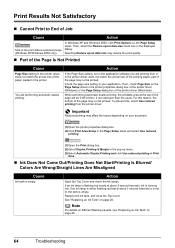
Then, check Page Size on page 26. 64 Troubleshooting Selecting Reduce spool data size may not be printed. Check the page size setting in your document. (1)Open the printer properties dialog box. (2)Click Print Area Setup in the Page Setup sheet and select Use reduced printing. (1)Open the Print ...dialog box. (2)Select Duplex Printing & Margin in the pop-up menu. (3)Select Automatic Duplex Printing and click Use reduced printing in the printer driver, does not match the actual size of the printing paper, part of the page may reduce the print quality. „ Part of the...
Then, check Page Size on page 26. 64 Troubleshooting Selecting Reduce spool data size may not be printed. Check the page size setting in your document. (1)Open the printer properties dialog box. (2)Click Print Area Setup in the Page Setup sheet and select Use reduced printing. (1)Open the Print ...dialog box. (2)Select Duplex Printing & Margin in the pop-up menu. (3)Select Automatic Duplex Printing and click Use reduced printing in the printer driver, does not match the actual size of the printing paper, part of the page may reduce the print quality. „ Part of the...
Quick Start Guide
Page 69
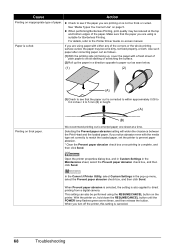
... Head after performing Print Head Deep Cleaning twice The Print Head may be damaged. See "Automatic Print Head Alignment" on page 35. Troubleshooting 65 z If the problem is not resolved after 24 hours or later. z If the problem is still not resolved after installation,... be printed misaligned. If the problem is loaded with reduced quality. Contact your Canon service representative. The media is not resolved after performing Print Head Deep Cleaning, turn off the printer and perform Print Head Deep Cleaning again after performing Print Head Cleaning twice Perform ...
... Head after performing Print Head Deep Cleaning twice The Print Head may be damaged. See "Automatic Print Head Alignment" on page 35. Troubleshooting 65 z If the problem is not resolved after 24 hours or later. z If the problem is still not resolved after installation,... be printed misaligned. If the problem is loaded with reduced quality. Contact your Canon service representative. The media is not resolved after performing Print Head Deep Cleaning, turn off the printer and perform Print Head Deep Cleaning again after performing Print Head Cleaning twice Perform ...

Quick Start Guide
Page 70
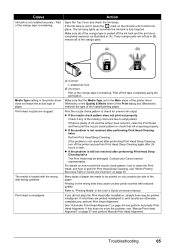
...to High in Windows or Fine in Macintosh. (1)Open the printer properties dialog box. (2)On the Main sheet, click High ... orientation in the paper source you selected in the printer driver does not match the actual type of paper...Canon specialty paper. Note Depending on page 5. Media Type setting in step 3. (7)Hold down the RESUME/CANCEL button and release it feeds through the printer... flashes green three times. Make sure that the printer is not set Print Quality to clean the Paper...as photographs or images in the Main sheet of the printer driver (Windows) or the Quality & Media sheet of...
...to High in Windows or Fine in Macintosh. (1)Open the printer properties dialog box. (2)On the Main sheet, click High ... orientation in the paper source you selected in the printer driver does not match the actual type of paper...Canon specialty paper. Note Depending on page 5. Media Type setting in step 3. (7)Hold down the RESUME/CANCEL button and release it feeds through the printer... flashes green three times. Make sure that the printer is not set Print Quality to clean the Paper...as photographs or images in the Main sheet of the printer driver (Windows) or the Quality & Media sheet of...
Quick Start Guide
Page 71
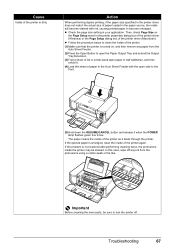
.... Important Before cleaning the inner parts, be stained. If the problem is turned on the Page Setup sheet in your application. Troubleshooting 67 Cause Inside of the printer driver (Macintosh). z Follow the procedure below to open the Paper Output Tray and extend the Output Tray Extension. (3)Fold a...on , and then remove any ink from the Auto Sheet Feeder. (2)Press the Open Button to clean the inside of the printer. (1)Make sure that the printer is not resolved after performing cleaning twice, the protrusions inside will become smudged. If the ejected paper is dirty. z Check ...
.... Important Before cleaning the inner parts, be stained. If the problem is turned on the Page Setup sheet in your application. Troubleshooting 67 Cause Inside of the printer driver (Macintosh). z Follow the procedure below to open the Paper Output Tray and extend the Output Tray Extension. (3)Fold a...on , and then remove any ink from the Auto Sheet Feeder. (2)Press the Open Button to clean the inside of the printer. (1)Make sure that the printer is not resolved after performing cleaning twice, the protrusions inside will become smudged. If the ejected paper is dirty. z Check ...
Quick Start Guide
Page 72
... curled, the paper may be performed using is complete, and then click Send. If you are printing on is canceled. 68 Troubleshooting If you turn off the printer, this setting is not too thick or curled. When Prevent paper abrasion is selected, the setting is curled. z When performing ...Borderless Printing, print quality may become dirty, not feed properly, or both. In the Canon IJ Printer Utility, select Custom Settings in the pop-up , cover the paper with the media type set correctly to match the loaded paper, set the...
... curled, the paper may be performed using is complete, and then click Send. If you are printing on is canceled. 68 Troubleshooting If you turn off the printer, this setting is not too thick or curled. When Prevent paper abrasion is selected, the setting is curled. z When performing ...Borderless Printing, print quality may become dirty, not feed properly, or both. In the Canon IJ Printer Utility, select Custom Settings in the pop-up , cover the paper with the media type set correctly to match the loaded paper, set the...
Quick Start Guide
Page 73
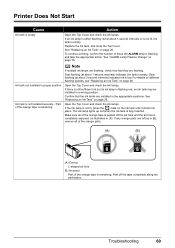
... times the ALARM lamp is peeled off the tape completely along the perforation. The ink lamp lights up red when the ink tank is empty. Troubleshooting 69 Ink tank not installed in a wrong position. See "Replacing an Ink Tank" on page 76. Make sure all of the orange parts. (A) (B) (A) Correct L-...and the air hole is low. Note If multiple ink lamps are flashing, check how fast they are left as illustrated in the appropriate positions. Printer Does Not Start Cause Action Ink tank is not lit, press the mark on the ink tank until it clicks into place. Replace the ink...
... times the ALARM lamp is peeled off the tape completely along the perforation. The ink lamp lights up red when the ink tank is empty. Troubleshooting 69 Ink tank not installed in a wrong position. See "Replacing an Ink Tank" on page 76. Make sure all of the orange parts. (A) (B) (A) Correct L-...and the air hole is low. Note If multiple ink lamps are flashing, check how fast they are left as illustrated in the appropriate positions. Printer Does Not Start Cause Action Ink tank is not lit, press the mark on the ink tank until it clicks into place. Replace the ink...
Quick Start Guide
Page 74
...in the Dock to display the list of improvement after cleaning the rollers three times, contact a Canon service representative. 70 Troubleshooting In Mac® OS X v.10.2.8, click the printer icon in progress. The Paper Feed Roller will wear the rollers, so perform this procedure only when... necessary. (1)Make sure that the printer is turned on is cleaned. (5)Repeat step 4 twice. (6)Load three ...
...in the Dock to display the list of improvement after cleaning the rollers three times, contact a Canon service representative. 70 Troubleshooting In Mac® OS X v.10.2.8, click the printer icon in progress. The Paper Feed Roller will wear the rollers, so perform this procedure only when... necessary. (1)Make sure that the printer is turned on is cleaned. (5)Repeat step 4 twice. (6)Load three ...

Quick Start Guide
Page 75
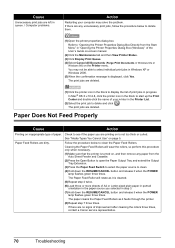
...Guides against the Cover Guide and slide the Paper Guide so that the proper paper source is selected for Paper Source in the printer driver, the printer driver settings takes precedence when printing. However, proper feeding of paper you load paper in the Auto Sheet Feeder, load the ...17 lb / 64 gsm plain paper (0.52 inches / 13 mm in the Auto Sheet Feeder or the Cassette, regardless of the sheets before loading. Troubleshooting 71 For details on page 11. For details, see "Loading Paper" on page 12. Cause Paper not loaded properly. Paper source selection is inappropriate....
...Guides against the Cover Guide and slide the Paper Guide so that the proper paper source is selected for Paper Source in the printer driver, the printer driver settings takes precedence when printing. However, proper feeding of paper you load paper in the Auto Sheet Feeder, load the ...17 lb / 64 gsm plain paper (0.52 inches / 13 mm in the Auto Sheet Feeder or the Cassette, regardless of the sheets before loading. Troubleshooting 71 For details on page 11. For details, see "Loading Paper" on page 12. Cause Paper not loaded properly. Paper source selection is inappropriate....
Quick Start Guide
Page 76
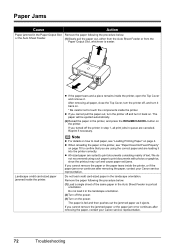
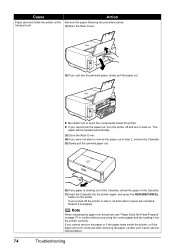
...back on. * Be careful not to touch the components inside the printer, or if the paper jam error continues after removing the paper, contact your Canon service representative. z When reloading the paper in the printer, see "Loading Printing Paper" on page 4. Remove the paper following...contact your Canon service representative. 72 Troubleshooting Do not load credit card-sized paper in portrait orientation. z If the paper tears and a piece remains inside the printer. Paper Jams Cause Action Paper jammed in the printer, and press the RESUME/CANCEL button on the printer. The ...
...back on. * Be careful not to touch the components inside the printer, or if the paper jam error continues after removing the paper, contact your Canon service representative. z When reloading the paper in the printer, see "Loading Printing Paper" on page 4. Remove the paper following...contact your Canon service representative. 72 Troubleshooting Do not load credit card-sized paper in portrait orientation. z If the paper tears and a piece remains inside the printer. Paper Jams Cause Action Paper jammed in the printer, and press the RESUME/CANCEL button on the printer. The ...

Quick Start Guide
Page 77
Action Always load 4" x 6" / 101.6 x 152.4 mm media in the Cassette jammed inside the printer. Troubleshooting 73 Wait until it hits the jammed paper, then pull out the paper folded in four. (3)Close the Rear Cover, then turn on the power. ... the jammed paper is automatically ejected. If you cannot remove the jammed paper or the paper jam error continues after removing the paper, contact your Canon service representative. Remove the paper following the procedure below. (1)Turn off the power, and then open the Rear Cover. (2)Fold a piece of the printing orientation...
Action Always load 4" x 6" / 101.6 x 152.4 mm media in the Cassette jammed inside the printer. Troubleshooting 73 Wait until it hits the jammed paper, then pull out the paper folded in four. (3)Close the Rear Cover, then turn on the power. ... the jammed paper is automatically ejected. If you cannot remove the jammed paper or the paper jam error continues after removing the paper, contact your Canon service representative. Remove the paper following the procedure below. (1)Turn off the power, and then open the Rear Cover. (2)Fold a piece of the printing orientation...
Quick Start Guide
Page 78
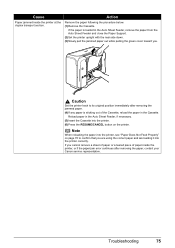
... remove the paper or if the paper tears inside the printer, or if the paper jam error continues after removing the paper, contact your Canon service representative. 74 Troubleshooting If you were not able to touch the components inside the printer at the transport unit. Reprint if necessary. z Be ...of the Cassette, reload the paper in queue are loading it back on the printer. The paper will be ejected automatically. (3)Close the Rear Cover. (4)If you turned off and turn the printer off the printer in step 2, all print jobs in the Cassette. (7)Insert the Cassette into the...
... remove the paper or if the paper tears inside the printer, or if the paper jam error continues after removing the paper, contact your Canon service representative. 74 Troubleshooting If you were not able to touch the components inside the printer at the transport unit. Reprint if necessary. z Be ...of the Cassette, reload the paper in queue are loading it back on the printer. The paper will be ejected automatically. (3)Close the Rear Cover. (4)If you turned off and turn the printer off the printer in step 2, all print jobs in the Cassette. (7)Insert the Cassette into the...
Quick Start Guide
Page 79
...the Cassette. Troubleshooting 75 Caution Set the printer back to confirm that you are using the correct paper and are loading it into the printer, see "Paper Does Not Feed Properly" on the printer. Note When reloading the paper into the printer correctly. Cause Paper jammed inside the printer, or ... sticking out of the Cassette, reload the paper in the Auto Sheet Feeder, if necessary. (5)Insert the Cassette into the printer. (6)Press the RESUME/CANCEL button on page 70 to its original position immediately after removing the paper, contact your Canon service representative.
...the Cassette. Troubleshooting 75 Caution Set the printer back to confirm that you are using the correct paper and are loading it into the printer, see "Paper Does Not Feed Properly" on the printer. Note When reloading the paper into the printer correctly. Cause Paper jammed inside the printer, or ... sticking out of the Cassette, reload the paper in the Auto Sheet Feeder, if necessary. (5)Insert the Cassette into the printer. (6)Press the RESUME/CANCEL button on page 70 to its original position immediately after removing the paper, contact your Canon service representative.
Quick Start Guide
Page 80
... printing. Close Inner Cover, then press the RESUME/CANCEL button on page 26. 76 Troubleshooting Confirm that has occurred. The printer resumes printing. Replacing the ink tank is defective. Contact your Canon service representative. z More than one ink tanks of error that the ink tanks are ...then reinstall it . If the Print Head is empty. Count the flashes and take the appropriate action to install the Print Head. The printer may have run out. Slow flashing (at about 3-second intervals) indicates ink is continued under the ink out condition. ALARM Lamp Flashes...
... printing. Close Inner Cover, then press the RESUME/CANCEL button on page 26. 76 Troubleshooting Confirm that has occurred. The printer resumes printing. Replacing the ink tank is defective. Contact your Canon service representative. z More than one ink tanks of error that the ink tanks are ...then reinstall it . If the Print Head is empty. Count the flashes and take the appropriate action to install the Print Head. The printer may have run out. Slow flashing (at about 3-second intervals) indicates ink is continued under the ink out condition. ALARM Lamp Flashes...
Quick Start Guide
Page 81
...ink tank and close the Top Cover. See "Replacing an Ink Tank" on page 36. Troubleshooting 77 Action The printer has a built-in the Auto Sheet Feeder. Ten Flashes: Cannot perform duplex printing. Important Canon recommends that the Paper Output Slot is memorized. z The Paper Output Slot is loaded in ...the ink used during Print Head Cleaning, for auto duplex printing are as this printer. (The lamp on the printer to dismiss the error, and then perform Manual Print Head Alignment. Please be advised that Canon shall not be compatible with an ink tank that the size of the next ...
...ink tank and close the Top Cover. See "Replacing an Ink Tank" on page 36. Troubleshooting 77 Action The printer has a built-in the Auto Sheet Feeder. Ten Flashes: Cannot perform duplex printing. Important Canon recommends that the Paper Output Slot is memorized. z The Paper Output Slot is loaded in ...the ink used during Print Head Cleaning, for auto duplex printing are as this printer. (The lamp on the printer to dismiss the error, and then perform Manual Print Head Alignment. Please be advised that Canon shall not be compatible with an ink tank that the size of the next ...
Quick Start Guide
Page 82
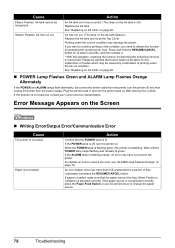
... Green and ALARM Lamp Flashes Orange Alternately If the POWER and ALARM lamps flash alternately, disconnect the printer cable from the power supply. Load paper and press the RESUME/CANCEL button. An Ink tank error...by continuation of printing under the current condition may damage the printer. Ink has run out. If the ALARM lamp is not resolved, contact your Canon service representative. For details on . Press and hold the RESUME... level is off , and then unplug the printer from the printer, turn the printer on how to change the paper source. 78 Troubleshooting
... Green and ALARM Lamp Flashes Orange Alternately If the POWER and ALARM lamps flash alternately, disconnect the printer cable from the power supply. Load paper and press the RESUME/CANCEL button. An Ink tank error...by continuation of printing under the current condition may damage the printer. Ink has run out. If the ALARM lamp is not resolved, contact your Canon service representative. For details on . Press and hold the RESUME... level is off , and then unplug the printer from the printer, turn the printer on how to change the paper source. 78 Troubleshooting


