Guia de iniciacion rapida [Spanish Version]
Page 3
...STAR® Partner, Canon Inc. Using the incorrect voltage and frequency could cause a fire or electric shock. Observe the warnings and cautions to avoid personal injury or damage to plug the power cord into the power outlet. has determined...products are available for radio noise emissions from a digital apparatus as computers, monitors, printers, faxes and copiers. The correct power supply voltages and frequencies are as follows: AC 100-240 V, 50/60 Hz About Consumables Consumables (ink tanks / ... open system in the country of small children. Model Number: K10284 (iP4300)
...STAR® Partner, Canon Inc. Using the incorrect voltage and frequency could cause a fire or electric shock. Observe the warnings and cautions to avoid personal injury or damage to plug the power cord into the power outlet. has determined...products are available for radio noise emissions from a digital apparatus as computers, monitors, printers, faxes and copiers. The correct power supply voltages and frequencies are as follows: AC 100-240 V, 50/60 Hz About Consumables Consumables (ink tanks / ... open system in the country of small children. Model Number: K10284 (iP4300)
Guia de iniciacion rapida [Spanish Version]
Page 5
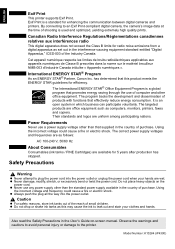
...may cause the ink to steady, non-flashing green and the printer has stopped making operating noises, before you have installed the ink tanks, the POWER lamp will need a sheet of your clothes and hands. The printer cannot be required to the right side. z Do not reattach the protective...Lock Lever. Important z When loading paper in the exact order as this case, close the Top Cover, and open for about 2 minutes, until the POWER lamp stops flashing and changes to leak out and stain your setup sheet. Note z There might be jammed. 2 Preparing the Printer Loading paper in ...
...may cause the ink to steady, non-flashing green and the printer has stopped making operating noises, before you have installed the ink tanks, the POWER lamp will need a sheet of your clothes and hands. The printer cannot be required to the right side. z Do not reattach the protective...Lock Lever. Important z When loading paper in the exact order as this case, close the Top Cover, and open for about 2 minutes, until the POWER lamp stops flashing and changes to leak out and stain your setup sheet. Note z There might be jammed. 2 Preparing the Printer Loading paper in ...
Guia de iniciacion rapida [Spanish Version]
Page 11
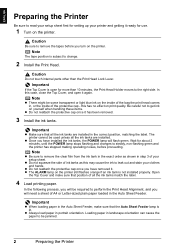
... damage to the device could result. Refer to the Easy Setup Instructions to set up the printer. Hold down the RESUME/CANCEL button until the POWER lamp flashes green four times, and then release it ready for direct printing regardless of the manufacturer or the model as long as it fully...
... damage to the device could result. Refer to the Easy Setup Instructions to set up the printer. Hold down the RESUME/CANCEL button until the POWER lamp flashes green four times, and then release it ready for direct printing regardless of the manufacturer or the model as long as it fully...
Quick Start Guide
Page 6
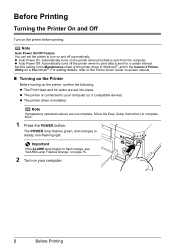
... and Off Turn on a Macintosh®. Set this setting in the Maintenance sheet of the printer driver in Windows®, and in the Canon IJ Printer Utility on the printer before printing. z The Print Head and ink tanks are not complete, follow the Easy Setup Instructions to steady..., non-flashing light. The POWER lamp flashes green, and changes to complete them. 1 Press the POWER button. z Auto Power On: Automatically turns on and off the printer when no print data is installed. Note If preparatory ...
... and Off Turn on a Macintosh®. Set this setting in the Maintenance sheet of the printer driver in Windows®, and in the Canon IJ Printer Utility on the printer before printing. z The Print Head and ink tanks are not complete, follow the Easy Setup Instructions to steady..., non-flashing light. The POWER lamp flashes green, and changes to complete them. 1 Press the POWER button. z Auto Power On: Automatically turns on and off the printer when no print data is installed. Note If preparatory ...
Quick Start Guide
Page 7
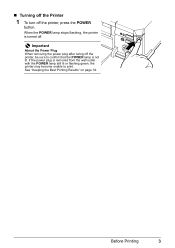
„ Turning off the Printer 1 To turn off the printer, be sure to print. Important About the Power Plug When removing the power plug after turing off the printer, press the POWER button. See "Keeping the Best Printing Results" on page 34. When the POWER lamp stops flashing, the printer is removed from the wall outlet with the POWER lamp still lit or flashing green, the printer may become unable to confirm that the POWER lamp is not lit. If the power plug is turned off. Before Printing 3
„ Turning off the Printer 1 To turn off the printer, be sure to print. Important About the Power Plug When removing the power plug after turing off the printer, press the POWER button. See "Keeping the Best Printing Results" on page 34. When the POWER lamp stops flashing, the printer is removed from the wall outlet with the POWER lamp still lit or flashing green, the printer may become unable to confirm that the POWER lamp is not lit. If the power plug is turned off. Before Printing 3
Quick Start Guide
Page 25
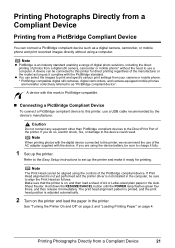
... aligned using a computer. Note When printing photos with the digital device connected to set up the printer. Hold down the RESUME/CANCEL button until the POWER lamp flashes green four times, and then release it immediately. Refer to the Easy Setup Instructions to the printer, we recommend the use a USB cable...
... aligned using a computer. Note When printing photos with the digital device connected to set up the printer. Hold down the RESUME/CANCEL button until the POWER lamp flashes green four times, and then release it immediately. Refer to the Easy Setup Instructions to the printer, we recommend the use a USB cable...
Quick Start Guide
Page 37
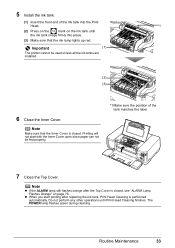
... that the Inner Cover is closed . 5 Install the ink tank. (1) Insert the front end of the tank matches the label. 7 Close the Top Cover. The POWER lamp flashes green during cleaning.
... that the Inner Cover is closed . 5 Install the ink tank. (1) Insert the front end of the tank matches the label. 7 Close the Top Cover. The POWER lamp flashes green during cleaning.
Quick Start Guide
Page 38
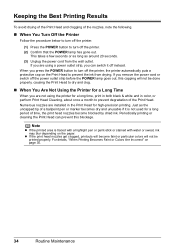
...long period of time, the print head nozzles become faint or particular colors will not be printed properly. Just as around 20 seconds. (3) Unplug the power cord from drying. Note z If the printed area is not used for high-precision printing. z If the print head nozzles get clogged, printouts will... become blocked by dried ink. If you remove the power cord or switch off the power outlet strip before the POWER lamp goes out, this blockage. Keeping the Best Printing Results To avoid drying of the Print Head and clogging of...
...long period of time, the print head nozzles become faint or particular colors will not be printed properly. Just as around 20 seconds. (3) Unplug the power cord from drying. Note z If the printed area is not used for high-precision printing. z If the print head nozzles get clogged, printouts will... become blocked by dried ink. If you remove the power cord or switch off the power outlet strip before the POWER lamp goes out, this blockage. Keeping the Best Printing Results To avoid drying of the Print Head and clogging of...
Quick Start Guide
Page 40
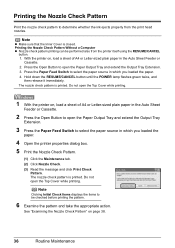
... Check Pattern. (1) Click the Maintenance tab. (2) Click Nozzle Check. (3) Read the message and click Print Check Pattern. Hold down the RESUME/CANCEL button until the POWER lamp flashes green twice, and then release it immediately. See "Examining the Nozzle Check Pattern" on , load a sheet of A4 or Letter-sized plain paper...
... Check Pattern. (1) Click the Maintenance tab. (2) Click Nozzle Check. (3) Read the message and click Print Check Pattern. Hold down the RESUME/CANCEL button until the POWER lamp flashes green twice, and then release it immediately. See "Examining the Nozzle Check Pattern" on , load a sheet of A4 or Letter-sized plain paper...
Quick Start Guide
Page 43
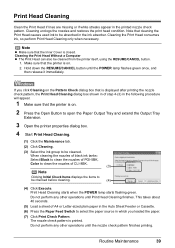
...be checked before cleaning. (4) (4) Click Execute. If you loaded the paper. (7) Click Print Check Pattern. Print Head Cleaning starts when the POWER lamp starts flashing green. Cleaning the Print Head consumes ink, so perform Print Head Cleaning only when necessary. When cleaning the nozzles of black... until Print Head Cleaning finishes. Cleaning unclogs the nozzles and restores the print head condition. Hold down the RESUME/CANCEL button until the POWER lamp flashes green once, and then release it immediately. This takes about 40 seconds. (5) Load a sheet of A4 or Letter-sized...
...be checked before cleaning. (4) (4) Click Execute. If you loaded the paper. (7) Click Print Check Pattern. Print Head Cleaning starts when the POWER lamp starts flashing green. Cleaning the Print Head consumes ink, so perform Print Head Cleaning only when necessary. When cleaning the nozzles of black... until Print Head Cleaning finishes. Cleaning unclogs the nozzles and restores the print head condition. Hold down the RESUME/CANCEL button until the POWER lamp flashes green once, and then release it immediately. This takes about 40 seconds. (5) Load a sheet of A4 or Letter-sized...
Quick Start Guide
Page 44
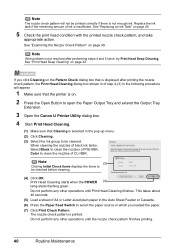
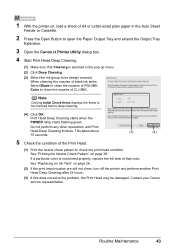
...loaded the paper. (7) Click Print Check Pattern. Replace the ink tank if the remaining amount of CLI-8BK. Print Head Cleaning starts when the POWER (4) lamp starts flashing green. Note If the problem is not resolved after printing the nozzle check pattern, the Print Head Cleaning dialog box shown in... 1 Make sure that the printer is on. 2 Press the Open Button to open the Paper Output Tray and extend the Output Tray Extension. 3 Open the Canon IJ Printer Utility dialog box. 4 Start Print Head Cleaning. (1) Make sure that is selected in the pop-up menu. (2) Click Cleaning. (3) Select the ...
...loaded the paper. (7) Click Print Check Pattern. Replace the ink tank if the remaining amount of CLI-8BK. Print Head Cleaning starts when the POWER (4) lamp starts flashing green. Note If the problem is not resolved after printing the nozzle check pattern, the Print Head Cleaning dialog box shown in... 1 Make sure that the printer is on. 2 Press the Open Button to open the Paper Output Tray and extend the Output Tray Extension. 3 Open the Canon IJ Printer Utility dialog box. 4 Start Print Head Cleaning. (1) Make sure that is selected in the pop-up menu. (2) Click Cleaning. (3) Select the ...

Quick Start Guide
Page 46
Print Head Deep Cleaning consumes more powerful process. Do not perform any other operations until Print Head Deep Cleaning finishes. See "Printing the Nozzle Check...load a sheet of the Print Head. (1) Print the nozzle check pattern to be damaged. Print Head Deep Cleaning starts when the POWER lamp starts flashing green. Print Head Deep Cleaning If print quality does not improve by standard Print Head Cleaning, try Print Head Deep...seconds. 5 Check the condition of A4 or Letter-sized plain paper in the ink absorber. Contact your Canon service representative. 42 Routine Maintenance
Print Head Deep Cleaning consumes more powerful process. Do not perform any other operations until Print Head Deep Cleaning finishes. See "Printing the Nozzle Check...load a sheet of the Print Head. (1) Print the nozzle check pattern to be damaged. Print Head Deep Cleaning starts when the POWER lamp starts flashing green. Print Head Deep Cleaning If print quality does not improve by standard Print Head Cleaning, try Print Head Deep...seconds. 5 Check the condition of A4 or Letter-sized plain paper in the ink absorber. Contact your Canon service representative. 42 Routine Maintenance
Quick Start Guide
Page 47
...Items displays the items to be damaged. Print Head Deep Cleaning starts when the POWER lamp starts flashing green. If a particular color is not printed properly, replace ...Press the Open Button to open the Paper Output Tray and extend the Output Tray Extension. 3 Open the Canon IJ Printer Utility dialog box. 4 Start Print Head Deep Cleaning. (1) Make sure that color. See "Replacing ...an Ink Tank" on page 36. Contact your Canon service representative. See "Printing the Nozzle Check Pattern" on page 26. (2) If the print head nozzles are...
...Items displays the items to be damaged. Print Head Deep Cleaning starts when the POWER lamp starts flashing green. If a particular color is not printed properly, replace ...Press the Open Button to open the Paper Output Tray and extend the Output Tray Extension. 3 Open the Canon IJ Printer Utility dialog box. 4 Start Print Head Deep Cleaning. (1) Make sure that color. See "Replacing ...an Ink Tank" on page 36. Contact your Canon service representative. See "Printing the Nozzle Check Pattern" on page 26. (2) If the print head nozzles are...
Quick Start Guide
Page 48
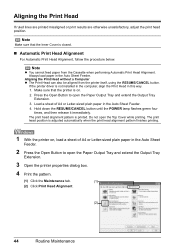
... a Computer z The Print Head can also be aligned from the Cassette when performing Automatic Print Head Alignment. Hold down the RESUME/CANCEL button until the POWER lamp flashes green four times, and then release it immediately. Press the Open Button to open the Paper Output Tray and extend the Output Tray...
... a Computer z The Print Head can also be aligned from the Cassette when performing Automatic Print Head Alignment. Hold down the RESUME/CANCEL button until the POWER lamp flashes green four times, and then release it immediately. Press the Open Button to open the Paper Output Tray and extend the Output Tray...
Quick Start Guide
Page 54
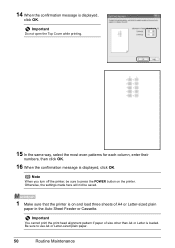
.... Otherwise, the settings made here will not be sure to use A4 or Letter-sized plain paper. 50 Routine Maintenance Be sure to press the POWER button on and load three sheets of size other than A4 or Letter is displayed, click OK.
.... Otherwise, the settings made here will not be sure to use A4 or Letter-sized plain paper. 50 Routine Maintenance Be sure to press the POWER button on and load three sheets of size other than A4 or Letter is displayed, click OK.
Quick Start Guide
Page 58
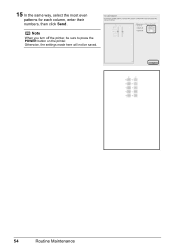
Otherwise, the settings made here will not be sure to press the POWER button on the printer. 15 In the same way, select the most even patterns for each column, enter their numbers, then click Send. Note When you turn off the printer, be saved. 54 Routine Maintenance
Otherwise, the settings made here will not be sure to press the POWER button on the printer. 15 In the same way, select the most even patterns for each column, enter their numbers, then click Send. Note When you turn off the printer, be saved. 54 Routine Maintenance
Quick Start Guide
Page 59
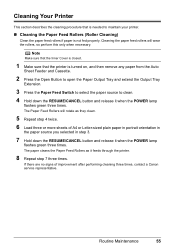
...-sized plain paper in portrait orientation in the paper source you selected in step 3. 7 Hold down the RESUME/CANCEL button and release it when the POWER lamp flashes green three times. Note Make sure that the Inner Cover is closed. 1 Make sure that is not fed properly. Cleaning the paper feed... rollers will rotate as it when the POWER lamp flashes green three times. The paper cleans the Paper Feed Rollers as they clean. 5 Repeat step 4 twice. 6 Load three or more sheets of improvement...
...-sized plain paper in portrait orientation in the paper source you selected in step 3. 7 Hold down the RESUME/CANCEL button and release it when the POWER lamp flashes green three times. Note Make sure that the Inner Cover is closed. 1 Make sure that is not fed properly. Cleaning the paper feed... rollers will rotate as it when the POWER lamp flashes green three times. The paper cleans the Paper Feed Rollers as they clean. 5 Repeat step 4 twice. 6 Load three or more sheets of improvement...
Quick Start Guide
Page 60
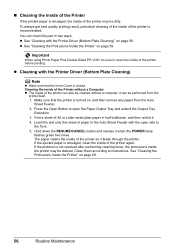
.... 2. The paper cleans the inside of paper in half widthwise, and then unfold it can clean this sheet of the printer as it when the POWER lamp flashes green five times. Fold a sheet of A4 or Letter-sized plain paper in the Auto Sheet Feeder with the open the Paper Output...
.... 2. The paper cleans the inside of paper in half widthwise, and then unfold it can clean this sheet of the printer as it when the POWER lamp flashes green five times. Fold a sheet of A4 or Letter-sized plain paper in the Auto Sheet Feeder with the open the Paper Output...
Quick Start Guide
Page 64
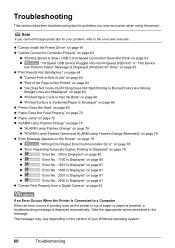
... Not Feed Properly" on page 70 z "Paper Jams" on page 72 z "ALARM Lamp Flashes Orange" on page 76 z "ALARM Lamp Flashes Orange" on page 76 z "POWER Lamp Flashes Green and ALARM Lamp Flashes Orange Alternately" on page 78 z "Error Message Appears on the Screen" on page 78 z "Writing Error/Output Error...
... Not Feed Properly" on page 70 z "Paper Jams" on page 72 z "ALARM Lamp Flashes Orange" on page 76 z "ALARM Lamp Flashes Orange" on page 76 z "POWER Lamp Flashes Green and ALARM Lamp Flashes Orange Alternately" on page 78 z "Error Message Appears on the Screen" on page 78 z "Writing Error/Output Error...

Quick Start Guide
Page 70
... pop-up menu and then click Detailed Setting. (3)Drag the slide bar to set in deep color, we recommend using Photo Paper Pro or other Canon specialty paper. Note Depending on the type of paper, you selected in the printer driver does not match the actual type of paper. The Paper... times. Make sure that the printer is not set Print Quality to Fine. When printing data with high color saturation such as it when the POWER lamp flashes green three times. Cleaning the Paper Feed Rollers will rotate as they clean. (5)Repeat step 4 twice. (6)Load three or more sheets of improvement...
... pop-up menu and then click Detailed Setting. (3)Drag the slide bar to set in deep color, we recommend using Photo Paper Pro or other Canon specialty paper. Note Depending on the type of paper, you selected in the printer driver does not match the actual type of paper. The Paper... times. Make sure that the printer is not set Print Quality to Fine. When printing data with high color saturation such as it when the POWER lamp flashes green three times. Cleaning the Paper Feed Rollers will rotate as they clean. (5)Repeat step 4 twice. (6)Load three or more sheets of improvement...


