
Users Manual - English
Page 2
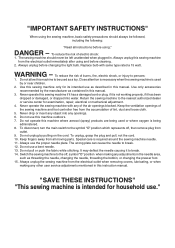
... this machine to be used as threading the needle, changing the needle, threading the bobbin, or changing the presser foot. 15. Use this machine where aerosol (spray) products are being administered. 8. Do not use ." Do not operate this sewing machine only for examination, repair, electrical or mechanical adjustment. 4. To unplug, grasp the plug and pull, not the cord. 10. Always use a bent needle. 13. Do not pull or push the fabric while stitching. It...
... this machine to be used as threading the needle, changing the needle, threading the bobbin, or changing the presser foot. 15. Use this machine where aerosol (spray) products are being administered. 8. Do not use ." Do not operate this sewing machine only for examination, repair, electrical or mechanical adjustment. 4. To unplug, grasp the plug and pull, not the cord. 10. Always use a bent needle. 13. Do not pull or push the fabric while stitching. It...
Users Manual - English
Page 3
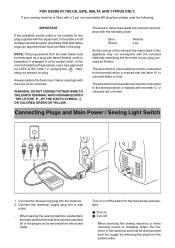
... with the coloured markings identifying the terminals in your sewing machine is fitted with bared flexible cords is marked with the fuse cover removed. When servicing the sewing machine, or when removing covers or changing lamps, the machine or the electrical set must be cut off or the plug must be ... as a plug with a 3 pin non-rewireable BS plug then please read the following code: Blue Brown Neutral Live As the colours of replacing the plug fuse, use plugs with the letter 'N' or coloured black or blue. Connecting Plugs and Main Power / Sewing Light Switch 1 2 1. In the ...
... with the coloured markings identifying the terminals in your sewing machine is fitted with bared flexible cords is marked with the fuse cover removed. When servicing the sewing machine, or when removing covers or changing lamps, the machine or the electrical set must be cut off or the plug must be ... as a plug with a 3 pin non-rewireable BS plug then please read the following code: Blue Brown Neutral Live As the colours of replacing the plug fuse, use plugs with the letter 'N' or coloured black or blue. Connecting Plugs and Main Power / Sewing Light Switch 1 2 1. In the ...
Users Manual - English
Page 4
... parts 1 Accessories 3 OPERATING YOUR SEWING MACHINE .......... 4 Connecting Plugs 4 Main Power and Sewing Light Switches ... 5 Foot Controller 5 Replacing the Needle 6 Checking the Needle 6 Changing the Presser Foot 7 Converting to Free-arm Style 7 VARIOUS CONTROLS 8 Pattern Selection Dial 8 Stitch Length Dial 11 Reverse Sewing Button 12 THREADING THE MACHINE 13 Winding the bobbin 13 Lower Threading 15 Upper Threading 16 Drawing Up Lower Thread 17 Twin Needle Sewing 18 Thread Tension 19 RELATIVE CHART OF SEWING FABRICS, NEEDLES AND THREADS 20 MAINTENANCE Changing the Bulb...
... parts 1 Accessories 3 OPERATING YOUR SEWING MACHINE .......... 4 Connecting Plugs 4 Main Power and Sewing Light Switches ... 5 Foot Controller 5 Replacing the Needle 6 Checking the Needle 6 Changing the Presser Foot 7 Converting to Free-arm Style 7 VARIOUS CONTROLS 8 Pattern Selection Dial 8 Stitch Length Dial 11 Reverse Sewing Button 12 THREADING THE MACHINE 13 Winding the bobbin 13 Lower Threading 15 Upper Threading 16 Drawing Up Lower Thread 17 Twin Needle Sewing 18 Thread Tension 19 RELATIVE CHART OF SEWING FABRICS, NEEDLES AND THREADS 20 MAINTENANCE Changing the Bulb...
Users Manual - English
Page 10
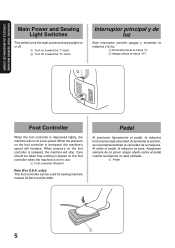
... para. Asegúrese siempre de no poner ningún objeto sobre el pedal cuando la máquina no esté utilizada. 1 Pedal 1 65 Al aumentar la presión, se incrementa también la velocidad de la máquina. Care should be used for sewing machine models XL3010 and XL3022. KNOWING YOUR SEWING MACHINE CONOZCA SU MAQUINA DE COSER Main Power and Sewing Light...
... para. Asegúrese siempre de no poner ningún objeto sobre el pedal cuando la máquina no esté utilizada. 1 Pedal 1 65 Al aumentar la presión, se incrementa también la velocidad de la máquina. Care should be used for sewing machine models XL3010 and XL3022. KNOWING YOUR SEWING MACHINE CONOZCA SU MAQUINA DE COSER Main Power and Sewing Light...

Users Manual - English
Page 14
... SEWING MACHINE CONOZCA SU MAQUINA DE COSER RECOMMENDED LENGTHS FOR STITCHES PATTERN a-b-c-d 1 2 3 4 5 6 7 8 9 10 11 12 STITCH NAME 4-STEP AUTOMATIC BUTTONHOLE STRAIGHT STITCH (Left needle position) STRAIGHT STITCH (Center needle position) ZIGZAG STITCH ZIGZAG STITCH ZIGZAG STITCH BLIND HEM STITCH STRETCH BLIND STITCH SCALLOP STITCH ELASTIC OVERLOCK STITCH ELASTIC STITCH TRIPLE ZIGZAG STRETCH STITCH TRIPLE STRETCH STITCH PRESET WIDTH [mm(inch)] 5 (13/64) 0 0 1.5 (1/16) 3.5 (9/64) 5 (13/64) 3 (1/8) 3 (1/8) 5 (13/64) 5 (13/64) 5 (13/64) 5 (13/64) 0 RECOMMENDED PAGE IN LENGTH INSTRUCTIONS...
... SEWING MACHINE CONOZCA SU MAQUINA DE COSER RECOMMENDED LENGTHS FOR STITCHES PATTERN a-b-c-d 1 2 3 4 5 6 7 8 9 10 11 12 STITCH NAME 4-STEP AUTOMATIC BUTTONHOLE STRAIGHT STITCH (Left needle position) STRAIGHT STITCH (Center needle position) ZIGZAG STITCH ZIGZAG STITCH ZIGZAG STITCH BLIND HEM STITCH STRETCH BLIND STITCH SCALLOP STITCH ELASTIC OVERLOCK STITCH ELASTIC STITCH TRIPLE ZIGZAG STRETCH STITCH TRIPLE STRETCH STITCH PRESET WIDTH [mm(inch)] 5 (13/64) 0 0 1.5 (1/16) 3.5 (9/64) 5 (13/64) 3 (1/8) 3 (1/8) 5 (13/64) 5 (13/64) 5 (13/64) 5 (13/64) 0 RECOMMENDED PAGE IN LENGTH INSTRUCTIONS...
Users Manual - English
Page 18
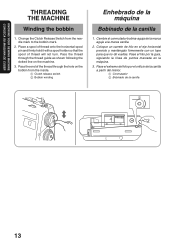
... spool pin and firmly hold it with a spool holder so that the spool of the thread through the thread guide as shown following the dotted line on the bobbin from the needle mark to the bobbin mark. 2. Change the Clutch Release Switch from the inside. 1 Clutch release switch 2 Bobbin winding Enhebrado de la máquina Bobinado de la canilla 1. KNOWING YOUR SEWING MACHINE CONOZCA SU MAQUINA DE COSER THREADING...
... spool pin and firmly hold it with a spool holder so that the spool of the thread through the thread guide as shown following the dotted line on the bobbin from the needle mark to the bobbin mark. 2. Change the Clutch Release Switch from the inside. 1 Clutch release switch 2 Bobbin winding Enhebrado de la máquina Bobinado de la canilla 1. KNOWING YOUR SEWING MACHINE CONOZCA SU MAQUINA DE COSER THREADING...
Users Manual - English
Page 22
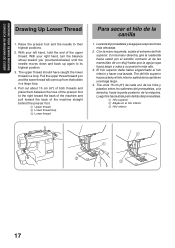
... the lower thread will come up again to their highest positions. 2. Tire del hilo superior hacia usted y el hilo inferior saldrá de la canilla en una baga larga. 4. Pull out about 15 cm (6") of both threads and place them between the toes of the presser foot to the right toward the back of the machine straight behind the presser foot. 1 Upper thread 2 Lower thread loop 3 Lower thread Para sacar el hilo...
... the lower thread will come up again to their highest positions. 2. Tire del hilo superior hacia usted y el hilo inferior saldrá de la canilla en una baga larga. 4. Pull out about 15 cm (6") of both threads and place them between the toes of the presser foot to the right toward the back of the machine straight behind the presser foot. 1 Upper thread 2 Lower thread loop 3 Lower thread Para sacar el hilo...

Users Manual - English
Page 25
... MAQUINA DE COSER D Correct tension Correct tension is important since too much or too little tension will weaken your seams or cause puckers on your fabric. 1 Reverse 2 Surface D Tensión correcta Es ecesario tener una tensión correcta dado que una tensión insuficiente o demasiado fuerte va a debilitar sus costuras o fruncir el tejido. 1 Revés 2 Derecho 1 2 1 2 RELATIVE CHART OF SEWING FABRICS, NEEDLES AND THREADS SEWING FABRICS NEEDLE SIZES THREAD SIZES...
... MAQUINA DE COSER D Correct tension Correct tension is important since too much or too little tension will weaken your seams or cause puckers on your fabric. 1 Reverse 2 Surface D Tensión correcta Es ecesario tener una tensión correcta dado que una tensión insuficiente o demasiado fuerte va a debilitar sus costuras o fruncir el tejido. 1 Revés 2 Derecho 1 2 1 2 RELATIVE CHART OF SEWING FABRICS, NEEDLES AND THREADS SEWING FABRICS NEEDLE SIZES THREAD SIZES...
Users Manual - English
Page 28
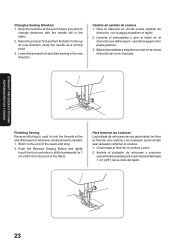
.... Stitch to line up its new direction using the needle as a turning point. 3. Changing Sewing Direction 1. Lower the presser foot and start sewing in the fabric. 2. Pare la máquina en donde quiera cambiar de dirección, con la aguja picada en el tejido. 2. Cosa hasta el final de la costura y pare. 2. Stop the machine at the end of the fabric. Push the Reverse Sewing Button and lightly touch the foot controller...
.... Stitch to line up its new direction using the needle as a turning point. 3. Changing Sewing Direction 1. Lower the presser foot and start sewing in the fabric. 2. Pare la máquina en donde quiera cambiar de dirección, con la aguja picada en el tejido. 2. Cosa hasta el final de la costura y pare. 2. Stop the machine at the end of the fabric. Push the Reverse Sewing Button and lightly touch the foot controller...
Users Manual - English
Page 31
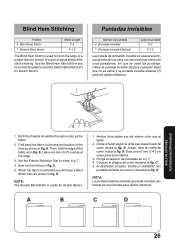
... (puntada invisible alemana) se recomienda para tejidos elásticos. A B C D 267 Set the Pattern Selection Dial to the desired location of the hem as shown in fig. Luego, dele la vuelta tal como indica la fig. B. C. 5. Use the Blind Hem Stitch (6) for any non-stretching fabrics and the Stretch Blind Stitch (7) for stretch fabrics. 1. A. Deje unos 6 mm (1/4") sin coser para esconderlos. 3. Blind Hem Stitching Pattern 6 (Blind Hem Stitch) 7 (Stretch Blind Stitch) Stitch Length F-2 F-1.5 The Blind Hem Stitch is used to finish the edge of a project...
... (puntada invisible alemana) se recomienda para tejidos elásticos. A B C D 267 Set the Pattern Selection Dial to the desired location of the hem as shown in fig. Luego, dele la vuelta tal como indica la fig. B. C. 5. Use the Blind Hem Stitch (6) for any non-stretching fabrics and the Stretch Blind Stitch (7) for stretch fabrics. 1. A. Deje unos 6 mm (1/4") sin coser para esconderlos. 3. Blind Hem Stitching Pattern 6 (Blind Hem Stitch) 7 (Stretch Blind Stitch) Stitch Length F-2 F-1.5 The Blind Hem Stitch is used to finish the edge of a project...
Users Manual - English
Page 47
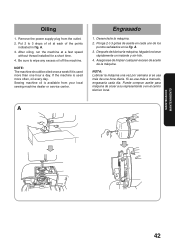
...;s de una hora diaria. Be sure to 3 drops of oil at a fast speed without thread installed for a short time. 4. Sewing machine oil is used more often, oil every day. Ponga 2 ó 3 gotas de aceite en cada uno de los puntos señalados en la fig. Después de lubricar la máquina, hágala funcionar rápidamente un instante y sin hilo. 4. Aseg...
...;s de una hora diaria. Be sure to 3 drops of oil at a fast speed without thread installed for a short time. 4. Sewing machine oil is used more often, oil every day. Ponga 2 ó 3 gotas de aceite en cada uno de los puntos señalados en la fig. Después de lubricar la máquina, hágala funcionar rápidamente un instante y sin hilo. 4. Aseg...
Users Manual - English
Page 48
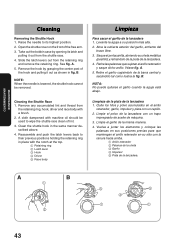
... bobbin case by grasping the center post of the hook and pulling it out from the shuttle race. 4. A cloth dampened with machine oil should be removed. Clean the shuttle hook in place with a brush. 2. A. 5. Remove any accumulated lint and thread from the retaining ring and remove the retaining ring. Quite los hilos y polvo acumulados en el anillo retenedor, garfio, impulsor y pista con un cepillo. 2. Open...
... bobbin case by grasping the center post of the hook and pulling it out from the shuttle race. 4. A cloth dampened with machine oil should be removed. Clean the shuttle hook in place with a brush. 2. A. 5. Remove any accumulated lint and thread from the retaining ring and remove the retaining ring. Quite los hilos y polvo acumulados en el anillo retenedor, garfio, impulsor y pista con un cepillo. 2. Open...

Users Manual - English
Page 50
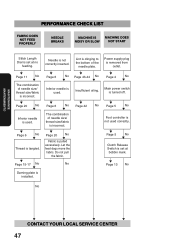
... shuttle hook. M Page 16 No M Upper thread is too tight. M Page 15 No M Lower thread tension is tangled. M Page 19 M No Page 19 No M Threading is incorrect. M Page 15-17 No M Wrong needle is used . M Page 20 No M Page 6 No M The combination of needle size/ thread size/fabric is not correctly installed. M Page 6 No M The combination of needle size/ thread size/fabric is not correct. PERFORMANCE CHECK LIST UPPER THREAD LOWER THREAD BREAKS BREAKS SKIPPED STITCHES LOOP IN SEAM FABRIC PUCKERS MAINTENANCE...
... shuttle hook. M Page 16 No M Upper thread is too tight. M Page 15 No M Lower thread tension is tangled. M Page 19 M No Page 19 No M Threading is incorrect. M Page 15-17 No M Wrong needle is used . M Page 20 No M Page 6 No M The combination of needle size/ thread size/fabric is not correctly installed. M Page 6 No M The combination of needle size/ thread size/fabric is not correct. PERFORMANCE CHECK LIST UPPER THREAD LOWER THREAD BREAKS BREAKS SKIPPED STITCHES LOOP IN SEAM FABRIC PUCKERS MAINTENANCE...
Users Manual - English
Page 52
... removed from outlet. M Page 4 No M Main power switch is incorrect. Do not pull the fabric. M Page 11 No M The combination of the needle plate. Needle is used. Insufficient oiling. M Page 20 No M Inferior needle is used correctly. M Page 6 No M M Page 43-44 No M Inferior needle is not correctly inserted. MAINTENANCE MANTENIMIENTO PERFORMANCE CHECK LIST FABRIC DOES NOT FEED PROPERLY NEEDLE BREAKS MACHINE IS MACHINE DOES NOISY OR SLOW NOT START Stitch Length Dial is set...
... removed from outlet. M Page 4 No M Main power switch is incorrect. Do not pull the fabric. M Page 11 No M The combination of the needle plate. Needle is used. Insufficient oiling. M Page 20 No M Inferior needle is used correctly. M Page 6 No M M Page 43-44 No M Inferior needle is not correctly inserted. MAINTENANCE MANTENIMIENTO PERFORMANCE CHECK LIST FABRIC DOES NOT FEED PROPERLY NEEDLE BREAKS MACHINE IS MACHINE DOES NOISY OR SLOW NOT START Stitch Length Dial is set...
Users Manual - English
Page 56
Page Pattern Widths 9 Performance Checklist 44 Principal Parts 1 R Relative Chart of Sewing Fabrics, Needles and Threads 20 Repacking 49 Reverse Sewing Button 12 S Scallop Stitch 27 Sewing Light Switch 5 Light Bulb Replacement 41 Shuttle Hook Removal 43 Shuttle Race Cleaning 43 Stitch Length Dial 11 Straight Stitch 22 Stretch Blind Stitch 26 T Thread Tension 19 Triple Stretch Stitch 22 Triple Zigzag Stretch Stitch 30 Troubleshooting 45, 47 Twin Needle Sewing 18 U Upper Tension Control Dial 19 Upper Threading 16 W Winding the Bobbin 13 Z Zigzag Stitch 25 Zipper Insertion...
Page Pattern Widths 9 Performance Checklist 44 Principal Parts 1 R Relative Chart of Sewing Fabrics, Needles and Threads 20 Repacking 49 Reverse Sewing Button 12 S Scallop Stitch 27 Sewing Light Switch 5 Light Bulb Replacement 41 Shuttle Hook Removal 43 Shuttle Race Cleaning 43 Stitch Length Dial 11 Straight Stitch 22 Stretch Blind Stitch 26 T Thread Tension 19 Triple Stretch Stitch 22 Triple Zigzag Stretch Stitch 30 Troubleshooting 45, 47 Twin Needle Sewing 18 U Upper Tension Control Dial 19 Upper Threading 16 W Winding the Bobbin 13 Z Zigzag Stitch 25 Zipper Insertion...

Users Manual - English
Page 59
English Spanish 194256-111 Printed in Taiwan
English Spanish 194256-111 Printed in Taiwan


