
Users Manual - English
Page 2
... outlet immediately after using ." Replace bulb with any openings. 6. Use only accessories recommended by the manufacturer as threading the needle, changing the needle, threading the bobbin, or changing the presser foot. 15. Return the sewing machine to break. 12. Keep the ventilation openings of the sewing machine and foot controller free...
... outlet immediately after using ." Replace bulb with any openings. 6. Use only accessories recommended by the manufacturer as threading the needle, changing the needle, threading the bobbin, or changing the presser foot. 15. Return the sewing machine to break. 12. Keep the ventilation openings of the sewing machine and foot controller free...
Users Manual - English
Page 4
... Foot 7 Converting to Free-arm Style 7 VARIOUS CONTROLS 8 Pattern Selection Dial 8 Stitch Length Dial 11 Reverse Sewing Button 12 THREADING THE MACHINE 13 Winding the bobbin 13 Lower Threading 15 Upper Threading 16 Drawing Up Lower Thread 17 Twin Needle Sewing 18 Thread Tension 19 RELATIVE CHART OF SEWING FABRICS, NEEDLES...
... Foot 7 Converting to Free-arm Style 7 VARIOUS CONTROLS 8 Pattern Selection Dial 8 Stitch Length Dial 11 Reverse Sewing Button 12 THREADING THE MACHINE 13 Winding the bobbin 13 Lower Threading 15 Upper Threading 16 Drawing Up Lower Thread 17 Twin Needle Sewing 18 Thread Tension 19 RELATIVE CHART OF SEWING FABRICS, NEEDLES...
Users Manual - English
Page 18
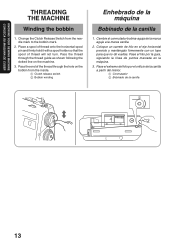
Change the Clutch Release Switch from the inside. 1 Clutch release switch 2 Bobbin winding Enhebrado de la máquina Bobinado de la canilla 1. Coloque un carrete de hilo en el eje horizontal previsto y manténgalo firmemente con ... of the thread through the thread guide as shown following the dotted line on the bobbin from the needle mark to the bobbin mark. 2. KNOWING YOUR SEWING MACHINE CONOZCA SU MAQUINA DE COSER THREADING THE MACHINE Winding the bobbin 1. Cambie el conmutador bobina-aguja de la marca aguja a la marca canilla. 2. Pase el...
Change the Clutch Release Switch from the inside. 1 Clutch release switch 2 Bobbin winding Enhebrado de la máquina Bobinado de la canilla 1. Coloque un carrete de hilo en el eje horizontal previsto y manténgalo firmemente con ... of the thread through the thread guide as shown following the dotted line on the bobbin from the needle mark to the bobbin mark. 2. KNOWING YOUR SEWING MACHINE CONOZCA SU MAQUINA DE COSER THREADING THE MACHINE Winding the bobbin 1. Cambie el conmutador bobina-aguja de la marca aguja a la marca canilla. 2. Pase el...
Users Manual - English
Page 22
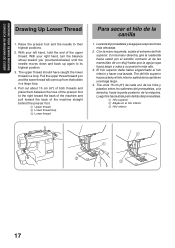
... hand, hold the end of the upper thread. Pull the upper thread toward you (counterclockwise) until the needle moves down and back up from the bobbin in a loop. Con la mano izquierda, sujete el extremo del hilo superior. KNOWING YOUR SEWING MACHINE CONOZCA SU MAQUINA DE COSER Drawing Up Lower Thread...
... hand, hold the end of the upper thread. Pull the upper thread toward you (counterclockwise) until the needle moves down and back up from the bobbin in a loop. Con la mano izquierda, sujete el extremo del hilo superior. KNOWING YOUR SEWING MACHINE CONOZCA SU MAQUINA DE COSER Drawing Up Lower Thread...
Users Manual - English
Page 48
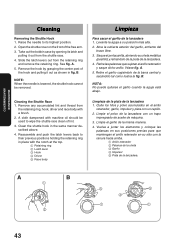
... Para sacar el garfio de la lanzadera 1. A. 5. B. Quite los hilos y polvo acumulados en el anillo retenedor, garfio, impulsor y pista con un cepillo. 2. Take out the bobbin case by grasping the center post of the hook and pulling it out from the retaining ring and remove the retaining ring. Levante la aguja...
... Para sacar el garfio de la lanzadera 1. A. 5. B. Quite los hilos y polvo acumulados en el anillo retenedor, garfio, impulsor y pista con un cepillo. 2. Take out the bobbin case by grasping the center post of the hook and pulling it out from the retaining ring and remove the retaining ring. Levante la aguja...

Users Manual - English
Page 50
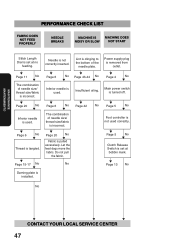
... . M Page 16 No M Page 20 No M M M M M CONTACT YOUR LOCAL SERVICE CENTER 456 Thread tension is not threaded properly in the shuttle hook. M Page 17 No M Bobbin is too tight. M Page 19 No M Spool of needle size/ thread size/fabric is not correctly installed. M Page 15 M No Page 43-44 No M Threading...
... . M Page 16 No M Page 20 No M M M M M CONTACT YOUR LOCAL SERVICE CENTER 456 Thread tension is not threaded properly in the shuttle hook. M Page 17 No M Bobbin is too tight. M Page 19 No M Spool of needle size/ thread size/fabric is not correctly installed. M Page 15 M No Page 43-44 No M Threading...
Users Manual - English
Page 52
... size/fabric is tangled. M Page 6 No M Thread is incorrect. M M Page 6 No Page 42 No M The combination of needle size/ thread size/fabric is set at bobbin mark. M Page 20 No M Fabric is set at no feeding. MAINTENANCE MANTENIMIENTO PERFORMANCE CHECK LIST FABRIC DOES NOT FEED PROPERLY NEEDLE BREAKS MACHINE IS MACHINE...
... size/fabric is tangled. M Page 6 No M Thread is incorrect. M M Page 6 No Page 42 No M The combination of needle size/ thread size/fabric is set at bobbin mark. M Page 20 No M Fabric is set at no feeding. MAINTENANCE MANTENIMIENTO PERFORMANCE CHECK LIST FABRIC DOES NOT FEED PROPERLY NEEDLE BREAKS MACHINE IS MACHINE...
Users Manual - English
Page 56
... Stretch Stitch 22 Triple Zigzag Stretch Stitch 30 Troubleshooting 45, 47 Twin Needle Sewing 18 U Upper Tension Control Dial 19 Upper Threading 16 W Winding the Bobbin 13 Z Zigzag Stitch 25 Zipper Insertion 36 Página M Modalidad brazo libre 7 Monogramas 39 O Ojales 31 P Pedal 5 Pulsador de retroceso 12 Puntada de triple pespunte...
... Stretch Stitch 22 Triple Zigzag Stretch Stitch 30 Troubleshooting 45, 47 Twin Needle Sewing 18 U Upper Tension Control Dial 19 Upper Threading 16 W Winding the Bobbin 13 Z Zigzag Stitch 25 Zipper Insertion 36 Página M Modalidad brazo libre 7 Monogramas 39 O Ojales 31 P Pedal 5 Pulsador de retroceso 12 Puntada de triple pespunte...


