
Users Manual - English
Page 2
... . 2. Return the sewing machine to the nearest authorized dealer or service center for its intended use as threading the needle, changing the needle, threading the bobbin, or changing the presser foot. 15. Never drop or insert any object into water. Do not use the proper needle plate. To reduce the risk...
... . 2. Return the sewing machine to the nearest authorized dealer or service center for its intended use as threading the needle, changing the needle, threading the bobbin, or changing the presser foot. 15. Never drop or insert any object into water. Do not use the proper needle plate. To reduce the risk...
Users Manual - English
Page 4
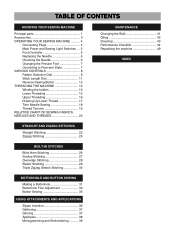
... Foot 7 Converting to Free-arm Style 7 VARIOUS CONTROLS 8 Pattern Selection Dial 8 Stitch Length Dial 11 Reverse Sewing Button 12 THREADING THE MACHINE 13 Winding the bobbin 13 Lower Threading 15 Upper Threading 16 Drawing Up Lower Thread 17 Twin Needle Sewing 18 Thread Tension 19 RELATIVE CHART OF SEWING FABRICS, NEEDLES...
... Foot 7 Converting to Free-arm Style 7 VARIOUS CONTROLS 8 Pattern Selection Dial 8 Stitch Length Dial 11 Reverse Sewing Button 12 THREADING THE MACHINE 13 Winding the bobbin 13 Lower Threading 15 Upper Threading 16 Drawing Up Lower Thread 17 Twin Needle Sewing 18 Thread Tension 19 RELATIVE CHART OF SEWING FABRICS, NEEDLES...
Users Manual - English
Page 18
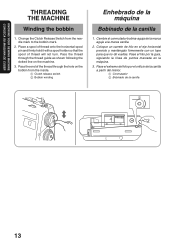
... with a spool holder so that the spool of the thread through the thread guide as shown following the dotted line on the bobbin from the needle mark to the bobbin mark. 2. Pass the thread through the hole on the machine. 3. Pase el hilo por la guía, siguiendo la lí... la máquina. 3. Pass the end of thread will not turn. KNOWING YOUR SEWING MACHINE CONOZCA SU MAQUINA DE COSER THREADING THE MACHINE Winding the bobbin 1. Pase el extremo del hilo por el orificio de la canilla a partir del nterior. 1 Conmutador 2 Bobinado de la canilla 2 1 134 Change the Clutch ...
... with a spool holder so that the spool of the thread through the thread guide as shown following the dotted line on the bobbin from the needle mark to the bobbin mark. 2. Pass the thread through the hole on the machine. 3. Pase el hilo por la guía, siguiendo la lí... la máquina. 3. Pass the end of thread will not turn. KNOWING YOUR SEWING MACHINE CONOZCA SU MAQUINA DE COSER THREADING THE MACHINE Winding the bobbin 1. Pase el extremo del hilo por el orificio de la canilla a partir del nterior. 1 Conmutador 2 Bobinado de la canilla 2 1 134 Change the Clutch ...
Users Manual - English
Page 22
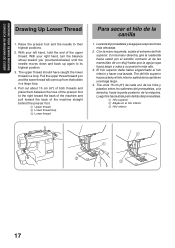
... needle to the right toward the back of the machine and pull toward you (counterclockwise) until the needle moves down and back up from the bobbin in a loop. With your left hand, hold the end of the machine straight behind the presser foot. 1 Upper thread 2 Lower thread loop 3 Lower thread Para...
... needle to the right toward the back of the machine and pull toward you (counterclockwise) until the needle moves down and back up from the bobbin in a loop. With your left hand, hold the end of the machine straight behind the presser foot. 1 Upper thread 2 Lower thread loop 3 Lower thread Para...
Users Manual - English
Page 48
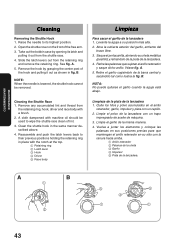
... the shuttle race. 4. Clean the shuttle hook in place with a brush. 2. Retire las palancas que sujetan el anillo retenedor y saque dicho anillo. Take out the bobbin case by grasping the center post of lint. 3. A. 5. A cloth dampened with machine oil should be removed. Abra la cubierta exterior del garfio, enfrente del brazo...
... the shuttle race. 4. Clean the shuttle hook in place with a brush. 2. Retire las palancas que sujetan el anillo retenedor y saque dicho anillo. Take out the bobbin case by grasping the center post of lint. 3. A. 5. A cloth dampened with machine oil should be removed. Abra la cubierta exterior del garfio, enfrente del brazo...

Users Manual - English
Page 50
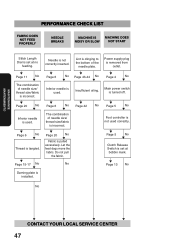
... M Upper thread is not threaded properly in the shuttle hook. M Page 16 No M Page 20 No M M M M M CONTACT YOUR LOCAL SERVICE CENTER 456 M Page 17 No M Bobbin is tangled. M Page 6 No M The combination of needle size/ thread size/fabric is used . Needle is incorrect. Thread tension is not correct. M Page 19 M No...
... M Upper thread is not threaded properly in the shuttle hook. M Page 16 No M Page 20 No M M M M M CONTACT YOUR LOCAL SERVICE CENTER 456 M Page 17 No M Bobbin is tangled. M Page 6 No M The combination of needle size/ thread size/fabric is used . Needle is incorrect. Thread tension is not correct. M Page 19 M No...
Users Manual - English
Page 52
... needle size/ thread size/fabric is not correctly inserted. M Page 5 No M Clutch Release Switch is removed from outlet. No Power supply plug is set at bobbin mark. M Page 6 No M Thread is not used correctly. M Page 5 No M Foot controller is tangled. M Page 20 No M Inferior needle is pulled excessively. Insufficient oiling. M Page...
... needle size/ thread size/fabric is not correctly inserted. M Page 5 No M Clutch Release Switch is removed from outlet. No Power supply plug is set at bobbin mark. M Page 6 No M Thread is not used correctly. M Page 5 No M Foot controller is tangled. M Page 20 No M Inferior needle is pulled excessively. Insufficient oiling. M Page...
Users Manual - English
Page 56
... Stretch Stitch 22 Triple Zigzag Stretch Stitch 30 Troubleshooting 45, 47 Twin Needle Sewing 18 U Upper Tension Control Dial 19 Upper Threading 16 W Winding the Bobbin 13 Z Zigzag Stitch 25 Zipper Insertion 36 Página M Modalidad brazo libre 7 Monogramas 39 O Ojales 31 P Pedal 5 Pulsador de retroceso 12 Puntada de triple pespunte...
... Stretch Stitch 22 Triple Zigzag Stretch Stitch 30 Troubleshooting 45, 47 Twin Needle Sewing 18 U Upper Tension Control Dial 19 Upper Threading 16 W Winding the Bobbin 13 Z Zigzag Stitch 25 Zipper Insertion 36 Página M Modalidad brazo libre 7 Monogramas 39 O Ojales 31 P Pedal 5 Pulsador de retroceso 12 Puntada de triple pespunte...


