
Users Manual - English
Page 2
... causing it has been dropped or damaged, or dropped into any of the air openings blocked. Always unplug this sewing machine from outlet. 9. Never operate this sewing machine if it has a damaged cord or plug, if it is not working properly, if it to the symbol ... "O" position when making any adjustments in the needle area, such as described in this instruction manual. Return the sewing machine to break. 12. Always unplug the sewing machine from the electrical outlet when removing covers, lubricating, or when making any other user service adjustments mentioned in this ...
... causing it has been dropped or damaged, or dropped into any of the air openings blocked. Always unplug this sewing machine from outlet. 9. Never operate this sewing machine if it has a damaged cord or plug, if it is not working properly, if it to the symbol ... "O" position when making any adjustments in the needle area, such as described in this instruction manual. Return the sewing machine to break. 12. Always unplug the sewing machine from the electrical outlet when removing covers, lubricating, or when making any other user service adjustments mentioned in this ...
Users Manual - English
Page 3
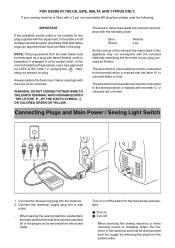
...fuse must be removed from the supply by ASTA to BS 1362, i.e. Always replace the fuse cover. When leaving the sewing machine unattended, the main switch of the machine must be switched off the switch for the plug supplied with the fuse cover removed. carrying the ASA mark, rating ... approved by removing the plug from the main leads must be destroyed as a plug with bared flexible cords is hazardous if engaged in your sewing machine is marked with the letter 'L' or coloured red or brown. IMPORTANT If the available socket outlet is marked with the letter 'N' or coloured...
...fuse must be removed from the supply by ASTA to BS 1362, i.e. Always replace the fuse cover. When leaving the sewing machine unattended, the main switch of the machine must be switched off the switch for the plug supplied with the fuse cover removed. carrying the ASA mark, rating ... approved by removing the plug from the main leads must be destroyed as a plug with bared flexible cords is hazardous if engaged in your sewing machine is marked with the letter 'L' or coloured red or brown. IMPORTANT If the available socket outlet is marked with the letter 'N' or coloured...
Users Manual - English
Page 4
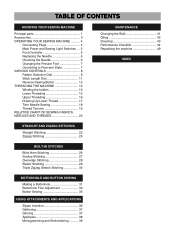
... CONTENTS KNOWING YOUR SEWING MACHINE Principal parts 1 Accessories 3 OPERATING YOUR SEWING MACHINE .......... 4 Connecting Plugs 4 Main Power and Sewing Light Switches ... 5 Foot Controller 5 Replacing the Needle 6 Checking the Needle 6 Changing the Presser Foot 7 Converting to Free-arm Style 7 VARIOUS CONTROLS 8 Pattern Selection Dial 8 Stitch Length Dial 11 Reverse Sewing Button 12 THREADING THE MACHINE 13 Winding the bobbin...
... CONTENTS KNOWING YOUR SEWING MACHINE Principal parts 1 Accessories 3 OPERATING YOUR SEWING MACHINE .......... 4 Connecting Plugs 4 Main Power and Sewing Light Switches ... 5 Foot Controller 5 Replacing the Needle 6 Checking the Needle 6 Changing the Presser Foot 7 Converting to Free-arm Style 7 VARIOUS CONTROLS 8 Pattern Selection Dial 8 Stitch Length Dial 11 Reverse Sewing Button 12 THREADING THE MACHINE 13 Winding the bobbin...
Users Manual - English
Page 10
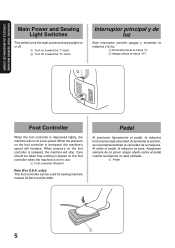
...marca "O") 1 2 Foot Controller When the foot controller is depressed lightly, the machine will run at a low speed. KNOWING YOUR SEWING MACHINE CONOZCA SU MAQUINA DE COSER Main Power and Sewing Light Switches This switch turns the main power and sewing light on or off (toward the "I" mark) 2 Turn off . 1... Turn on the foot controller is increased, the machine's speed will increase. Care should be used for sewing machine models XL3010 and XL3022. Asegúrese siempre de no poner ningún objeto sobre el pedal cuando la má...
...marca "O") 1 2 Foot Controller When the foot controller is depressed lightly, the machine will run at a low speed. KNOWING YOUR SEWING MACHINE CONOZCA SU MAQUINA DE COSER Main Power and Sewing Light Switches This switch turns the main power and sewing light on or off (toward the "I" mark) 2 Turn off . 1... Turn on the foot controller is increased, the machine's speed will increase. Care should be used for sewing machine models XL3010 and XL3022. Asegúrese siempre de no poner ningún objeto sobre el pedal cuando la má...

Users Manual - English
Page 14
KNOWING YOUR SEWING MACHINE CONOZCA SU MAQUINA DE COSER RECOMMENDED LENGTHS FOR STITCHES PATTERN a-b-c-d 1 2 3 4 5 6 7 8 9 10 11 12 STITCH NAME 4-STEP AUTOMATIC BUTTONHOLE STRAIGHT STITCH (Left needle position) STRAIGHT STITCH (...
KNOWING YOUR SEWING MACHINE CONOZCA SU MAQUINA DE COSER RECOMMENDED LENGTHS FOR STITCHES PATTERN a-b-c-d 1 2 3 4 5 6 7 8 9 10 11 12 STITCH NAME 4-STEP AUTOMATIC BUTTONHOLE STRAIGHT STITCH (Left needle position) STRAIGHT STITCH (...
Users Manual - English
Page 18
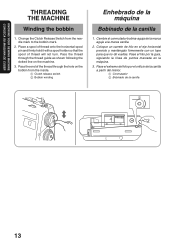
... el orificio de la canilla a partir del nterior. 1 Conmutador 2 Bobinado de la canilla 2 1 134 KNOWING YOUR SEWING MACHINE CONOZCA SU MAQUINA DE COSER THREADING THE MACHINE Winding the bobbin 1. Pass the thread through the hole on the machine. 3. Pass the end of thread will not turn. Change the Clutch Release Switch from the inside...
... el orificio de la canilla a partir del nterior. 1 Conmutador 2 Bobinado de la canilla 2 1 134 KNOWING YOUR SEWING MACHINE CONOZCA SU MAQUINA DE COSER THREADING THE MACHINE Winding the bobbin 1. Pass the thread through the hole on the machine. 3. Pass the end of thread will not turn. Change the Clutch Release Switch from the inside...
Users Manual - English
Page 22
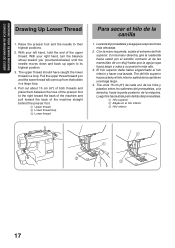
...out about 15 cm (6") of both threads and place them between the toes of the presser foot to the right toward the back of the machine and pull toward you and the lower thread will come up again to their highest positions. 2. With your left hand, hold the end of... aguja vaya hacia abajo y suba a su posición más alta. 3. El hilo superior debe haber enganchado el hilo inferior y hacer una lazada. KNOWING YOUR SEWING MACHINE CONOZCA SU MAQUINA DE COSER Drawing Up Lower Thread 1. Luego tire hacia atrás justo detrás del prensatelas. 1 Hilo superior 2 Bagas en el hilo...
...out about 15 cm (6") of both threads and place them between the toes of the presser foot to the right toward the back of the machine and pull toward you and the lower thread will come up again to their highest positions. 2. With your left hand, hold the end of... aguja vaya hacia abajo y suba a su posición más alta. 3. El hilo superior debe haber enganchado el hilo inferior y hacer una lazada. KNOWING YOUR SEWING MACHINE CONOZCA SU MAQUINA DE COSER Drawing Up Lower Thread 1. Luego tire hacia atrás justo detrás del prensatelas. 1 Hilo superior 2 Bagas en el hilo...

Users Manual - English
Page 25
KNOWING YOUR SEWING MACHINE CONOZCA SU MAQUINA DE COSER D Correct tension Correct tension is important since too much or too little tension will weaken your seams or cause puckers ... THREADS SEWING FABRICS NEEDLE SIZES THREAD SIZES Cotton: 80 VERY THIN Fine tricot, Fine lace, Thin linen, 9 Synthetic Silk, Organza, Chiffon Fine Mercerized Cotton LIGHTWEIGHT MEDIUM WEIGHT Voile, Taffeta, Synthetics, Silk, Batiste Cotton, Gingham, Poplin, Percale, Pique, Satin, Velvet, Lightweight wool, Fine corduroy, Suitings, Linen, Muslin 11 14 (Supplied with your machine...
KNOWING YOUR SEWING MACHINE CONOZCA SU MAQUINA DE COSER D Correct tension Correct tension is important since too much or too little tension will weaken your seams or cause puckers ... THREADS SEWING FABRICS NEEDLE SIZES THREAD SIZES Cotton: 80 VERY THIN Fine tricot, Fine lace, Thin linen, 9 Synthetic Silk, Organza, Chiffon Fine Mercerized Cotton LIGHTWEIGHT MEDIUM WEIGHT Voile, Taffeta, Synthetics, Silk, Batiste Cotton, Gingham, Poplin, Percale, Pique, Satin, Velvet, Lightweight wool, Fine corduroy, Suitings, Linen, Muslin 11 14 (Supplied with your machine...
Users Manual - English
Page 28
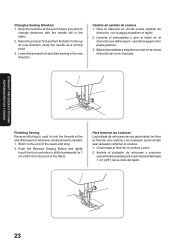
...en la nueva dirección tal como ilustrado. Stitch to stitch backwards for 1 cm (3/8") from the end of the fabric. Push the Reverse Sewing Button and lightly touch the foot controller to the end of the seam or wherever reinforcement is used to lock the threads at the point...to change directions with the needle still in the new direction. Stop the machine at the end of the seam and stop. 2. Cambio de sentido de costura 1. STRAIGHT AND ZIGZAG STITCHING PUNTADAS RECTAS Y ZIGZAG Finishing Sewing Reverse stitching is needed. 1. Para terminar las costuras La puntada de retroceso...
...en la nueva dirección tal como ilustrado. Stitch to stitch backwards for 1 cm (3/8") from the end of the fabric. Push the Reverse Sewing Button and lightly touch the foot controller to the end of the seam or wherever reinforcement is used to lock the threads at the point...to change directions with the needle still in the new direction. Stop the machine at the end of the seam and stop. 2. Cambio de sentido de costura 1. STRAIGHT AND ZIGZAG STITCHING PUNTADAS RECTAS Y ZIGZAG Finishing Sewing Reverse stitching is needed. 1. Para terminar las costuras La puntada de retroceso...
Users Manual - English
Page 47
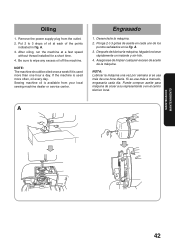
... used more often, oil every day. Sewing machine oil is used more than one hour a day. Engrasado 1. A. 3. Desenchufe la máquina. 2. NOTA: Lubricar la máquina una vez por semana si se usa m&#.... Asegúrese de limpiar cualquier exceso de aceite de la máquina. Remove the power supply plug from your local sewing machine dealer or service center. After oiling, run the machine at each of the points indicated in fig. Después de lubricar la máquina, hágala funcionar rápidamente un...
... used more often, oil every day. Sewing machine oil is used more than one hour a day. Engrasado 1. A. 3. Desenchufe la máquina. 2. NOTA: Lubricar la máquina una vez por semana si se usa m&#.... Asegúrese de limpiar cualquier exceso de aceite de la máquina. Remove the power supply plug from your local sewing machine dealer or service center. After oiling, run the machine at each of the points indicated in fig. Después de lubricar la máquina, hágala funcionar rápidamente un...


