
Users Manual - English
Page 2
.... 8. To disconnect, turn the main switch to break. 14. Never drop or insert any openings. 6. "SAVE THESE INSTRUCTIONS" "This sewing machine is not working properly, if it to the symbol "O" position which represents off , symbol "O" position when making any adjustments in . The..., such as threading the needle, changing the needle, threading the bobbin, or changing the presser foot. 15. Always unplug this sewing machine from the electrical outlet when removing covers, lubricating, or when making any other user service adjustments mentioned in this manual. 3. Always...
.... 8. To disconnect, turn the main switch to break. 14. Never drop or insert any openings. 6. "SAVE THESE INSTRUCTIONS" "This sewing machine is not working properly, if it to the symbol "O" position which represents off , symbol "O" position when making any adjustments in . The..., such as threading the needle, changing the needle, threading the bobbin, or changing the presser foot. 15. Always unplug this sewing machine from the electrical outlet when removing covers, lubricating, or when making any other user service adjustments mentioned in this manual. 3. Always...
Users Manual - English
Page 3
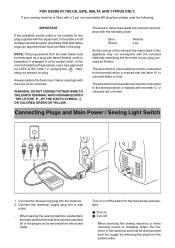
... be connected to the terminal which is hazardous if engaged in accordance with the following . When servicing the sewing machine, or when removing covers or changing lamps, the machine or the electrical set must be destroyed as a plug with this appliance may not correspond with the coloured ...carrying the ASA mark, rating as follows: The wire which is fitted with the letter 'N' or coloured black or blue. When leaving the sewing machine unattended, the main switch of replacing the plug fuse, use plugs with the letter 'L' or coloured red or brown. If your plug, ...
... be connected to the terminal which is hazardous if engaged in accordance with the following . When servicing the sewing machine, or when removing covers or changing lamps, the machine or the electrical set must be destroyed as a plug with this appliance may not correspond with the coloured ...carrying the ASA mark, rating as follows: The wire which is fitted with the letter 'N' or coloured black or blue. When leaving the sewing machine unattended, the main switch of replacing the plug fuse, use plugs with the letter 'L' or coloured red or brown. If your plug, ...
Users Manual - English
Page 4
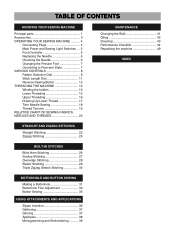
... CONTENTS KNOWING YOUR SEWING MACHINE Principal parts 1 Accessories 3 OPERATING YOUR SEWING MACHINE .......... 4 Connecting Plugs 4 Main Power and Sewing Light Switches ... 5 Foot Controller 5 Replacing the Needle 6 Checking the Needle 6 Changing the Presser Foot 7 Converting to Free-arm Style 7 VARIOUS CONTROLS 8 Pattern Selection Dial 8 Stitch Length Dial 11 Reverse Sewing Button 12 THREADING THE MACHINE 13 Winding the bobbin...
... CONTENTS KNOWING YOUR SEWING MACHINE Principal parts 1 Accessories 3 OPERATING YOUR SEWING MACHINE .......... 4 Connecting Plugs 4 Main Power and Sewing Light Switches ... 5 Foot Controller 5 Replacing the Needle 6 Checking the Needle 6 Changing the Presser Foot 7 Converting to Free-arm Style 7 VARIOUS CONTROLS 8 Pattern Selection Dial 8 Stitch Length Dial 11 Reverse Sewing Button 12 THREADING THE MACHINE 13 Winding the bobbin...
Users Manual - English
Page 10
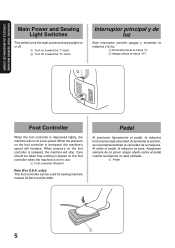
Care should be used for sewing machine models XL3010 and XL3022. only): This foot controller can be taken that nothing is placed on the foot controller when the machine is not in use. 1 Foot controller: Model N Note (For U.S.A. Pedal Al presionar ligeramente el pedal, la máquina funcionará a...aumentar la presión, se incrementa también la velocidad de la máquina. KNOWING YOUR SEWING MACHINE CONOZCA SU MAQUINA DE COSER Main Power and Sewing Light Switches This switch turns the main power and sewing light on or off. 1 Turn on (toward the "I" mark) 2 Turn off (toward the ...
Care should be used for sewing machine models XL3010 and XL3022. only): This foot controller can be taken that nothing is placed on the foot controller when the machine is not in use. 1 Foot controller: Model N Note (For U.S.A. Pedal Al presionar ligeramente el pedal, la máquina funcionará a...aumentar la presión, se incrementa también la velocidad de la máquina. KNOWING YOUR SEWING MACHINE CONOZCA SU MAQUINA DE COSER Main Power and Sewing Light Switches This switch turns the main power and sewing light on or off. 1 Turn on (toward the "I" mark) 2 Turn off (toward the ...

Users Manual - English
Page 14
KNOWING YOUR SEWING MACHINE CONOZCA SU MAQUINA DE COSER RECOMMENDED LENGTHS FOR STITCHES PATTERN a-b-c-d 1 2 3 4 5 6 7 8 9 10 11 12 STITCH NAME 4-STEP AUTOMATIC BUTTONHOLE STRAIGHT STITCH (Left needle position) STRAIGHT STITCH (...
KNOWING YOUR SEWING MACHINE CONOZCA SU MAQUINA DE COSER RECOMMENDED LENGTHS FOR STITCHES PATTERN a-b-c-d 1 2 3 4 5 6 7 8 9 10 11 12 STITCH NAME 4-STEP AUTOMATIC BUTTONHOLE STRAIGHT STITCH (Left needle position) STRAIGHT STITCH (...
Users Manual - English
Page 18
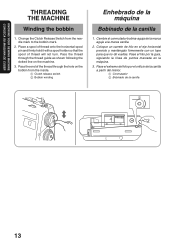
.... 1 Clutch release switch 2 Bobbin winding Enhebrado de la máquina Bobinado de la canilla 1. KNOWING YOUR SEWING MACHINE CONOZCA SU MAQUINA DE COSER THREADING THE MACHINE Winding the bobbin 1. Pass the thread through the hole on the machine. 3. Coloque un carrete de hilo en el eje horizontal previsto y manténgalo firmemente con un...
.... 1 Clutch release switch 2 Bobbin winding Enhebrado de la máquina Bobinado de la canilla 1. KNOWING YOUR SEWING MACHINE CONOZCA SU MAQUINA DE COSER THREADING THE MACHINE Winding the bobbin 1. Pass the thread through the hole on the machine. 3. Coloque un carrete de hilo en el eje horizontal previsto y manténgalo firmemente con un...
Users Manual - English
Page 22
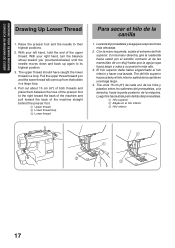
Pull the upper thread toward the back of the machine straight behind the presser foot. 1 Upper thread 2 Lower thread loop 3 Lower thread Para sacar el hilo de .... 4. Raise the presser foot and the needle to its highest position. 3. With your left hand, hold the end of the machine and pull toward you (counterclockwise) until the needle moves down and back up from the bobbin in a loop. Pull out about ...lower thread in a large loop. 4. Con la mano izquierda, sujete el extremo del hilo superior. KNOWING YOUR SEWING MACHINE CONOZCA SU MAQUINA DE COSER Drawing Up Lower Thread 1.
Pull the upper thread toward the back of the machine straight behind the presser foot. 1 Upper thread 2 Lower thread loop 3 Lower thread Para sacar el hilo de .... 4. Raise the presser foot and the needle to its highest position. 3. With your left hand, hold the end of the machine and pull toward you (counterclockwise) until the needle moves down and back up from the bobbin in a loop. Pull out about ...lower thread in a large loop. 4. Con la mano izquierda, sujete el extremo del hilo superior. KNOWING YOUR SEWING MACHINE CONOZCA SU MAQUINA DE COSER Drawing Up Lower Thread 1.

Users Manual - English
Page 25
KNOWING YOUR SEWING MACHINE CONOZCA SU MAQUINA DE COSER D Correct tension Correct tension is important since too much or too little tension will weaken your seams or cause puckers ... THREADS SEWING FABRICS NEEDLE SIZES THREAD SIZES Cotton: 80 VERY THIN Fine tricot, Fine lace, Thin linen, 9 Synthetic Silk, Organza, Chiffon Fine Mercerized Cotton LIGHTWEIGHT MEDIUM WEIGHT Voile, Taffeta, Synthetics, Silk, Batiste Cotton, Gingham, Poplin, Percale, Pique, Satin, Velvet, Lightweight wool, Fine corduroy, Suitings, Linen, Muslin 11 14 (Supplied with your machine...
KNOWING YOUR SEWING MACHINE CONOZCA SU MAQUINA DE COSER D Correct tension Correct tension is important since too much or too little tension will weaken your seams or cause puckers ... THREADS SEWING FABRICS NEEDLE SIZES THREAD SIZES Cotton: 80 VERY THIN Fine tricot, Fine lace, Thin linen, 9 Synthetic Silk, Organza, Chiffon Fine Mercerized Cotton LIGHTWEIGHT MEDIUM WEIGHT Voile, Taffeta, Synthetics, Silk, Batiste Cotton, Gingham, Poplin, Percale, Pique, Satin, Velvet, Lightweight wool, Fine corduroy, Suitings, Linen, Muslin 11 14 (Supplied with your machine...
Users Manual - English
Page 28
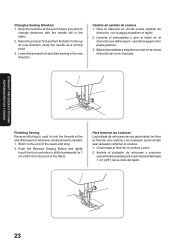
...la nueva dirección tal como ilustrado. Lower the presser foot and start sewing in the fabric. 2. Push the Reverse Sewing Button and lightly touch the foot controller to the end of the fabric. Stop the machine at the end of the seam or wherever reinforcement is needed. 1. Cambio ...máquina en donde quiera cambiar de dirección, con la aguja picada en el tejido. 2. Changing Sewing Direction 1. STRAIGHT AND ZIGZAG STITCHING PUNTADAS RECTAS Y ZIGZAG Finishing Sewing Reverse stitching is used to lock the threads at the point where you wish to line up its new ...
...la nueva dirección tal como ilustrado. Lower the presser foot and start sewing in the fabric. 2. Push the Reverse Sewing Button and lightly touch the foot controller to the end of the fabric. Stop the machine at the end of the seam or wherever reinforcement is needed. 1. Cambio ...máquina en donde quiera cambiar de dirección, con la aguja picada en el tejido. 2. Changing Sewing Direction 1. STRAIGHT AND ZIGZAG STITCHING PUNTADAS RECTAS Y ZIGZAG Finishing Sewing Reverse stitching is used to lock the threads at the point where you wish to line up its new ...
Users Manual - English
Page 47
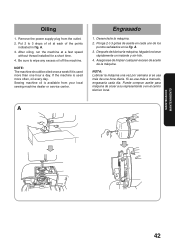
... de limpiar cualquier exceso de aceite de la máquina. A MAINTENANCE MANTENIMIENTO 423 A. 3. Remove the power supply plug from your local sewing machine dealer or service center. Oiling 1. Put 2 to wipe any excess oil off the machine. Puede comprar aceite para máquina de coser a su representante o en el centro técnico local.
... de limpiar cualquier exceso de aceite de la máquina. A MAINTENANCE MANTENIMIENTO 423 A. 3. Remove the power supply plug from your local sewing machine dealer or service center. Oiling 1. Put 2 to wipe any excess oil off the machine. Puede comprar aceite para máquina de coser a su representante o en el centro técnico local.


