
Users Manual - English
Page 2
... removing covers, lubricating, or when making any adjustments in the needle area, such as contained in this machine outdoors. 7. DANGER - Always unplug the sewing machine from all instructions before using and before changing the light bulb. WARNING - Close attention is necessary when ... is intended for household use this manual. 3. Never drop or insert any other user service adjustments mentioned in this sewing machine from the electrical outlet immediately after using ." Do not unplug by the manufacturer as threading the needle, changing the needle,...
... removing covers, lubricating, or when making any adjustments in the needle area, such as contained in this machine outdoors. 7. DANGER - Always unplug the sewing machine from all instructions before using and before changing the light bulb. WARNING - Close attention is necessary when ... is intended for household use this manual. 3. Never drop or insert any other user service adjustments mentioned in this sewing machine from the electrical outlet immediately after using ." Do not unplug by the manufacturer as threading the needle, changing the needle,...
Users Manual - English
Page 3
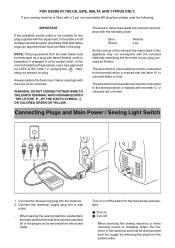
... the wiring in the mains lead of replacing the plug fuse, use plugs with bared flexible cords is hazardous if engaged in your sewing machine is not suitable for the main power and sewlight. 1 Turn on plug. Connecting Plugs and Main Power / Sewing Light Switch 1 2 1.... When leaving the sewing machine unattended, the main switch of the machine must be switched off the switch for the plug supplied with this appliance may not correspond with the coloured markings identifying the...
... the wiring in the mains lead of replacing the plug fuse, use plugs with bared flexible cords is hazardous if engaged in your sewing machine is not suitable for the main power and sewlight. 1 Turn on plug. Connecting Plugs and Main Power / Sewing Light Switch 1 2 1.... When leaving the sewing machine unattended, the main switch of the machine must be switched off the switch for the plug supplied with this appliance may not correspond with the coloured markings identifying the...
Users Manual - English
Page 4
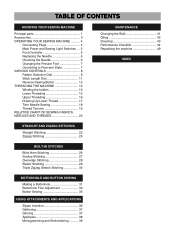
... 7 Converting to Free-arm Style 7 VARIOUS CONTROLS 8 Pattern Selection Dial 8 Stitch Length Dial 11 Reverse Sewing Button 12 THREADING THE MACHINE 13 Winding the bobbin 13 Lower Threading 15 Upper Threading 16 Drawing Up Lower Thread 17 Twin Needle Sewing 18 Thread Tension 19 RELATIVE... OF SEWING FABRICS, NEEDLES AND THREADS 20 MAINTENANCE Changing the Bulb 41 Oiling 42 Cleaning 43 Performance Checklist 44 Repacking the machine 49 INDEX STRAIGHT AND ZIGZAG STITCHING Straight Stitching 22 Zigzag Stitching 25 BUILT-IN STITCHES Blind Hem Stitching 26 Scallop Stitching 27...
... 7 Converting to Free-arm Style 7 VARIOUS CONTROLS 8 Pattern Selection Dial 8 Stitch Length Dial 11 Reverse Sewing Button 12 THREADING THE MACHINE 13 Winding the bobbin 13 Lower Threading 15 Upper Threading 16 Drawing Up Lower Thread 17 Twin Needle Sewing 18 Thread Tension 19 RELATIVE... OF SEWING FABRICS, NEEDLES AND THREADS 20 MAINTENANCE Changing the Bulb 41 Oiling 42 Cleaning 43 Performance Checklist 44 Repacking the machine 49 INDEX STRAIGHT AND ZIGZAG STITCHING Straight Stitching 22 Zigzag Stitching 25 BUILT-IN STITCHES Blind Hem Stitching 26 Scallop Stitching 27...
Users Manual - English
Page 10
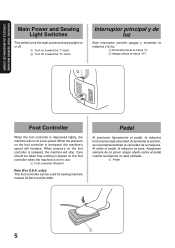
...;quina se para. When pressure on the foot controller is not in use. 1 Foot controller: Model N Note (For U.S.A. Care should be used for sewing machine models XL3010 and XL3022. Al aumentar la presión, se incrementa también la velocidad de la máquina. Pedal Al presionar ligeramente el pedal...rese siempre de no poner ningún objeto sobre el pedal cuando la máquina no esté utilizada. 1 Pedal 1 65 KNOWING YOUR SEWING MACHINE CONOZCA SU MAQUINA DE COSER Main Power and Sewing Light Switches This switch turns the main power and sewing light on or off. 1 Turn on...
...;quina se para. When pressure on the foot controller is not in use. 1 Foot controller: Model N Note (For U.S.A. Care should be used for sewing machine models XL3010 and XL3022. Al aumentar la presión, se incrementa también la velocidad de la máquina. Pedal Al presionar ligeramente el pedal...rese siempre de no poner ningún objeto sobre el pedal cuando la máquina no esté utilizada. 1 Pedal 1 65 KNOWING YOUR SEWING MACHINE CONOZCA SU MAQUINA DE COSER Main Power and Sewing Light Switches This switch turns the main power and sewing light on or off. 1 Turn on...

Users Manual - English
Page 14
KNOWING YOUR SEWING MACHINE CONOZCA SU MAQUINA DE COSER RECOMMENDED LENGTHS FOR STITCHES PATTERN a-b-c-d 1 2 3 4 5 6 7 8 9 10 11 12 STITCH NAME 4-STEP AUTOMATIC BUTTONHOLE STRAIGHT STITCH (Left needle position) STRAIGHT STITCH (...
KNOWING YOUR SEWING MACHINE CONOZCA SU MAQUINA DE COSER RECOMMENDED LENGTHS FOR STITCHES PATTERN a-b-c-d 1 2 3 4 5 6 7 8 9 10 11 12 STITCH NAME 4-STEP AUTOMATIC BUTTONHOLE STRAIGHT STITCH (Left needle position) STRAIGHT STITCH (...
Users Manual - English
Page 18
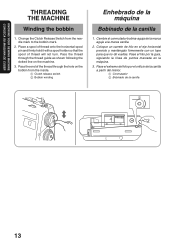
... SU MAQUINA DE COSER THREADING THE MACHINE Winding the bobbin 1. Change the Clutch Release Switch from the inside. 1 Clutch release switch 2 Bobbin winding Enhebrado de la máquina Bobinado de la canilla 1. ... as shown following the dotted line on the bobbin from the needle mark to the bobbin mark. 2. Pass the thread through the hole on the machine. 3. Pase el hilo por la guía, siguiendo la línea de puntos marcada en la máquina. 3. Cambie el conmutador bobina-aguja de la...
... SU MAQUINA DE COSER THREADING THE MACHINE Winding the bobbin 1. Change the Clutch Release Switch from the inside. 1 Clutch release switch 2 Bobbin winding Enhebrado de la máquina Bobinado de la canilla 1. ... as shown following the dotted line on the bobbin from the needle mark to the bobbin mark. 2. Pass the thread through the hole on the machine. 3. Pase el hilo por la guía, siguiendo la línea de puntos marcada en la máquina. 3. Cambie el conmutador bobina-aguja de la...
Users Manual - English
Page 22
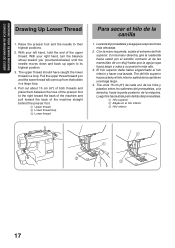
... balance wheel toward you and the lower thread will come up again to their highest positions. 2. With your left hand, hold the end of the machine straight behind the presser foot. 1 Upper thread 2 Lower thread loop 3 Lower thread Para sacar el hilo de la canilla 1. Luego tire hacia atrá... thread should have caught the lower thread in a large loop. 4. Pull the upper thread toward the back of the upper thread. KNOWING YOUR SEWING MACHINE CONOZCA SU MAQUINA DE COSER Drawing Up Lower Thread 1. Tire unos 15 cm (6") de cada uno de los hilos y páselos entre los salientes...
... balance wheel toward you and the lower thread will come up again to their highest positions. 2. With your left hand, hold the end of the machine straight behind the presser foot. 1 Upper thread 2 Lower thread loop 3 Lower thread Para sacar el hilo de la canilla 1. Luego tire hacia atrá... thread should have caught the lower thread in a large loop. 4. Pull the upper thread toward the back of the upper thread. KNOWING YOUR SEWING MACHINE CONOZCA SU MAQUINA DE COSER Drawing Up Lower Thread 1. Tire unos 15 cm (6") de cada uno de los hilos y páselos entre los salientes...

Users Manual - English
Page 25
KNOWING YOUR SEWING MACHINE CONOZCA SU MAQUINA DE COSER D Correct tension Correct tension is important since too much or too little tension will weaken your seams or cause puckers ... WEIGHT Voile, Taffeta, Synthetics, Silk, Batiste Cotton, Gingham, Poplin, Percale, Pique, Satin, Velvet, Lightweight wool, Fine corduroy, Suitings, Linen, Muslin 11 14 (Supplied with your machine) Cotton: 60~80 Silk: "A" Synthetic Mercerized 50 Cotton: 50~60 Silk: "A" Synthetic Mercerized 50~60 HEAVYWEIGHT Denim, Gabardine, Tweed, Corduroy, Canvas, Duck 16 Cotton: 40...
KNOWING YOUR SEWING MACHINE CONOZCA SU MAQUINA DE COSER D Correct tension Correct tension is important since too much or too little tension will weaken your seams or cause puckers ... WEIGHT Voile, Taffeta, Synthetics, Silk, Batiste Cotton, Gingham, Poplin, Percale, Pique, Satin, Velvet, Lightweight wool, Fine corduroy, Suitings, Linen, Muslin 11 14 (Supplied with your machine) Cotton: 60~80 Silk: "A" Synthetic Mercerized 50 Cotton: 50~60 Silk: "A" Synthetic Mercerized 50~60 HEAVYWEIGHT Denim, Gabardine, Tweed, Corduroy, Canvas, Duck 16 Cotton: 40...
Users Manual - English
Page 28
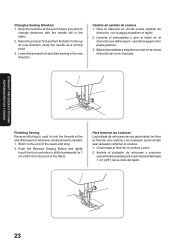
... Reverse Sewing Button and lightly touch the foot controller to change directions with the needle still in the new direction. Changing Sewing Direction 1. Stop the machine at the end of the seam or wherever reinforcement is used to the end of the fabric. Raise the presser foot and turn the fabric...
... Reverse Sewing Button and lightly touch the foot controller to change directions with the needle still in the new direction. Changing Sewing Direction 1. Stop the machine at the end of the seam or wherever reinforcement is used to the end of the fabric. Raise the presser foot and turn the fabric...
Users Manual - English
Page 47
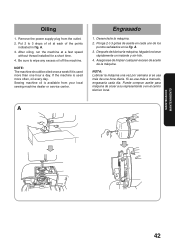
...de aceite de la máquina. Si se usa más a menudo, engrasarla cada día. Oiling 1. After oiling, run the machine at each of the points indicated in fig. NOTE: The machine should be oiled once a week if it is used more than one hour a day. Engrasado 1. A. 3. A. 3. NOTA: Lubricar ...225;quina de coser a su representante o en el centro técnico local. Remove the power supply plug from your local sewing machine dealer or service center. Sewing machine oil is used more often, oil every day. Ponga 2 ó 3 gotas de aceite en cada uno de los puntos se&#...
...de aceite de la máquina. Si se usa más a menudo, engrasarla cada día. Oiling 1. After oiling, run the machine at each of the points indicated in fig. NOTE: The machine should be oiled once a week if it is used more than one hour a day. Engrasado 1. A. 3. A. 3. NOTA: Lubricar ...225;quina de coser a su representante o en el centro técnico local. Remove the power supply plug from your local sewing machine dealer or service center. Sewing machine oil is used more often, oil every day. Ponga 2 ó 3 gotas de aceite en cada uno de los puntos se&#...
Users Manual - English
Page 48
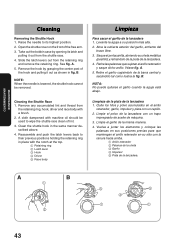
... con la ranura hacia arriba. 1 Anillo retenedor 2 Palanca de la uñeta 3 Garfio 4 Impulsor 5 Pista de la lanzadera. A. 5. Clean the shuttle hook in place with machine oil should be removed. Abra la cubierta exterior del garfio, enfrente del brazo libre. 3. Retire las palancas que sujetan el anillo retenedor y saque dicho anillo...
... con la ranura hacia arriba. 1 Anillo retenedor 2 Palanca de la uñeta 3 Garfio 4 Impulsor 5 Pista de la lanzadera. A. 5. Clean the shuttle hook in place with machine oil should be removed. Abra la cubierta exterior del garfio, enfrente del brazo libre. 3. Retire las palancas que sujetan el anillo retenedor y saque dicho anillo...
Users Manual - English
Page 52
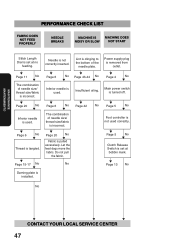
... mark. M Page 6 No M M Page 43-44 No M Inferior needle is not used . MAINTENANCE MANTENIMIENTO PERFORMANCE CHECK LIST FABRIC DOES NOT FEED PROPERLY NEEDLE BREAKS MACHINE IS MACHINE DOES NOISY OR SLOW NOT START Stitch Length Dial is set at no feeding. M Page 20 No M Inferior needle is turned off. Let the feed...
... mark. M Page 6 No M M Page 43-44 No M Inferior needle is not used . MAINTENANCE MANTENIMIENTO PERFORMANCE CHECK LIST FABRIC DOES NOT FEED PROPERLY NEEDLE BREAKS MACHINE IS MACHINE DOES NOISY OR SLOW NOT START Stitch Length Dial is set at no feeding. M Page 20 No M Inferior needle is turned off. Let the feed...


