
Instruction Manual
Page 2
... Windows® 10. Congratulations on your particular embroidery machine model. However, the final result will depend on choosing our product! For a longer service life • When storing the "PE-DESIGN Software Key", avoid direct sunlight and high humidity locations. Notice • Since this manual are either registered trademarks or trademarks of sewing attribute settings (thread density, sewing pitch, etc.). Trademarks • Windows®...
... Windows® 10. Congratulations on your particular embroidery machine model. However, the final result will depend on choosing our product! For a longer service life • When storing the "PE-DESIGN Software Key", avoid direct sunlight and high humidity locations. Notice • Since this manual are either registered trademarks or trademarks of sewing attribute settings (thread density, sewing pitch, etc.). Trademarks • Windows®...
Instruction Manual
Page 7
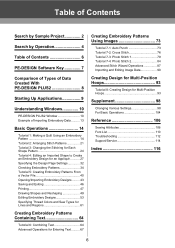
... by Operation 4 Table of Contents 6 PE-DESIGN Software Key 7 Comparison of Types of Data Created With PE-DESIGN PLUS2 8 Starting Up Applications 9 Understanding Windows 10 PE-DESIGN PLUS2 Window 10 Example of Importing Embroidery Data .......... 13 Basic Operations 14 Tutorial 1: Making a Quilt Using an Embroidery Pattern 14 Tutorial 2: Arranging Stitch Patterns 21 Tutorial 3: Changing the Stitching for Each Shape Pattern 24 Tutorial 4: Editing an Imported Shape to Create an Embroidery Design for an Appliqu 27 Specifying the Design Page Settings 32 Checking Embroidery Patterns 34...
... by Operation 4 Table of Contents 6 PE-DESIGN Software Key 7 Comparison of Types of Data Created With PE-DESIGN PLUS2 8 Starting Up Applications 9 Understanding Windows 10 PE-DESIGN PLUS2 Window 10 Example of Importing Embroidery Data .......... 13 Basic Operations 14 Tutorial 1: Making a Quilt Using an Embroidery Pattern 14 Tutorial 2: Arranging Stitch Patterns 21 Tutorial 3: Changing the Stitching for Each Shape Pattern 24 Tutorial 4: Editing an Imported Shape to Create an Embroidery Design for an Appliqu 27 Specifying the Design Page Settings 32 Checking Embroidery Patterns 34...
Instruction Manual
Page 8
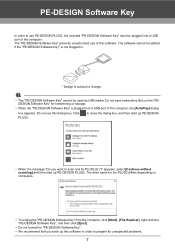
... change. The "PE-DESIGN Software Key" prevents unauthorized use this dialog box. Do not use of this software in . * Design is subject to scan and fix PLUS2 (E:)?" PE-DESIGN Software Key In order to prepare for transferring or storage. • When the "PE-DESIGN Software Key" is plugged into a USB port of the computer. The drive name for the PLUS2 differs depending on the "PEDESIGN Software Key" for unexpected problems...
... change. The "PE-DESIGN Software Key" prevents unauthorized use this dialog box. Do not use of this software in . * Design is subject to scan and fix PLUS2 (E:)?" PE-DESIGN Software Key In order to prepare for transferring or storage. • When the "PE-DESIGN Software Key" is plugged into a USB port of the computer. The drive name for the PLUS2 differs depending on the "PEDESIGN Software Key" for unexpected problems...

Instruction Manual
Page 9
... (such as the font or the transformation shape) and specify sewing attributes. ■ Shape pattern You can specify region and line sew types as well as sewing attributes, edit paths (by moving/deleting points, reshaping through handle movements), remove/merge overlapping regions, set hole sewing, and create offset lines. 8 Comparison of Types of Data Created With PE-DESIGN PLUS2 Three types of built-in PE-DESIGN PLUS2.
... (such as the font or the transformation shape) and specify sewing attributes. ■ Shape pattern You can specify region and line sew types as well as sewing attributes, edit paths (by moving/deleting points, reshaping through handle movements), remove/merge overlapping regions, set hole sewing, and create offset lines. 8 Comparison of Types of Data Created With PE-DESIGN PLUS2 Three types of built-in PE-DESIGN PLUS2.
Instruction Manual
Page 10
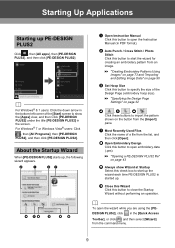
... "Opening a PE-DESIGN PLUS2 file" on page 90 c Set Hoop Size Click this check box to start the wizard for creating an embroidery pattern from the [Import] pane. Starting Up Applications Starting up PE-DESIGN PLUS2 Click , then [All apps], then [PE-DESIGN PLUS2], and then click [PE-DESIGN PLUS2]. For Windows® 7 or Windows Vista® users: Click , then [All Programs], then [PE-DESIGN PLUS2], and then click [PE-DESIGN PLUS2]. b Auto Punch / Cross Stitch / Photo Stitch Click this button...
... "Opening a PE-DESIGN PLUS2 file" on page 90 c Set Hoop Size Click this check box to start the wizard for creating an embroidery pattern from the [Import] pane. Starting Up Applications Starting up PE-DESIGN PLUS2 Click , then [All apps], then [PE-DESIGN PLUS2], and then click [PE-DESIGN PLUS2]. For Windows® 7 or Windows Vista® users: Click , then [All Programs], then [PE-DESIGN PLUS2], and then click [PE-DESIGN PLUS2]. b Auto Punch / Cross Stitch / Photo Stitch Click this button...

Instruction Manual
Page 11
... by the machine and how the stitching will appear. 10 Understanding Windows PE-DESIGN PLUS2 Window 45 1 2 3 7 6 10 8 11 9 12 13 14 15 1 Application button Click to display a menu containing commands for file operations, such as [New], [Save], [Print] and [Design Settings]. 2 Ribbon Click a tab at the top of the pane to change the sewing order or thread color. 7 Import/Color/Sewing Attributes/Text...
... by the machine and how the stitching will appear. 10 Understanding Windows PE-DESIGN PLUS2 Window 45 1 2 3 7 6 10 8 11 9 12 13 14 15 1 Application button Click to display a menu containing commands for file operations, such as [New], [Save], [Print] and [Design Settings]. 2 Ribbon Click a tab at the top of the pane to change the sewing order or thread color. 7 Import/Color/Sewing Attributes/Text...
Instruction Manual
Page 15
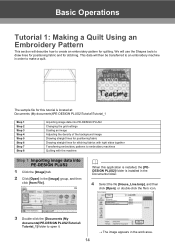
... PE-DESIGN PLUS2 Changing the grid settings Scaling an image Adjusting the density of the background image Drawing straight lines for positioning fabric Drawing straight lines for stitching. This data will describe how to create an embroidery pattern for quilting. Basic Operations Tutorial 1: Making a Quilt Using an Embroidery Pattern This section will then be transferred to an embroidery machine in order to make a quilt. We will use the Shapes tools to draw lines for positioning fabric and for stitching fabrics...
... PE-DESIGN PLUS2 Changing the grid settings Scaling an image Adjusting the density of the background image Drawing straight lines for positioning fabric Drawing straight lines for stitching. This data will describe how to create an embroidery pattern for quilting. Basic Operations Tutorial 1: Making a Quilt Using an Embroidery Pattern This section will then be transferred to an embroidery machine in order to make a quilt. We will use the Shapes tools to draw lines for positioning fabric and for stitching fabrics...
Instruction Manual
Page 16
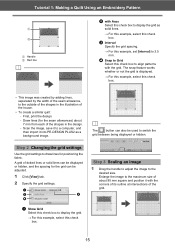
... grid settings to draw lines for the seam allowances) about 95 mm square and position it into PE-DESIGN PLUS2 as solid lines. For this example, select this check box. Step 3 Scaling an image 1 Drag the handle to adjust the image to the outside of the house. • To create a similar quilt: - Draw lines (for positioning the fabric. Tutorial 1: Making a Quilt Using an Embroidery Pattern...
... grid settings to draw lines for the seam allowances) about 95 mm square and position it into PE-DESIGN PLUS2 as solid lines. For this example, select this check box. Step 3 Scaling an image 1 Drag the handle to adjust the image to the outside of the house. • To create a similar quilt: - Draw lines (for positioning the fabric. Tutorial 1: Making a Quilt Using an Embroidery Pattern...
Instruction Manual
Page 18
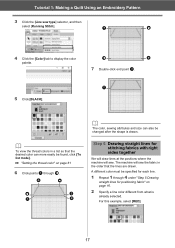
Tutorial 1: Making a Quilt Using an Embroidery Pattern 3 Click the [Line sew type] selector, and then select [Running Stitch]. b To view the thread colors in the order that the desired color can also be changed after the shape is already selected. A different color must be found, click [To list mode]. k 5 Click [BLACK]. For this example, select [RED]. 17 j i 7 Double-click end point k. cc "Setting the thread color...
Tutorial 1: Making a Quilt Using an Embroidery Pattern 3 Click the [Line sew type] selector, and then select [Running Stitch]. b To view the thread colors in the order that the desired color can also be changed after the shape is already selected. A different color must be found, click [To list mode]. k 5 Click [BLACK]. For this example, select [RED]. 17 j i 7 Double-click end point k. cc "Setting the thread color...
Instruction Manual
Page 22
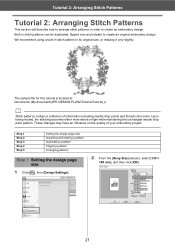
...)\PE-DESIGN PLUS2\Tutorial\Tutorial_2 b Stitch patterns contain a collection of your embroidery project. Upon being resized, the stitching becomes either more dense or light while maintaining the unchanged needle drop point pattern. We recommend using a built-in stitch pattern in stitch patterns can be duplicated, flipped over and rotated to create an embroidery design. These changes may have an influence on the quality of information including needle drop points and thread color order. Tutorial...
...)\PE-DESIGN PLUS2\Tutorial\Tutorial_2 b Stitch patterns contain a collection of your embroidery project. Upon being resized, the stitching becomes either more dense or light while maintaining the unchanged needle drop point pattern. We recommend using a built-in stitch pattern in stitch patterns can be duplicated, flipped over and rotated to create an embroidery design. These changes may have an influence on the quality of information including needle drop points and thread color order. Tutorial...

Instruction Manual
Page 25
... [Outline Shapes] from the [From] selector, then [Misc] from the [Sewing Attributes] pane. at : Documents (My documents)\PE-DESIGN PLUS2\Tutorial\Tutorial_3 Step 1 Step 2 Step 3 Step 4 Importing an outline shape Applying motif stitches to line Applying programmable stitches to a shape Applying motif stitches to deselect the heart pattern. While holding down the key, click the line (frame 2) and region...
... [Outline Shapes] from the [From] selector, then [Misc] from the [Sewing Attributes] pane. at : Documents (My documents)\PE-DESIGN PLUS2\Tutorial\Tutorial_3 Step 1 Step 2 Step 3 Step 4 Importing an outline shape Applying motif stitches to line Applying programmable stitches to a shape Applying motif stitches to deselect the heart pattern. While holding down the key, click the line (frame 2) and region...
Instruction Manual
Page 28
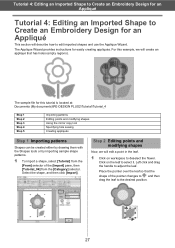
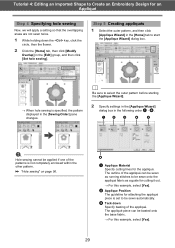
.... Place the pointer over the leaf so that has holes (empty regions). For this tutorial is located at: Documents (My documents)\PE-DESIGN PLUS2\Tutorial\Tutorial_4 Step 1 Step 2 Step 3 Step 4 Step 5 Importing patterns Editing points and modifying shapes Using the mirror copy tool Specifying hole sewing Creating appliqués Step 1 Importing patterns Shapes can be created either by drawing them with the...
.... Place the pointer over the leaf so that has holes (empty regions). For this tutorial is located at: Documents (My documents)\PE-DESIGN PLUS2\Tutorial\Tutorial_4 Step 1 Step 2 Step 3 Step 4 Step 5 Importing patterns Editing points and modifying shapes Using the mirror copy tool Specifying hole sewing Creating appliqués Step 1 Importing patterns Shapes can be created either by drawing them with the...
Instruction Manual
Page 30
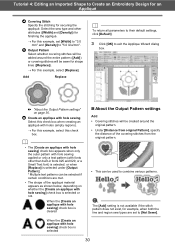
...; piece can be sewn as running stitches to be sewn onto the appliqué fabric as a guide for attaching the appliqué piece is set to be sewn automatically. Tutorial 4: Editing an Imported Shape to Create an Embroidery Design for the appliqué. f. cc "Hole sewing" on page 56. b Be sure to start the [Applique Wizard] dialog box. When hole sewing is not completely enclosed within the...
...; piece can be sewn as running stitches to be sewn onto the appliqué fabric as a guide for attaching the appliqué piece is set to be sewn automatically. Tutorial 4: Editing an Imported Shape to Create an Embroidery Design for the appliqué. f. cc "Hole sewing" on page 56. b Be sure to start the [Applique Wizard] dialog box. When hole sewing is not completely enclosed within the...
Instruction Manual
Page 31
... if certain conditions are set [Width] to "3.0 mm" and [Density] to Create an Embroidery Design for an Appliqué d Covering Stitch Specify the stitching for example, when both the line and region sew types are met. • The shape of the covering stitches from the original pattern. • This can be used to exit the Applique Wizard dialog box. Select the sew type and other than...
... if certain conditions are set [Width] to "3.0 mm" and [Density] to Create an Embroidery Design for an Appliqué d Covering Stitch Specify the stitching for example, when both the line and region sew types are met. • The shape of the covering stitches from the original pattern. • This can be used to exit the Applique Wizard dialog box. Select the sew type and other than...
Instruction Manual
Page 32
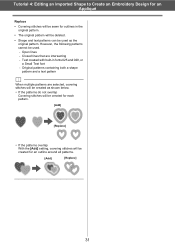
... an outline around all patterns. [Add] [Replace] 31 Text created with built-in the original pattern. • The original pattern will be deleted. • Shape and text patterns can be used . - Original patterns containing both a shape pattern and a text pattern b When multiple patterns are intersecting - Tutorial 4: Editing an Imported Shape to Create an Embroidery Design for an Appliqué Replace • Covering stitches will be sewn for...
... an outline around all patterns. [Add] [Replace] 31 Text created with built-in the original pattern. • The original pattern will be deleted. • Shape and text patterns can be used . - Original patterns containing both a shape pattern and a text pattern b When multiple patterns are intersecting - Tutorial 4: Editing an Imported Shape to Create an Embroidery Design for an Appliqué Replace • Covering stitches will be sewn for...
Instruction Manual
Page 96
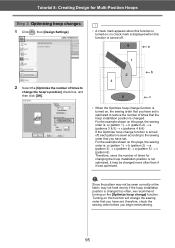
..., the sewing order is: a (pattern 1) b (pattern 2) a (pattern 3) c (pattern 4) a (pattern 5) c (pattern 6) Therefore, since the number of times that you have set is optimized to change the hoop's position] check box, and then click [OK]. 3 1 b 2 4 6 c • When the Optimize hoop change function is turned on this function will change the sewing order that you have set . Tutorial 8: Creating Design for changing the hoop installation position is...
..., the sewing order is: a (pattern 1) b (pattern 2) a (pattern 3) c (pattern 4) a (pattern 5) c (pattern 6) Therefore, since the number of times that you have set is optimized to change the hoop's position] check box, and then click [OK]. 3 1 b 2 4 6 c • When the Optimize hoop change function is turned on this function will change the sewing order that you have set . Tutorial 8: Creating Design for changing the hoop installation position is...
Instruction Manual
Page 102
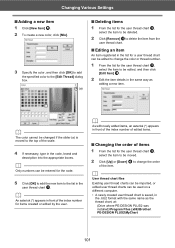
...] h to change the color or thread number. 1 From the list for the user thread chart m, select the item to be edited, and then click [Edit Item] j. 2 Edit the item details in the same way as the thread chart, at: (Drive where PE-DESIGN PLUS2 was installed)\Program Files (x86)\Brother\ PE-DESIGN PLUS2\MyChart 101 b User thread chart files Existing user thread charts can be imported, or edited user thread charts...
...] h to change the color or thread number. 1 From the list for the user thread chart m, select the item to be edited, and then click [Edit Item] j. 2 Edit the item details in the same way as the thread chart, at: (Drive where PE-DESIGN PLUS2 was installed)\Program Files (x86)\Brother\ PE-DESIGN PLUS2\MyChart 101 b User thread chart files Existing user thread charts can be imported, or edited user thread charts...
Instruction Manual
Page 105
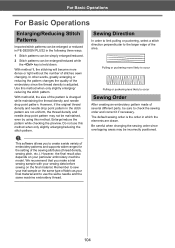
... thread density and needle drop point pattern in the stitch pattern are drawn. Sewing Direction In order to limit pulling or puckering, select a stitch direction perpendicular to sew your trial sample on your sewing data before sewing on the final material. Use this method when only slightly enlarging/reducing the stitch pattern. a This software allows you make a trial sewing sample with your particular embroidery machine model. For Basic Operations For Basic Operations Enlarging/Reducing Stitch Patterns...
... thread density and needle drop point pattern in the stitch pattern are drawn. Sewing Direction In order to limit pulling or puckering, select a stitch direction perpendicular to sew your trial sample on your sewing data before sewing on the final material. Use this method when only slightly enlarging/reducing the stitch pattern. a This software allows you make a trial sewing sample with your particular embroidery machine model. For Basic Operations For Basic Operations Enlarging/Reducing Stitch Patterns...
Instruction Manual
Page 115
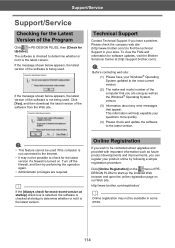
...® Operating System version. (3) Information about upgrades and provided with important information such as future product developments and improvements, you wish to start up the installed Web browser and open the online registration page on . http://www.brother.com/registration/ b Online registration may not be available in PE-DESIGN PLUS2, then [Check for Updates]. a Before contacting web site: (1) Please have a problem. The software is...
...® Operating System version. (3) Information about upgrades and provided with important information such as future product developments and improvements, you wish to start up the installed Web browser and open the online registration page on . http://www.brother.com/registration/ b Online registration may not be available in PE-DESIGN PLUS2, then [Check for Updates]. a Before contacting web site: (1) Please have a problem. The software is...
Installation Guide
Page 1
... your authorized dealer or Brother Customer Service. PE-DESIGN Software Key* Containing the software and Instruction Manual (PDF format) * Design is the retail price of material from this unit and to use . 1) General terms This is not operating properly, perform the installation again. • If the computer does not start with your particular sewing machine model. Plug the "PE-DESIGN Software Key" in use. • The "PE-DESIGN Software Key" prevents unauthorized use of copyrights which...
... your authorized dealer or Brother Customer Service. PE-DESIGN Software Key* Containing the software and Instruction Manual (PDF format) * Design is the retail price of material from this unit and to use . 1) General terms This is not operating properly, perform the installation again. • If the computer does not start with your particular sewing machine model. Plug the "PE-DESIGN Software Key" in use. • The "PE-DESIGN Software Key" prevents unauthorized use of copyrights which...


