
Instruction Manual
Page 1
We recommend that you keep this Instruction Manual before using this software, first read this document nearby for details on installing the software. In addition, be sure to read the Installation Guide for future reference. Personal Embroidery Design Software System Instruction Manual Before using the software.
We recommend that you keep this Instruction Manual before using this software, first read this document nearby for details on installing the software. In addition, be sure to read the Installation Guide for future reference. Personal Embroidery Design Software System Instruction Manual Before using the software.
Instruction Manual
Page 2
...the retail price of the windows may be used on an operating system other liquids on the "PE-DESIGN Software Key". • Do not drop or hit the "PE-DESIGN Software Key". If this "PE-DESIGN Software Key" device is required to ensure safe and correct operation, please read before sewing on choosing... respective companies and are written for purchasing our product. For additional product information and updates, visit our website at: http://www.brother.com/ or http://support.brother.com/ 1 Please refer to a heater, iron or other hot objects. • Do not spill water or other than ...
...the retail price of the windows may be used on an operating system other liquids on the "PE-DESIGN Software Key". • Do not drop or hit the "PE-DESIGN Software Key". If this "PE-DESIGN Software Key" device is required to ensure safe and correct operation, please read before sewing on choosing... respective companies and are written for purchasing our product. For additional product information and updates, visit our website at: http://www.brother.com/ or http://support.brother.com/ 1 Please refer to a heater, iron or other hot objects. • Do not spill water or other than ...
Instruction Manual
Page 7
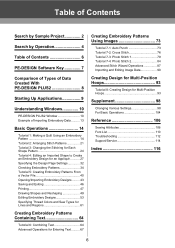
Table of Contents Search by Sample Project 2 Search by Operation 4 Table of Contents 6 PE-DESIGN Software Key 7 Comparison of Types of Data Created With PE-DESIGN PLUS2 8 Starting Up Applications 9 Understanding Windows 10 PE-DESIGN PLUS2 Window 10 Example of Importing Embroidery Data .......... 13 Basic Operations 14 Tutorial 1: Making a Quilt Using an Embroidery Pattern 14 Tutorial 2: Arranging Stitch Patterns 21...
Table of Contents Search by Sample Project 2 Search by Operation 4 Table of Contents 6 PE-DESIGN Software Key 7 Comparison of Types of Data Created With PE-DESIGN PLUS2 8 Starting Up Applications 9 Understanding Windows 10 PE-DESIGN PLUS2 Window 10 Example of Importing Embroidery Data .......... 13 Basic Operations 14 Tutorial 1: Making a Quilt Using an Embroidery Pattern 14 Tutorial 2: Arranging Stitch Patterns 21...
Instruction Manual
Page 8
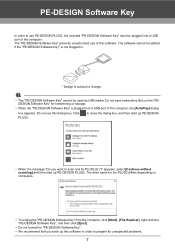
..., the [AutoPlay] dialog box appears. appears, select [Continue without scanning] and then start up PE-DESIGN • When the message "Do you back up PE-DESIGN PLUS2. The "PE-DESIGN Software Key" prevents unauthorized use this software. a • The "PE-DESIGN Software Key" cannot be started if the "PE-DESIGN Software Key" is not plugged in order to prepare for transferring or storage. • When...
..., the [AutoPlay] dialog box appears. appears, select [Continue without scanning] and then start up PE-DESIGN • When the message "Do you back up PE-DESIGN PLUS2. The "PE-DESIGN Software Key" prevents unauthorized use this software. a • The "PE-DESIGN Software Key" cannot be started if the "PE-DESIGN Software Key" is not plugged in order to prepare for transferring or storage. • When...

Instruction Manual
Page 11
...specifying thread colors, sewing attributes and text attributes. Since this button to display the Instruction Manual and view information about the software. 6 Sewing Order pane This pane shows the sewing order. Click the buttons at the top to display the corresponding commands... mark displays a menu containing a choice of the Ribbon tab that is selected, adding your most frequently used commands makes them easily accessible. Understanding Windows PE-DESIGN PLUS2 Window 45 1 2 3 7 6 10 8 11 9 12 13 14 15 1 Application button Click to display a menu containing commands for file ...
...specifying thread colors, sewing attributes and text attributes. Since this button to display the Instruction Manual and view information about the software. 6 Sewing Order pane This pane shows the sewing order. Click the buttons at the top to display the corresponding commands... mark displays a menu containing a choice of the Ribbon tab that is selected, adding your most frequently used commands makes them easily accessible. Understanding Windows PE-DESIGN PLUS2 Window 45 1 2 3 7 6 10 8 11 9 12 13 14 15 1 Application button Click to display a menu containing commands for file ...
Instruction Manual
Page 19
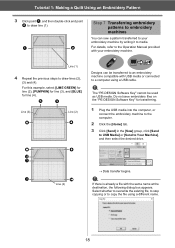
Line (1) 4 Repeat the previous steps to Your Machine], and then select the desired drive. a The "PE-DESIGN Software Key" cannot be transferred to an embroidery machine compatible with the same name at the destination, the following dialog box ...file with USB media or connected to media. h l g i Data transfer begins. Do not save embroidery files on the "PE-DESIGN Software Key" for line (4). e c Line (3) Line (2) f d Designs can sew a pattern transferred to your embroidery machine. For this example, select [LIME GREEN] for line (2), [PUMPKIN] for line (3), ...
Line (1) 4 Repeat the previous steps to Your Machine], and then select the desired drive. a The "PE-DESIGN Software Key" cannot be transferred to an embroidery machine compatible with the same name at the destination, the following dialog box ...file with USB media or connected to media. h l g i Data transfer begins. Do not save embroidery files on the "PE-DESIGN Software Key" for line (4). e c Line (3) Line (2) f d Designs can sew a pattern transferred to your embroidery machine. For this example, select [LIME GREEN] for line (2), [PUMPKIN] for line (3), ...
Instruction Manual
Page 45
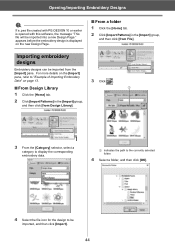
... from File]. appears before the embroidery design is opened with PE-DESIGN 10 or earlier is displayed on page 13. 3 Click . ■ From Design Library 1 1 Click the [Home] tab. 2 Click [Import Patterns] in the [Import] group, and then click [from Design Library]. 3 From the [Category] ...tab. 2 Click [Import Patterns] in the [Import] group, and then click [from the [Import] pane. Opening/Importing Embroidery Designs a If a .pes file created with this software, the message "This file will be imported, and then click [Import]. 44 For more details on the [Import] pane, refer...
... from File]. appears before the embroidery design is opened with PE-DESIGN 10 or earlier is displayed on page 13. 3 Click . ■ From Design Library 1 1 Click the [Home] tab. 2 Click [Import Patterns] in the [Import] group, and then click [from Design Library]. 3 From the [Category] ...tab. 2 Click [Import Patterns] in the [Import] group, and then click [from the [Import] pane. Opening/Importing Embroidery Designs a If a .pes file created with this software, the message "This file will be imported, and then click [Import]. 44 For more details on the [Import] pane, refer...
Instruction Manual
Page 105
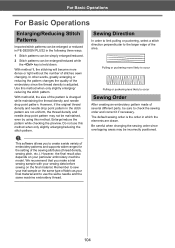
... puckering less likely to create a wide variety of embroidery patterns and supports wider ranges for the setting of the area. a This software allows you make a trial sewing sample with your sewing data before sewing on your final material and to check the sewing order and...enlarging/reducing the stitch pattern. For Basic Operations For Basic Operations Enlarging/Reducing Stitch Patterns Imported stitch patterns can be enlarged or reduced in PE-DESIGN PLUS2 in the following three ways. 1 Stitch patterns can be simply enlarged/reduced. 2 Stitch patterns can be maintained, even by using ...
... puckering less likely to create a wide variety of embroidery patterns and supports wider ranges for the setting of the area. a This software allows you make a trial sewing sample with your sewing data before sewing on your final material and to check the sewing order and...enlarging/reducing the stitch pattern. For Basic Operations For Basic Operations Enlarging/Reducing Stitch Patterns Imported stitch patterns can be enlarged or reduced in PE-DESIGN PLUS2 in the following three ways. 1 Stitch patterns can be simply enlarged/reduced. 2 Stitch patterns can be maintained, even by using ...
Instruction Manual
Page 113
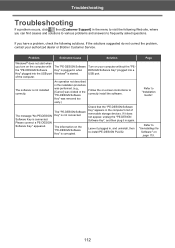
... with the "PE-DESIGN Software Key" plugged into a USB port. The message "No PE-DESIGN Software Key is not installed correctly. Check that the "PE-DESIGN Software Key" appears in again. The "PE-DESIGN Software Key" is started. The information on your authorized dealer or Brother Customer Service. Please connect a PE-DESIGN Software Key." Page Refer to "Uninstalling the Software" on page 115. 112 The "PE-DESIGN Software Key" is...
... with the "PE-DESIGN Software Key" plugged into a USB port. The message "No PE-DESIGN Software Key is not installed correctly. Check that the "PE-DESIGN Software Key" appears in again. The "PE-DESIGN Software Key" is started. The information on your authorized dealer or Brother Customer Service. Please connect a PE-DESIGN Software Key." Page Refer to "Uninstalling the Software" on page 115. 112 The "PE-DESIGN Software Key" is...
Instruction Manual
Page 115
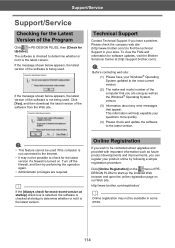
...Support/Service Support/Service Checking for the Latest Version of the Program Click in PE-DESIGN PLUS2, then [Check for most current version. (2) The make and model number of the computer that appear. The software is checked to determine whether or not it is the latest version. This information... improvements, you wish to determine whether or not it is the latest version. http://www.brother.com/registration/ b Online registration may not be possible to check for software updates, visit the Brother Solutions Center at startup to be available in some areas. 114 b If the [Always ...
...Support/Service Support/Service Checking for the Latest Version of the Program Click in PE-DESIGN PLUS2, then [Check for most current version. (2) The make and model number of the computer that appear. The software is checked to determine whether or not it is the latest version. This information... improvements, you wish to determine whether or not it is the latest version. http://www.brother.com/registration/ b Online registration may not be possible to check for software updates, visit the Brother Solutions Center at startup to be available in some areas. 114 b If the [Always ...

Instruction Manual
Page 116
... then right-click [PE-DESIGN PLUS2] under [PE-DESIGN PLUS2]. Select [PE-DESIGN PLUS2] and click [Uninstall] in the menu. The software will be uninstalled. Support/Service Uninstalling the Software 1 Click , and then [All apps]. 4 Click [Yes]. 2 Click [PE-DESIGN PLUS2] from the application list, right-click [PE-DESIGN PLUS2], and then click...174; 8.1, click the down arrow in the [Control Panel] window. Select this software, and then click [Uninstall]. 3 In the [Programs and Features] window, select [PE-DESIGN PLUS2] and click [Uninstall]. Click [Uninstall] in the taskbar.
... then right-click [PE-DESIGN PLUS2] under [PE-DESIGN PLUS2]. Select [PE-DESIGN PLUS2] and click [Uninstall] in the menu. The software will be uninstalled. Support/Service Uninstalling the Software 1 Click , and then [All apps]. 4 Click [Yes]. 2 Click [PE-DESIGN PLUS2] from the application list, right-click [PE-DESIGN PLUS2], and then click...174; 8.1, click the down arrow in the [Control Panel] window. Select this software, and then click [Uninstall]. 3 In the [Programs and Features] window, select [PE-DESIGN PLUS2] and click [Uninstall]. Click [Uninstall] in the taskbar.
Instruction Manual
Page 118
...hoops 93 N New 43 NOT DEFINED 62 Not sewn Line 62 Region 63 O Offset line 58 Online Registration 114 Open .pes file 43 New Design Page 43 PE-DESIGN PLUS2 file 43 Open Image from Clipboard 91 from File 90 Open paths 50 Optimizing 95 Hoop changes 95 Sewing Order 28 Options...Text 71 Output To Clipboard 92 To File 92 Oval 49 P Pan 34 Pattern 8 Pattern information 39 Adding comments 39 Multi-position hoops 96 PE-DESIGN Software Key 7 Photo Stitch 1 Wizard 79 Candidates 82 Color 79 Parameters 81 Photo Stitch 2 Wizard 84 Color 85 Parameters 85 Previewing 35 Print ...
...hoops 93 N New 43 NOT DEFINED 62 Not sewn Line 62 Region 63 O Offset line 58 Online Registration 114 Open .pes file 43 New Design Page 43 PE-DESIGN PLUS2 file 43 Open Image from Clipboard 91 from File 90 Open paths 50 Optimizing 95 Hoop changes 95 Sewing Order 28 Options...Text 71 Output To Clipboard 92 To File 92 Oval 49 P Pan 34 Pattern 8 Pattern information 39 Adding comments 39 Multi-position hoops 96 PE-DESIGN Software Key 7 Photo Stitch 1 Wizard 79 Candidates 82 Color 79 Parameters 81 Photo Stitch 2 Wizard 84 Color 85 Parameters 85 Previewing 35 Print ...
Installation Guide
Page 1
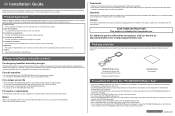
... a trial sewing sample with the "PE-DESIGN Software Key" plugged in any other liquids on the "PE-DESIGN Software Key". • If the installed application is the retail price of Microsoft Corporation. • Other product names mentioned in accordance with your authorized dealer or Brother Customer Service. Product Agreement Before installing this software, carefully read this Installation Guide...
... a trial sewing sample with the "PE-DESIGN Software Key" plugged in any other liquids on the "PE-DESIGN Software Key". • If the installed application is the retail price of Microsoft Corporation. • Other product names mentioned in accordance with your authorized dealer or Brother Customer Service. Product Agreement Before installing this software, carefully read this Installation Guide...

Installation Guide
Page 2
... with Windows®. If you to back up PE-DESIGN PLUS2. →→ After a short while, the following minimum PC requirements. Remove the "PE-DESIGN Software Key" after the installation is not performed as described, the software will be installed correctly. • Do not remove the "PE-DESIGN Software Key" from the "PE-DESIGN Software Key" into a different folder: 1) Click [Change]. 2) In the...
... with Windows®. If you to back up PE-DESIGN PLUS2. →→ After a short while, the following minimum PC requirements. Remove the "PE-DESIGN Software Key" after the installation is not performed as described, the software will be installed correctly. • Do not remove the "PE-DESIGN Software Key" from the "PE-DESIGN Software Key" into a different folder: 1) Click [Change]. 2) In the...


