Instruction Manual
Page 1
Personal Embroidery Design Software System Instruction Manual Before using the software. In addition, be sure to read the Installation Guide for future reference. We recommend that you keep this software, first read this Instruction Manual before using this document nearby for details on installing the software.
Personal Embroidery Design Software System Instruction Manual Before using the software. In addition, be sure to read the Installation Guide for future reference. We recommend that you keep this software, first read this Instruction Manual before using this document nearby for details on installing the software.
Instruction Manual
Page 2
...brother.com/ or http://support.brother.com/ 1 Please keep it in accordance with this Instruction Manual carefully, and then keep in a safe place when not in use . Caution The software included with the copyright laws. SAVE THESE INSTRUCTIONS This product is intended for transferring or storage. • Do not plug the "PE-DESIGN... Software Key" into your particular embroidery machine model. Do not store the "PE-DESIGN Software Key" close to use in the Instruction Manual and Installation Guide may differ slightly. Congratulations on the "PE-DESIGN Software Key...
...brother.com/ or http://support.brother.com/ 1 Please keep it in accordance with this Instruction Manual carefully, and then keep in a safe place when not in use . Caution The software included with the copyright laws. SAVE THESE INSTRUCTIONS This product is intended for transferring or storage. • Do not plug the "PE-DESIGN... Software Key" into your particular embroidery machine model. Do not store the "PE-DESIGN Software Key" close to use in the Instruction Manual and Installation Guide may differ slightly. Congratulations on the "PE-DESIGN Software Key...
Instruction Manual
Page 10
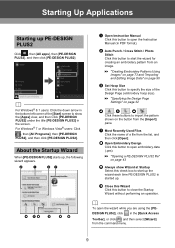
...PE-DESIGN PLUS2] under the title [PE-DESIGN PLUS2] in PDF format). b Auto Punch / Cross Stitch / Photo Stitch Click this check box to close the Startup Wizard without performing an operation. cc "Creating Embroidery Patterns Using Images" on page 73 and "Importing and Editing Image Data" on the button from the command menu. 9 b a c g d ef j i h a Open Instruction Manual... button to open embroidery data (.pes). Starting Up Applications Starting up PE-DESIGN PLUS2 Click , then [All apps], then [PE-DESIGN PLUS2], and then click [PE-DESIGN PLUS2]. For Windows® 7 or...
...PE-DESIGN PLUS2] under the title [PE-DESIGN PLUS2] in PDF format). b Auto Punch / Cross Stitch / Photo Stitch Click this check box to close the Startup Wizard without performing an operation. cc "Creating Embroidery Patterns Using Images" on page 73 and "Importing and Editing Image Data" on the button from the command menu. 9 b a c g d ef j i h a Open Instruction Manual... button to open embroidery data (.pes). Starting Up Applications Starting up PE-DESIGN PLUS2 Click , then [All apps], then [PE-DESIGN PLUS2], and then click [PE-DESIGN PLUS2]. For Windows® 7 or...

Instruction Manual
Page 11
...98 4 Option button Click this button to specify settings for the Design Page and user thread charts. 5 Help button Click this toolbar is always displayed, regardless of the pane to display the Instruction Manual and view information about the software. 6 Sewing Order pane This ... Ribbon Click a tab at the top of the Ribbon tab that is selected, adding your most frequently used commands makes them easily accessible. Understanding Windows PE-DESIGN PLUS2 Window 45 1 2 3 7 6 10 8 11 9 12 13 14 15 1 Application button Click to display a menu containing commands for file operations...
...98 4 Option button Click this button to specify settings for the Design Page and user thread charts. 5 Help button Click this toolbar is always displayed, regardless of the pane to display the Instruction Manual and view information about the software. 6 Sewing Order pane This ... Ribbon Click a tab at the top of the Ribbon tab that is selected, adding your most frequently used commands makes them easily accessible. Understanding Windows PE-DESIGN PLUS2 Window 45 1 2 3 7 6 10 8 11 9 12 13 14 15 1 Application button Click to display a menu containing commands for file operations...
Instruction Manual
Page 19
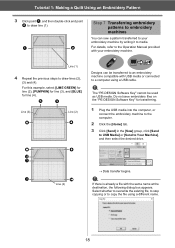
...an Embroidery Pattern 3 Click point a, and then double-click end point b to the Operation Manual provided with your embroidery machine by writing it to copy the file using a USB cable. a The "PE-DESIGN Software Key" cannot be transferred to an embroidery machine compatible with the same name at the ...b Step 7 Transferring embroidery patterns to embroidery machines You can be used as USB media. Do not save embroidery files on the "PE-DESIGN Software Key" for line (4). k j a Line (4) If there is already a file with USB media or connected to draw lines (2), (3) and (4).
...an Embroidery Pattern 3 Click point a, and then double-click end point b to the Operation Manual provided with your embroidery machine by writing it to copy the file using a USB cable. a The "PE-DESIGN Software Key" cannot be transferred to an embroidery machine compatible with the same name at the ...b Step 7 Transferring embroidery patterns to embroidery machines You can be used as USB media. Do not save embroidery files on the "PE-DESIGN Software Key" for line (4). k j a Line (4) If there is already a file with USB media or connected to draw lines (2), (3) and (4).
Instruction Manual
Page 20
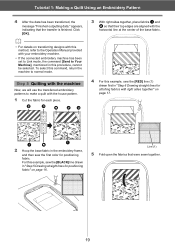
To select this method, refer to the Operation Manual provided with your embroidery machine. • If the connected embroidery machine has been set to Link mode, the command [Send to normal mode. a d a 2 Hoop the ... data." Click [OK]. Step 8 Quilting with the machine Now, we will use the transferred embroidery patterns to make a quilt with right sides together" on transferring designs with this command, return the machine to Your Machine], mentioned in "Step 6 Drawing straight lines for stitching fabrics with the house pattern. 1 Cut the fabric...
To select this method, refer to the Operation Manual provided with your embroidery machine. • If the connected embroidery machine has been set to Link mode, the command [Send to normal mode. a d a 2 Hoop the ... data." Click [OK]. Step 8 Quilting with the machine Now, we will use the transferred embroidery patterns to make a quilt with right sides together" on transferring designs with this command, return the machine to Your Machine], mentioned in "Step 6 Drawing straight lines for stitching fabrics with the house pattern. 1 Cut the fabric...
Instruction Manual
Page 27
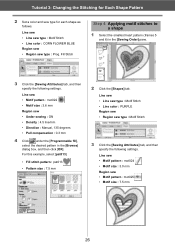
... then click [OK]. Line sew • Motif pattern : mot022 • Motif size : 3.6 mm Region sew • Under sewing : ON • Density : 4.5 line/mm • Direction : Manual, 135 degrees • Pull compensation : 0.3 mm 4 Click under the [Programmable fill], select the desired pattern in the [Sewing Order] pane. 3 Click the [Sewing Attributes] tab...
... then click [OK]. Line sew • Motif pattern : mot022 • Motif size : 3.6 mm Region sew • Under sewing : ON • Density : 4.5 line/mm • Direction : Manual, 135 degrees • Pull compensation : 0.3 mm 4 Click under the [Programmable fill], select the desired pattern in the [Sewing Order] pane. 3 Click the [Sewing Attributes] tab...
Instruction Manual
Page 43
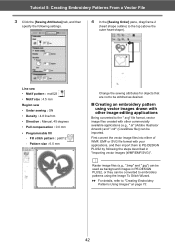
... Order] pane, drag frame 2 (heart shape outline) to embroidery patterns using vector images drawn with other image-editing applications Being converted to PE-DESIGN PLUS2 by following the steps described in PE-DESIGN PLUS2, or they can be converted to the top (above the outer heart shape). b Raster image files (e.g., ".bmp" and ".jpg") can .... 42 Line sew • Motif pattern : mot023 • Motif size : 4.5 mm Region sew • Under sewing : ON • Density : 4.8 line/mm • Direction : Manual, 45 degrees • Pull compensation : 0.0 mm • Programmable fill -
... Order] pane, drag frame 2 (heart shape outline) to embroidery patterns using vector images drawn with other image-editing applications Being converted to PE-DESIGN PLUS2 by following the steps described in PE-DESIGN PLUS2, or they can be converted to the top (above the outer heart shape). b Raster image files (e.g., ".bmp" and ".jpg") can .... 42 Line sew • Motif pattern : mot023 • Motif size : 4.5 mm Region sew • Under sewing : ON • Density : 4.8 line/mm • Direction : Manual, 45 degrees • Pull compensation : 0.0 mm • Programmable fill -
Instruction Manual
Page 54
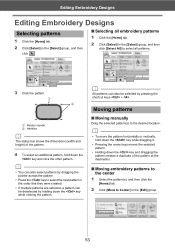
b All patterns can be selected by holding down the key while clicking the pattern. Moving patterns ■ Moving manually Drag the selected pattern(s) to the desired location. b • You can also select patterns by dragging the pointer across the ... while dragging it. • Pressing the arrow keys moves the selected pattern. • Holding down the key and click the other pattern. Editing Embroidery Designs Editing Embroidery Designs Selecting patterns 1 Click the [Home] tab. 2 Click [Select] in the [Select] group, and then click . ■ Selecting all embroidery patterns...
b All patterns can be selected by holding down the key while clicking the pattern. Moving patterns ■ Moving manually Drag the selected pattern(s) to the desired location. b • You can also select patterns by dragging the pointer across the ... while dragging it. • Pressing the arrow keys moves the selected pattern. • Holding down the key and click the other pattern. Editing Embroidery Designs Editing Embroidery Designs Selecting patterns 1 Click the [Home] tab. 2 Click [Select] in the [Select] group, and then click . ■ Selecting all embroidery patterns...
Instruction Manual
Page 55
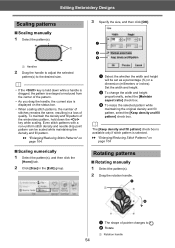
...8226; As you drag the handle, the current size is selected. cc "Enlarging/Reducing Stitch Patterns" on page 104 Rotating patterns ■ Rotating manually 1 Select the pattern(s). 2 Drag the rotation handle. a b c a Select the whether the width and height will be scaled while maintaining the... a dimension (millimeters or inches). b • If the key is held down the key while scaling. Editing Embroidery Designs Scaling patterns ■ Scaling manually 1 Select the pattern(s). 1 1 Handles 2 Drag the handle to adjust the selected pattern(s) to b Rotate 1 Rotation handle 54
...8226; As you drag the handle, the current size is selected. cc "Enlarging/Reducing Stitch Patterns" on page 104 Rotating patterns ■ Rotating manually 1 Select the pattern(s). 2 Drag the rotation handle. a b c a Select the whether the width and height will be scaled while maintaining the... a dimension (millimeters or inches). b • If the key is held down the key while scaling. Editing Embroidery Designs Scaling patterns ■ Scaling manually 1 Select the pattern(s). 1 1 Handles 2 Drag the handle to adjust the selected pattern(s) to b Rotate 1 Rotation handle 54
Instruction Manual
Page 60
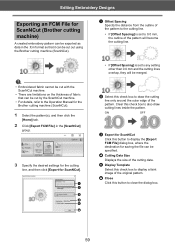
... Spacing] is set to draw the cutting line only around the outer edge of the original pattern. b Select this button to the Operation Manual for the Brother cutting machine (ScanNCut). 1 Select the pattern(s), and then click the [Home] tab. 2 Click [Export FCM File] in the .fcm..., where the destination for ScanNCut]. Clear this check box to 0.0 mm, the outline of the cutting data. Editing Embroidery Designs Exporting an FCM File for ScanNCut (Brother cutting machine) A created embroidery pattern can be exported as data in the [ScanNCut] group. 3 Specify the desired settings for...
... Spacing] is set to draw the cutting line only around the outer edge of the original pattern. b Select this button to the Operation Manual for the Brother cutting machine (ScanNCut). 1 Select the pattern(s), and then click the [Home] tab. 2 Click [Export FCM File] in the .fcm..., where the destination for ScanNCut]. Clear this check box to 0.0 mm, the outline of the cutting data. Editing Embroidery Designs Exporting an FCM File for ScanNCut (Brother cutting machine) A created embroidery pattern can be exported as data in the [ScanNCut] group. 3 Specify the desired settings for...
Instruction Manual
Page 63
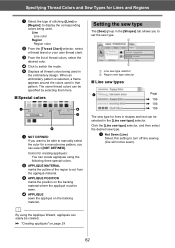
...cc "Creating appliqués" on the backing material. a Not Sewn (Line) Select this setting to turn off line sewing (line will not be able to manually select the color for a monochrome pattern, you can be specified by selecting them here. ■ Special colors a d c b a NOT DEFINED If you ...[Shapes] tab allows you want to be sewn). 62 When an embroidery pattern is selected, a frame appears around the colors used in the embroidery design. b By using the Applique Wizard, appliqués can create appliqués using the following three special colors. c From the list of the ...
...cc "Creating appliqués" on the backing material. a Not Sewn (Line) Select this setting to turn off line sewing (line will not be able to manually select the color for a monochrome pattern, you can be specified by selecting them here. ■ Special colors a d c b a NOT DEFINED If you ...[Shapes] tab allows you want to be sewn). 62 When an embroidery pattern is selected, a frame appears around the colors used in the embroidery design. b By using the Applique Wizard, appliqués can create appliqués using the following three special colors. c From the list of the ...
Instruction Manual
Page 73
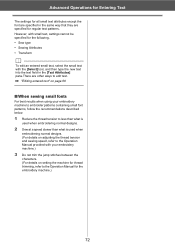
... the thread tension to less than what is used when embroidering normal designs. 2 Sew at a speed slower than what is used when embroidering normal designs. (For details on setting the machine for thread trimming, refer to the Operation Manual for the embroidery machine.) 72 Advanced Operations for Entering Text The settings...3 Do not trim the jump stitches between the characters. (For details on adjusting the thread tension and sewing speed, refer to the Operation Manual provided with the [Select] tool, and then type the new text into the text field in the same way that they are other ways ...
... the thread tension to less than what is used when embroidering normal designs. 2 Sew at a speed slower than what is used when embroidering normal designs. (For details on setting the machine for thread trimming, refer to the Operation Manual for the embroidery machine.) 72 Advanced Operations for Entering Text The settings...3 Do not trim the jump stitches between the characters. (For details on adjusting the thread tension and sewing speed, refer to the Operation Manual provided with the [Select] tool, and then type the new text into the text field in the same way that they are other ways ...
Instruction Manual
Page 83
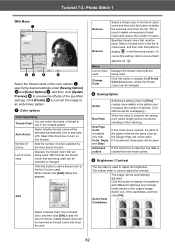
... checked or changed . If this button to delete unnecessary thread colors and reduce the number of the pattern that are the same color as the Design Page will not be changed . Select from the list. Tutorial 7-3: Photo Stitch 1 With Mono a b c d e Select the thread colors in the created... in the Reserved column. b Sewing Option Detail Run Pitch Sew Page Color (Available only with different brightness and contrast levels based on ) or manually (off). If it appears as thread colors that are being used . Click this setting, click to icon so that are being used , and...
... checked or changed . If this button to delete unnecessary thread colors and reduce the number of the pattern that are the same color as the Design Page will not be changed . Select from the list. Tutorial 7-3: Photo Stitch 1 With Mono a b c d e Select the thread colors in the created... in the Reserved column. b Sewing Option Detail Run Pitch Sew Page Color (Available only with different brightness and contrast levels based on ) or manually (off). If it appears as thread colors that are being used . Click this setting, click to icon so that are being used , and...
Instruction Manual
Page 108
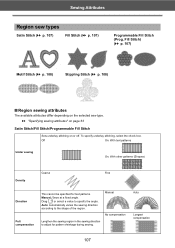
... Stitch (cc p. 107) Programmable Fill Stitch (Prog. Drag or select a value to the shape of the region. Manual No compensation Lengthen the sewing region in the sewing direction to adjust for text patterns. Manual: Sews at a fixed angle. Auto: Automatically varies the sewing direction according to specify the angle. Auto Longest compensation...
... Stitch (cc p. 107) Programmable Fill Stitch (Prog. Drag or select a value to the shape of the region. Manual No compensation Lengthen the sewing region in the sewing direction to adjust for text patterns. Manual: Sews at a fixed angle. Auto: Automatically varies the sewing direction according to specify the angle. Auto Longest compensation...
Installation Guide
Page 1
.... For additional product information and updates, visit our web site at: http://www.brother.com/ or http://support.brother.com Package contents Check that may be used as USB media. PE-DESIGN Software Key* Containing the software and Instruction Manual (PDF format) * Design is an agreement between you (the end-user) and our company for this...
.... For additional product information and updates, visit our web site at: http://www.brother.com/ or http://support.brother.com Package contents Check that may be used as USB media. PE-DESIGN Software Key* Containing the software and Instruction Manual (PDF format) * Design is an agreement between you (the end-user) and our company for this...

Installation Guide
Page 2
... up the installer onto your computer. 1) Create a backup folder on the computer. 2) Copy the entire [PE-DESIGN PLUS2] folder from the USB port of the [InstallShield Wizard] shows the selected folder. 4) Click [Next] to the Windows® manual. • The installation procedure is being performed. If you are finished. →→ When the installation...
... up the installer onto your computer. 1) Create a backup folder on the computer. 2) Copy the entire [PE-DESIGN PLUS2] folder from the USB port of the [InstallShield Wizard] shows the selected folder. 4) Click [Next] to the Windows® manual. • The installation procedure is being performed. If you are finished. →→ When the installation...


